Sicce Seachem Tidal 35 User manual
Tidal 35 Owner’s Manual
Made by
Seachem Laboratories, Inc.
1000 Seachem Drive, Madison, GA 30052 USA
888-SEACHEM • www.seachem.com
™


English 1
Español 10
Français 18
Português 27
Italiano 35
Deutsche 43
Nederlands 51
Русский 59
1
IMPORTANT SAFETY INSTRUCTIONS
WARNING - To guard against injury, basic safety precautions should be observed,
including the following:
a) READ AND FOLLOW ALL SAFETY
INSTRUCTIONS
b) DANGER: To avoid possible electric shock, special care should be taken since
water is employed in the use of aquarium equipment. For each of the following sit-
uations, do not attempt repairs by yourself.; return the appliance to an authorized
service facility for service or discard the appliance.
1) If the appliance falls into the water, DON’T reach for it! First unplug it and then retrieve it. If
electrical components of the appliance get wet, unplug the appliance immediately. (Non-
immersible equipment only)
2) If the appliance shows any sign of abnormal water leakage, immediately unplug it from the
power source. (Immersible equipment only)
3) Carefully examine the appliance after installation. It should not be plugged in if there is
water on parts not intended to be wet.
4) Do not operate any appliance if it has a damaged cord or plug, or if it is malfunctioning or
has been dropped or damaged in any manner.
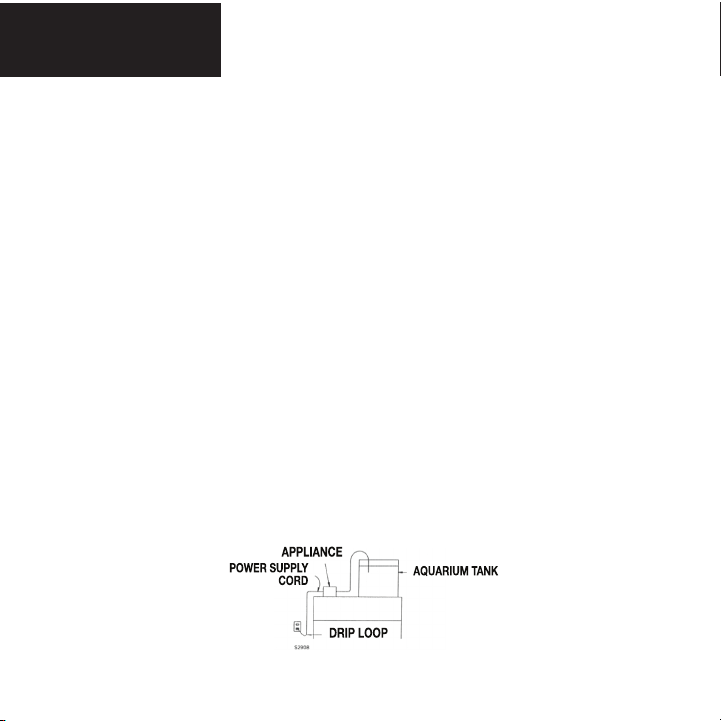
5) To avoid the possibility of the appliance plug or receptacle getting wet, position aquarium
stand and tank or the fountain to one side of a wall-mounted receptacle to prevent
water from dripping onto the receptacle or plug. A “drip-loop” shown in g. A should be
Fig. A
English

2
arranged by the user for each cord connecting an aquarium appliance to a receptacle. The
“drip-loop” is the part of the cord below the level of the receptacle or the connector if an
extension cord is used, to prevent water traveling along the cord and coming in contact with
the receptacle. If the plug or receptacle does get wet, DON’T unplug the cord. Disconnect
the fuse or circuit breaker that supplies power to appliance. Then unplug and examine for
presence of water in the receptacle.
c) Close supervision is necessary when any appliance is used by or near children.
d) To avoid injury, do not contact moving parts or hot parts such as heaters, reectors, lamp
bulbs and the like.
e) Always unplug an appliance from an outlet when not in use, before putting on or taking o
parts and before cleaning. Never yank cord to pull plug from outlet. Grasp the plug and pull
to disconnect.
f) Do not use an appliance for other than intended use. The use of attachments not
recommended or sold by the appliance manufacturer may cause an unsafe condition.
g) Do not install or store the appliances where it will be exposed to the weather or to
temperatures below freezing.
h) Make sure an appliance mounted on a tank is securely installed before operating it.
i) Read and observe all the important notices of the appliance.
j) If an extension cord is necessary, a cord with a proper rating should be used. A cord rated
for less amperes or watts than the appliance rating may overheat. Care should be taken to
arrange the cord so that it will not be tripped over or pulled.
k) This appliance has a polarized plug (one blade is wider than other). As a safety feature, this
plug will t in a polarized outlet only one way. If the plug does not t fully in the outlet, reverse
the plug. If it still does not t, contact a qualied electrician. Never use with an extension cord
unless plug can be fully inserted. Do no attempt to defeat this safety feature.
EXCEPTION: This instruction may be omitted for an appliance that is not provided with a
polarized attachment plug.
SAVE THESE INSTRUCTIONS
TIDAL FILTERS are made in conformity with the national and international security laws.

3
READ AND FOLLOW ALL SAFETY INSTRUCTIONS
1. Check that the current on the pump’s label matches the outlet current. The pump has
a dierential switch (protector) through which the nominal current must be lower or
equal to 30 mA.
2. Never operate the pump without water to avoid damage to the pump motor.
3. Before plugging in the pump, check that the cord and pump are not damaged.
4. The pump has a type Z cable link. The cable and plug cannot be substituted or
repaired. In case of damage, replace the entire pump
5. CAUTION: disconnect all submerged electrical products before doing maintenance in
the water; in case the plug or electrical outlet is damaged, switch o the circuit breaker
before disconnecting the plug from the outlet.
6. The lter can be run in liquids or in any environment with a maximum temperature of
35°C/95° F.
7. Do not use the lter for purposes (i.e. in bathroom or similar applications) other than
for which it was designed for.
8. Avoid lter use with corrosive or abrasive liquids.
9. The lter has not been designed for use by children or mentally challenged individuals.
Appropriate adult supervision or persons responsible for personal safety is required.
10. Do not disconnect the lter from an electrical outlet by pulling the cord.
11. The lter can only be used in the above-mentioned applications and is only for indoor
use.
12. This appliance has no user serviceable parts.
INSTRUCTIONS FOR THE CORRECT DISPOSAL OF THE PRODUCT ACCORDING TO
EU DIRECTIVE 2002/96/EC
When used or broken, this product does not have to be disposed with other waste. It can
be delivered to specic electrical waste collection centers or to dealers who provide this
service. Disposal of electrical products separately avoids negative consequences for the
environment and for overall public health and allows the reuse of materials providing savings
of energy and resources.

4
LIMITED WARRANTY
Seachem guarantees this product (see Exclusions below) to the original purchaser against
defects of materials and workmanship for a period of ve (5) years from the date of original
purchase, except for the pump’s impeller, which is guaranteed for a period of six (6) months.
This warranty is limited to repair or replacement (at Seachem’s option) of defective product
only and does not cover loss of aquarium life, personal injury, property loss, or damage
arising from the use of the product. You must retain original proof of purchase to validate
the warranty. Any warranty herein shall run concurrently with, and not in addition to, any
minimum warranty periods established by applicable law.
Claims made under warranty shall be led online at www.seachem.com by the original
purchaser and who must provide proof of purchase at the time of ling. The claimant must
obtain a “Return Merchandise Authorization” at the time of ling before sending any product
for warranty or technical service. The purchaser bears the cost of shipping to and from the
service center or repair station.
EXCLUSIONS. This warranty does not cover the following: *Damage resulting from
accident, misuse, abuse, lack of reasonable care, use of the product that is other than
normal or ordinary, using the project in abnormal working conditions or any other failures not
resulting from defects in materials or workmanship. *Damage resulting from modication,
tampering with or attempted repair by anyone other than Seachem or its designee. *
Transfer of the product to someone other than the original purchaser. * Subjecting the
product to electrical service not specied in the packaging; the original purchaser is
responsible for providing adequate electrical facilities.
EXCLUSION DAMAGES AND LIMITATION OF IMPLIED WARRANTIES
Your sole and exclusive remedy is product repair or replacement as provided in this Limited
Warranty. The company disclaims any liability for incidental and consequential damages for
breach of any express or implied warranty or conditions, including the implied warranties
or conditions of merchantability, merchantable quality, tness for a particular purpose, or of
satisfactory quality with respect to this product. This writing constitutes the entire warranty
agreement of the parties with respect to the subject matter hereof, no waiver or amendment
shall be valid unless in writing signed by Seachem. Any implied warranties herein are limited
to one year or the shortest period allowed by the law of your jurisdiction.
5
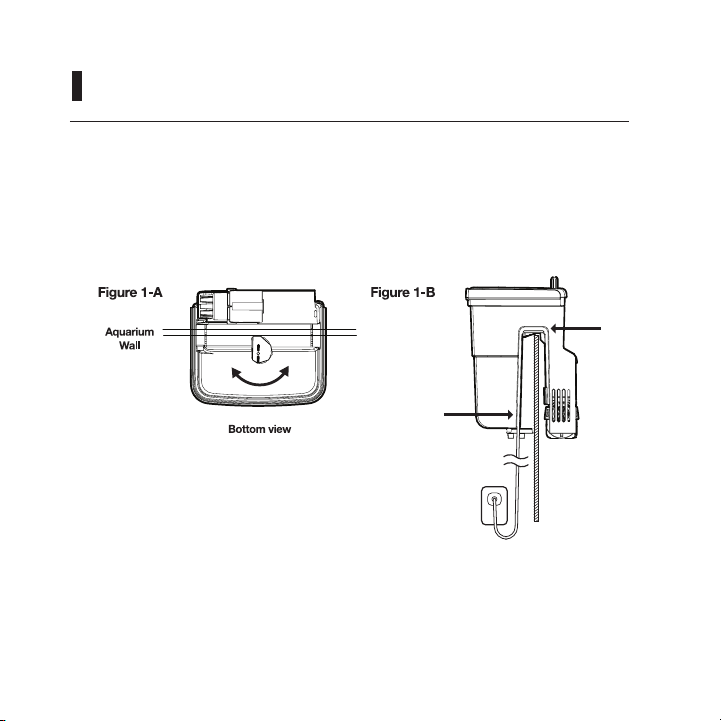
Setup
Place the lter on the aquarium edge and adjust the leveling dial by turning it left or right
until the lter is level with the aquarium (Figure 1-A) .
Insert the pump cord into the guides as shown (Figure 1-B) and run the cord to the outlet
making certain to form a drip loop as shown.

6
Filling the Filter Media Basket
Remove all plastic bags containing ltration media prior to starting the lter. All Tidal™
Filters have been designed to hold any type of lter media. In general there are three types
of ltration used in most aquaria – mechanical, chemical, and biological.
Mechanical ltration includes media that capture waste for removal directly from the lter.
Chemical ltration includes ltration media, which work to chemically remove dissolved
compounds from the water. Biological ltration provides a housing for bacteria to grow and
breakdown organic waste.
All Tidal™ Filters include a bottom foam lter for mechanical ltration and Matrix™ bio
media for exceptional biological ltration. There are a variety of chemical ltration options
available for many diering purposes given a variety of aquarium environments. Seachem
MatrixCarbon™ is a preferred option in almost any aquarium setup. MatrixCarbon™ is
available pre-bagged for any size Tidal™ Filter.
Thoroughly rinse the foam lter and all lter media under running water before placing them
in the lter basket. Layer the media with the foam lter on the bottom, then any chemical
ltration media such as MatrixCarbon™ and lastly the Matrix™ biological media. Do not
remove Matrix™ from its mesh bag. The bag is packaged folded over; lay mesh bag
lengthwise and distribute Matrix™ evenly before placing in it in the lter basket. In order
to more quickly seed Matrix™ with bacteria, we recommend the addition of Seachem
Stability™ to your aquarium. The internal basket prevents water bypass and allows for quick
removal and cleaning of the foam lter and any media used. To avoid interfering with proper
ow through the lter do not overll the lter media basket. An indication of this will be
activation of the maintenance alert or dripping from the right side of the return ow wall (see
Figure 2, Figure 3).

7
Starting the Filter
Maintenance
After assembly and installation of the Tidal™ Filter on a lled aquarium, connect the power cord to
the intended outlet. The lter is self-priming and will immediately begin ltering water.
Adjust the total amount of ow through the lter using the Flow Regulation Dial. Adjust
performance to a specic aquarium volume, type, or provide an environment for sh which prefer
more or less water movement or oxygenation. This feature oers up to 80% reduction of maximum
ow intake while making continuous full use of the lter motor. When reduced intake ows are
selected, the reltration grid allows for water to re-circulate through the lter media to maximize
ltration performance through increased contact time
The minimum water level in the aquarium should not fall below the “Minimum Water Level” mark. A
lower level might stop the ow of water and cause damage to the pump – do not allow the pump to
run dry. There is no maximum water level although it is recommended that the level not exceed the
height of the of the surface skimmer slots.
WARNING: Before any maintenance on the Tidal™ Filter, unplug it from the outlet.
Tidal™ Filters are made to oer excellent function with low maintenance. However, regular
maintenance can aid dramatically in the overall health and well being of your aquarium. The
maintenance alert device oers an excellent signal to perform routine maintenance on the Tidal™
Filter. The maintenance alert device indicates that ow is unable to move freely through the lter
media basket. When the maintenance alert rises above the lter cover to about ½” or 1 cm (Figure
2), it is time to clean the lter.

8
If the lter starts to drip from the right side (Figure 3) of the
return ow wall, it indicates that the lter media basket is
completely clogged. Water in this case is bypassing lter
media and a thorough cleaning is necessary to maintain the
overall health of the aquarium.
To begin cleaning the lter:
1) Lift the cover, and remove the lter media basket by
pulling up on the two side handles.
2) Turn the cover over and set the lter media basket into the
slots on the cover. You can now carry the lter media basket
to a cleaning area without spilling or dripping water.
3) Remove the bag of Matrix™ biological media, any
chemical ltration media and the foam lter.
4) Rinse the foam lter thoroughly. Do not use any soaps
or detergents as these can harm aquarium inhabitants.
Rinse or replace any chemical ltration media as necessary.
Replacement ltration packs designed specically for
Tidal™ Filter units (Matrix™, MatrixCarbon™, and Zeolite)
are sold separately.
The bag of Matrix™ biological media contains important
bacteria for the stability of the aquarium environment. Do not
allow the media to dry out. The media can be rinsed gently
in a container with some of the water from the aquarium to
remove any slime coating that may build up on the media
over time. If the Matrix™ media is replaced it is advisable to
replace no more than half of the media at any time so as to
protect the bacteria culture that allows for a stable aquarium
environment. At this time we would suggest re-seeding
the aquarium with Seachem Stability™. Rinse the lter
media basket. Reassemble media and all components
in reverse order.
9
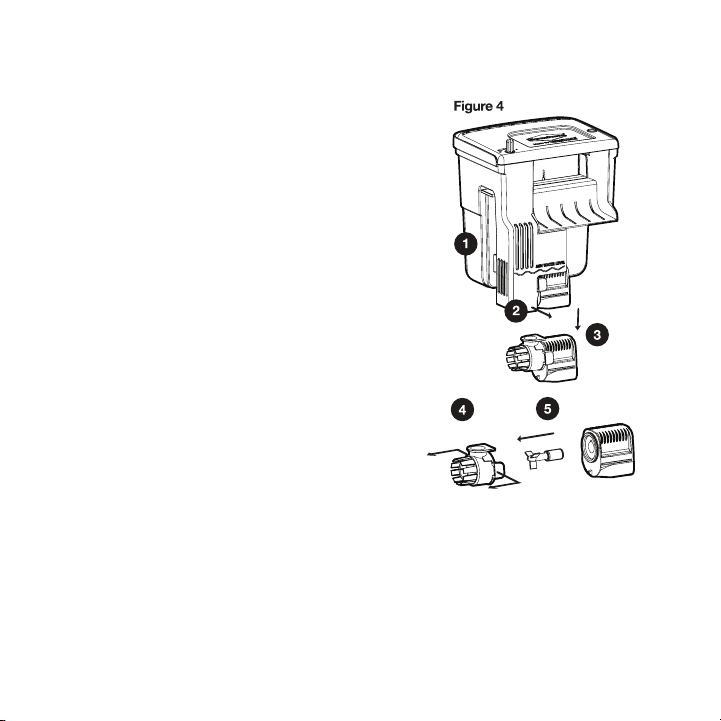
To service the pump:
Proceed as follows (Figure 4): (1) Pull the power cord
from the lter body. (2) Pull outward on the bottom
right corner of the lter body releasing the hook and
(3) pull downward on the pump. (4) Gently pull the
intake cover of the pump away. This will reveal the
impeller (5).
Wash the impeller thoroughly to remove any slime
or scales build up. Do not use soap or detergent. If
desired a dilute solution of vinegar and water can be
used to breakup any scale or lime buildup.
After cleaning, replace the impeller insuring that
it rotates freely around the shaft and replace the
intake cover of the pump. Reassemble remaining
components in the reverse order. Scale and
limestone deposits and the natural wear-out of
components might cause the silent nature of the
pump to diminish. However, they do not aect
the proper function of the lter. In such cases it is
advisable to replace the impeller to return to the
silent operation.

10
INSTRUCCIONES DE SEGURIDAD IMPORTANTES
ADVERTENCIA: Para evitar lesiones, se deben tomar precauciones básicas de seguridad, incluyendo
las siguientes normas de seguridad:
Los FILTROS TIDAL están fabricados de conformidad con las legislaciones sobre seguridad nacionales e
internacionales
LEA Y SIGA TODAS LAS INSTRUCCIONES DE SEGURIDAD
1. Comprobar que el voltaje de la bomba que se indica en la etiqueta sea igual al de la red eléctrica. El
aparato debe recibir la alimentación a través de un interruptor diferencial (protector) con una corriente
nominal inferior o igual a 30mA.
2. La bomba nunca debe funcionar sin agua para evitar daños en el motor.
3. Antes de conectar el aparato a la red eléctrica, comprobar que ni el cable ni la bomba presenten daños.
4. La bomba cuenta con una conexión de tipo Z. El cable y el enchufe no pueden sustituirse ni repararse.
En caso de daño se deberá sustituir la bomba completa.
5. PRECAUCIÓN: Desconecte todos los aparatos eléctricos sumergidos antes de realizar trabajos de
mantenimiento en el agua; en caso de que la clavija o la toma de corriente estén dañados, apague el
interruptor automático antes de desconectar el enchufe de la toma.
6. El ltro se puede utilizar en líquidos o en ambientes con una temperatura máxima de 35 °C / 95 °F.
7. No utilizar el aparato con nes distintos al n con el que se ha fabricado, como, por ejemplo, en cuartos
de baño o aplicaciones similares.
8. No utilizar los ltro con líquidos corrosivos o abrasivos.
9. Este dispositivo no ha sido diseñado para su uso por niños o por personas con problemas mentales. Se
requiere la supervisión adecuada de un adulto o de personas responsables de la seguridad personal.
10. Para evitar que el agua pueda accidentalmente mojar el enchufe o la toma de corriente, realizar un
bucle con el cable justo debajo del nivel de la toma (Fig. A).
Figura A
Español

11
11. No desconecte el ltro de una toma de corriente tirando del cable.
12. El ltro puede utilizarse únicamente para las aplicaciones indicadas y solo puede funcionar en
interior.
13. NO EXTRAVÍE ESTAS INSTRUCCIONES
ADVERTENCIAS PARA UNA ELIMINACIÓN CORRECTA DEL PRODUCTO SEGÚN LA DIRECTIVA
EUROPEA 2002/96/EC
Al nal de su vida útil o su avería, el producto no debe eliminarse junto con los otros desechos.
Pueden llevarse a un centro de gestión de residuos eléctricos o a un vendedor que ofrezca estos
servicios. Reciclar los electrodomésticos separadamente evita consecuencias negativas para el
medio ambiente y para la salud pública en general, permite la reutilización de los materiales y supone
un ahorro energético y de recursos.EXCEPTION: This instruction may be omitted for an appliance
that is not provided with a polarized attachment plug
GARANTÍA LIMITADA
Seachem garantiza este producto (ver Exclusiones abajo) al comprador original contra defectos de
materiales y mano de obra durante un período de tres (3) años desde la fecha de compra original
y puede ser extendida por dos (2) años adicionales con el registro del producto en www.seachem.
com; todos los términos excepto para el impulsor de la bomba, que está garantizado por un período
de seis (6) meses. Esta garantía se limita a reparar o reemplazar (a elección de Seachem) el producto
defectuoso y no cubre la pérdida de la vida del acuario, lesiones personales, pérdida de propiedad
o daño causado por el uso del producto. Debe conservar el comprobante de compra para validar la
garantía. Cualquier garantía en este documento deberá transcurrir al mismo tiempo, y no además, de
cualquier período de garantía mínimo establecido por la legislación aplicable.
Las reclamaciones bajo garantía deberán ser presentadas en línea en www.seachem.com por el
comprador original y deben presentar prueba de compra en el momento de la presentación. El
solicitante debe obtener una “Return Merchandise Authorization” en el momento del registro antes
de enviar cualquier producto para garantía o servicio técnico. El comprador corre con los gastos de
envío desde y hacia el centro de servicio o taller de reparaciones.
EXCLUSIONES. Esta garantía no cubre lo siguiente: * Los daños causados por accidentes, mal uso,
abuso, falta de cuidado razonable, que el uso del producto sea distinta de la normal u ordinara, usado
en proyectos en condiciones anormales de trabajo o cualesquiera otros fallos que no resulten de

12
defectos en los materiales o mano de obra. * Los daños derivados de la modicación, alteración
o intento de reparación por cualquiera que no sea Seachem o su representante. * La transferencia
del producto a una persona distinta del comprador original. * Someter el producto a un servicio
eléctrico no especicado en el envase; el comprador original es responsable de proporcionar las
instalaciones eléctricas adecuadas.
EXCLUSIÓN DE DAÑOS Y LIMITACIÓN DE GARANTÍAS IMPLÍCITAS
Su único y exclusivo derecho es la reparación o el reemplazo del producto como se indica en
esta Garantía Limitada. La empresa se exime de cualquier responsabilidad por daños incidentales
y consecuentes por incumplimiento de cualquier garantía o condición expresa o implícita,
incluyendo las garantías implícitas o condiciones de comerciabilidad, calidad comercializable,
aptitud para un propósito particular o de calidad satisfactoria con respecto a este producto. Este
escrito constituye el acuerdo de garantía de las partes con respecto al objeto del mismo, ninguna
renuncia o enmienda será válida a menos que esté por escrito rmada por Seachem. Cualquier
garantía implícita en este documento está limitada a un año o el período más corto permitido por
la ley de su jurisdicción.

13
PUESTA EN MARCHA
Gire el dial de nivel del ltro en la parte inferior de la carcasa del ltro para prepararse para colgar y
nivelar el ltro. (Figura 1-A) .
Inserte el cable de la bomba en las guías como se muestra (Fig 1-B) y lleve el cable a la toma de
corrientea formando un lazo de goteo como se muestra.

14
LLENANDO LA CESTA DE MEDIOS DE FILTRACIÓN
Elimine todas las bolsas de plástico que contienen medios de ltración antes de iniciar el ltro.
Todos los ltros Tidal™ han sido diseñados para contener cualquier tipo de medios de ltración.
En general hay tres tipos de ltración utilizados en la mayoría de los acuarios - mecánica, química
y biológica.
La ltración mecánica incluye medios de ltración que capturan los residuos para la eliminación
directamente desde el ltro. La ltración química incluye medios de ltración que trabajan para
eliminar químicamente los compuestos disueltos del agua. La ltración biológica ofrece un
alojamiento para el crecimiento de bacterias y la ruptura de residuos orgánicos.
Todos los ltros Tidal™ incluyen un ltro de esponja inferior para la ltración mecánica y bio
medios Matrix™ para una ltración biológica excepcional. Hay una gran variedad de opciones
de ltración química disponibles para muchos propósitos diferentes propuestos para una gran
variedad de ambientes de acuario. MatrixCarbon™ de Seachem es la opción preferida en casi
cualquier conguración de acuario. Matrix Carbon™ está disponible pre-empaquetado para
cualquier tamaño de ltro Tidal™.
Enjuague bien la esponja y todos los medios de ltración con agua corriente antes de colocarlos
en la canasta del ltro. Coloque los medios de ltración con el ltro de esponja en la parte inferior,
sitúe entonces cualquier medio de ltración química como MatrixCarbon™ y por último el medio
biológico Matrix™. No retire Matrix™ de su bolsa de malla. La bolsa de malla se envasa plegada;
estirelá a toda su longitud y distribuya uniformemente Matrix™ antes de colocarla en la canasta
del ltro. Con el n de sembrar más rápidamente Matrix™ con bacterias se recomienda la adición
de Stability™ de Seachem a su acuario. La cesta interna impide que el agua se desvíe y permite
una extracción rápida y la limpieza de la esponja del ltro inferior y cualquier medio de ltración
utilizado. Para evitar interferencias con el ujo adecuado a través del ltro no sobrecargue la cesta
de los medios de ltración. Una indicación de esto será la activación de la alerta de mantenimiento
o goteo en el lado derecho de la pared de retorno (Fig 2, Fig 3).

15
INICIANDO EL FILTRO
MANTENIMIENTO
Tras el montaje y la instalación del ltro Tidal™ en un acuario lleno, conecte el cable de alimentación a la
toma de corriente prevista. El ltro es autocebante e inmediatamente comenzará a ltrar el agua.
Ajuste la cantidad total de ujo a través del ltro. Ajustar el rendimiento para un determinado volumen
del acuario, tipo o para proporcionar un entorno para peces que preeran más o menos movimiento
de agua u oxigenación. Esta característica ofrece una reducción de hasta el 80% sobre la tasa máxima
de ujo, mientras que continúa haciendo pleno uso del motor del ltro. Cuando se seleccionan ujos
reducidos, el sistema de re-ltración permite que el agua pueda volver a circular a través de los medios
de ltro para maximizar el rendimiento de la ltración a través de un aumento del tiempo de contacto.
El nivel mínimo de agua en el acuario no debe caer por debajo de la marca “Minimum Water Level”. Un
nivel más bajo podría detener el ujo de agua y causar daños en la bomba - no permita que la bomba
funcione en seco. No hay un nivel máximo de agua, aunque se recomienda que el nivel no sea superior a
la altura de la de las ranuras de skimmer de supercie.
ADVERTENCIA: Antes de cualquier mantenimiento en el ltro Tidal™, desenchúfelo de la toma de
corriente.
Los ltros Tidal™ están diseñados para ofrecer una excelente función con un bajo mantenimiento. Sin
embargo, el mantenimiento regular puede ayudar drásticamente en la salud general y en el bienestar
de su acuario. El dispositivo de alerta de mantenimiento ofrece una excelente señal para realizar el
mantenimiento de rutina en el ltro Tidal™. El dispositivo de alerta de mantenimiento indica que el ujo
no es capaz de moverse libremente a través de la cesta de ltración. Cuando la alerta de mantenimiento
se eleva por encima de la tapa del ltro en aproximadamente ½” o 1 cm (Fig 2), es el momento de limpiar
el ltro.
Si el ltro comienza a gotear desde el lado derecho (Fig 3) de la pared de retorno, indica que la cesta de
medios de ltración está completamente obstruida. El agua en este caso está haciendo bypass sobre los
medios de ltración y es necesaria una limpieza a fondo para mantener la salud general del acuario.

16
Para empezar la limpieza del ltro:
1) Levante la tapa y retire el cesto de los medios de ltración
tirando hacia arriba de las dos asas laterales
2) De la vuelta a la tapa superior y coloque la cesta de
material de ltración en las guías de la tapa. Ahora puede
llevar la cesta de medios de ltración a una zona de limpieza
sin que se derrame o gotee agua.
3) Retire la bolsa del medio de ltración biológica Matrix™,
todos los medios de ltración química y la esponja de
ltración mecánica inferior .
4) Enjuague la esponja de ltración inferior a fondo. No
utilice jabones o detergentes, ya que pueden dañar a los
habitantes del acuario. Enjuague o reemplace cualquier
medio de ltración química cuando sea necesario.
Reemplace los paquetes de ltración de diseñados
especícamente para las unidades de ltro Tidal™ (Matrix™,
MatrixCarbon™ y zeolita), se venden por separado.
La bolsa del medio biológico Matrix™ contiene bacterias
importantes para la estabilidad del ambiente del acuario.
No deje que el material se seque. Los medios de ltración
pueden ser enjuagados con suavidad en un recipiente
con un poco de agua del acuario para eliminar cualquier
recubrimiento de limo que se pueda acumular en el
medio con el tiempo. Si se sustituye el medio Matrix™
es aconsejable sustituir no más de la mitad del medio
de ltración cada vez, a n de proteger el cultivo de
bacterias que permite un ambiente del acuario estable.
En este momento, sugerimos volver a sembrar el acuario
con Stability™ de Seachem. Enjuague la canasta de los
medios de ltración. Vuelva a montar los medios y todos los
componentes en orden inverso.

17
Para dar servicio a la bomba:
Proceda de la siguiente manera (Fig 4): (1) Tire del
cable de alimentación del cuerpo del ltro (2) Tire hacia
afuera en la esquina inferior derecha del cuerpo del ltro,
liberando el gancho 3) tire hacia abajo en la bomba. (4)
Tire suavemente de la cubierta de entrada de la bomba.
Esto mostrará el impulsor (5).
Lave el impulsor a fondo para eliminar cualquier limo o
incrustaciones acumuladas. No use jabón o detergente.
Si se desea se puede utilizar una solución diluida de
vinagre y agua para limpiar cualquier acumulación de
sarro o cal.
Después de la limpieza, vuelva a colocar el impulsor
asegurándose de que gira libremente alrededor del eje y
coloque la tapa de aspiración de la bomba. Reensamble
los componentes restantes en orden inverso. Las
incrustaciones y los depósitos de cal y el desgaste
natural de los componentes pueden causar que la
naturaleza silenciosa de la bomba pueda disminuir. Sin
embargo no afectan a una función apropiada del ltro.
En tales casos, es aconsejable sustituir el impulsor para
volver a una operación silenciosa.
Table of contents
Languages:
Other Sicce Water Filtration System manuals

Sicce
Sicce Green Reset Series User manual

Sicce
Sicce Seachem Tidal Series User manual

Sicce
Sicce Voyager 7 User manual

Sicce
Sicce SHARK ADV User manual

Sicce
Sicce Space Eko 100 User manual

Sicce
Sicce Tidal 55 User manual

Sicce
Sicce NINPHEO 25 User manual

Sicce
Sicce 1500 User manual

Sicce
Sicce GREEN RESET 25 User manual

Sicce
Sicce SHARK PRO 500 User manual
Popular Water Filtration System manuals by other brands


Dupla
Dupla Perfect Clean PC 1 Instructions for use

Siemens
Siemens SINAMICS G130 operating instructions

aquasweet
aquasweet 2220 quick start guide

Steinbach
Steinbach Active Balls 50 ORIGINAL OWNER'S MANUAL

GE
GE AvantaPure Professional Series Operation manual

Water
Water Body Glove BG-12000 Installation and operating instructions