SICE Tech Why Evo 6.3 Reference guide

NEW
DUPLICATING PROCEDURES
6.3
VERSION

2
Totally enriched, in detail well-finished,
honouring the original design that gave the
success obtained till today.
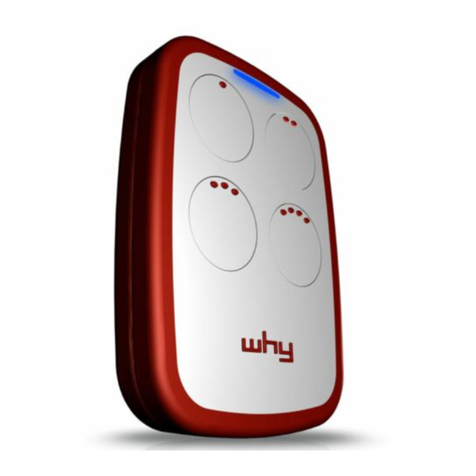
New Why Evo has been enriched by a double
LED (one WHITE and one BLUE) and a “buzzer”
that is able to emit sound alerts. These
additional characteristics allow to provide
further information and useful confirmations to
the user committed on duplication procedures.
An important news has been represented by
a default integration, on each button, of a 64
bit Sice Rolling code. This allows to use the
WHY EVO remote controls as a first installation
in combination with one of our SICE Tech
multifrequeuncy receiver. The further copies
and its insertion on the receiver happen simply
and directly.
NEW
ANTI-SHOCK
NEW DESIGN
BI-COMPONENT MOLD
DOUBLE LED
WHITE-BLUE
GROWN
COMPATIBILITY LIST
INTENSIFIED POWER
SIGNAL
SOUND SIGNAL

3
6.3
1. While pressing the button 1 of the “WHY EVO”, at the same time press 4 times the 2 button.
2. Release both buttons. Now the WHY EVO WHITE LED emits a short flash every 2 seconds.
3. Place the original remote control to be programmed in front of the “WHY EVO”, at about 5 cm of distance (as shown in
the picture).
4. Press and retain pressed the button of the original remote control and wait for a change flash (as a faster flash) of
WHY EVO WHITE LED and a change of its color (BLUE) that confirms the correct learning of code. This step may take a few
seconds and during that the color LED is WHITE.
5. While the BLUE LED is flashing, press the button of the “WHY EVO” where you want to program the code just learnt, and
retain pressed until the LED switches o and an extended sound “BEEP” for a reconfirmation of the correct code learning.
This step may take some seconds.
6. The copy has been happened with success. Now check on the automation the correct
functioning of the new WHY EVO remote control.
Notes:
• If the WHITE LED flashes only 3 times (of WHITE color) and switches o, the code has not learnt correctly. Please repeat
the operation from the step 1.
• The WHY EVO memory is completely re-writable.
• To duplicate further buttons of WHY EVO, please repeat the operation from the step 1.
FIXED CODE
DUPLICATING PROCEDURES
BEST POSITION FOR THE
DUPLICATION
licorice black
cod. 4791010
magnolia white
cod. 4791011
granade red
cod. 4791012
sky blue
cod. 4791013
5 cm
IT IS RECOMMENDED:
TO REALIZE A CORRECT DUPLICATION OF THE REMOTE CONTROLS, WE RECOMMEND TO
FOLLOW THE PROCEDURES HERE BELOW TAKING CARE TO DISTANCE YOURSELF BY TOOL
THAT CAN GENERATE FREQUENCY TROUBLES AS:
CORDLESS
WI-FI VIDEO SURVEILLANCE DEVICES
MOBILE PHONES, SMARTPHONES OR TABLETS
WI-FI OR BLUETOOTH ACTIVED IN YOUR COMPUTERS
ELECTRONIC MOTOR
NEON LIGHTS
WIRLESS DEVICES FOR BACK END MANAGEMENT IN THE BUSINESS STORES

4
6.3 ROLLING SIMPLE
DUPLICATING PROCEDURES
1. While pressing the button 1 of the “WHY EVO”, at the same time press 4 times the 2 button.
2. Release both buttons. Now the WHY EVO WHITE LED will emit a short flash every 2 seconds.
3. Place the original remote control to be programmed in front of the “WHY EVO”, at about 5 cm of distance (as shown in
the picture).
4. Press and retain pressed the button of the original remote control and wait for a change flash (as a faster flash) of
WHY EVO WHITE LED and a change of its color (BLUE) that confirms the correct learning of code. This step may take a few
seconds and during that the color LED is WHITE.
5. While the BLUE LED is flashing, press the button of the “WHY EVO” where you want to program the code just learnt,
and retain pressed until the LED will switch o. The WHY EVO remote control will emit an extended sound “BEEP” for a
reconfirmation of the correct code learning.
6. The copy has been happened with success.
7. Activate now the correct procedure for the programmed model and insert the new remote control on the receiver (see
the compatibility list present in this manual).
Notes:
• If the WHITE LED flashes only 3 times (of WHITE color) and switches o, the code has not learnt correctly. Please repeat
the operation from the step 1.
• The WHY EVO memory is completely re-writable.
• To duplicate further buttons of WHY EVO, please repeat the operation from the step 1.
To activate the remote control on the receiver for models marked with proceed as below:
1. First of all you must be closed to the automation.
2. Press and retain pressed the programmed button during 10 seconds, when the LED start to flash, release the button.
3. Wait until the LED will turn o. The operation has been done, now you can use your new remote control.
To activate on the receiver all the other models: Refer you to the instructions of the original model.
NOTE: THE SEED CODE OF THE WHY EVO CAM BE EMITTED AS HERE BELOW:
1. Press the buttons 1 and 2 simultaneously for 8 seconds and release them when the LED start to flash;
2. While the LED is flashing press the button with the seed code needed.
ATTENTION!! Every kind of receiver can have the “radio-mode” disarmed. In this cases will be necessary insert the new remotes controls with the “manual procedures”.

5
6.3 ROLLING COMPLEX
DUPLICATING PROCEDURES
1. While pressing the button 1 of the “WHY EVO”, at the same time press 4 times the 2 button.
2. Release both buttons. Now the WHY EVO WHITE LED will emit a short flash every 2 seconds.
3. Place the original remote control to be programmed in front of the “WHY EVO”, at about 5 cm of distance (as shown in
the picture).
4. Press and retain pressed the button to be programmed of the original remote control, till the WHITE LED will switch on
as a fix light; now release the button.
5. The WHY EVO WHITE LED will emit a short flash every 2 seconds supported by two following sound “BEEP”. These two
alerts inform the user that, to duplicate the remote control, it is necessary to emit the SEED CODE to realize the copy.
6. Transmit now the SEED CODE of the BFT original remote control, using a pin, press the rear hide button (see the picture)
or, according to the new references, press the 1 and 2 buttons until the original remote control LED switches on. (see the
picture)
7. Now the WHY EVO WHITE LED will change the flash mode (more fast) and color (BLUE), for a reconfirmation of the
correct code learning. This step may take some seconds.
8. At this moment, press the WHY EVO button when you want to store the code and retain pressed until the WHY EVO
BLUE LED switches o and an extended sound “BEEP” is emitted for a reconfirmation of the correct code learning.
9. Activate now the procedure to insert the new remote control on the receiver.
BFT
V2
433 - 868
1. While pressing the button 1 of the “WHY EVO”, at the same time press 4 times the 2 button.
2. Release both buttons. Now the WHY EVO WHITE LED will emit a short flash every 2 seconds.
3. Place the original remote control to be programmed in front of the “WHY EVO”, at about 5 cm of distance (as shown in
the picture).
4. Press and retain pressed the button to be programmed of the original remote control, till the WHITE LED will switch on
as a fix light; now release the button.
5. The WHY EVO WHITE LED will emit a short flash every 2 seconds supported by two following sound “BEEP”. These two
alerts inform the user that, to duplicate the remote control, it is necessary to emit the SEED CODE to realize the copy.
6. Transmit now the SEED CODE of the V2 original remote control pressing at the same time 1 and 2 buttons.
7. Now the WHY EVO WHITE LED will change the flash mode (more fast) and color (BLUE), for a reconfirmation of the
correct code learning. This step may take some seconds.
8. At this moment, press the WHY EVO button when you want to store the code and retain pressed until the WHY EVO
BLUE LED switches o and an extended sound “BEEP” is emitted for a reconfirmation of the correct code learning.
9. Activate now the procedure to insert the new remote control on the receiver.
To activate the remote control on the receiver for models marked with proceed as below:
1. First of all you must be closed to the automation.
2. Press and retain pressed the programmed button during 10 seconds, when the LED start to flash, release the button.
3. Wait until the LED will turn o. The operation has been done, now you can use your new remote control.
To activate on the receiver all the other models: Refer you to the instructions of the original model.
NOTE: THE SEED CODE OF THE WHY EVO CAM BE EMITTED AS HERE BELOW:
1. Press the buttons 1 and 2 simultaneously for 8 seconds and release them when the LED start to flash;
2. While the LED is flashing press the button with the seed code needed.
ATTENTION!! Every kind of receiver can have the “radio-mode” disarmed. In this cases will be necessary insert the new remotes controls with the “manual procedures”.

6
6.3
Attention: verify the programming remote control is a MASTER.
Pressing whatever button, the LED has to emit a double flash rather than to switch on as a fixed light.
1. While pressing the button 1 of the “WHY EVO”, at the same time press 4 times the 2 button.
2. Release both buttons. Now the WHY EVO WHITE LED will emit a short flash every 2 seconds.
3. Place the original remote control to be programmed in front of the “WHY EVO”, at about 5 cm of distance.
4. Press and retain pressed the button to be programmed of the original remote control, till the WHITE LED will switch on
as a fix light; now release the button.
5. The WHY EVO WHITE LED will emit a short flash every 2 seconds supported by two following sound “BEEP”. These two
alerts inform the user that, to duplicate the remote control, it is necessary to emit the SEED CODE to realize the copy.
6. Predispose the FAAC/GENIUS remote control for the SEED CODE emission. Press at the same time the 1 and 2 buttons
(note: THESE ARE THE BUTTONS OF THE DIAGONAL LINE as in the picture).
7. While FAAC/GENIUS remote control LED flashes, place it in front of WHY EVO at a distance of 5cm and press the
button to be programmed until the WHY EVO WHITE LED will change the flash mode (more fast) and color (BLUE), for a
reconfirmation of the correct code learning. This step may take some seconds.
8. At this moment, press the button when you want to store the code and retain pressed until the WHY EVO BLUE LED,
switches o and an extended sound “BEEP” is emitted to confirm the correct learning of the code.
9. The copy has been happened with success. Now check on the automation the correct functioning of new WHY EVO
remote control pressing two times the copied button.
Notes:
• If the WHITE LED flashes only 3 times (of WHITE color) and switches o, the code has not learnt correctly. Please repeat
the operation from the step 1.
• The WHY EVO memory is completely re-writable.
• To duplicate further buttons of WHY EVO, please repeat the operation from the step 1.
ROLLING COMPLEX
DUPLICATING PROCEDURES
FAAC
433 - 868 GENIUS
433 - 868

7
6.3
1. While pressing the button 1 of the “NEW WHY EVO”, at the same time press 4 times the 2 button.
2. Release both buttons. Now the WHITE LED of “NEW WHY EVO” will emit a short flash every 2 seconds.
3. Place the “SOURCE WHY EVO” in front of the “NEW WHY EVO” , at about 5 cm of distance (as in the picture 3 at the page 3).
4. Press and retain pressed the button to be programmed of the “SOURCE WHY EVO”
NOW IF THE CODE IN THE “SOURCE WHY EVO”
Notes:
• If the WHITE LED flashes only 3 times (of WHITE color) and switches o, the code has not learnt correctly. Please repeat the operation
from the step 1.
• The WHY EVO memory is completely re-writable.
• To duplicate further buttons of WHY EVO, please repeat the operation from the step 1.
WHY EVO WHY EVO
DUPLICATING PROCEDURES
IS A FIXED
OR ROLLING-SIMPLE CODE
5a wait for a change flash (as a faster flash) of “NEW
WHY EVO” WHITE LED and a change of its color (BLUE)
that confirms the correct learning of code. This operation
may take some seconds.
6a While the BLUE LED is flashing, press the button of
the “NEW WHY EVO” where you want to program the
code just learnt, and retain pressed until the LED will
switch o and an extended sound “BEEP” is emitted for a
reconfirmation of the correct code learning.
7a The copy has been happened with success. Now check
on the automation the correct functioning of NEW WHY
EVO remote control pressing directly the button where
the code has been programmed. If it will not work, please
proceed with the insertion on the receiver of the NEW
WHY EVO, through the function, if it is present,
or through the procedures given by the automation
manufacturer.
IS A ROLLING-COMPLEX CODE
5b The WHY EVO WHITE LED will emit a short flash every
2 seconds supported by two following sound “BEEP”.
These two alerts inform the user that, to duplicate the
remote control, it is necessary to emit the SEED CODE to
realize the copy.
6b Transmit now the SEED CODE of the “SOURCE WHY
EVO” pressing at the same time 1 and 2 buttons for 3
seconds till the switch on of WHITE LED. While the LED is
flashing, (within 10 seconds) pressing and retain pressed
the button where you want to program the SEED CODE.
7b Now the WHITE LED of the “NEW WHY EVO” will
change the flash (more fast) and color (BLUE) to confirm
the correct learning of the code. This step may take some
seconds.
8b At this moment, press the NEW WHY EVO button when
you want to store the code and retain pressed until the
WHY EVO BLUE LED, switches o and an extended sound
“BEEP” is emitted to confirm the correct learning of the
code.
9b The copy has been happened with success. Now
check on the automation the correct functioning of NEW
WHY EVO remote control pressing directly the button
where the code has been programmed. If it will not work,
please proceed with the insertion on the receiver of the
NEW WHY EVO, through the function, if it is present,
or through the procedures given by the automation
manufacturer.

8
SPECIAL PROCEDURES
TO REACTIVATE THE ROLLING SICE TECH CODE INSERTED AS DEFAULT ON A
BUTTON, PROCEED AS HERE BELOW:
1. While pressing the button 1 of the WHY EVO, at the same time press 4 times the 2 button.
2. Release both buttons. Now the WHITE LED “WHY EVO” will emit a short flash every 2 seconds.
3. Press the button where you want to reactivate the rolling code and retain pressed till the WHITE LED will become BLUE
and then it switches o. At this moment, an extended sound “BEEP” will be emitted to confirm the correct reactivation.
NOTES:
TO reactivate further buttons of WHY EVO, please repeat the operation form the step 1.
TO MAINTAIN THE SAME SERIAL NUMBER ON ALL 4 BUTTONS
1. While pressing the button 1 of the WHY EVO, at the same time press 4 times the 2 button.
2. Release both buttons. Now the WHITE LED “WHY EVO” will emit a short flash every 2 seconds.
3. Place the original remote control to be programmed in front of the “WHY EVO”, at about 5 cm of distance (as shown in
the picture at the page 3).
4. Press and retain pressed the 1 button of the original remote control and wait for a change of color (BLUE) of “WHY EVO”
WHITE LED that it will switch o and it emit an extended sound “BEEP” to confirm the correct learning code. This step
may take some seconds.
5. The copy has been happened.
6. Activate now the correct procedure for the copied model and insert the new remote control on the receiver (see the
compatibility list present in this manual).
6.3

9
6.3 COMPATIBILITY LIST
ACM TX2, TX2 COLOR, TX4
ADYX TE4433H BLUE, 433-HG BRAVO
AERF
COMPACT, HY-DOM, MERCURI B,
MERCURI C, SABUTON, MARS,
SATURN, ST3/N, TERRA, TMP-1,
TMP-2, UNITECH
ALLMATIC BROWN, BROWN RED, BRO.OVER,
PASS, MINIPASS, TECH3
APERIO GO, GO PRO, GO MINI
APERTO (Sommer) 4020-TX03-434, TX02-434-2,
TX02-868-2
APRIMATIC TR, TM4, TXM
ATA PTX4 BLU, PTX4 PINK
AVIDSEN 104251, 104250, 104250 OLD,
104250 RED, 104257, 104350, 654250
BALLAN FM400, FM400E
BENINCA
TO. GO. WV, TWV, ROLLKEY, APPLE,
LOT WCV, CUPIDO, TO.GO. QV
IO
BFT
MITTO, MITTO M, MITTO RCB,
MITTO A, TRC, GHIBLI, MURALE,
KLEIO
CARDIN
TRQ S449,
TRQ S449 GREEN (PRECODE),
TXQ S449, TXQ S449 GREEN,
TRQ S486, TXQ S486, S437 TX,
XRADO
BRAND MODEL D.O.R.
LEGEND:
DOR TECHNOLOGY ACT ON THE RECEIVER DIRECT FUNCTIONING

10
6.3
CASALI
JA33 AMIGO
GENIUS/CASALI A252RC
CHAMBERLAIN/LIFT MASTER/
MOTOR LIFT
953ESTD, 371 LM, 971
LM, 84330E, 94334CE,
94333E/94334E/94335E, 9747E,
1A5639-7, 1A5477, 1A6487, 132B2372,
94330EML/9333EML/94335EML,
84330EML/84333EML/84335EML,
8747EML
CLEMSA
MUTANCODE, T, T-8, E-CODE N
MASTERCODE MV
ATTENTION! FIXED CODE
DASPI ZERO RC
DEA SYSTEM PUNTO 278, GOLDR, GENIE R 273,
GENIE R-GT2N, MIO TR, GT2M, TRN
DITEC BIXLP, GOL4, BIXLG
DOORHAN TRANSMITTER 4
DOORMATIC MILENY, MILENY-EVO
ECOSTAR RSC, RSE, RSZ
ERREKA
IRIS, ROLLER 2, ROLLER 433, ROLLER
868, SOL433, SOL868, VEGA 433,
VEGA 868
FAAC
TML 433SLH, DL 868 SLH,
XT 868 SLH, XT 433 SLH, T 868 SLH,
T 433 SLH, XT 868 SLH BLACK,
XT 433 SLH BLACK
XT 433 RC, TE433HG, XT4 433 RCBE
FADINI JUBI-SMALL, JUBI 433
GENIE GITR-3, GIT, GICT390, GIFT390-1,
G3T-BX, G1T-BX, GM3T, GICTD, GIFTD
BRAND MODEL D.O.R.
COMPATIBILITY LIST

11
6.3
GENIUS
AMIGOLD, AMIGO, KILO
BRAVO, ECHO
GIBIDI AU1600, AU1600 WOOD, AU1680,
AU1680 WOOD, DOMINO
JCM
NEO, TWIN
GO, GO PORTIS, GO NORTON,
KBLUE ETH-TEL01
KEY 900TXB-42R, TXB 44R, SUB 44R
KING GATES CLIPPER, STYLO
KLING KUA, KUA E, KUA S
LABEL SPYCO
LIFE FIDO
LINEAR
MCT-11, ACT-21, ACT-22,
STING RAY ACT-31,
STING RAY ACT-34B
MERLIN 2.0 E945M, E943M, E940M
MERLIN/PROLIFT C945, C940, C943, M842, M844
MHOUSE TX3, TX4, GTX4
MOOVO MT4G
NICE
SMILO, FLOR-S, VERY-VR,
FLOR-S ERA
ONE (ON), ON ERA, INTI, ERGO,
PLANO, ONE (ON FM)
BRAND MODEL D.O.R.
COMPATIBILITY LIST

12
6.3
NORTON
NEO, TXCD
GO NORTON,
GO MINI NORTON
NOVOFERM
MCHS, MICRO-NOVOTRON 502,
MINI-NOVOTRON 504,
MICRO-NOVOTRON 502,
MICRO-NOVOTRON 504,
MICRO-NOVOTRON 31,
MICRO-NOVOTRON 51,
MINI-NOVOTRON 30,
MINI-NOVOTRON 50, MNHS,
O&O TX, T.COM R4-2, T.COM R8-2, TWIN,
TX (NEO)
PECCININ TX MENBRANA
PRASTEL MTE, MPSTLE, MPSTP2E, TCE, BFOR,
TRQ-P, SLIM-E
PUJOL
WARNING
YOU MIGHT FACE CUSTOMISED
CODES NOT DUPLICABLE
TWIN, VARIO, VARIO MARS,
VARIO OCEAN, NEO
RIB LITHIO
ROPER
NEO
GO ROPER, GO MINI ROPER
SABUTOM BROOVER, BROSTAR
SEA
HEAD, SMART DUAL ROLL,
SMART-3 ROLLING CODE,
COCCINELLA ROLL
SEAV BE HAPPY RS
SECULUX NEO
SILVELOX Mhz 2007, QUARZ SAW
BRAND MODEL D.O.R.
COMPATIBILITY LIST

13
6.3
SIMINOR
CVXNL, MITTO
SIM433
SOMFY
K-EASY, K-EASY NEW, K-EASY OLD,
MITTO, KEY GO RTS, TELIS RTS,
KEYTIS RTS, KEYTIS RTS NS, ALARMA
SOMMER
4010, 4011, 4014 TX03-434-2,
4013 TX03-434-4, 4020 TX03-868-4,
4026 TX03-868-2, 4022 TX02-434-2,
4025 TX02-868-2, 4031 TX08-868-4
STAGNOLI KALLISTO, VENUS AV223
TAU 250K-SLIMRP, 250K-SLIMR,
250T-4RP
TELCOMA FM400E, FM400
TOR LIFT TORMIT4
V2 TSC, TXC, TRC, HANDY,
PHOENIX, PHOX 433
VDS ECO-R, TRQ P
BRAND MODEL D.O.R.
COMPATIBILITY LIST

NEW
THE MULTIFREQUENCY REMOTE CONTROL
Sice Tech Srl
Via Berardo Maggi, 4 - 25124 Brescia (BS)
Tel. +39 02 45073682
Fax +39 02 45073683
for orders: sales@sicetech.it
www.sicetech.it - www.radiocomandowhy.com
Operative center:
Via Nedo Nadi, 7/A - 43122 Parma (PR)
Table of contents
Other SICE Tech Remote Control manuals
