SIELINE FLB500W User manual
Electric Towel Warmer
Model: FLB500W, FLB750W

WARNING
CAUTION: Some parts of this product can become very hot and cause burns. Particular attention
has to be given where children and vulnerable people are present.
Children of less than 3 years should be kept away unless continuously supervised.
Children aged from 3 years and less than 8 years shall only switch on/off the appliance provided that it has
been placed or installed in its inten-ded normal operating position and they have been given supervision or
instruction concerning use of the appliance in a safe way and unders-tand the hazards involved.
Children between 3 and 8 years old must not disconnect, regulate and clean the appliance or perform user
maintenance.
This appliance can be used by chil-dren aged from 8 years and above and persons with reduced physical,
sensory or mental capabilities or lack of experience and knowledge if they have been given supervision or
instruction concerning use of the appliance in a safe way and unders-tand the hazards involved.Children
shall not play with the appliance. Cleaning and user maintenance shall not be made by children without
su-pervision.
Never install the appliance:
- immediately below or in front of a power socket or a junction box.
- in contact with the wall or floor
- near curtains, flammable or com-bustible materials or pressure ves-sels.
If the supply cord is damaged, it must be replaced by the manufacturer, its service agent or similarly qualified
persons in order to avoid hazard.
Never use the appliance if the elec-tronic controls are damaged.
Make sure the fixed power line is fitted with a disconnecting switch allowing the appliance to be
discon-nected completely from the household mains, included the Pilot Wire, when present, in
accordance with the wiring rules.
WARNING:
Do not obstruct the air outlet and intake grilles on the fan heater. This could cause the appliance
to ove-rheat.
Disposal of this appliance in accordance with the legislation in force for the disposal and manage-ment
of waste.

1. SPECIFICATIONS OF THE APPLIANCE
Voltage: 230 V ~ 50 Hz
Insulation class: II
Protection class: IP24
2. GENERAL INFORMATION
Storage and maintenance:
Avoid storing the appliance in places at risk of freezing. Protect from frost.
Unpack the appliance carefully and rest it on the polystyrene corner pieces or a soft support to avoid
damage.
The package contains:
– the appliance
– Wall mount brackets
– instructions
Read all the instructions carefully before installation and use. Keep for future consultation.
Install and use the appliance as described in these instructions only.
These instructions do not cover all situations which might arise. Caution and common sense should be
applied when installing, operating and servicing the appliance.
Modifying the characteristics of the appliance and removing any fixed component including the caps
and/or removing or rotating the control device in any way are expressly prohibited.
Make sure the appliance is complete and unda-maged. If damaged, do not use the appliance, but contact
your local dealer or a qualified professional.
3. POSITIONING AND INSTALLING
WARNING:
This appliance is designed to dry towels washed in water only. It must not be used for other purposes.
The appliance must be used permanently mounted on a wall as described in the instructions.
In bathrooms (with bath or shower), install the ap-pliance outside volume 1.
Item NO. POWER Horizontal tube
quantity
Product dimension
L(CM)
W(CM)
H(CM)
FLB500W 500W 2+2+4 55 5 81
FLB750W 750W 3+4+5 55 5 112
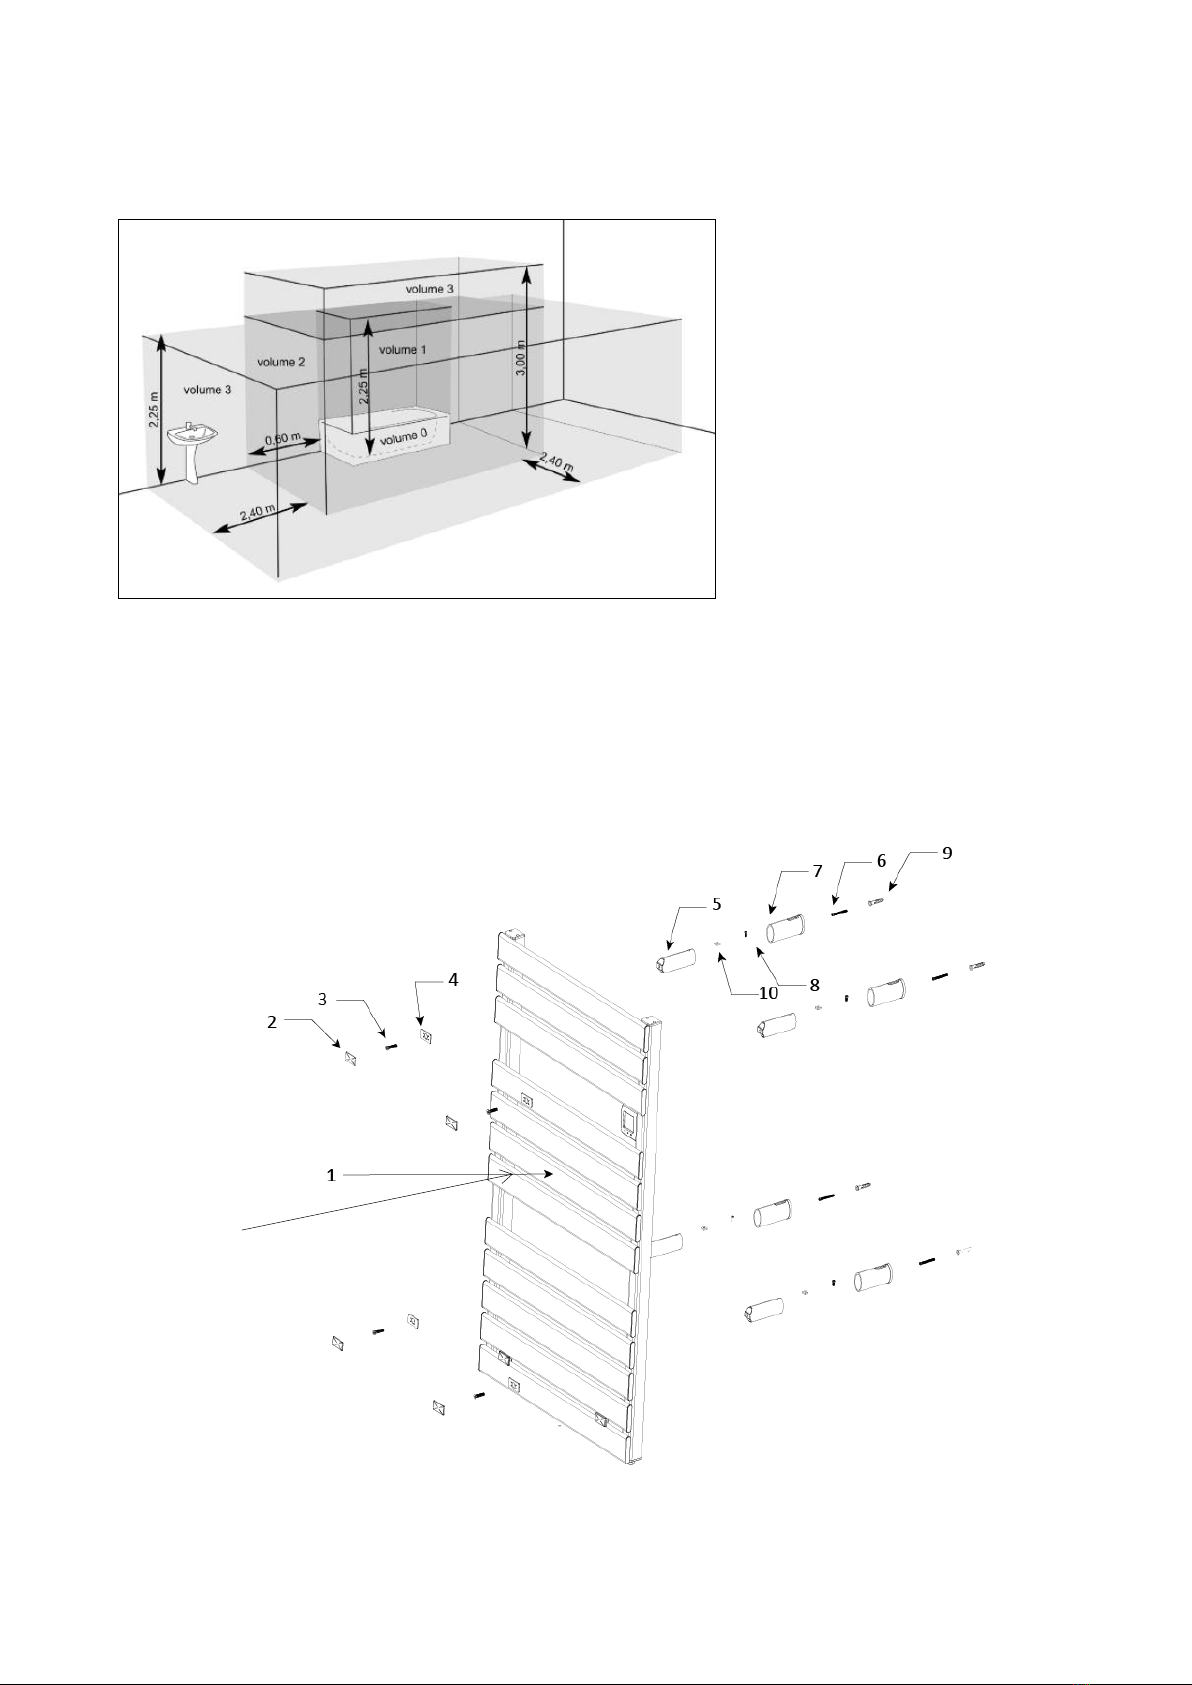
The appliance must be installed in such a way that the switch, electronic controls and other control
devices cannot be touched by someone in the bath or shower. The electronic controls and other control
devices must always be in volume 3. The appliance must not be connected with a plug.
3.1 WALL MOUNTING
The screws and wall plugs supplied are suitable for solid walls. For all other types of wall, please use
suitable screws and wall plugs. Make sure the screws and anchors included in the mounting pack are
suitable for the type of wall on which you are mounting the appliance. If in doubt, contact a qualified
professional or your local dealer.
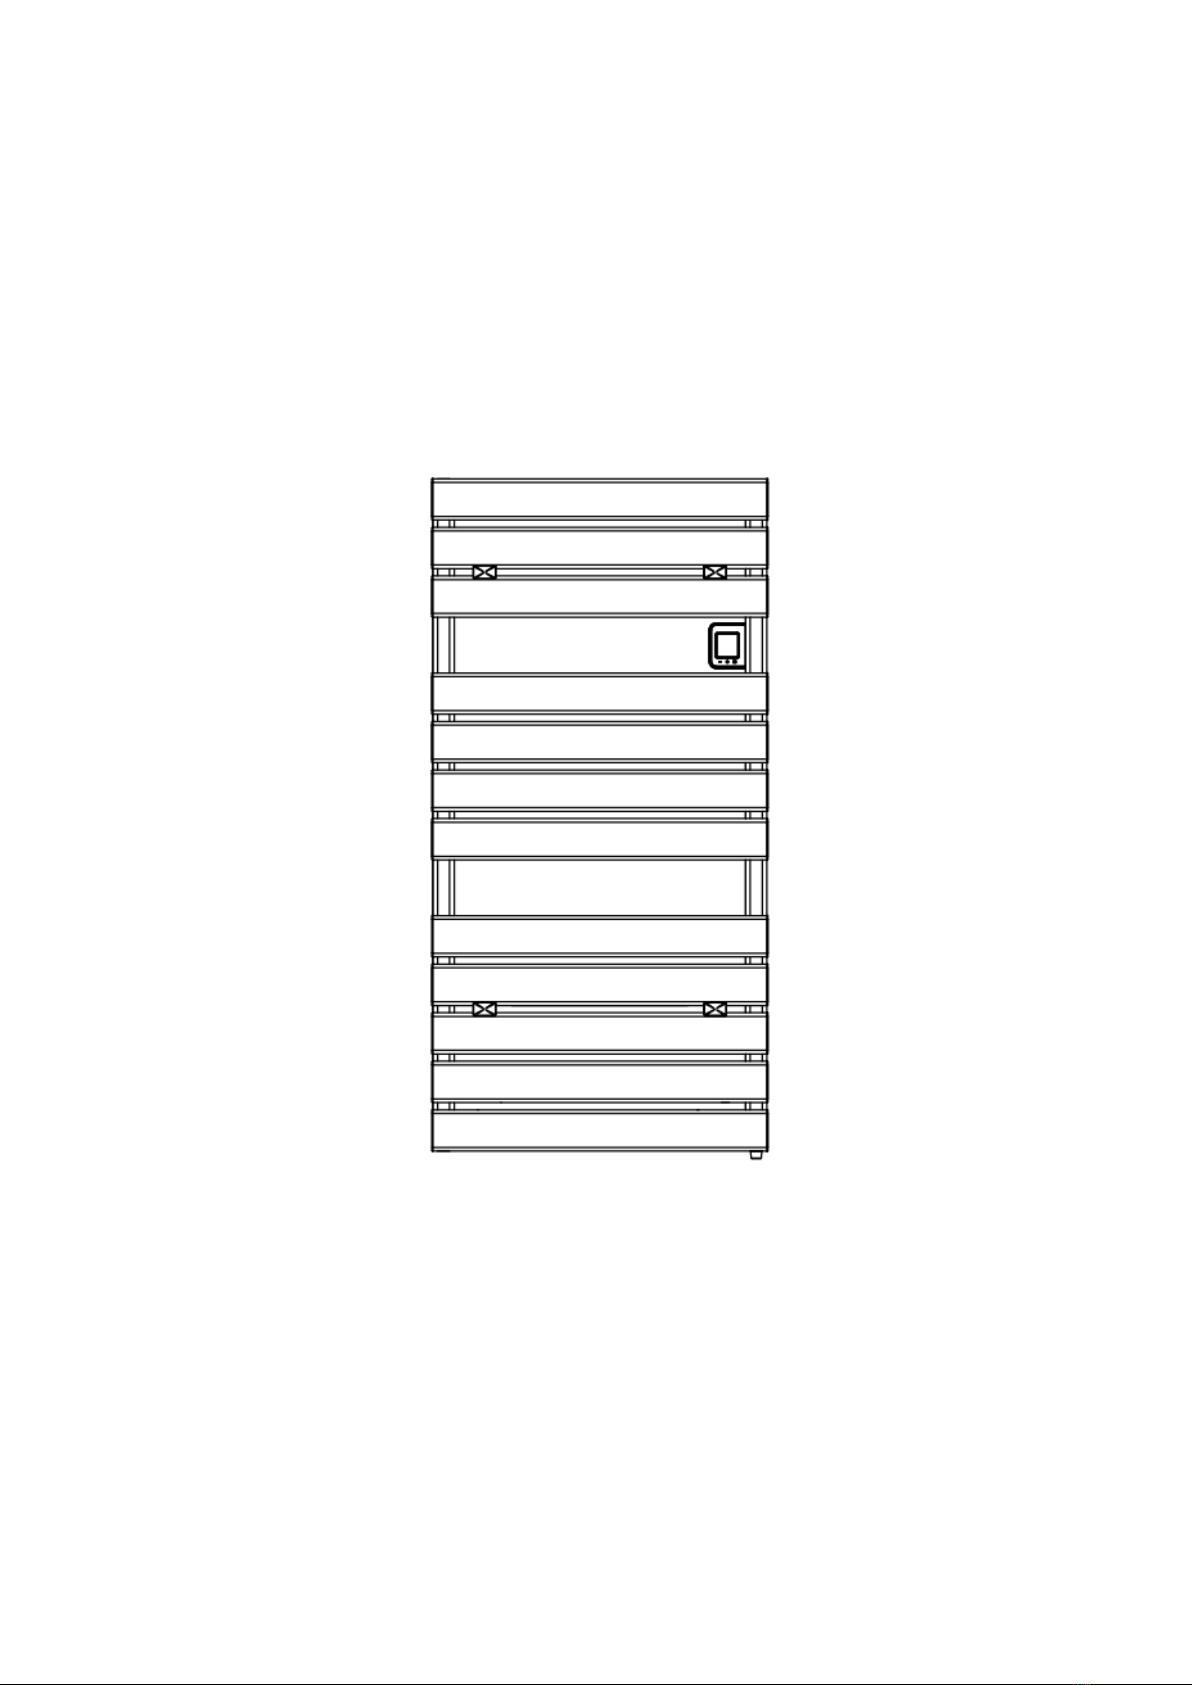
Fig. 1
1

Picture Name Quantity
1
Product 1
2
Bracket part 4
3 Screw 4
4
Bracket part 4
5
Bracket part 4
6 Screw 4
7
Bracket part 4
8 Screw 4
9 Screw 4
10
Nut 4
Fig. 2

Fig. 3 Fig. 4
1, The minimum recommended distance between the bottom and the floor is 600 mm.
2, With a pencil, mark the four holes on the wall according to Fig.3(FLB500W) and Fig.4(FLB750W), drill and
insert the screw 9.
3, Fix part 7 by using screw 6.
4, Insert part 5 into part 7 and fix it by screw 8. The length is adjustable.
5, Fix the top part of the towel warmer, insert it between part 5 and part 4, then fix it by using screw 3. Finally
cover it with part 2.
6, Repeat the settings to fix bottom part of the towel warmer.
3.2 ELECTRICAL CONNECTIONS
You are recommended to have the appliance installed by a qualified professional.
The appliance must be installed in compliance with national legislation regulating electrical
equipment and installations. When the appliance is installed, make the power is off.
The appliance requires a 230 V ~ 50 Hz power supply.
Make sure the fixed power line is fitted with a disconnecting switch allowing the appliance to be
disconnected comple-tely from the household mains, included the Pilot Wire, when present, in
accordance with the wiring rules.
If the appliance is installed in a bathroom, the power line must be fitted with a 30 mA RCD (high
sensitivity residual current protection device).
The power supply line must be protected by the same differential protection device. Permanently
connected appliances must be connected using a connector block placed within a proper junction box.
When installing the appliance in damp rooms (kitchen, bathroom), the point of connection with the
household mains must be at least 25 cm from the floor.
Make sure the power cable cannot in any way come into contact with the surface of the appliance.
4. REGULATION AND OPERATION
The appliance is designed to heat rooms. Some parts of this product can become very hot and cause
burns. Particular attention has to be given where children and vulnerable people are present.
Keep combustible or flammable materials or pressure vessels (e.g. spray cans, fire extinguishers) at
least 50 cm from the appliance. Do not vaporise any type of substance on the surface of the appliance.
Never touch the appliance with wet or damp hands or feet.
Do not wet the electronic control unit with water or other fluids. If this occurs, disconnect the appliance
from the mains power supply and allow to dry completely.
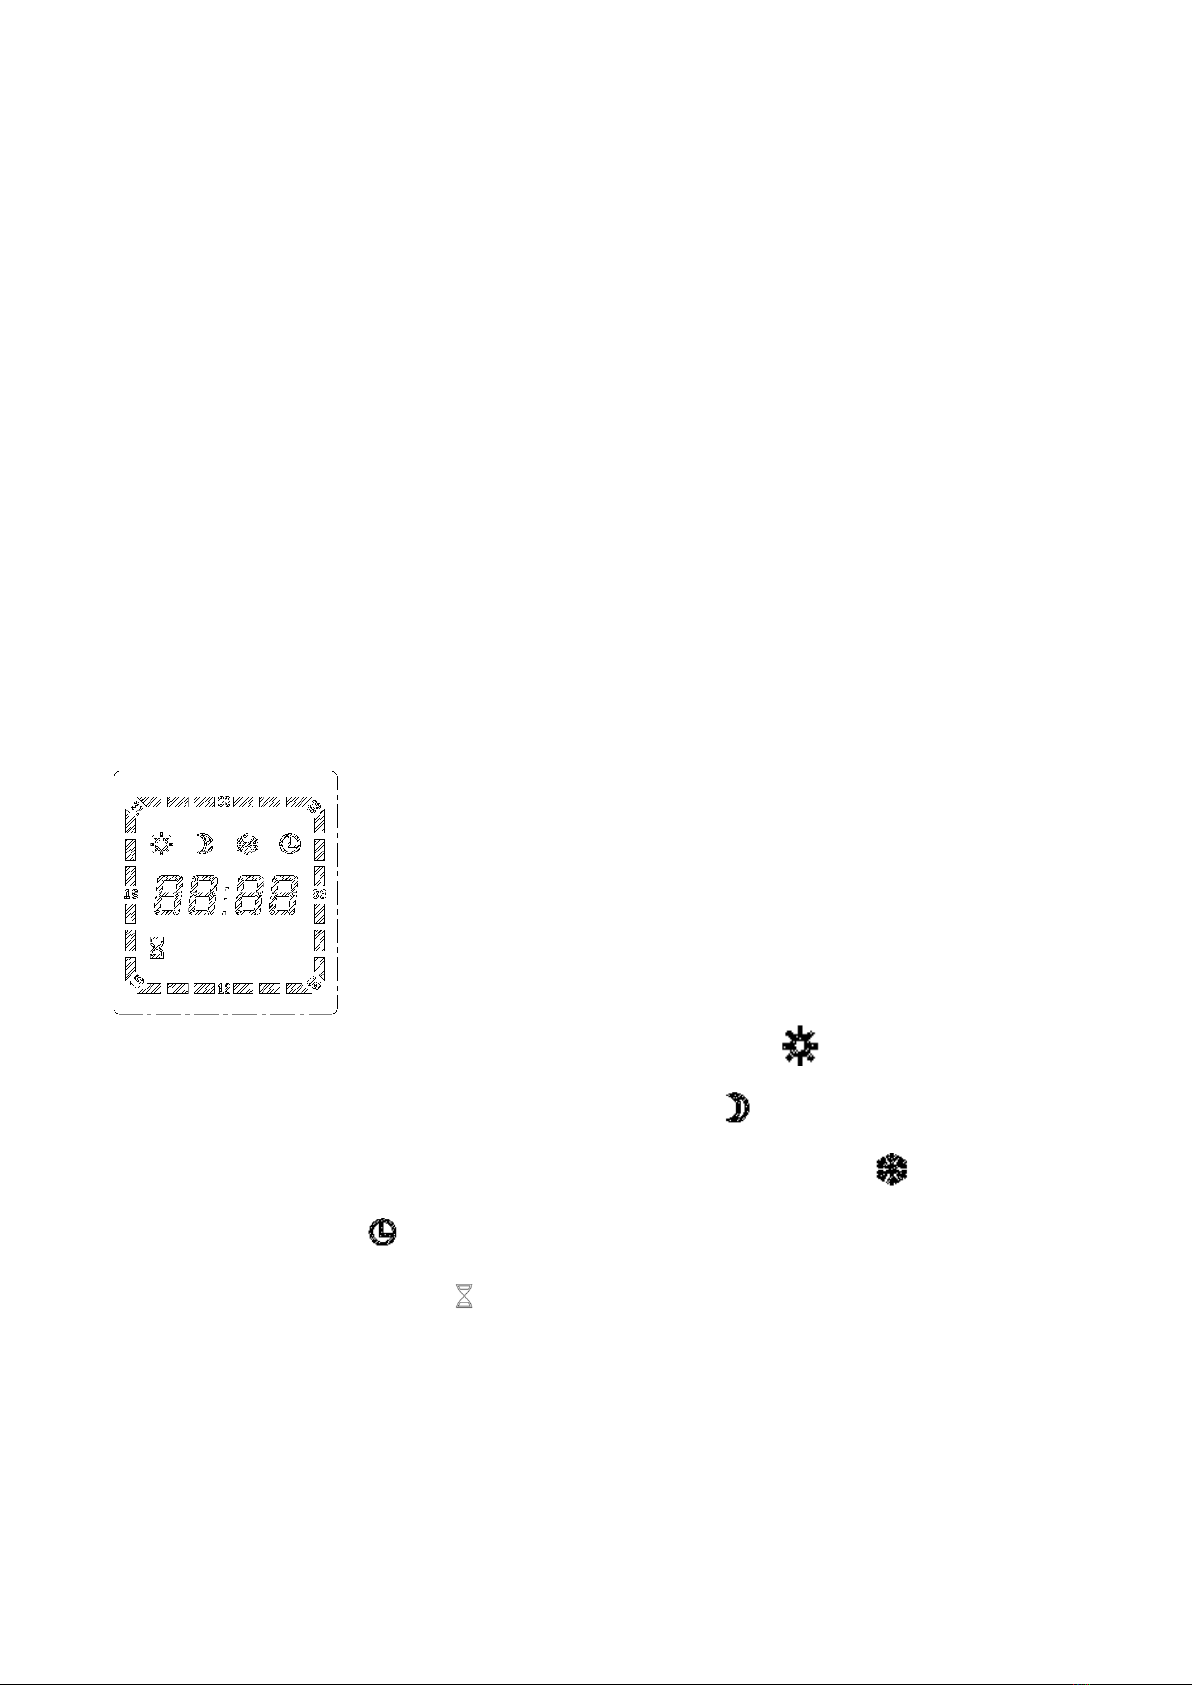
4.1 CONTROLLER:
Comfort: show setting temperature under confort mode, range from 7-30℃, icon bright.
ECO: show setting temperature under ECO mode, range from 7-30℃, icon bright.
Anti freeze: show setting temperature under anti freeze mode, temperature is 7℃fixed, icon bright.
Timer: show current time, icon bright.
Booster: show booster heating time, icon bright.
Open window function: If temperature drop 2℃in 5 minutes, open window function will start automaticly.
Heating: LCD screen backlight show red color.

4.2 OPERATION:
4.2.1 Select mode:
Each time press button, you can select confort , ECO , anti freeze , timer, booster
in sequence.
4.2.2 Comfort mode:
Press and select to confort mode . Default temperature is 19℃.
Temperature range from 5℃to 30℃. Press or to set temperature. LCD screen backlight red
means heating, white means not heating.
4.2.3 ECO mode:
Press and select to ECO mode . Default temperature is 15.5℃.
Temperature range from 5℃to 30℃. Press or to set temperature. LCD screen backlight red
means heating, white means not heating. Please note ECO temperature always lower than Comfort.
4.2.4 Anti freeze mode:
Press and select to anti freeze mode . Default temperature is 7℃.
Temperature can’t change. LCD screen backlight red means heating, white means not heating.

4.2.5 Time set and Week timer mode:
Press and select to timer mode , then you can set hour, minute, week(1 to 7 means Monday to
Sunday) and select running program(P1 to P9) for week. Please note there are 9 default programs(P1 to
P9), and if you want, you also can change these 9 programs by yourself. Screen and setting instruction
as below:
Running status: Show setting time. In comfort mode, icon bright for 3 seconds and not bright for 1 second
circulation. In ECO mode, icon not bright for 3 seconds and bright for 1 second circulation. Below is an
example:
Press
Press and to change, means
comfort, show and means ECO, show
Always use or to set hour, minute, week and to select P1 to P9 for week.
Press
Press and hold
for 3 seconds
P1 to P9 won’t flash,
but still can adjust
Repeat till Sunday(7)
and press to quit
Press
Press
Press and hold
for 3 seconds
Please note you can change the default setting
of running program(P1 to P9) at this step. If you
want to change P1, then set under P1, if change
P2, then set under P2, repeat till P9.
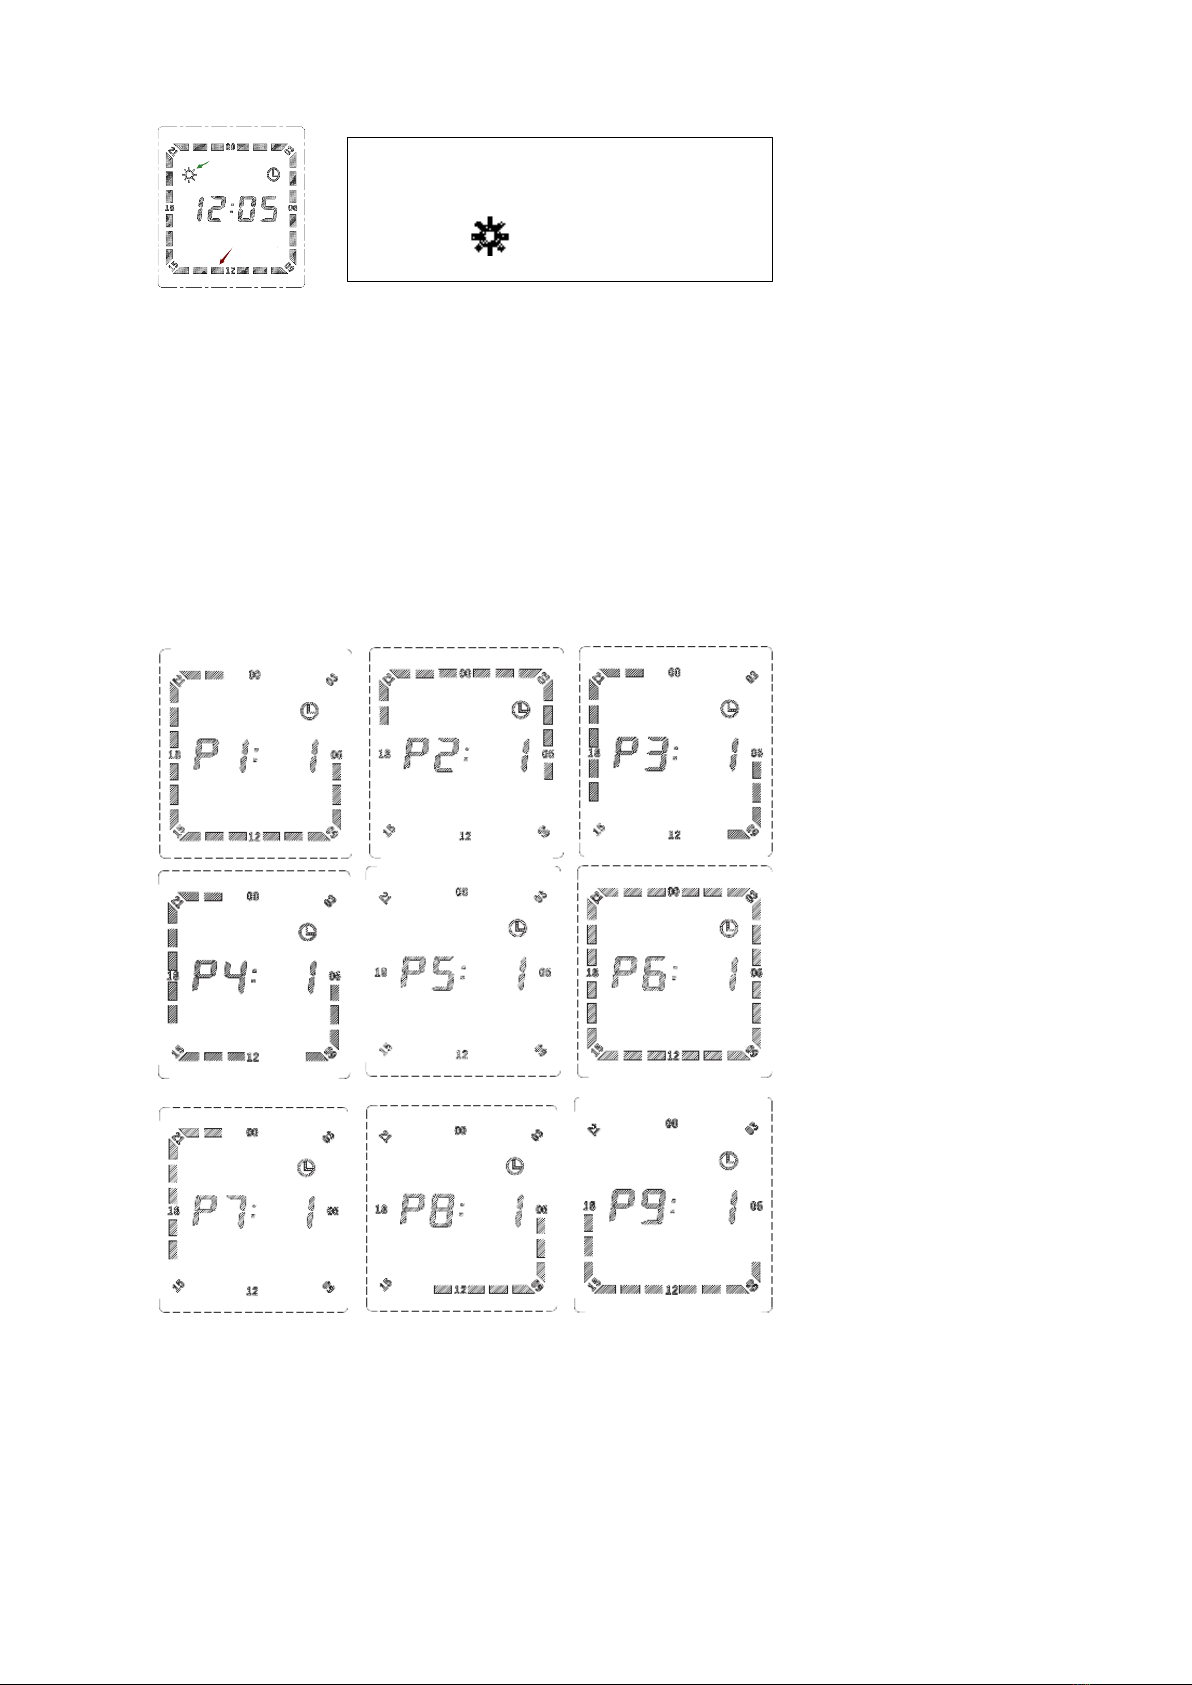
Default P1-P9 setting as below:
P1: comfort mode 6:00 to 22:00, the others all ECO mode.
P2: comfort mode 19:00 to 6:00, the others all ECO mode.
P2: comfort mode 6:00 to 9:00 and 16:00 to 22:00, the others all ECO mode.
P4: comfort mode 6:00 to 9:00 and 12:00 to 14:00 and 16:00 to 22:00, the others all ECO mode.
P5: all ECO mode.
P6: all comfort mode.
P7: comfort mode 16:00 to 22:00, the others all ECO mode.
P8: comfort mode 6:00 to 12:00, the others all ECO mode.
P9: comfort mode 8:00 to 17:00, the others all ECO mode.
4.2.5 Booster mode:
This show the time is 12:05, and the red
arrow indicate it run comfort mode, and
comfort icon also bright.
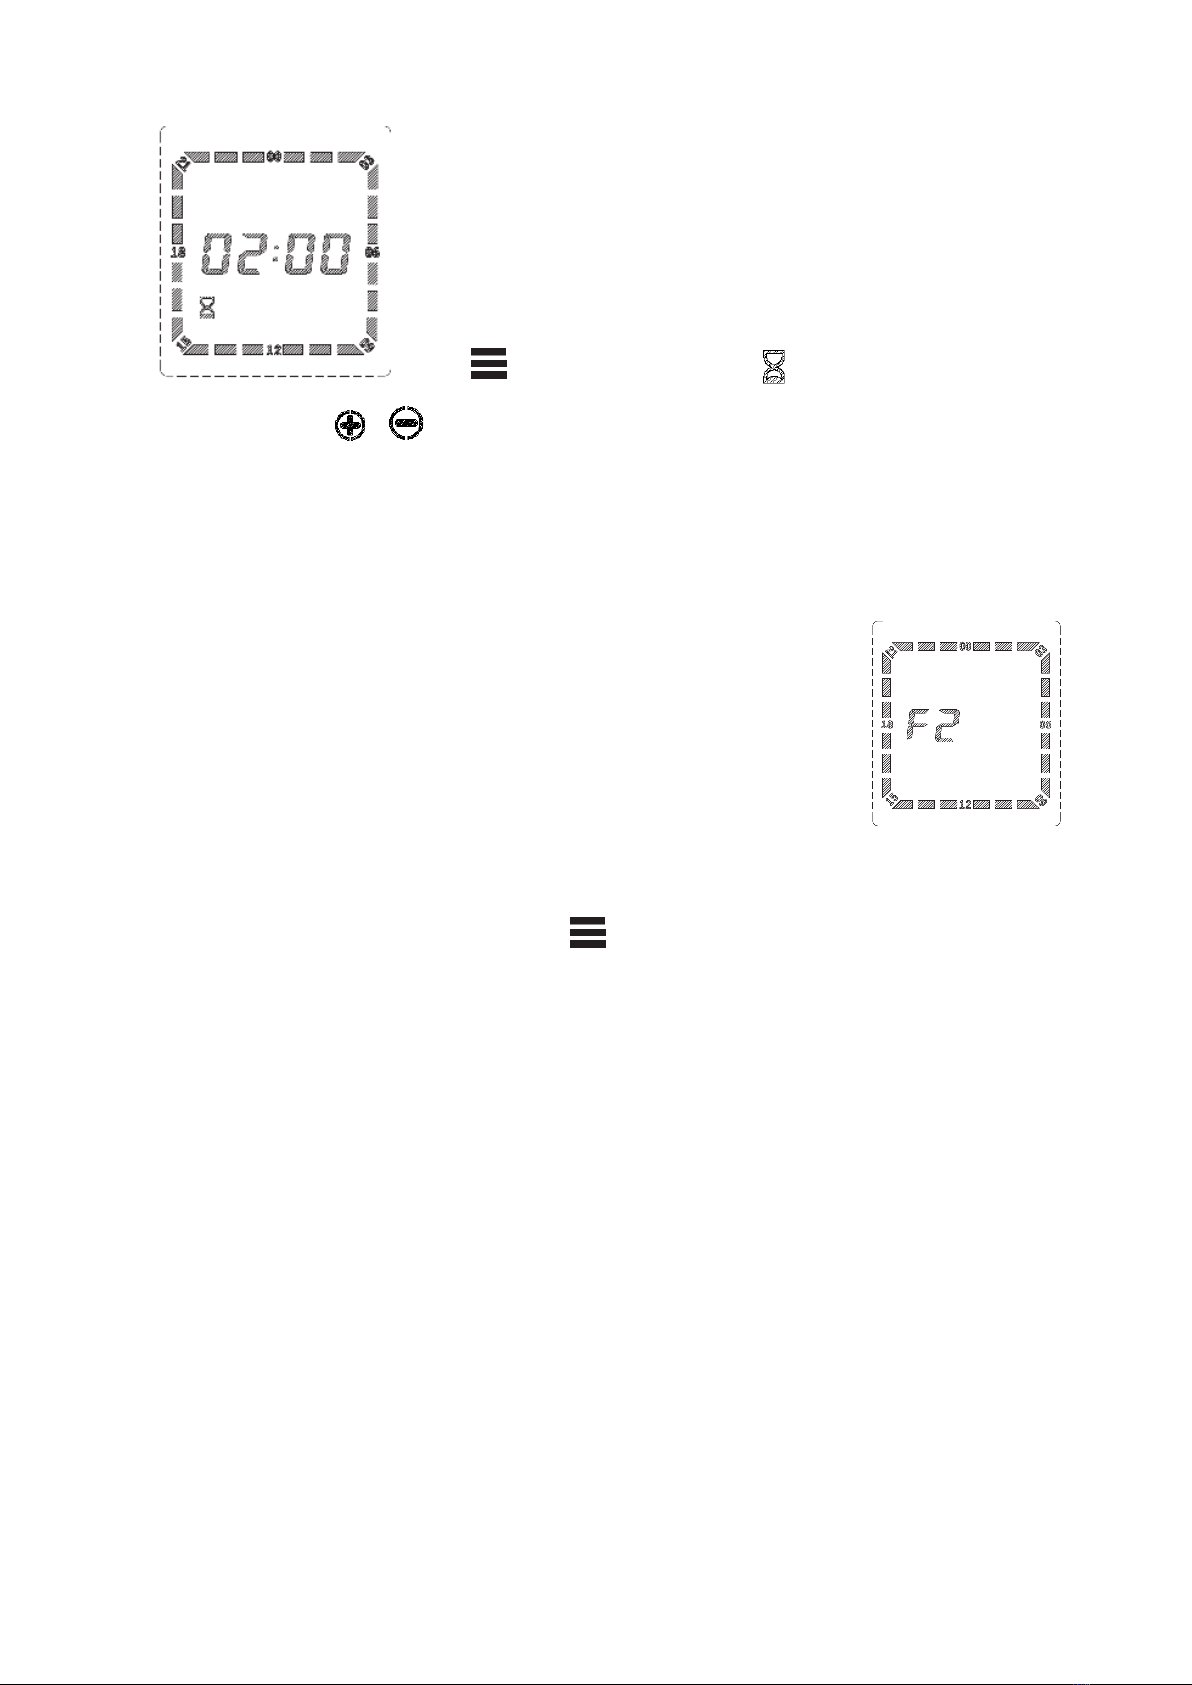
Press and select to booster mode . It can keep heating from 0.5 to
2 hours, and press or to change hours.It will return to previous mode after booster finished.
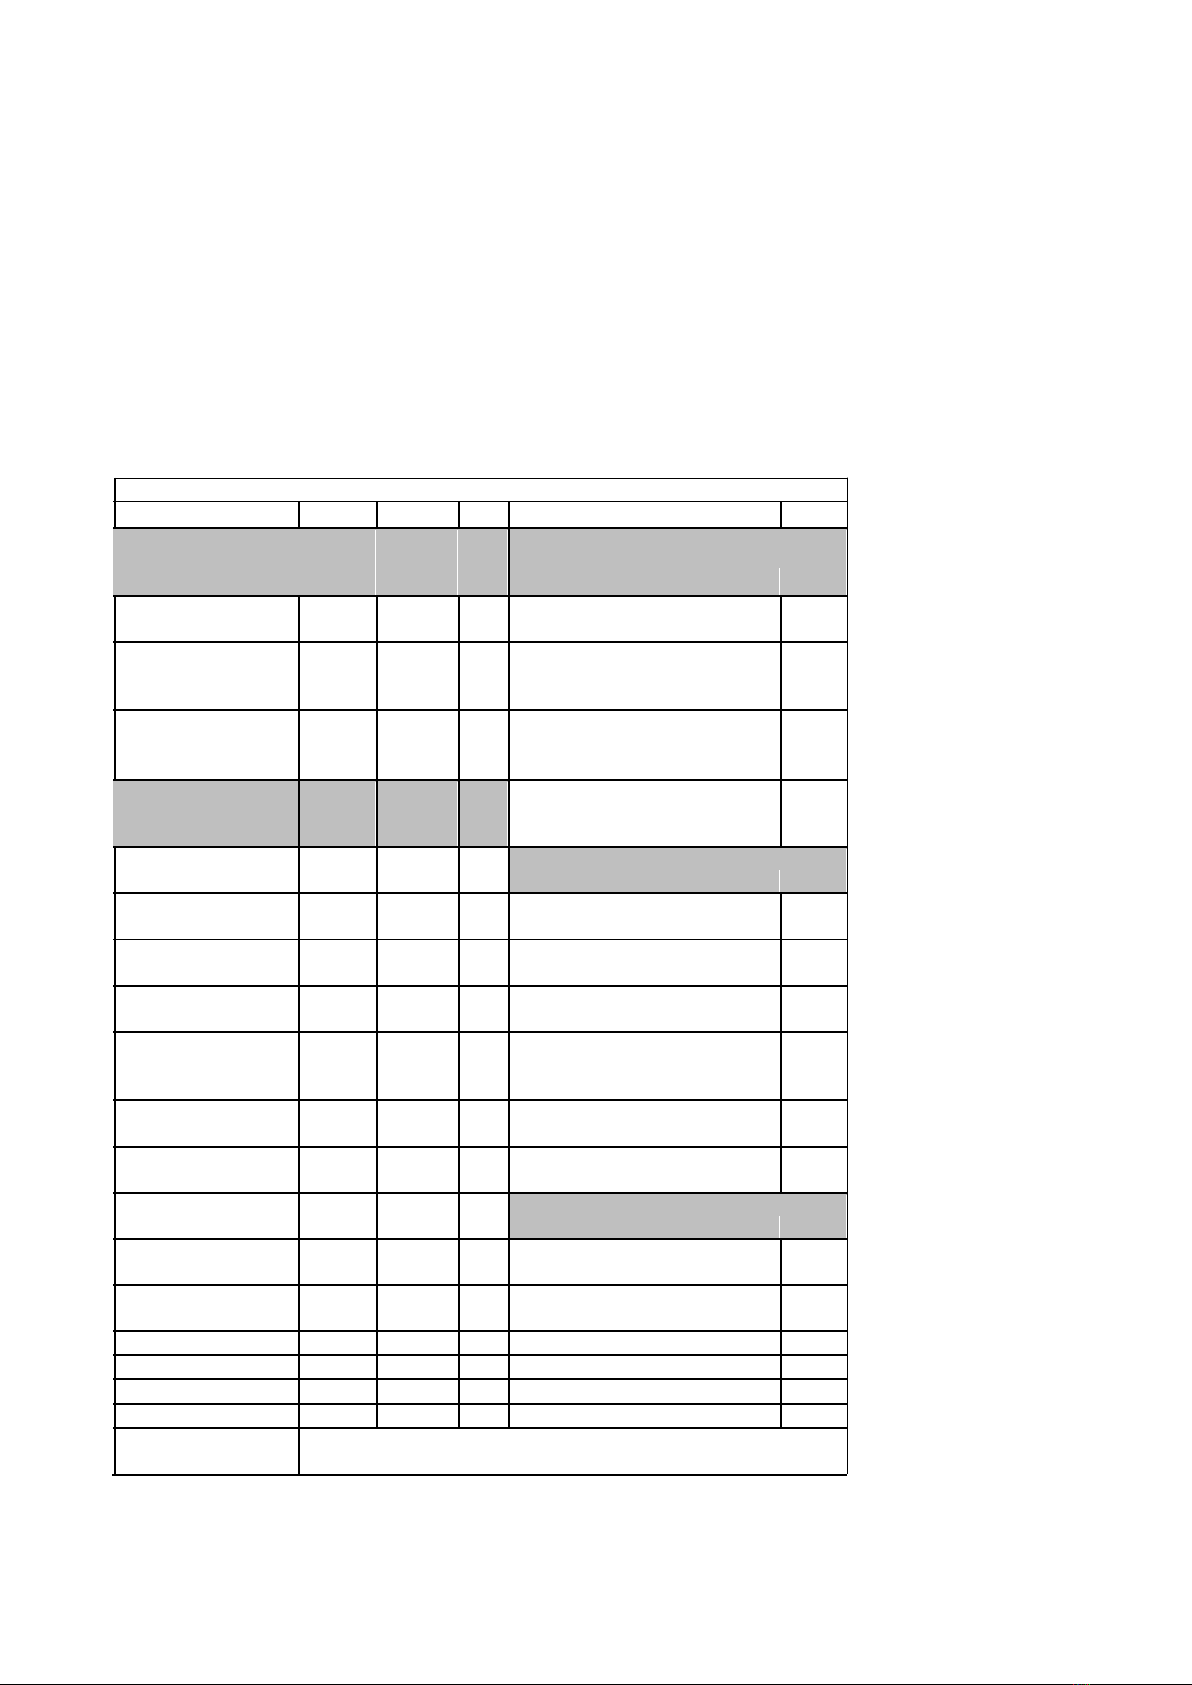
4.2.7 Open window function:
If you open a window widely in the space where the towel warmer is located, a sensor will detect the
sharp drop in temperature. If it drop 2℃in 5 minutes, it means open window function start and the towel
warmer will enter into anti-freeze mode and stop heating and show F2 in screen .
The towel warmer is reignited automatically after 65 minutes, however you can manually relight the towel
warmer before the 65 minutes end by pressing .
Please note open window function is default setting, and can’t adjust.

5. ERP table
Information requirment for the electric local space heaters
Model identifier(s): FLB500W
Item
Symbol
Value
Unit
Item
Unit
Heat output
Type of heat input, for electric storage
local space heaters only (select one)
Nominal heat output
Pnom
0,5
kW
manual heat charge control, with
No
integrated thermostat
Minimum heat output
manual heat charge control with
Pmin
0,5
kW
room and/or outdoor temperature
No
(indicative)
feedback
Maximum continuous
electronic heat charge control
Pmax,c
0,5
kW
with room and/or outdoor tempe-
No
heat output
rature feedback
Auxiliary electricity
fan assisted heat output
No
consumption
At nominal heat out-
elmax
N/A
kW
Type of heat output/room temperature
put
control (select one)
At minimum heat out-
elmin
N/A
kW
single stage heat output and no
No
put
room temperature control
In standby mode
elSB
0,00045
kW
Two or more manual stages, no
No
room temperature control
with mechanic thermostat room
No
temperature control
Seasonal space hea-
ηs
38 %
with electronic room temperature
No
ting energy efficiency
control
electronic room temperature con-
No
trol plus day timer
electronic room temperature con-
Yes
trol plus week timer
Other control options (multiple se-
lections possible)
room temperature control, with
No
presence detection
room temperature control, with
Yes
open window detection
with distance control option
No
with adaptive start control
No
with working time limitation
No
with black bulb sensor
No
Contact details
Company name and address
Information requirment for the electric local space heaters
Model identifier(s): FLB750W
Item
Symbol
Value
Unit
Item
Unit
Heat output
Type of heat input, for electric storage
local space heaters only (select one)
Nominal heat output
Pnom
0,75
kW
manual heat charge control, with
No
integrated thermostat
Minimum heat output
manual heat charge control with
Pmin
0,75
kW
room and/or outdoor temperature
No
(indicative)
feedback
Maximum continuous
electronic heat charge control
Pmax,c
0,75
kW
with room and/or outdoor tempe-
No
heat output
rature feedback
Auxiliary electricity
fan assisted heat output
No
consumption
At nominal heat out-
elmax
N/A
kW
Type of heat output/room temperature
put
control (select one)
At minimum heat out-
elmin
N/A
kW
single stage heat output and no
No
put
room temperature control
In standby mode
elSB
0,00045
kW
Two or more manual stages, no
No
room temperature control
with mechanic thermostat room
No
temperature control
Seasonal space hea-
ηs
38 %
with electronic room temperature
No
ting energy efficiency
control
electronic room temperature con-
No
trol plus day timer
electronic room temperature con-
Yes
trol plus week timer
Other control options (multiple se-
lections possible)
room temperature control, with
No
presence detection
room temperature control, with
Yes
open window detection
with distance control option
No
with adaptive start control
No
with working time limitation
No
with black bulb sensor
No
Contact details
Company name and address

6. MAINTENANCE AND CLEANING
If technical problems arise, contact a qualified professional (recognised or authorised by the dealer
or manufacturer) or your local dealer.
All operations on the appliance must be carried out by a qualified professional who before
performing maintenance must make sure the appliance is turned off, cold and disconnected from
the household mains.
Before cleaning, always turn off the appliance and disconnect the appliance from the mains power
supply.
To clean, just wipe with a soft damp cloth and neutral detergent. Never use abrasive or corrosive
cleaning products or solvents.
To maintain efficiency, remove the dust from the surface of the appliance at least twice a year
using a vacuum cleaner.
7. DISPOSAL
The dustbin icon indicates that the product must be sorted. There must be recycled in accordance with
local environmental regulations for waste. By sorting products bearing this symbol, you will help reduce
the volume of waste incinerated or buried, and to reduce any negative impact on human health and the
environment.
This manual suits for next models
1
Table of contents
Popular Food Warmer manuals by other brands

Avantco
Avantco 177HEAT1836 user manual

HSP HanseShopping
HSP HanseShopping Thermo Heater 2Go Instructions for use

Hatco
Hatco GR2BW-24 Installation & operating manual

Omcan
Omcan DW-CN-0035 instruction manual

Hatco
Hatco 07.04.658.00 Installation and operating manual

APW Wyott
APW Wyott IP30-rated L2+ W-3Vi Installation and operating instructions


BKI
BKI Universal Warmer UW-17 Operation and installation manual

BEER
BEER GN-2/1 Operating Manual, Installation & Technical Specifications

Hatco
Hatco Glo-Ray GRKW-1 Specifications

odass
odass OD-0810 installation manual

Gastros Switzerland
Gastros Switzerland InductWarm 130+ Operating and assembly manual

Hendi
Hendi 273906 user manual