Sig Sauer ELECTRO-OPTICS FOXTROT1X User manual
PISTOL MOUNTED WHITE LIGHT
FOXTROT1X
™
OPERATORS MANUAL
ELECTRO-OPTICS
Please visit sigsauer.com for Owners Manual downloads.
INTRODUCTION:
The FOXTROT1X™ is a compact yet powerful pistol mounted white light that is
perfect for concealed carry, home defense and duty use. The FOXTROT1X™ is
compatible with any firearm that uses a MIL-STD 1913 rail, as well as many other
pistols on the market.
The FOXTROT1X™ is covered by the SIG SAUER Electro-Optics Infinite
Guarantee and Electronics & Tritium Component Limited 5-Year Warranty.
KEY FEATURES:
• 450 Lumens
• 1.5 Hours of Runtime
• Runs on 1 x CR123A Lithium Battery
• Compact 6061 Aluminum Housing
• Ambidextrous Side Activation Switches with Momentary and Latching
Modes
• Lockout Mode
• 4-Position Sliding Rail Interface Adapter Inserts For Maximum Adjustment
Range on the Firearm
CONTENTS:
• FOXTROT1X™ Tactical White Light
• CR123A Lithium Battery
• 2 Rail Interface Adapter Inserts
• E-Clip Removal/Installation Tool
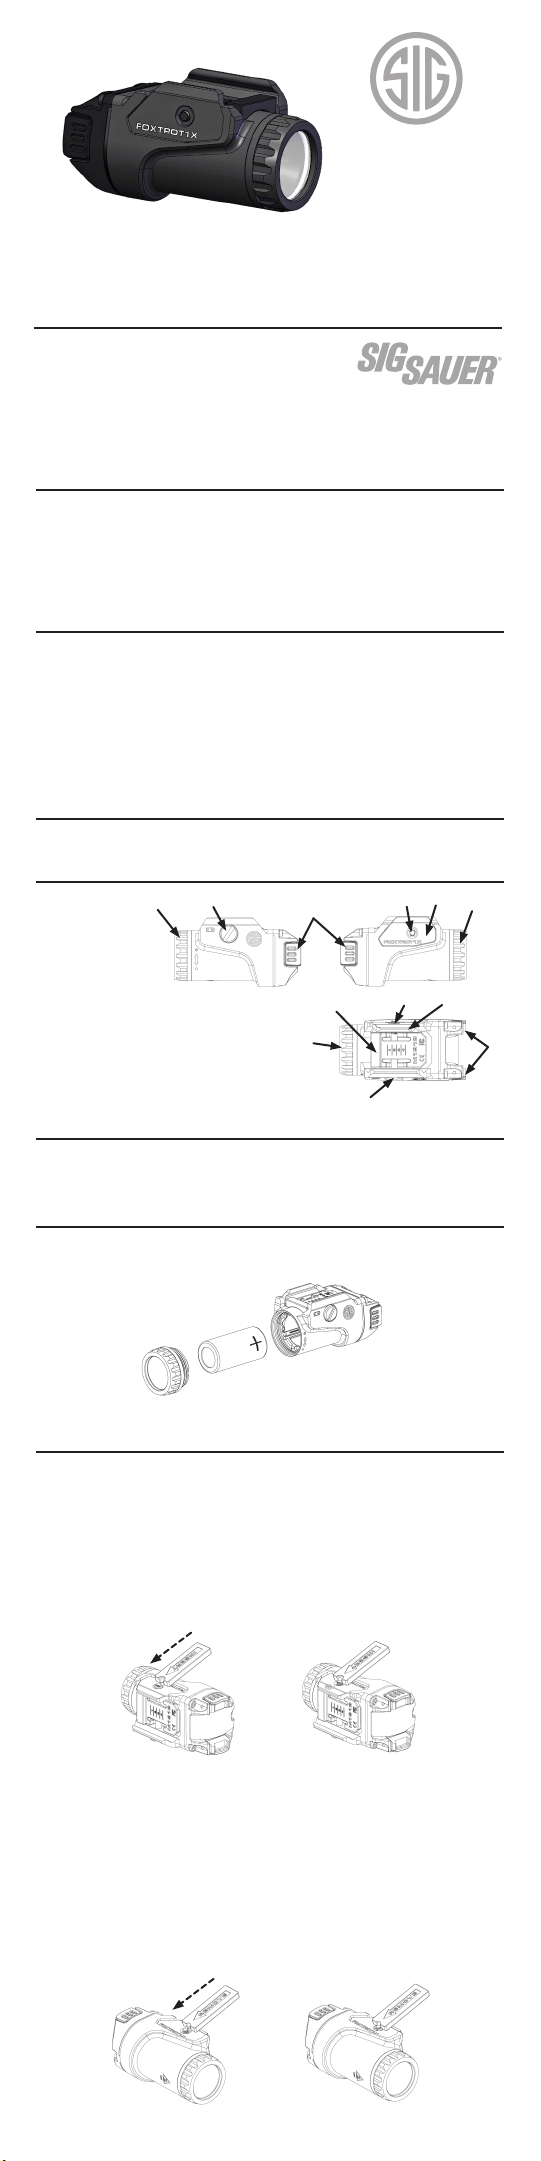
PRODUCT IDENTIFICATION:
A. Bezel
B. Cross Bolt
C. Activation Switch
D. E-Clip
E. Rail Mount Keeper
F. Rail Interface Adapter Insert
IMPORTANT:
Prior to installation, battery change, cleaning or maintenance, follow the firearm
operator’s manual to ensure the firearm is unloaded and pointed in a safe
direction.
BATTERY INSTALLATION/CHANGE
Turn the bezel counter-clockwise completely to remove it. Insert a fresh CR123A
lithium primary battery into the battery compartment of the flashlight, positive (+)
end first (Fig. 1). Replace the bezel and turn it clockwise until fully tightened.
SELECTING THE PROPER RAIL INTERFACE INSERT
The FOXTROT1X comes with 2 sliding rail interface insert pieces. One is
marked M1913 and is meant for any MIL-STD 1913 or similar rail. The other
insert piece is marked OTHER and is meant for pistols with non-MIL-STD 1913
rail designs. To change out the rail interface insert piece, the FOXTROT1X must
be completely disconnected from the rail.
1. Turn the cross bolt head clockwise with a athead screwdriver until the
small E-clip is exposed on the other end of the bolt.
2. Use the included E-clip tool (with the word REMOVE face down) to push
the E-clip o the end of the cross bolt (Fig. 2 & 3), taking care not to lose
the small E-clip.
3. Next, turn the cross bolt head counter-clockwise until the cross bolt can
be pulled completely out, taking care not to lose the wave spring that is
on the cross bolt, or the rail mount keeper.
4. Test both rail interface insert pieces to determine which one has a recoil
lug that ts securely into a slot on the rearm rail with the least amount
of free play.
5. Put the correct rail interface insert piece into the slot on top of the light,
reinsert the cross bolt with wave spring through the rail insert piece and
thread it clockwise into the rail mount keeper.
6. Turn the cross bolt head clockwise completely, to expose the groove on
the end of the cross bolt. Use the E-clip tool (with the word INSTALL face
down) to slide the E-clip onto the groove on the end of the cross bolt (Fig.
4 & 5).
ABCA
DE
A
D
FE
B
C
FIGURE 1.
FIGURE 3.
FIGURE 2.
FIGURE 5.
FIGURE 4.

For Product Service on this model,
Please Call 603-610-3000
27100 SW Parkway Ave.
Wilsonville, OR 97070 USA
sigsauer.com
P/N 7403260-01 R00
SIG SAUER Electro-Optics Innite Guarantee™
Sig Sauer has manufactured the most rugged, dependable
high-performance firearms for over two centuries. Our heritage
of design, engineering and precision-manufactured quality
predates the existence of any other optics company worldwide.
We understand the importance of quality in the line of fire, at
the shooting range or on your next hunt. Sig Sauer Electro-Optics had to earn
the right to wear that badge and the Infinite Guarantee has your back, forever.
Period.
We will repair or replace your SIG SAUER product in the event it becomes
damaged or defective, at no charge to you. If we cannot repair your product, we
will replace it with a product in perfect working order of equal or better physical
condition. It doesn’t matter how it happened, whose fault it was, or where you
purchased it.
SIG SAUER Innite Guarantee™
• Unlimited Lifetime Guarantee
• No Receipt Required
• Fully Transferable
• No Time Limit Applies
• No Warranty Card Required
• No Charge
If you ever have a problem, no matter the cause, we promise to take care of you
when it counts. Please note that our Infinite Guarantee does not provide
coverage for intentional damage, misuse, cosmetic damage that does not affect
the performance of the optic, loss, theft or unauthorized repair or modification.
Excludes electronic components.
SIG SAUER Electronic & Tritium Component
Limited 5-Year Warranty
For components not included under the SIG SAUER®Infinite
Guarantee™, this warranty covers any defects in materials
and workmanship in the electronic and Tritium components
of illuminated riflescopes/sights, pistol sights, electronic sights, flashlights,
lasers, binoculars, spotting scopes, and rangefinders. This warranty lasts for
five years from the date of manufacture. If, during that five-year period, these
products are found to have electronic or Tritium component defects in materials
or workmanship, SIG SAUER will repair your product, at no charge to you. If we
cannot repair your product, we will replace it with a product in perfect working
order of equal or better physical condition.
I
N
F
I
N
I
T
E
G
U
A
R
A
N
T
E
E
S
I
G
S
A
U
E
R
L
I
M
I
T
E
D
5
Y
E
A
R
W
A
R
R
A
N
T
Y
E
L
E
C
T
R
O
N
I
C
&
T
R
I
T
I
U
M
FOXTROT1X SPECIFICATIONS
Dimensions 2.4” L x 1.2” W x 1.3” H
Weight without battery 1.8 oz
Peak Lumen Output 450
Battery (1) CR123A Lithium
Activation Switch Type Side Switches w/ Momentary and
Latching Modes
Water Resistance IPX7
NOTICE: Export restrictions may apply –
This product may be controlled either by the ITAR or EAR.
WARNING:
CANCER AND REPRODUCTIVE HARM—www.P65warnings.ca.gov
INSTALLATION:
1. Use a athead screwdriver to turn the cross bolt head counterclockwise
until it is stopped by the E-clip on the end of the bolt.
2. The rail interface insert piece can be slid forward or back in 4 micro-
adjustment positions, for maximum location adjustment of the light on
the rail.
3. Press the head of the cross bolt to open up the rail clamp to it’s maximum
width.
4. Place the xed side of the rail clamp against the rearm rail and swing
the light into position until the recoil lug of the rail interface insert piece is
resting completely inside a slot in the rearm rail and release the tension
on the cross bolt head so that the rail mount keeper grabs onto the rail.
5. While pushing forward on the FOXTROT1X (toward the rearm muzzle),
turn the cross bolt head clockwise completely until the FOXTROT1X is
secured onto the rail and cannot be moved forward or back.
OPERATION:
The FOXTROT1X has press-in activation switches on both sides of the flashlight
housing. There are 2 modes of operation:
• Momentary Mode - Press and hold either activation switch. The light will
stay on until you release the activation switch.
• Latching Mode - Press and release either activation switch within 1/4
second. The light will stay on continuously until either activation switch is
pressed and released again.
The FOXTROT1X contains a lockout feature, to prevent unintended activation
of the light during storage or transport when a battery is installed. Turn the
bezel approximately 1/4 turn counterclockwise. Press either activation switch, to
determine if the lockout feature is properly set. The light should not turn on. If it
does, continue turning the bezel counterclockwise until the light turns off.
The FOXTROT1X will produce its peak brightness output upon initial activation,
when using a fresh battery. If left on continuously, the light will get very warm and
the brightness will gradually taper down over time, but will continue to produce
usable levels of light for over 1.5 hours, or until a fresh battery is installed.
CLEANING & MAINTENANCE:
After repeated fire, the lens may become clouded with gunpowder residue. For
best results, it is recommended that this area be cleaned, along with the firearm,
after each use. To clean the lens, follow these steps:
1. Keep rearm pointed in a safe direction
2. Ensure rearm is unloaded
3. Conrm light is o
4. In a small circular pattern use a soft, degreased, lint-free cloth to clean
the lens. Be sure to clean around lens edge.
Firearm should be cleaned and lubricated exactly as directed in your firearm
owner’s manual. Submerging, Flushing, and or Excess lubrication, can interfere
with the proper function of both firearm and FOXTROT1X™ Pistol Mounted
White Light.
Table of contents
Other Sig Sauer Flashlight manuals

Popular Flashlight manuals by other brands

Larson Electronics
Larson Electronics EXP-LED-F4W-R2 instruction manual

Planet Bike
Planet Bike DUAL BLAZE 1500 quick start guide

SKF
SKF TKRS 10 Instructions for use

Astro Pneumatic
Astro Pneumatic 50SLMAX quick start guide

Bernzomatic
Bernzomatic TS3000 instruction manual

Weather X
Weather X FR1807 user guide


Ribimex
Ribimex Ribitech PRTORZ2/B User and maintenance manual

bauhaus
bauhaus 24508629 quick start guide

Sunforce
Sunforce 7,500,000 user manual

Silverline
Silverline Rechargeable Torch Original instructions

PNI
PNI Adventure F420 user manual

GreatLite
GreatLite Professional Series Operating instructions and parts manual