SIGNIFY EA2190 User manual

Vintage Turntable
AFTER SALES SUPPORT
1300 777 137
Model Number: EA2190
INSTRUCTION MANUAL

AFTER SALES SUPPORT
1300 777 137
MODEL: EA2190 PRODUCT CODE: 705469 05/2021
02
Welcome
Congratulations on choosing to buy a Signify product.
All products brought to you by Signify are manufactured to the highest standards of performance
and safety, and, as part of our philosophy of customer service and satisfaction, are backed by our
comprehensive 1 Year Warranty and customer technical support line.
This comprehensive instruction manual will provide you with a detailed guide on how to operate your
product and will also assist you in troubleshooting any problems that you may encounter.
If you have any queries regarding the use of this product, please feel free to phone our technical
support line for some friendly advice. If you are experiencing difculties or believe that the product
may have a technical fault, we will assist you in rectifying the issue. We can generally solve most
problems simply and quickly over the phone, so please always phone us rst!
We are sure that you will enjoy using this product and you can expect to gain years of service from
this product when it is used and maintained in the correct manner.

AFTER SALES SUPPORT
1300 777 137
MODEL: EA2190 PRODUCT CODE: 705469 05/2021
03
Contents
Welcome 02
Warranty Details 04
General Information and Safety Instructions 05
Product Overview 08
Getting Started 11
Before First Use 11
Removing the Turntable Protective Packaging 11
Power Input 11
Playback Modes 11
Playback Controls 11
Instructions 12
Handling Vinyl Records 12
Playing Vinyl Records 12
Playing a USB Drive/Micro SD Card 13
Using the Auxiliary Input 14
Using the Bluetooth® Connection 14
Using the FM Radio 15
Using the Headphone Output 16
Using the RCA Audio Output 16
Recording from the Turntable to USB Drive / Micro SD Card 17
Replacing the Stylus 18
Frequently Asked Questions 20
Repair and Refurbished Goods or Parts Notice 21
Other Useful Information 22
Cleaning and Maintenance 22
Storage 22
Responsible Disposal 23
Specication Table 23

AFTER SALES SUPPORT
1300 777 137
04
MODEL: EA2190 PRODUCT CODE: 705469 05/2021
The product is guaranteed to be free from defects in workmanship and parts for a period of 12
months from the date of purchase. Defects that occur within this warranty period, under normal
use and care, will be repaired, replaced or refunded at our discretion. The benets conferred by this
warranty are in addition to all rights and remedies in respect of the product that the consumer has
under the Competition and Consumer Act 2010 and similar state and territory laws.
Our goods come with guarantees that cannot be excluded under the Australian Consumer Law.
You are entitled to a replacement or refund for a major failure and for compensation for any other
reasonably foreseeable loss or damage. You are also entitled to have the goods repaired or replaced
if the goods fail to be of acceptable quality and the failure does not amount to a major failure.
Vintage Turntable
Warranty Details

AFTER SALES SUPPORT
1300 777 137
MODEL: EA2190 PRODUCT CODE: 705469 05/2021
05
RETAIN FOR FUTURE USE
Read this manual thoroughly before rst use, even if you are familiar with this type of product. The
safety precautions enclosed herein reduce the risk of re, electric shock and injury when correctly
adhered to. Please keep this user manual in a safe place along with your purchase receipt, warranty
card and carton for future reference. If applicable, pass these instructions and packaging on to the
next owner of the product. Always follow basic safety precautions and accident prevention measures
when using an electrical product.
1. Read all instructions before using the Turntable.
2. Never allow children to play with electrical equipment.
3. Do not use the Turntable for anything other than its intended use.
4. Before turning on, ensure the electrical voltage and frequency of the circuit corresponds to those
indicated on the rating label of the power adaptor.
5. Do not allow the Turntable, its power adaptor, cable or plug to come into contact with water or
any other liquid. Do not expose the Turntable to spills, drips or splashes from objects lled with
liquids, such as vases.
6. The Turntable is not intended to be operated by means of an external timer or any type of
separate remote control system.
7. The use of attachments not recommended or sold by the manufacturer is dangerous and may
cause re, electric shock or injury.
8. This Turntable is intended to be used indoors, for household use only. Do not use the Turntable
outdoors.
9. Keep the Turntable, its power adaptor, cable and plug out of direct sunlight.
10. Do not use an extension cable with this Turntable unless completely necessary. If an extension
cable is used, please ensure that it has a rating equal or exceeding the rating of the power
adaptor.
11. Do not pull or carry by the power adaptor cable, use the cable as a handle, close a door on
the cable, or pull the cable around sharp edges or corners. Keep the cable away from heated
surfaces.
12. Do not bend or damage the power adaptor cable.
13. Always unplug the Turntable when not in use. To disconnect from the power supply, rst ensure
the power switch is turned off, then grip the plug and pull from the power socket. Never pull by
the cable. The power plug must be removed from the power socket before cleaning, servicing, or
maintenance.
14. Unplug the Turntable in cases of electrical storms to protect against the possibility of power
surges damaging the Turntable.
General Information and
Safety Instructions

AFTER SALES SUPPORT
1300 777 137
MODEL: EA2190 PRODUCT CODE: 705469 05/2021
06
15. Never force the plug into an outlet.
16. Ensure that power sockets are not overloaded by operating several electrical products that
exceed the power supply of the socket. Review the rating label of each electrical product being
operated to ensure that they do not exceed the capacity of the power socket. Always turn off and
unplug any electrical product that is not being used.
17. Never operate the Turntable with wet hands, submerge under water or spill liquids into the unit.
18. Always turn the Turntable off and disconnect from the power source before cleaning. Never use
liquid cleaners, use a soft dry (or slightly damp) cloth to wipe over.
19. Do not place the Turntable near a hot burner (gas or electric), heat sources or open ames.
20. Improper installation may result in the risk of re, electric shock and/or injury to persons.
21. If the power adaptor or its cable or plug is damaged, do not use the Turntable. Please contact the
After Sales Support Line for assistance.
22. Always ensure that the power adaptor and cable are placed in a safe location to ensure that they
cannot be stepped on or cannot pose as a tripping hazard. Do not place any items on or against
the power adaptor and cable.
23. The manufacturer and retailer are not responsible for any eventual damages caused by improper
or faulty use.
24. The Turntable and its power adaptor have no user serviceable parts contained within (with the
exception of the stylus). Do not attempt to repair, disassemble or modify the Turntable or its
power adaptor.
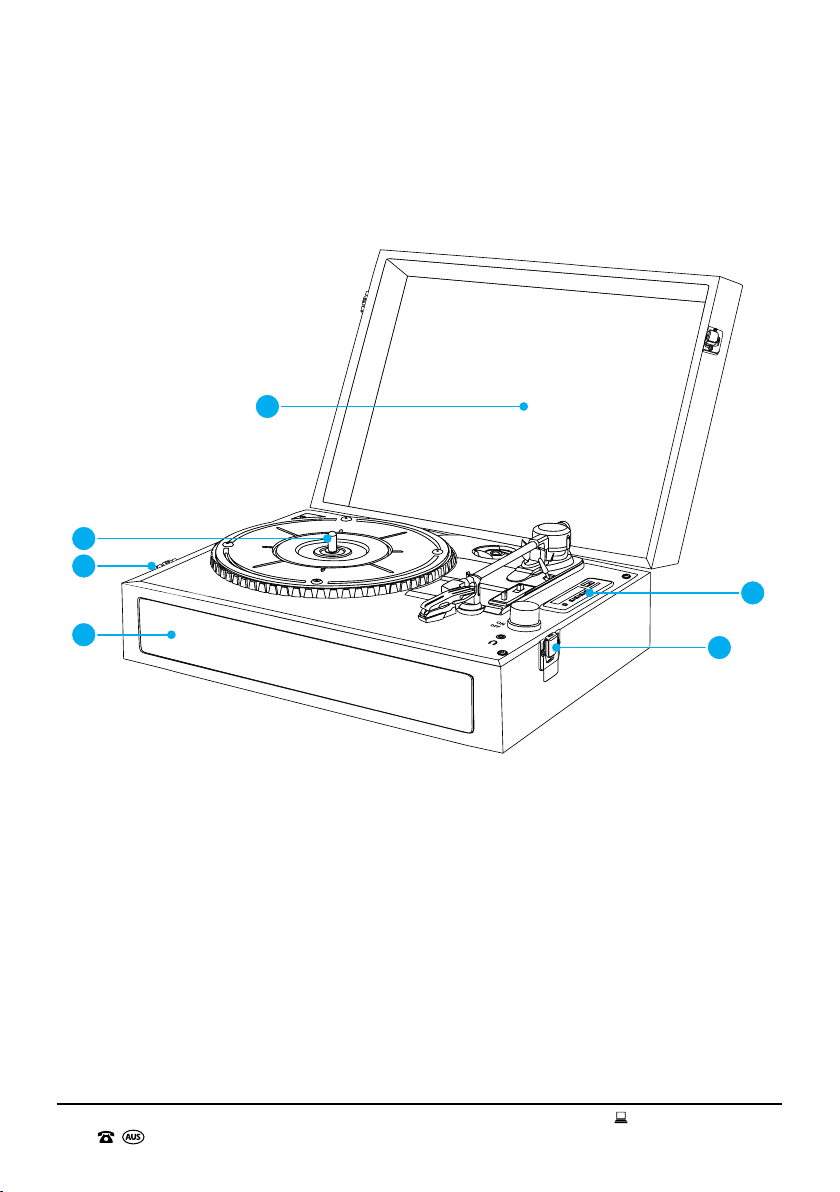
NOTE: See page 18 for further details on how to replace the stylus.
25. This Turntable is not intended for use by persons (including children) with reduced physical,
sensory or mental capabilities or lack of experience and knowledge, unless they have been given
supervision or instruction concerning use of the Turntable by a person responsible for their safety.
Children should be supervised to ensure they do not play with the Turntable.
26. Ensure that all packaging and plastic bags that were included in the Turntable gift box are kept
out of reach from children to avoid potential danger of suffocation.
27. Do not use the Turntable on an unstable surface.
28. The Turntable must ONLY be powered by the power adaptor that is supplied with the product. Do
not use any other power adaptor. If you experience difculties with the power adaptor supplied,
please contact the After Sales Support Line for assistance.
29. Be extremely careful when unpacking or relocating the Turntable and its power adaptor. Ensure
that the Turntable and power adaptor are not dropped, bumped or have excessive force applied
to it. Impacts such as these can damage the product and its internal components.
30. We recommend that, where possible, to avoid moving the unit unnecessarily once placed.
General Information and Safety
Instructions (cont.)

AFTER SALES SUPPORT
1300 777 137
MODEL: EA2190 PRODUCT CODE: 705469 05/2021
07
31. For the protection of the Turntable, we recommend that it is placed on a protected surface to
prevent any damage.
32. If the Turntable has been exposed to strong uctuations in temperature (for example, after
transport), do not switch it on immediately. Moisture and condensation could damage the
equipment. Do not switch on the equipment until it has reached room temperature.
33. The Turntable should always be repacked in its original packaging whenever transporting to
prevent any possible damage to the device.
34. Where the mains plug or an appliance coupler is used as the disconnect device, the disconnect
device shall remain readily operable.
General Information and Safety
Instructions (cont.)

AFTER SALES SUPPORT
1300 777 137
MODEL: EA2190 PRODUCT CODE: 705469 05/2021
08
Front View
1. Turntable Lid
2. Turntable Platter
3. Speakers
4. LED Control Panel (for USB drive / Micro SD card playback)
5. Lock Latches
Product Overview
1
4
5
2
3
5

AFTER SALES SUPPORT
1300 777 137
MODEL: EA2190 PRODUCT CODE: 705469 05/2021
09
Product Overview (cont.)
Turntable
1. Turntable Platter
2. Spindle
3. 45 RPM Adaptor
4. Cue Lever
5. LED Control Panel (for USB drive/Micro SD
card playback)
6. Tone Arm
7. Speed Selection Switch (33, 45, 78 RPM)
8. Auto Stop ON/OFF Switch
9. Tone Arm Lock
10. Power/Volume Dial
11. Headphone Output
12. Stylus
1
6
5
8
9
12
10
11
7
2 3 4

AFTER SALES SUPPORT
1300 777 137
MODEL: EA2190 PRODUCT CODE: 705469 05/2021
10
Product Overview (cont.)
Front and Rear Control Panels
1. LED Display Screen
2. AUX Input
3. Button
4. Button
5. Button
6. M(Mode) Button
7. Micro SD Input
8. USB Input
9. FM Antenna
10. RCA Audio Output
11. DC Power Input
Included (not pictured):
1x Power Adaptor, 1x Instruction Manual and 1x Warranty Card.
2
1
3 4 5 6
7
8
10 119

AFTER SALES SUPPORT
1300 777 137
MODEL: EA2190 PRODUCT CODE: 705469 05/2021
11
Before First Use
Prior to using your Turntable, please read all safety and operating instructions thoroughly. Please
ensure you follow the steps below before using this device. We recommend you keep the original
packaging for storing your Turntable when not in use.
Removing the Turntable Protective Packaging
1. Unlock the Lock Latches on the sides of the Turntable, and lift the Turntable Lid to reveal the
Turntable Platter.
2. Peel off the protective tape and remove the twist tie from the Tone Arm.
3. Remove the protective cover from the stylus.
Power Input
Once all packaging has been removed, insert the Power Adaptor into a power socket and connect
the other end to the DC Power Input (rear panel of the unit) and switch the power socket on.
Playback Modes
There are six playback options available for use in the Turntable being; Turntable, USB, Micro SD, FM
Radio, Bluetooth®and AUX. Each playback mode is explained in the following pages allowing you to
enjoy listening to your music from a wide variety of formats and sources.
The default playback mode is the Turntable mode and is shown on the LED Display Screen as -PHO.
Press the Mbutton to scroll through the available playback modes, noting that some modes will not
be selectable unless external media sources are connected. (USB, Micro SD and AUX).
When an external source is connected such as a USB, Micro SD card or AUX cable the LED Control
Panel will automatically select the relevant playback mode. If the USB drive or Micro SD card have
music stored in folders, these will not be recognised by the Turntable. The music will play in the order
it is stored on the USB drive or Micro SD card.
Playback Controls
The below controls only apply to music playback through the USB drive and Micro SD Card formats.
Button Function
Skip to previous track / rewind through track in progress
Play / Pause or delete track
Skip to next track / fast forward through track in progress
MScroll through the available playback modes
WARNING: During playback of tracks on USB drive or Micro SD, a fast double press of the Play /
Pause button will delete the track in progress.
Getting Started

AFTER SALES SUPPORT
1300 777 137
MODEL: EA2190 PRODUCT CODE: 705469 05/2021
12
Handling Vinyl Records
NOTE: Only handle vinyl records with clean hands and hold them by the edge or the label. Do not
touch the record grooves.
• Keep your vinyl records in protective sleeves when not in use to avoid dust and scratches.
• Store vinyl records upright. Records stored horizontally may bend and warp.
• Avoid placing vinyl records in direct sunlight, close to any heat source (radiator, stoves etc.)
or in a location that may be subject to vibration, excessive dust, heat, cold or moisture.
• To clean a vinyl record, gently wipe the surface in a circular motion using a soft anti-static
cloth.
Playing Vinyl Records
To play a vinyl record, follow the steps below.
1. Turn the Power/Volume Dial clockwise until you hear a ‘click’ sound. The LED Display Screen
will show the welcome message HI briey, then show -PHO indicating that the Turntable mode is
active. This is the default setting for the Turntable.
IMPORTANT: Before playing a vinyl record, turn down the volume of the Turntable to avoid
possible loud crackling noises. The crackling noises made by the stylus coming into contact with
the vinyl record could damage the unit. Wait until the stylus is completely placed on the vinyl
record, and then turn up the volume.
2. Set the Auto Stop Switch to the ON position. The unit will now be set to automatically stop after
the completion of play of the vinyl record. If the Auto Stop Switch is set to the OFF position, the
unit will not stop automatically when the vinyl record is completed and the Turntable Platter will
constantly spin.
NOTE: While the Turntable Platter is spinning no other playback mode can be activated.
3. Choose the desired playing speed using the Speed Selection Switch (No. 7 on the Turntable
parts list). Select between 33, 45 and 78 RPM.
NOTE: When playing a 45 RPM record, use the included 45 RPM adaptor on the record spindle.
4. Carefully place the vinyl record on the Turntable Platter.
5. Unlock the Tone Arm Lock by moving it up and away from the Tone Arm itself.
6. Raise the Tone Arm using the Cue Lever, or carefully with your hand.
7. Place the Tone Arm vertically over the rst track or over the outer edge of the vinyl record. The
Turntable Platter will start spinning if the Auto Start Stop switch is set to the ON position.
Instructions

AFTER SALES SUPPORT
1300 777 137
MODEL: EA2190 PRODUCT CODE: 705469 05/2021
13
8. Lower the Stylus onto the vinyl record using the Cue Lever.
9. Turn the Power/Volume Dial clockwise to increase the volume , or turn the Power/Volume Dial
anticlockwise to decrease the volume.
10. To stop playing, lift the Tone Arm using the Cue Lever or your hand and place it back into the
Tone Arm rest. Secure the Tone Arm once more by engaging the Tone Arm Lock. Cover the Stylus
with the protective cover if needed.
Playing a USB Drive/Micro SD Card
You can play digital music from a USB drive or Micro SD card using the Turntable.
1. Turn the Power/Volume Dial clockwise until you hear a ‘click’ sound. The LED Display Screen
will show the welcome message HI briey, then show -PHO indicating that the Turntable mode is
active. This is the default setting for the Turntable.
NOTE: The Tone Arm must be in the Tone Arm rest or the Turntable will automatically select the
Turntable playback mode. Ensure that the Auto Stop Switch is in the ON Position.
IMPORTANT: Before playing music/media from a USB drive or Micro SD card, turn down the
volume of the Turntable to avoid a possible loud output from the speakers. Wait until the music/
media is playing and then turn up the volume.
IMPORTANT: Before inserting a USB drive or Micro SD card into the unit, ensure that the
Turntable Platter is not spinning. While the Turntable Platter is spinning no other playback modes
can be selected.
2. Insert a USB drive or Micro SD Card into USB input or Micro SD input. The LED Display Screen
will briey show the -LOD message while the music loads.
NOTE: When inserting a Micro SD card into the Micro SD input, the top of the Micro SD card
should be facing away from the LED Display Screen. The Micro SD card can only be inserted in
the correct direction. Never force the Micro SD card into the Micro SD input.
3. Any music loaded on the storage device will then begin to play automatically.
4. Use the Playback Controls to pause or skip forwards and backwards through the stored tracks.
The Playback Controls can be seen on page 11 of the manual.
5. Once you have nished playback from a USB drive or Micro SD card press the Mbutton to scroll
through the other available playback modes.
NOTE: Ensure that before the USB drive or Micro SD card is removed from the LED Control Panel
that playback has been paused by pressing the Play/Pause button once.
Instructions (cont.)

AFTER SALES SUPPORT
1300 777 137
MODEL: EA2190 PRODUCT CODE: 705469 05/2021
14
Instructions (cont.)
Using the Auxiliary Input
The Turntable features a 3.5mm AUX input which allows audio devices a 3.5mm output such as CD
players, Smartphones, Tablets or Computers to be played through the units inbuilt speakers. To use
the AUX input, follow the steps below.
1. Turn the Power/Volume Dial clockwise until you hear a ‘click’ sound. The LED Display Screen
will show the welcome message HI briey, then show -PHO indicating that the Turntable mode is
active. This is the default setting for the Turntable.
NOTE: The Tone Arm must be in the Tone Arm rest or the Turntable will automatically select the
Turntable playback mode.
IMPORTANT: Before playing music/media from the desired device, turn down the volume of the
Turntable to avoid a possible loud output from the speakers. Wait until the music/media is playing
and then turn up the volume.
2. Connect one end of the AUX cable (not included) into the AUX input on the LED Control Panel of
the Turntable.
3. Connect the other end of the AUX cable into the desired media device.
4. Use the media device (not the Turntable) to control playback.
NOTE: The volume can be controlled on both the connected media device and the Turntable
itself.
Using the Bluetooth®Connection
The Turntable features a wireless Bluetooth®connection enabling music to be streamed directly
from compatible devices such as Smartphones, Tablets or Computers. Before using the Bluetooth®
connection you must rst pair your chosen device. Please follow the steps below to pair and use the
Bluetooth®connection.
Pairing your Bluetooth®enabled device
1. Turn the Power/Volume Dial clockwise until you hear a ‘click’ sound. The LED Display Screen
will show the welcome message HI briey, then show -PHO indicating that the Turntable mode is
active. This is the default setting for the Turntable.
NOTE: The Tone Arm must be in the Tone Arm rest or the Turntable will automatically select the
Turntable playback mode. Ensure that the Auto Stop Switch is in the ON Position.
2. Press the Mbutton to scroll through the available playback modes and select Bluetooth®playback
mode. The LED Display Screen will show the message bt that will be constantly ashing.
3. Switch on the Bluetooth®functionality on your device and scan for available connections. The
Turntable will be shown in the available connections as SIGTURN.

AFTER SALES SUPPORT
1300 777 137
MODEL: EA2190 PRODUCT CODE: 705469 05/2021
15
Instructions (cont.)
4. Select SIGTURN from the list. Depending on your device you may be prompted to enter a pass
code. If requested enter the code ‘0000’.
5. When the letters bt stop ashing on the LED Display Screen, your device has now been paired
and you can being using your connected device.
NOTE: If no device is paired the bt message shown on the LED Display Screen will constantly ash.
When a previously paired device is found it will automatically connect to the Turntable.
NOTE: The volume can be controlled on both the connected media device and the Turntable
itself.
NOTE: Use playback controls on your connected device to navigate through your music selections.
Using your previously paired Bluetooth®enabled device.
1. Turn the Power/Volume Dial clockwise until you hear a ‘click’ sound. The LED Display Screen
will show the welcome message HI briey, then show -PHO indicating that the Turntable mode is
active. This is the default setting for the Turntable.
NOTE: The Tone Arm must be in the Tone Arm rest or the Turntable will automatically select the
Turntable playback mode. Ensure that the Auto Stop Switch is in the ON Position.
2. Press the Mbutton to scroll through the available playback modes and select Bluetooth®
playback mode. The LED Display Screen will show bt.
3. Allow a few seconds for the Turntable to automatically connect to your previously paired
Bluetooth®device.
4. Once the connection is made the bt message will stop ashing on the LED Display Screen and
you can begin using your connected device.
Using the FM Radio
1. Turn the Power/Volume Dial clockwise until you hear a ‘click’ sound. The LED Display Screen
will show the welcome message HI briey, then show -PHO indicating that the Turntable mode is
active. This is the default setting for the Turntable.
NOTE: The Tone Arm must be in the Tone Arm rest or the Turntable will automatically select the
Turntable playback mode. Ensure that the Auto Stop Switch is in the ON Position.
IMPORTANT: Before playing music from the FM Radio, turn down the volume of the Turntable to
avoid a possible loud output from the speakers. Wait until the music is playing, and then turn up
the volume.

AFTER SALES SUPPORT
1300 777 137
MODEL: EA2190 PRODUCT CODE: 705469 05/2021
16
2. Press the Mbutton to scroll through the available playback options and select FM Radio playback
mode. The LED Display Screen will show the FM icon lit and the current frequency the Turntable is
tuned to in MHz.
3. Fully uncoil the FM antenna found on the rear panel. Adjust the position of the antenna if required
to acquire a clear signal.
4. Press and hold the button for about two seconds for the Turntable to automatically search and
store FM radio stations into the Pre-Sets memory. The Stations will be saved as P01, P02, and so
on until the scanning is complete and all available stations have been saved into the memory.
5. To scroll through the saved Pre-Set stations use the or buttons to move forwards to
backwards. When you advance through the saved station the LED Display Screen will briey show the
selected Pre-Set, then show the Frequency of the Pre-Set in MHz until another Pre-Sets is selected.
NOTE: If the FM radio mode will not appear while scrolling through the Moptions, please turn off
the Suitcase Turntable using the Power/Volume Dial and then turn it back on again. The FM Radio
mode should now appear in the Moptions.
Using the Headphone Output
The Turntable features a 3.5mm headphone output. When headphones or external speakers with a
3.5mm connection are attached to the Turntable via the headphone output, all sound will be diverted
to the headphones or external speakers, and no sound will be played via the inbuilt speakers. Ensure
that the 3.5mm plug is removed from the Turntable when required, to ensure that sound is played via
the unit's inbuilt speakers once again.
NOTE: There will be no output from the inbuilt speakers while there is any connection present in
the headphone output socket.
Using the RCA Audio Output
The Turntable features an RCA Audio Output located on the rear of the unit, which allows you to
connect the Turntable to external speakers. To use the RCA Audio Output, follow the steps below.
1. Turn the Power/Volume Dial clockwise until you hear a ‘click’ sound. The LED Display Screen
will show the welcome message HI briey, then show -PHO indicating that the Turntable mode is
active. This is the default setting for the Turntable.
2. Plug the AV connections of the RCA cable (not included) into the RCA Audio Output.
NOTE: The red and white coloured AV connections should be connected to the matching red and
white AV connection sockets.
3. Insert the other end/s of the RCA cable (not included) into the audio input of the external speakers.
NOTE: The volume can only be controlled on the connected speakers.
Instructions (cont.)

AFTER SALES SUPPORT
1300 777 137
MODEL: EA2190 PRODUCT CODE: 705469 05/2021
17
Instructions (cont.)
Recording from the Turntable to USB Drive / Micro SD Card
The Turntable features a recording function allowing for vinyl records to be recorded to USB drive or
Micro SD card. To use the recording function, follow the steps below.
1. Turn the Power/Volume Dial clockwise until you hear a ‘click’ sound. The LED Display Screen
will show the welcome message HI briey, then show -PHO indicating that the Turntable mode is
active. This is the default setting for the Turntable.
2. Insert either a USB drive or Micro SD card into the LED Control Panel.
NOTE: If there is any music already present on the storage device the Turntable will automatically
select the relevant playback mode and begin playback automatically. Press the Mbutton to scroll
back to Turntable mode shown as -PHO on the LED Display Screen.
3. Prepare the Turntable and vinyl record for playback by following steps 1 through 7 on page 12 for
vinyl record playback. Do not lower the stylus at this point.
IMPORTANT: When the recording begins it will create a new track and retain the music already
on the USB drive or Micro SD card. Ensure there is adequate storage room for the length of your
recording on the USB drive or Micro SD card.
4. With the vinyl record spinning, press and hold the Mbutton until you hear a single beep sound.
The LED Display Screen will show the rEc message briey and the recording time will appear.
5. Lower the Stylus to the vinyl record using the Cue Lever. The audio output from the vinyl record
will now be captured on either USB drive or Micro SD card.
6. Once you have nished recording, lift the Tone Arm using the Cue Lever to stop the sound production.
7. Press and hold the M button once more until two beeps are heard. The LED Display Screen will
show the StOP message briey and the recording will immediately stop.
Deleting Music from USB Drive / Micro SD Card
You can manage the stored music on the USB drive and Micro SD card directly from the Turntable. To
clear the stored music from either a USB drive or Micro SD card follow the steps below.
1. Turn the Power/Volume Dial clockwise until you hear a ‘click’ sound. The LED Display Screen
will show the welcome message HI briey, then show -PHO indicating that the Turntable mode is
active. This is the default setting for the Turntable.
2. Insert either a USB drive or Micro SD card into the LED Control Panel. Playback will begin automatically.
3. Select the track you wish to delete. Wait for playback of the selected track to begin.
4. Once the track is playing press and hold the until two beeps are heard. The LED Display Screen
will shown the dEl message briey. The track that was playing has now been permanently deleted.
5. Repeat the above steps 3 through 4 until you have deleted the required tracks.

AFTER SALES SUPPORT
1300 777 137
MODEL: EA2190 PRODUCT CODE: 705469 05/2021
18
Instructions (cont.)
1
2
3
4
Replacing the Stylus
1. Unlock Tone Arm Lock by moving it up and away from the
Tone Arm itself.
2. Remove the protective cover from the stylus cartridge to
expose the needle.
3. Separate the cartridge from the cartridge holder.
4. Gently pull the audio-lines from the cartridge, taking care to
pull from the terminal connector and not the wire itself.
NOTE: Please exercise care whilst performing this operation
so as to avoid damaging the Tone Arm and audio-lines.
NOTE: Please ensure the Turntable has been turned OFF and
unplugged before attempting to replace the stylus.

AFTER SALES SUPPORT
1300 777 137
MODEL: EA2190 PRODUCT CODE: 705469 05/2021
19
Instructions (cont.)
5
6
7
8
5. Carefully insert the audio-lines into the new cartridge.
6. Make sure the audio-lines are not touching each other.
7. Carefully slide the cartridge into the cartridge holder.
8. Gently clip the cartridge into the cartridge holder.

AFTER SALES SUPPORT
1300 777 137
MODEL: EA2190 PRODUCT CODE: 705469 05/2021
20
Frequently Asked Questions
Q: Why is the Turntable not powering on?
A: Ensure that each end of the Power Adaptor has been correctly and securely connected, and
the power socket has been switched on.
Q: Why is there no sound coming from the speakers?
A: Ensure there is no cable connected to the Headphone input or the RCA Audio Output.
A: Check that the volume control is adjusted or that any connected digital devices have their
volume adequately set.
Q: Why is the Turntable not spinning?
A: If the Auto Stop Switch is set to the ON position the Turntable Platter will only spin once the
Tone Arm has been moved from the Tone Arm rest.
Q: Why is the sound distorted when playing a vinyl record?
A: The Stylus may be damaged. Remove and replace it with a new Stylus (see page 18 for
further details).
Q: Why is bt ashing on the LED Display Screen?
A: You have selected Bluetooth® playback and the Turntable is attempting to connect to a
previously paired device or is waiting for you to pair a new Bluetooth® enabled device.
Q: Why can I not connect via Bluetooth?
A: Check that your device has Bluetooth® switched on and that you are in range of the
Turntable.
Table of contents
Other SIGNIFY Turntable manuals