1. Disconnect AC power before servicing.
2. Refer to wiring diagram for proper connections.
3. All servicing should be performed by qualified personnel.
4. Consult your local building code for approved wiring and
installation.
5. Do not use outdoors.
6. Do not use this equipment for other than intended use.
7. Do not let power cords touch hot surfaces.
8. Mount and secure the fixture at a location and height
to avoid ready access and tampering by unauthorized
persons.
9. The use of accessory equipment is not recommended by
the manufacturer and may cause an unsafe condition.
IMPORTANT SAFEGUARDS READ AND FOLLOW ALL SAFETY INSTRUCTIONS
SAVE THESE INSTRUCTIONS
4”
CTAGON
J- BOX
B
R
ADAPTOR
PLATE
PUSH TO TEST
AC POWER
CONNECTOR
120/277 VAC
SET SCREWS #6-32 X 1/4”
(2 SUPPLIED)
LAMP HOUSING
SCREWS #8-32 X 5/16”
FLATHEAD(2 PLACES)
POLARIZED BATTERY
CONNECTOR
TEST PANEL
CONNECTOR
LAMP
CONNECTOR
LED LAMP
ASSEMBLY
MOUNT SCREWS #8-32 X 1/2”
(2 SUPPLIED)
GND
N
UN-SWITCHED
EM POWER
SWITCHED
SEC POWER
(SW OPTION
DG MODELS)
WALL
WALL MOUNT
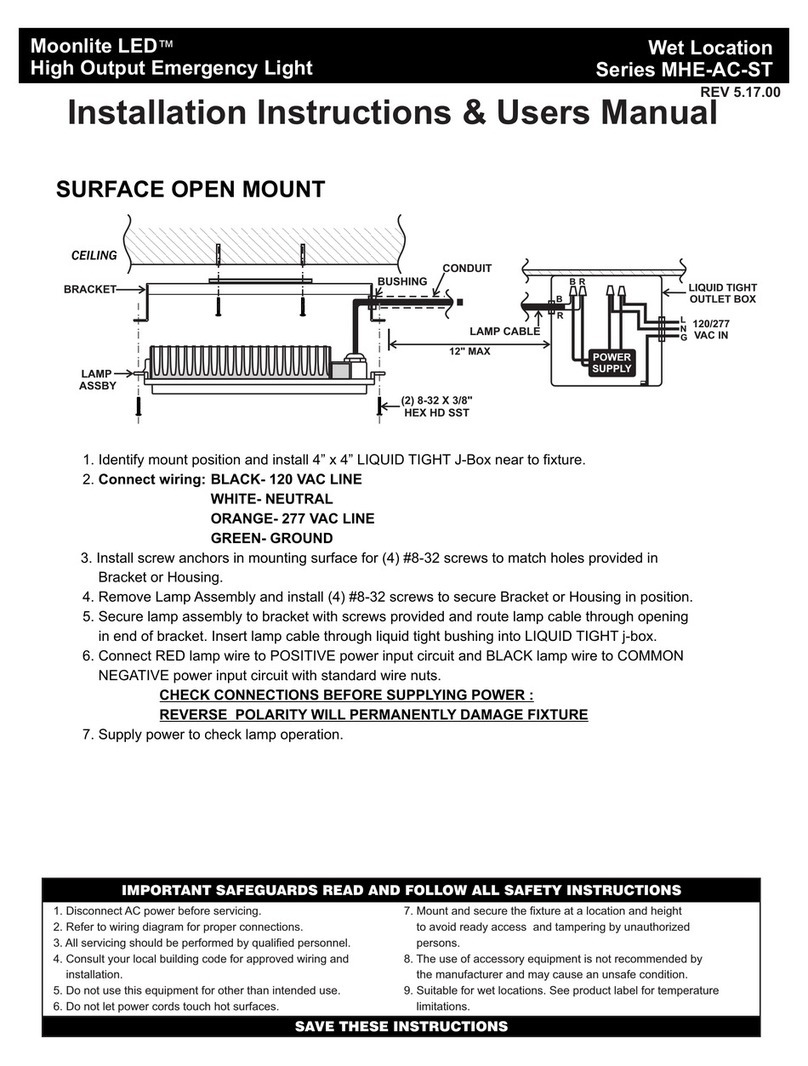
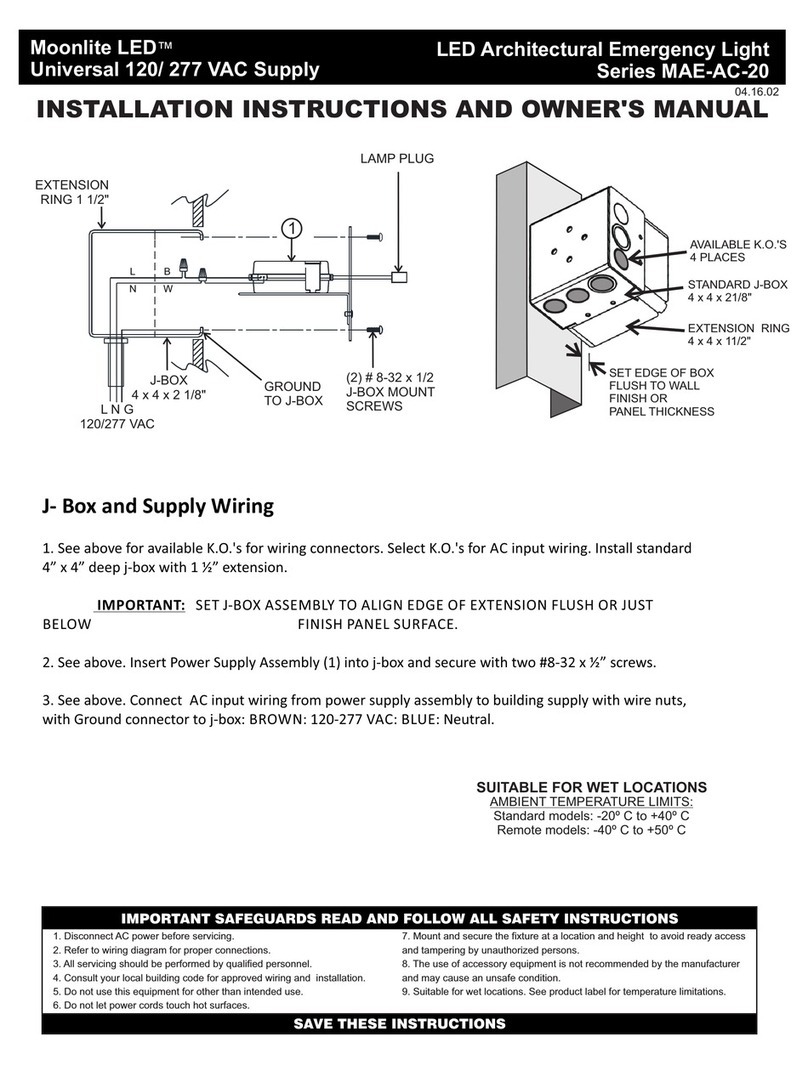
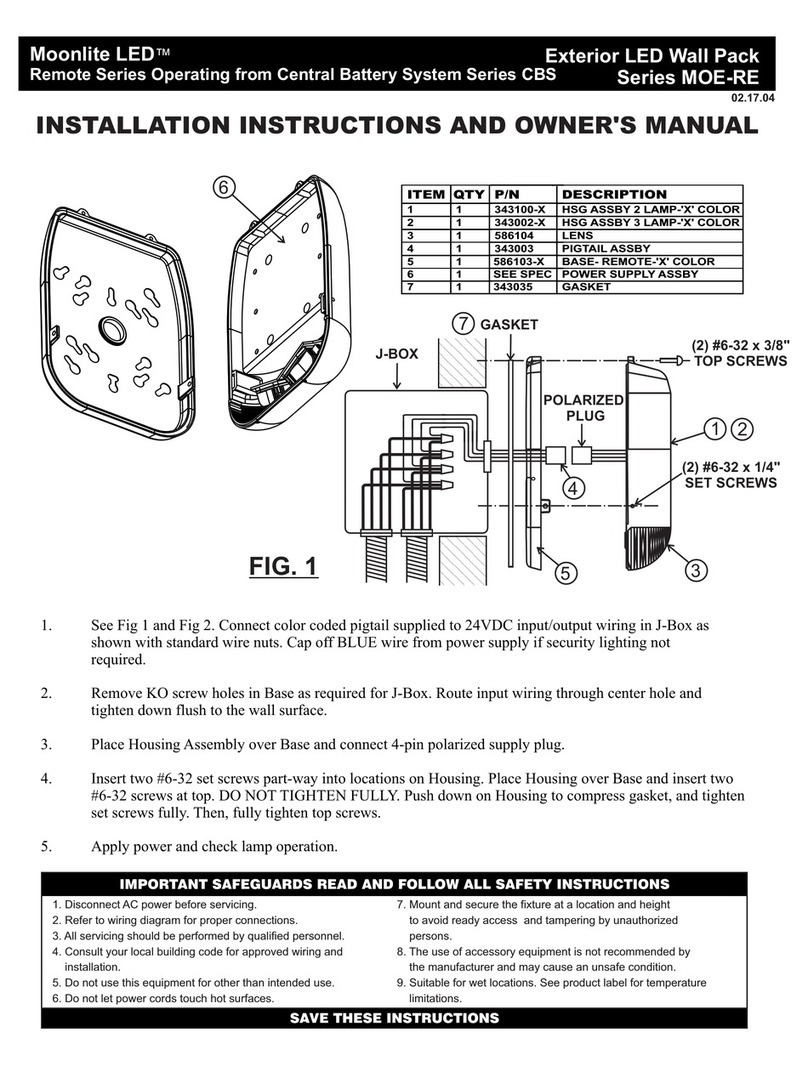
1. Install 4 x 4 J-box as shown. Route AC Line, Neutral and Ground into box. Secure supplied Adaptor Plate to
J-Box with (2) #8-32 screws and connect supplied lamp wiring pigtail to AC wiring with standard wire nuts.
2. Separate Canopy Plate from Housing by loosening (2) #6-32 set screws. Secure Canopy Plate to Adaptor
Plate and route pigtail plug through center hole.
3. To connect the battery, remove (2) #8-32 Flat Head screws in lamp housing and slide the housing down to
expose the battery plug and connect the plug. NOTE: lamps will turn on until AC power is supplied. Slide
housing back into position and replace the (2) screws.
4. Connect plug on AC pigtail to matching plug on fixture (lamps will turn OFF is AC power is supplied). Push
plug into j-box cavity, locate the fixture on the Canopy Plate, and tighten (2) #6-32 screws to secure in position.
5. Supply AC power to check lamp operation, the CHARGE indicator should show GREEN and lamps will illuminate
when PUSH TO TEST switch is pressed. Allow 12 -24 hrs for full battery charge
P/N DESCRIPTION
POWER SUPPLY LAMP ASSBY- 2 LAMP
POWER SUPPLY LAMP ASSBY- 3 LAMP
BATTERY PACK 3.6 V
BATTERY PACK 4.8 V
INSTALLATION INSTRUCTIONS AND OWNER'S MANUAL
Surface Mount LED Down Light
Series MLSBB
Moonlite LED™
Emergency & Security Light
REV 03.20.07
W
3401881-0
3401881-2
3000645-0
3001459-0
LENS
POWER SUPPLY
LAMP ASSEMBLY
HOUSING
CANOPY
PLATE
BATTERY
PACK

