SIGURO SGR-KM-M320W Operating instructions

SGR-KM-M320W
SGR-KM-M350W
Stand Mixer
Stand Mixer
Küchenmaschine
Kuchyňský robot
Kuchynský robot
Konyhai robotgép
EN Translation of the operating instructions from the original language.
DE Übersetzung der Bedienungsanleitung aus der Originalsprache.
CZ Návodkpoužitívoriginálnímjazyce.
SK Prekladnávodunapoužitiezoriginálnehojazyka.
HU Ahasználatiutasításfordításaeredetinyelvről.

ENGLISH 6
Safety information 6
Technical specications 10
Before rst use 10
Assembly and disassembly 10
Use 12
Cleaning and maintenance 15
DEUTSCH 17
Sicherheitshinweise 17
Technische parameter 21
Vor der erstverwendung 21
Montage und demontage 21
Verwendung 23
Reinigung und wartung 27
ČESKY 29
Bezpečnostní informace 29
Technické parametry 33
Před prvním použitím 33
Složení a rozložení 33
Použití 34
Čištění a údržba 38
SLOVENSKY 40
Bezpečnostné informácie 40
Technické parametre 44
Pred prvým použitím 44
Zloženie arozloženie 44
Použitie 45
Čistenie a údržba 49
MAGYAR 51
Biztonsági információk 51
Műszaki paraméterek 55
Az első használatba vétel előtt 55
A konyhai robot össze- és szétszerelése 55
Használat 56
Tisztítás és karbantartás 60

1
2
3
4
5
6
7
8
9
10
11
12 13 14
SGR-KM-320W

15
16
17
18
19
20
21
22
23
24
SGR-KM-350W
+ + +
28
29
30
25
26
27

EN
EN - 6
Thank you for purchasing a SIGURO appliance. We are grateful for
your trust and we are pleased to introduce to you the appliance
on the following pages and acquaint you with all its functions and
uses.
We believe in a fair and responsible company, and therefore we only work
with suppliers who meet our strict criteria to protect the interests of employ-
ees, prevent their abuse and fair working conditions.
If you need help with extensive maintenance or repair of the product that re-
quires intervention in its internal parts, our authorized service center is avail-
able at siguro@alza.cz. You may also contact the vendor’s helpline. For your
convenience in solving potential issues with the product, the unied contact
points above can also be used for any complaints or post-warranty service.
SAFETY INFORMATION
Please read this manual carefully before
use and keep it for future reference.
1. This appliance is not intended for use by children. Keep the appliance
and its power cord out of the reach of children.
2. The appliance may be used by persons with reduced physical, sensory
or mental capabilities, or lack of experience and knowledge, provided
they have been given supervision or instruction concerning use of the
appliance in a safe manner and understand the potential hazards.
3. Children must not play with the device.
4. Cleaning and user maintenance must not be done by children.
5. If the power cord is damaged, it must be replaced by the manufacturer,
its service agent or similarly qualied persons in order to avoid a
dangerous situation.
6. WARNING: Risk of injury from improper use.
7. Pay attention when handling the chopping blades, especially when
removing the blades from the container, emptying the container and
during cleaning. The blades are very sharp and there is a risk of serious
injury.
8. Clean the food contact accessories according to the instructions in the
chapter "Cleaning and maintenance" after each use. Keep the appliance
and its accessories clean.
9. Disconnect the appliance from the power supply if left unattended and
before assembly, disassembly or cleaning.
10. Before replacing accessories or accessible parts that move during use,
switch off the appliance and disconnect it from the power supply.
11. Use only the accessories supplied with the appliance or those specically
recommended by the manufacturer. The use of accessories other than
ENGLISH

EN
EN - 6 EN - 7
ENGLISH
those supplied or recommended is prohibited.
12. This appliance is intended for household use only and for processing
common household ingredients. Do not use the appliance for any
purpose other than that for which it is intended. The appliance is not
intended for commercial or laboratory use.
13. Do not use the appliance outdoors.
14. Before connecting the fork of the power cord to a power outlet, make
sure that the voltage listed on the power cord's rating plate matches the
voltage in your power outlet. Plug the power cord plug into a properly
grounded outlet. Do not use extension cords or plug adapters.
15. Unwind the power supply completely before plugging it in.
16. Do not let the power cord hang over the edge of a table or countertop,
touch hot surfaces, or become tangled. Do not place heavy objects on
the power cord.
17. To prevent electric shock, do not immerse the appliance, power cord or
plug in water or other liquid.
18. Do not touch the appliance, the power cord or the plug with wet or
damp hands.
19. We recommend connecting the appliance to a separate electrical circuit.
20. Always place the appliance on a stable, level and dry worktop at a
sufcient distance from the mains socket. Vibrations during operation
may cause unwanted movement of the appliance.
21. Do not place the appliance on or near heat sources such as an oven or
stove.
22. Do not use more than one type of attachment at the same time.
23. This appliance is not intended to be controlled by an external timer,
programmer, etc.
24. Ensure that the appliance is correctly assembled and that the arm is in
a horizontal position before switching on the appliance. The appliance is
equipped with a safety lock that prevents it from starting if the arm is not
folded down correctly.
25. This appliance is designed to process 1 kg of our in one batch. Do not
use it to process large quantities of our. We recommend dividing the
larger quantity into smaller portions.
26. The recommended maximum operation of the appliance under normal
load is 5 minutes. Do not use the appliance continuously for more than 10
minutes. Allow the appliance to cool for at least 10 minutes before further
processing.
27. Do not run the appliance empty. There's a risk of damage!
28. Do not tilt the arm while the appliance is in operation. There's a risk of
damage!
29. Regularly check the condition of the raw materials being processed.
If it is necessary to wipe down the walls or attachment, rst switch off
the appliance and disconnect it from the power supply. Wait for the
rotating parts to come to a complete stop. Unscrew the arm and use the
squeegee to wipe the sides of the container or the attachment.
30. If a foreign object falls into the container, switch off the appliance and
disconnect it from the power supply. Wait for the rotating parts to stop

EN
EN - 8
and then remove the object.
31. Do not leave the appliance unattended when switched on!
32. Do not put your hands or objects into the food processor container or the
blending container when the appliance is switched on.
33. Do not touch rotating parts of the appliance or attachments. Make sure
that foreign objects, loose pieces of clothing, hair, etc. do not get near
them. There is a risk of serious injury!
34. Do not handle hot or boiling liquids or food. Let them cool before
processing.
35. The grinder is not intended for grinding bones, nuts in the shell, hard raw
materials, etc.
36. Take particular care when handling the grinding blade of the meat
grinder and the graters. Serious injury is imminent.
37. Always use the supplied pressure plates to push the ingredients through
the lling opening of the meat grinder or grating attachment. Do not
use your ngers, hands or other objects.
38. Switch off the appliance and unplug it from the mains socket if you are
not going to use it or leave it unattended.
39. Disconnect the power cord from the socket by pulling the plug. Do not
disconnect by pulling on the power lead. There is a risk of damaging the
power cord or the power socket.
40. Clean the appliance and its accessories according to the instructions in
the "Cleaning and maintenance" section. Clean the appliance and its
accessories after each use to prevent dirt build-up, unpleasant odours
and damage to the appliance and accessories.
41. Check the appliance and accessories regularly for damage. Do not use
the appliance if it is damaged or the accessories are damaged. You're in
danger of serious injury!
42. Replace damaged accessories with new ones. Have a damaged
appliance or one that is not working properly checked and repaired.
Contact an authorized service center.

EN
EN - 8 EN - 9
Overview
1 Folding arm handle
2 Front cover
3 Control panel and display
4 Protective bowl cover
5 Stainless steel bowl
6 Anti-slip feet
7 Top cover
8 Folding arm
9 Appliance base
10 Folding arm lock
11 Speed controller
12 Flat whisk
13 Kneading hook
14 Whisking whisk
Blender (SGR-KM-M350W only)
15 Inner cap
16 Blender container lid
17 Blender container
18 Container handle
19 Knife unit (located inside the container)
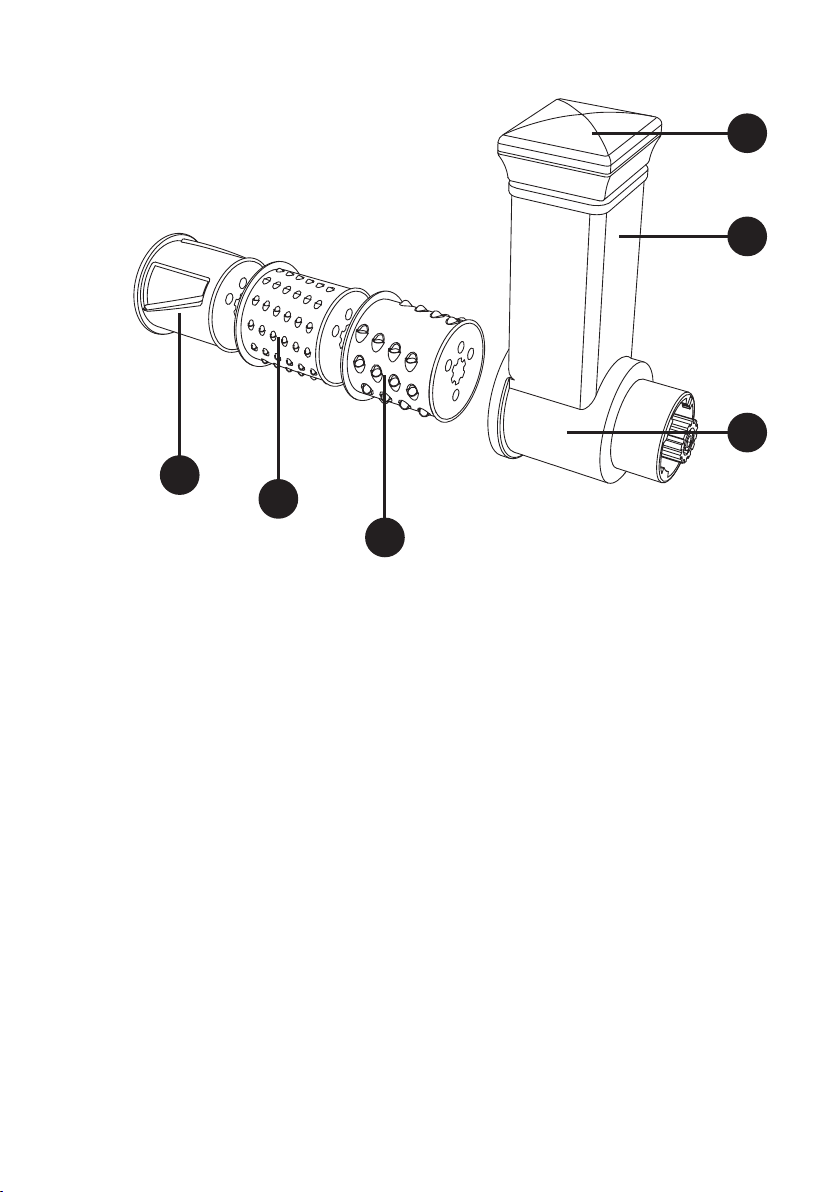
Meat grinder (SGR-KM-M350W only)
20 Push tube
21 Food tray
22 Filling tube
23 Screw cap
24 Grinding chamber
Not shown: worm shaft, grinding blade, grinding discs (coarse, ne, extra ne)
Grater (SGR-KM-M350W only)
25 Push tube
26 Filling tube
27 Grater chamber
28 Grater for slicing
29 Fine grater
30 Coarse grater
3
EN
EN - 10
TECHNICAL SPECIFICATIONS
Power 220–240 V~, 50–60 Hz
Input power 1800 W
Stainless steel bowl volume 6 l
Dimensions 37 × 23.5 × 40 cm (h×w×w)
Weight 8.2 kg
BEFORE FIRST USE
Remove the appliance and its accessories from the packaging. Before disposing of the
packaging, be sure to remove all components. Check the appliance and accessories for
damage.
Wipe the outside of the appliance with a soft sponge slightly moistened with warm
water.
Wash the protective cover, whisk, kneading hook, at whisk, parts of the mixer, meat
grinder and grater in warm water with a little kitchen detergent. Rinse with clean
water and wipe dry.
Warning:
Be very careful not to cut yourself on the blade when handling the meat
grinder blade, the blender blade unit and the graters.
ASSEMBLY AND DISASSEMBLY
Warning:
Always ensure that the appliance is switched off and disconnected from
the power supply before assembling or disassembling.
Note:
The food processor is equipped with a safety lock that will not start it if it is
not assembled correctly.
Assembling the food processor
1. Place the appliance base on a dry, at and rm surface.
2. Press the folding arm lock and gently lift the arm upwards until it is locked in the
upper position.
3. Insert the stainless steel bowl into the base of the appliance and turn it to secure it.
4. Place the desired attachment (whisk, kneading hook or at whisk) on the shaft. Fit
it by aligning the lugs on the shaft with the cutouts in the extension, pushing the
extension upwards and rotating it so that the lugs on the shaft t into the recesses
in the extension.
5. Put the protective cover on the edge of the stainless steel bowl. The opening in the

EN
EN - 10 EN - 11
cover should face forward or sideways.
6. Press the folding arm lock and gently fold the arm downwards until it is locked in
the down position.
7. Now the food processor is ready to use.
Assembling the blender (SGR-KM-M350W only)
1. Place the appliance base on a dry, at and rm surface.
2. The folding arm must be secured in the down position.
3. Screw the knife unit from the bottom into the blender container. Make sure it is
properly tightened.
4. Put on the lid and then the inner cap.
5. Remove the top cover.
6. Place the folded blender container on the shaft at the top. Rotate the blender
container to secure it in the base of the appliance.
7. The blender is now ready for use.
Assembling the meat grinder (SGR-KM-M350W only)
1. Insert the worm shaft, the grinding blade, the grinding disc one by one into the
grinding chamber and nally secure with the screw cap.
2. Place the appliance base on a dry, at and rm surface.
3. The folding arm must be secured in the down position.
4. Remove the front cover.
5. Place the assembled meat grinder against the shaft at the front of the processor
and tilt it slightly to the left. Insert the meat grinder into the processor and turn the
grinder to the right (vertical position) to secure it in the processor.
6. Place the food tray on the lling tube and insert the push tube into the lling tube.
7. The meat grinder is now ready for use.
Note:
Select the grinding disc according to the preferred structure of the
ground meat and its subsequent use.
Grater (SGR-KM-M350W only)
1. Insert the desired grater (slicing grater, ne or coarse grater) into the grater
chamber. Push it gently to make it click in the chamber.
2. Place the appliance base on a dry, at and rm surface.
3. The folding arm must be secured in the down position.
4. Remove the front cover.
5. Place the folded grater against the shaft at the front of the appliance and tilt it
slightly to the left. Insert the grater into the appliance and turn it to the right (to
the vertical position) to secure it in the appliance.
6. Insert the push tube into the lling tube.
7. The grater is now ready for use.
EN
EN - 12
USE
Using a food processor
1. Connect the power cord plug into the electrical outlet.
2. Turn the speed dial to select the desired speed from 1 to 8. The display starts
to read the processing time. We recommend choosing a lower speed and then
gradually increasing the speed.
Or
1. On the control panel, press the button for the attachment used and use the +/-
buttons to set the desired processing time.
2. Then long press the button and the food processor will start. The display starts
counting down the processing time.
3. The food processor switches off after this period.
Button : low speed; corresponds to speeds 1 to 3.
Button : medium speed; corresponds to speeds 1 to 5.
Button : high speed; corresponds to speeds 1 to 8.
Interruption of operation
1. If you need to wipe food off the sides of the bowl or the attachment, rst turn the
food processor off (by turning the speed control to OFF or pressing and holding
the button for 1 to 2 seconds) and wait until the rotating parts have come to a
complete stop. Unplug the appliance.
2. Then press the folding arm lock and gently lift the arm upwards until it is locked in
the upper position.
3. Use the squeegee to wipe the sides of the bowl and the attachment.
4. Press the folding arm lock and gently fold the arm downwards until it is locked in
the down position. Plug the power supply plug into the mains socket and continue
processing.
Warning:
Do not wipe the sides of the bowl and attachment while the food proces-
sor is in operation.
Turning Off
• To switch off the food processor, turn the speed control to OFF.
• If you have set the processing time, press the button to abort the run. Pressing
the button again resumes the operation of the food processor.
• To switch off completely, disconnect the power plug from the mains socket.
• Clean the food processor according to the instructions in the "Cleaning and
maintenance" section.
Using the blender (SGR-KM-M350W only)
1. Remove the lid and put the ingredients you want to process into the blender
container. Insert the lid. Make sure it seals properly.
2. Connect the power cord plug into the electrical outlet.
3. Turn the speed dial to select speed 8.
4. If you need to add ingredients during processing, carefully loosen and remove the
inner lid. You can add ingredients through the opening in the lid.
5. Once the ingredients are processed, turn the speed control to OFF. Wait for the

EN
EN - 12 EN - 13
rotating parts to come to a complete stop. Unplug the appliance.
6. Remove the blender container from the body of the food processor.
7. Clean the blender according to the instructions in the "Cleaning and Maintenance"
section.
Warning:
The maximum capacity of the blender container is 1.5 l of raw materials
and the maximum continuous operation time of the blender is 5 minutes.
Do not turn on the blender empty!
Pulse rate
The pulse speed ensures fast and efcient processing of ingredients in the blender
container at maximum speed and rpm during short intervals.
• Turn the speed control to position P. The appliance will start at maximum speed
and rpm.
• The appliance will continue to run as long as you keep the speed control in position
P. When you return it to the OFF position, the appliance will stop running.
• We recommend using the appliance at this speed for 3 to 5 seconds at a time.
• This speed is suitable for processing ice cubes in the blender container.
Warning:
Use this speed only when using the appliance as a blender. Do not use it
with a food processor, meat grinder or grater.
Using the meat grinder (SGR-KM-M350W only)
1. Prepare the ingredients you want to process. We recommend cutting the
ingredients into equal sized pieces. Remove bones, tendons, skin, etc. from the
meat.
2. Connect the power cord plug into the electrical outlet.
3. Place the ingredients on a food tray.
4. Place a bowl large enough for the ground ingredients to fall into at the outlet of
the grinder.
5. Turn the speed dial to select speeds 4 to 6.
6. Slowly insert the ingredients into the lling tube and use pressure to push them
downwards. Apply slight pressure as needed.
7. If the food gets stuck, turn the grinder off by turning the speed control to OFF. Wait
for the rotating parts to come to a complete stop. Unplug the appliance.
8. Disassemble the grinder and remove the blocked food. Reassemble it and plug the
power plug into a power outlet to continue processing.
9. Once all the ingredients have been processed, turn the grinder off by turning
the speed control to OFF. Wait for the rotating parts to come to a complete stop.
Unplug the appliance.
10. Clean the grinder according to the instructions in the "Cleaning and Maintenance"
section.
Using the grater (SGR-KM-M350W only)
1. Prepare the ingredients you want to process. It is recommended to cut the
ingredients so that they t into the lling tube of the grater.
2. Connect the power cord plug into the electrical outlet.
3. Place a bowl large enough for the processed ingredients to fall into at the outlet of
the grater.

EN
EN - 14
4. Turn the speed dial to select speeds 4 to 6.
5. Slowly insert the ingredients into the lling tube and use pressure to push them
downwards. Apply slight pressure as needed.
6. If food gets stuck, turn the grater OFF by turning the speed control to OFF. Wait for
the rotating parts to come to a complete stop. Unplug the appliance.
7. Disassemble the grater and remove the blocked food. Reassemble it and plug the
power plug into a power outlet to continue processing.
8. Once all the ingredients have been processed, switch off the grater by turning
the speed control to OFF. Wait for the rotating parts to come to a complete stop.
Unplug the appliance.
9. Clean the grater according to the instructions in the "Cleaning and maintenance"
section.
Overview of accessory use and preparation time
Food processor
Raw ma-
terials
Attach-
ment
Amount Speed Process-
ing time
Note
Bread
dough
Kneading
hook
max. 1.6
kg
1 to 2 5 minutes The recommended ratio of
water to our is 5:3.
The recommended
amount of our is max. 1
kg
Cast
doughs
Flat whisk 1.0 to 1.2
kg
1 to 4 max. 5
minutes
Select a lower speed rst
and gradually increase it.
Egg
whites
Whisking
whisk
max.
16 egg
whites
6 to 8 max. 5
minutes
Whip for a maximum of
5 minutes in continuous
operation
Whipped
Cream
Whisking
whisk
250 ml 6 to 8 max. 5
minutes
Blender
Raw mate-
rials
Amount Speed Processing
time
Note
Cocktails max. 1.5 l 7 to 8 max. 4 min-
utes
If you are processing a cocktail
with ice, use the pulse speed.
Soup max. 1.2 l 7 to 8 max. 5 min-
utes
Allow the ingredients to cool
before placing in the blender
container.
Baby food max. 1.2 l 7 to 8 max. 5 min-
utes
Boiled
mashed
potatoes
max. 750 g 7 to 8 max. 4 min-
utes
Cooked
vegetables
max. 750 g 7 to 8 max. 4 min-
utes

EN
EN - 14 EN - 15
Meat grinder
Raw mate-
rials
Amount Speed Processing
time
Note
Raw meat
(diced)
1 kg 4 to 6 5 minutes The maximum continuous
run time of the grinder is 10
minutes.
Grater
Raw ma-
terials
Grater Amount Speed Process-
ing time
Note
Fruit and
vegeta-
bles
Slicing grater 0.5 kg 4 to 6 max. 5
minutes
Cut the ingredients to
t the lling tube.
Fine grater 0.5 kg 4 to 6 max. 5
minutes
Coarse grater 0.5 kg 4 to 6 max. 5
minutes
Bread-
crumbs
Fine grater 0.5 kg 4 to 6 max. 5
minutes
Note:
The above values are approximate and may vary according to conditions.
CLEANING AND MAINTENANCE
Always switch off the appliance, wait until the rotating parts have come to a complete
stop, disconnect the power plug from the mains socket and allow it to cool down com-
pletely before cleaning or carrying out any maintenance.
Clean the appliance and accessories immediately after use to prevent food from dry-
ing out.
Warning:
Never immerse the appliance, the power cord or the plug of the power
cord in water or any other liquid.
• Do not use plastic or metal scrapers, harsh cleaners, chemicals, petrol, solvents
or other similar substances to clean any parts of the appliance. The surface nish
could be seriously damaged.
• Wipe the outside of the appliance with a soft sponge slightly moistened with warm
water.
• Wash the protective cover, whisk, kneading hook, at whisk, parts of the mixer,
meat grinder and grater in warm water with a little kitchen detergent. Rinse with
clean water and wipe dry.
• Whisk, kneading hook, and at whisk are not dishwasher safe.
• To make it easier to remove any residual ingredients from the blender blade unit,
pour some water into the container and run the blender at pulse speed 2-3 times.

EN
EN - 16
Warning:
Be very careful not to cut yourself on the blade when handling the meat
grinder blade, the blender blade unit and the graters.
Storage
• Before storing, make sure that the appliance and its accessories are cool and clean.
• Store the appliance and its accessories in a dry and well-ventilated place out of the
reach of children or pets.
• Do not place any objects on the appliance.

DE
DE - 17 DE - 17
Vielen Dank, dass Sie sich für ein Gerät der Marke SIGURO ent-
schieden haben. Wir bedanken uns für Ihr Vertrauen und freu-
en uns, Ihnen auf den folgenden Seiten das Gerät mit all seinen
Funktionen und Einsatzmöglichkeiten vorstellen zu können.
Wir glauben an ein faires und verantwortungsvolles Unternehmen und
arbeiten daher nur mit Lieferanten zusammen, die unsere strengen Kriterien
zum Schutz der Interessen der Mitarbeiter, zur Verhinderung von Missbrauch
und fairen Arbeitsbedingungen erfüllen.
Wenn Sie Hilfe bei der umfassenden Wartung oder Reparatur des Produkts
benötigen, die einen Eingriff in die Innenteile erfordert, stehen Ihnen unser
autorisierter Kundendienst unter der E-Mail-Adresse siguro@alza.cz oder die
Hotline des Verkäufers zur Verfügung. Bei der Lösung von Problemen mit
dem Produkt haben wir diese Kontaktstellen vereinheitlicht. Die oben ge-
nannten Kontakte können auch bei Beschwerden oder Nachgarantieservice
genutzt werden.
SICHERHEITSHINWEISE
Lesen Sie vor der Anwendung sorgfältig die-
ses Benutzerhandbuch durch und bewahren
Sie es für den künftigen Gebrauch auf.
1. Dieses Gerät darf nicht von Kindern bedient werden. Bewahren Sie das
Gerät und das Netzkabel außerhalb der Reichweite von Kindern auf.
2. Das Gerät kann von Personen mit verminderten physischen und
mentalen Fähigkeiten oder mangelnden Erfahrungen und Kenntnissen
verwendet werden, sofern diese beaufsichtigt sind oder über die
sichere Anwendung des Geräts belehrt wurden und mögliche Gefahren
verstehen.
3. Kinder dürfen nicht mit dem Gerät spielen.
4. Die Reinigung und Wartung durch den Benutzer darf nicht von Kindern
durchgeführt werden.
5. Wenn das Netzkabel beschädigt ist, muss es vom Hersteller, seinem
Servicetechniker oder einer ähnlich qualizierten Person ersetzt werden,
um eine gefährliche Situation zu vermeiden.
6. WARNUNG: Bei unsachgemäßer Verwendung besteht die Gefahr von
Verletzungen.
7. Seien Sie beim Umgang mit den Hackmessern vorsichtig, insbesondere
beim Herausnehmen der Messer aus dem Behälter, beim Entleeren des
Behälters und bei der Reinigung. Die Klingen sind sehr scharf und es
besteht die Gefahr von schweren Verletzungen.
8. Reinigen Sie das Zubehör, das mit Lebensmitteln in Berührung kommt,
nach jedem Gebrauch gemäß den Anweisungen im Kapitel „Reinigung
und Wartung“. Halten Sie das Gerät und sein Zubehör sauber.
DEUTSCH

DE
DE - 18
9. Trennen Sie das Gerät vom Stromnetz, wenn Sie es unbeaufsichtigt
lassen und bevor Sie es montieren, auseinandernehmen oder reinigen.
10. Bevor Sie Zubehör oder zugängliche Teile, die sich während des
Gebrauchs bewegen, austauschen möchten, schalten Sie das Gerät aus
und trennen Sie es vom Stromnetz.
11. Verwenden Sie nur das mit dem Gerät gelieferte oder das vom Hersteller
ausdrücklich empfohlene Zubehör. Die Verwendung von anderem als
dem mitgelieferten oder empfohlenen Zubehör ist verboten.
12. Dieses Gerät ist nur für den Hausgebrauch und für die Verarbeitung von
haushaltsüblichen Zutaten vorgesehen. Verwenden Sie das Gerät nicht
für andere Zwecke als die, für die es bestimmt ist. Das Gerät ist nicht für
kommerzielle Zwecke oder Laborzwecke vorgesehen.
13. Verwenden Sie das Gerät nicht im Freien.
14. Vergewissern Sie sich vor dem Einstecken des Steckers in die Steckdose,
dass die auf dem Typenschild des Netzkabels angegebene Spannung
mit der Spannung Ihrer Steckdose übereinstimmt. Stecken Sie den
Stecker des Netzkabels in eine ordnungsgemäß geerdete Steckdose.
Verwenden Sie keine Verlängerungskabel oder Steckeradapter.
15. Wickeln Sie das Netzkabel vollständig ab, bevor Sie es einstecken.
16. Lassen Sie das Netzkabel nicht über die Kante eines Tisches oder einer
Arbeitsplatte hängen, berühren Sie keine heißen Oberächen und
verheddern Sie es nicht. Stellen Sie keine schweren Gegenstände auf das
Netzkabel.
17. Um das Risiko eines Stromschlags zu vermeiden, tauchen Sie das
Gerät, das Netzkabel oder den Stecker nicht in Wasser und andere
Flüssigkeiten.
18. Berühren Sie das Gerät, das Netzteil oder den Stecker nicht mit nassen
oder feuchten Händen.
19. Wir empfehlen, das Gerät an einen separaten Stromkreis anzuschließen.
20. Stellen Sie das Gerät immer auf eine stabile, ebene und trockene
Arbeitsäche in ausreichendem Abstand zur Steckdose. Vibrationen
während des Betriebs können zu unerwünschten Bewegungen des
Geräts führen.
21. Stellen Sie das Gerät nicht auf oder in der Nähe von Wärmequellen wie z.
B. einem Ofen oder Herd auf.
22. Verwenden Sie nicht mehr als einen Aufsatz gleichzeitig.
23. Dieses Gerät ist nicht für die Bedienung durch eine externe Zeitschaltuhr,
ein Programmiergerät usw. vorgesehen.
24. Vergewissern Sie sich vor dem Einschalten des Geräts, dass das Gerät
richtig zusammengebaut ist und dass sich der Motorkopf in horizontaler
Position bendet. Das Gerät ist mit einer Sicherheitssperre ausgestattet,
die verhindert, dass es sich einschaltet, wenn der Motorkopf nicht richtig
heruntergeklappt ist.
25. Dieses Gerät ist für die Verarbeitung von 1 kg Mehl in einer Portion
ausgelegt. Verwenden Sie es nicht zur Verarbeitung größerer Mengen
Mehl. Wir empfehlen, größere Mengen in kleinere Portionen aufzuteilen.
26. Die empfohlene maximale Betriebsdauer des Geräts bei normaler
Belastung beträgt 5 Minuten. Verwenden Sie das Gerät nicht länger als

DE
DE - 18 DE - 19
10 Minuten am Stück. Lassen Sie das Gerät vor der weiteren Verarbeitung
mindestens 10 Minuten abkühlen.
27. Lassen Sie das Gerät nicht leerlaufen. Es besteht die Gefahr von Schäden!
28. Heben Sie den Motorkopf nicht hoch, während das Gerät in Betrieb ist. Es
besteht die Gefahr von Schäden!
29. Kontrollieren Sie regelmäßig den Zustand der zu verarbeitenden
Ingredienzen. Wenn es notwendig ist, die Wände oder den Aufsatz
abzuwischen, schalten Sie das Gerät zuerst aus und trennen Sie es
vom Stromnetz. Warten Sie, bis die rotierenden Teile zum Stillstand
gekommen sind. Heben Sie den Motorkopf hoch und wischen Sie die
Seiten des Behälters oder des Aufsatzes mit der Spatel ab.
30. Wenn ein Fremdkörper in den Behälter fällt, schalten Sie das Gerät
aus und trennen Sie es vom Stromnetz. Warten Sie, bis die rotierenden
Teile zum Stillstand gekommen sind, und entfernen Sie dann den
Gegenstand.
31. Lassen Sie das Gerät im eingeschalteten Zustand nicht unbeaufsichtigt!
32. Stecken Sie nicht Ihre Hände oder Gegenstände in den Roboter- oder
Mixerbehälter, wenn das Gerät eingeschaltet ist.
33. Berühren Sie keine rotierenden Teile des Geräts oder des Zubehörs.
Achten Sie darauf, dass keine fremden Gegenstände, lose
Kleidungsstücke, Haare usw. in ihre Nähe gelangen. Es besteht die
Gefahr von schweren Verletzungen!
34. Fassen Sie keine heißen oder kochenden Flüssigkeiten oder
Lebensmittel an. Lassen Sie sie vor der Verarbeitung abkühlen.
35. Das Mahlwerk ist nicht für das Zerkleinern von Knochen, Nüssen mit
Schale, harten Rohstoffen usw. geeignet.
36. Seien Sie besonders vorsichtig beim Umgang mit der Klinge des
Fleischwolfs und den Reiben. Es besteht die Gefahr von schweren
Verletzungen.
37. Verwenden Sie immer die mitgelieferten Stopfer, um die Zutaten durch
die Einfüllöffnung des Fleischwolfs oder des Raspelaufsatzes zu drücken.
Verwenden Sie nicht Ihre Finger, Hände oder andere Gegenstände.
38. Schalten Sie das Gerät aus und ziehen Sie den Stecker aus der Steckdose,
wenn Sie es nicht benutzen oder unbeaufsichtigt lassen.
39. Ziehen Sie das Netzkabel aus der Steckdose, indem Sie am Stecker
ziehen. Ziehen Sie nicht am Netzkabel. Es besteht die Gefahr, dass das
Netzkabel oder die Steckdose beschädigt wird.
40. Reinigen Sie das Gerät und sein Zubehör gemäß den Anweisungen
im Abschnitt „Reinigung und Wartung“. Reinigen Sie das Gerät und
sein Zubehör nach jedem Gebrauch, um Schmutzablagerungen,
unangenehme Gerüche und Schäden am Gerät und Zubehör zu
vermeiden.
41. Überprüfen Sie das Gerät und das Zubehör regelmäßig auf Schäden.
Verwenden Sie das Gerät nicht, wenn es beschädigt ist oder das Zubehör
beschädigt ist. Es besteht die Gefahr von schweren Verletzungen!
42. Ersetzen Sie beschädigtes Zubehör durch neues. Lassen Sie ein
beschädigtes oder nicht richtig funktionierendes Gerät überprüfen und
reparieren. Wenden Sie sich an eine autorisierte Kundendienststelle.

DE
DE - 20
Übersicht
1 Griff am kippbaren Motorkopf
2 Vordere Abdeckung
3 Bedienfeld mit Display
4 Schutzabdeckung für die Schüssel
5 Edelstahlschüssel
6 Anti-Rutsch-Füße
7 Oberer Deckel
8 Kippbarer Motorkopf
9 Gerätebasis
10 Verriegelungshebel des kippbaren Motorkopfes
11 Geschwindigkeitsregler
12 Flachrührer
13 Knethaken
14 Rührbesen
Mixer (nur bei Modell SGR-KM-M350W)
15 Innerer Deckel
16 Deckel des Mixerbehälters
17 Mixerbehälter
18 Behältergriff
19 Messereinheit (im Inneren des Behälters)
Fleischwolf (nur bei Modell SGR-KM-M350W)
20 Stopfer
21 Fleischwolf-Vorsatz
22 Füllrohr
23 Schraubverschluss
24 Mahlkammer
Nicht abgebildet: Schneckenwelle, Hackmesser, Mahlschreiben (grob, fein, extra fein)
Reibe (nur bei Modell SGR-KM-M350W)
25 Stopfer
26 Füllrohr
27 Reibekammer
28 Scheibenreibe
29 Feine Reibe
30 Grobe Reibe
3
This manual suits for next models
1
Table of contents
Languages:
Other SIGURO Kitchen Appliance manuals


Popular Kitchen Appliance manuals by other brands

SEVERIN
SEVERIN CP 3542 - PRESSE-AGRUMES Dimensions

Zanussi Electrolux
Zanussi Electrolux ZCM1080X Instruction booklet

SodaStream
SodaStream GENESIS user manual

KitchenAid
KitchenAid KAC-22 Technical education

Lacor
Lacor 69178 Instructions for use and maintenance

Electrolux
Electrolux EKM3407 Instruction book


