B+K precision B5927.406 User manual

User Manual
Pressure cooker | stainless steel | 6 litres
B5927.406
E
Including
4recipes

Contents
Congratulations on purchasing this BK refined
stainless steel pressure cooker. We recommend
that you read these instructions carefully and
keep the manual safely.
Introduction 3
Instructions for safe use 4
Parts and use 6
Pressure regulator 8
Operating instructions 9
Food preparation instructions 9
Cooking and heating 10
Cleaning 12
Cooking diagram 13
Packaging list 13
Resolving problems 14
Maintenance and guarantee 16
Recipes 18
Diameter
Product information
Capacity Working Pressure
22 cm 50 KPa - Position 1
90 KPa - Position 2
2
6 litres (usable
capacity 4 litres)
E

The pressure cooker works under pressure that is built up in the pan.
Under pressure, the internal temperatures in the pan rise above the
normal boiling point of water, so that food is cooked more rapidly.
Introduction
Faster
The BK pressure cooker cooks food 3 times faster than other methods
of cooking. Meals that would usually take half an hour to prepare can be
on the table in just 10 minutes!
Tastier
Food tastes better when it is prepared in a BK pressure cooker. The
shorter cooking time enables retention of the natural flavours. Half as
many herbs are needed and less or no flavour is lost during cooking.
A significant difference with, for example, a microwave is that meat is
cooked faster in a BK pressure cooker and it becomes golden brown.
Delicious!
Healthier
In a BK pressure cooker, the food retains important vitamins and
minerals. We all know that the longer food is cooked for, the more
nutrients can be lost. In a BK pressure cooker, twice as many vitamins
and nutrients are retained in comparison to the usual cooking methods.
Pressure cooking also prevents the loss of vitamins and minerals, where-
by less water has to be used.Take a look at the recipes (from page 18
onwards) for the versatile uses.
3
X X
Suitable heat sources:
E

Instructions for safe use
When using the pressure cooker, always follow the
instructions for safe use.
1. Read these instructions properly and thoroughly.
2. Do not let children near to the pressure cooker when in use.
3. Only use the pressure cooker on the indicated heat sources
(see page 3). Do not place the pressure cooker in a hot oven or
microwave.
4. Take great care when moving a pressure cooker. Do not touch the
hot pan or lid; use the handle and side grip, if necessary use oven
gloves or pan holders.
5. Do not use the pressure cooker for purposes other than the one for
which it is intended.
6. This pressure cooker cooks under pressure. Incorrect use can
result in burns. Before use, make sure that the pressure cooker is
properly closed and locked using the sliding knob. Refer to
“Operations Instructions” from page 9 onwards. Never use the pan
without attaching the lid securely.
7. Never use the pressure cooker without adding liquid as this can
seriously damage the pan. Use a minimum of 250 ml of liquid.
8. Before use, always check the pressure regulator to ensure this is not
blocked. Refer to page 12.
9. Fill the pan up to no more than 2/3 of the pressure cooker’s capa-
city. This is the usable capacity (shown in the pan by “4.0 L: MAX”).
When cooking food that expands during cooking, such as rice or
dried vegetables, do not fill the pressure cooker to any more than
half of the capacity.
10. When the intended pressure has been reached and the pressure
indicator is fully raised, adjust the heat source. This prevents excess
amounts of steam from escaping, the food from burning and the
pan from being damaged.
4
E

11. When you release pressure from the pan using the setting
‘depressurise completely ’, the escaping steam can harm you. Only
change the setting of the pressure regulator using the small knob
on the valve.
12. Never use force when opening the lid of the pressure cooker.
Do not open the lid until the pressure indicator shows that all
internal pressure has subsided. Refer to “Operating Instructions”
from page 9 onwards.
13. When you cook meat in the pressure cooker which has an outer
layer of skin which could potentially swell due to the effects of
pressure, do not pierce the skin if this appears swollen; you could
get burnt.
14. When cooking pasta in the pressure cooker, the pan should be
shaken before carefully opening to prevent burns caused by food
spurting out.
15. Applesauce and compotes must not be prepared in the pressure
cooker; these mixtures can froth and splatter and potentially block
the pressure regulator.
16. Never use the pressure cooker under pressure to deep-fry or fry food.
17. Do not attempt to repair the pressure cooker yourself, this would
invalidate the guarantee. You may only carry out the maintenance
activities described in this User Manual.
18. Replace the silicon ring (see page 7, part 10) after approximately
400 uses, or every 2 years.
19. Use only the appropriate BK spare parts specifically intended for
this model. Only use the lid and pan that are part of the same model.
20. Please note: the lid must not be cleaned in the dishwasher.
This harms the safety system, which can lead to dangerous situations.
21. Keep these instructions!
5
E
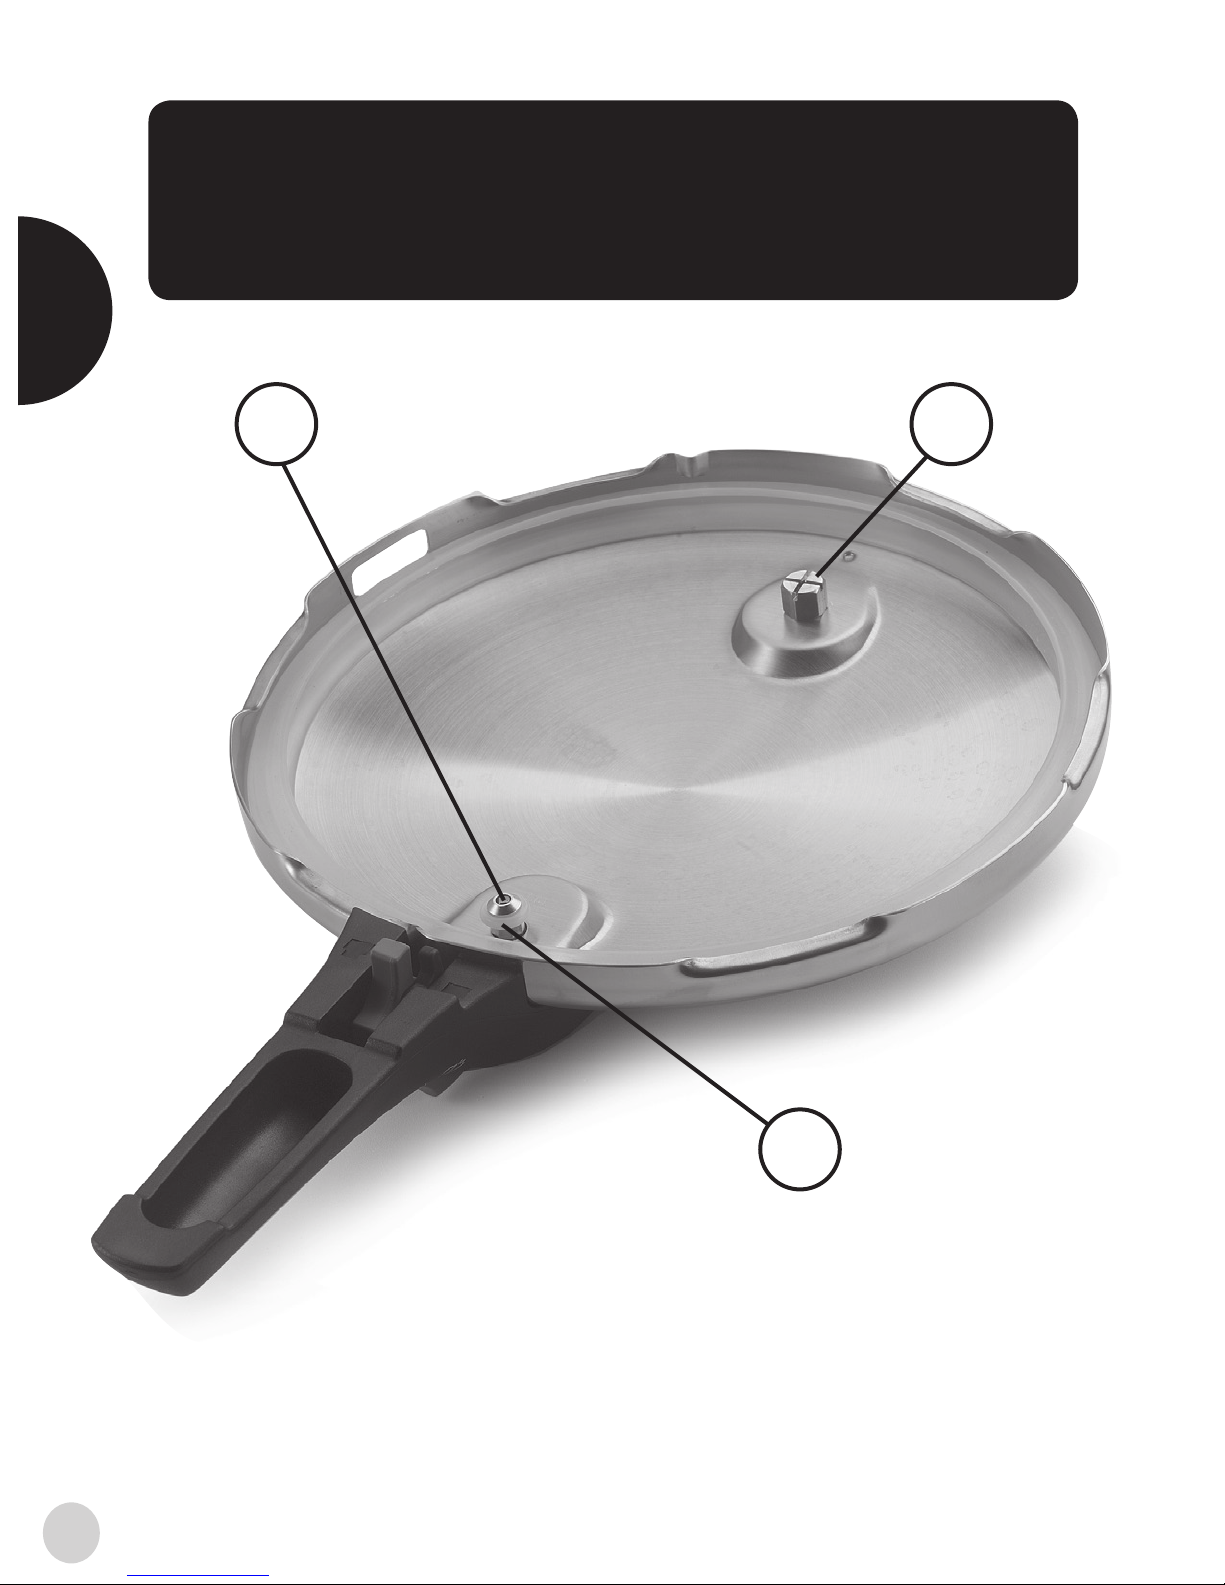
Parts
and use
1
3
2
1. Safety valve with pressure indicator.
2.The screw of the pressure regulator. Do not unscrew.
3.Silicon sealing ring of the pressure indicator.
Do not remove!
6
E

13
11
12
4 5 6 7
8
910
4. Lid handle 5. Sliding knob. To lock and unlock the lid. 6. Pressure
indicator. When this rises, the pan is under pressure and the lid may
not be opened. 7. Lid. 8. Pressure regulator. Mechanism to regulate
the pressure. 9. Safety openings. A safety mechanism to reduce excess
pressure. When the pressure is too high, the silicon ring will push
outwards. 10. Silicon ring. Seals the pan. 11. Helper handle of the pan.
12. Pan. 13. Pan handle.
7
E
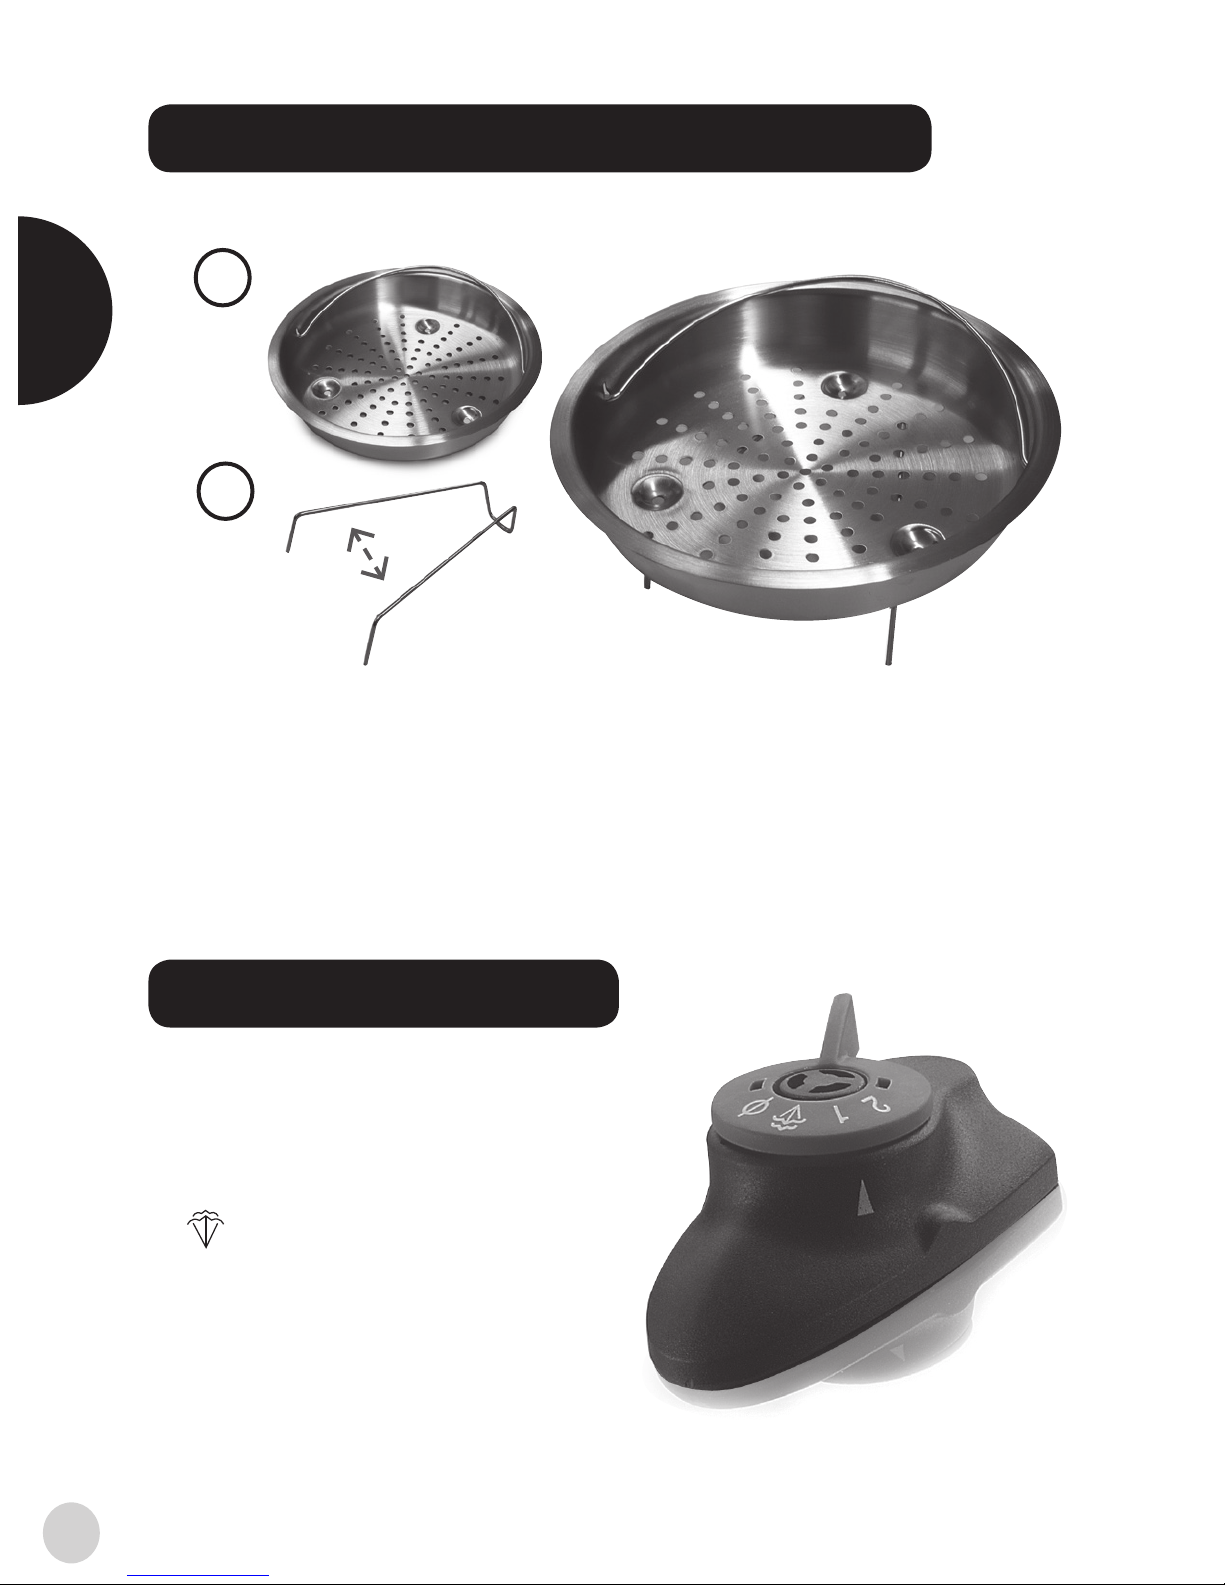
Pressure regulator
Mechanism with which to regulate
the pressure:
2 significant pressure – 90 KPa.
1little pressure – 50 KPa.
fully ventilate
Ø
remove valve from the pressure
regulator.
Parts and use continued
14
15
14. Insert basket.
15.Insert basket trivet. Fold outwards before use.
Place the insert basket on the trivet and place like this in the pan.
To steam your meal under pressure.
8
E

Before using the pressure cooker for the first time, it is important to
read all instructions, particularly the instructions for safe use
(see page 4).
Remove all the packaging material and accessories. Lubricate the silicon
ring with a little olive oil, so that it is easier to open and close the lid.
Clean the pan and lid before using for the first time with mild soapy water.
Operating Instructions
Food preparation Instructions
Place the food and the liquid (not less than ¼ of a litre) in the pan.
The content (water, soup, gravy or drink) has to be able to produce
steam when this is heated up. Therefore do not fill the pan more than
2/3 (4.0 L: MAX) full. For foods that swell during cooking, such as rice
and dried vegetables, do not fill the pan more than half way.
Warning:Before closing the pressure cooker, check that the pressure
regulator (8) is clean. Check the safety openings (9) to check that these
are clean. Make sure that the silicon ring (10) is in the edge of the lid.
Check that the valve of the pressure indicator (1) functions correctly
(also refer to page 12). Make sure that the silicon sealing ring of the
pressure indicator (3) is present.
9
4,0 L : MAX
E

1. Link up the
0 symbol on the
lid handle with the
∆symbol of the
pan handle.
Cooking and heating
Closing the lid
2.Turn the lid
clockwise until the
lid handle and
pan handle are
connected to one
another.
3.Once the lid is
closed, lock the
pan and lid using
the sliding knob.
1.Move the pressure cooker by holding
both the helper handle and the handle.
Place the pan on a stable heat source.
2.When using gas, keep the flame under the
base of the pan to protect the handles.
If using on electric, ceramic or induction heat
sources, the cooking zone has to be even to
the base of the pan.
3.The pressure regulator can be set in
2 cooking positions.
1 For normal food preparation
(50 KPa).
2For rapid preparation or food with a
longer cooking time (90 KPa).
10
E
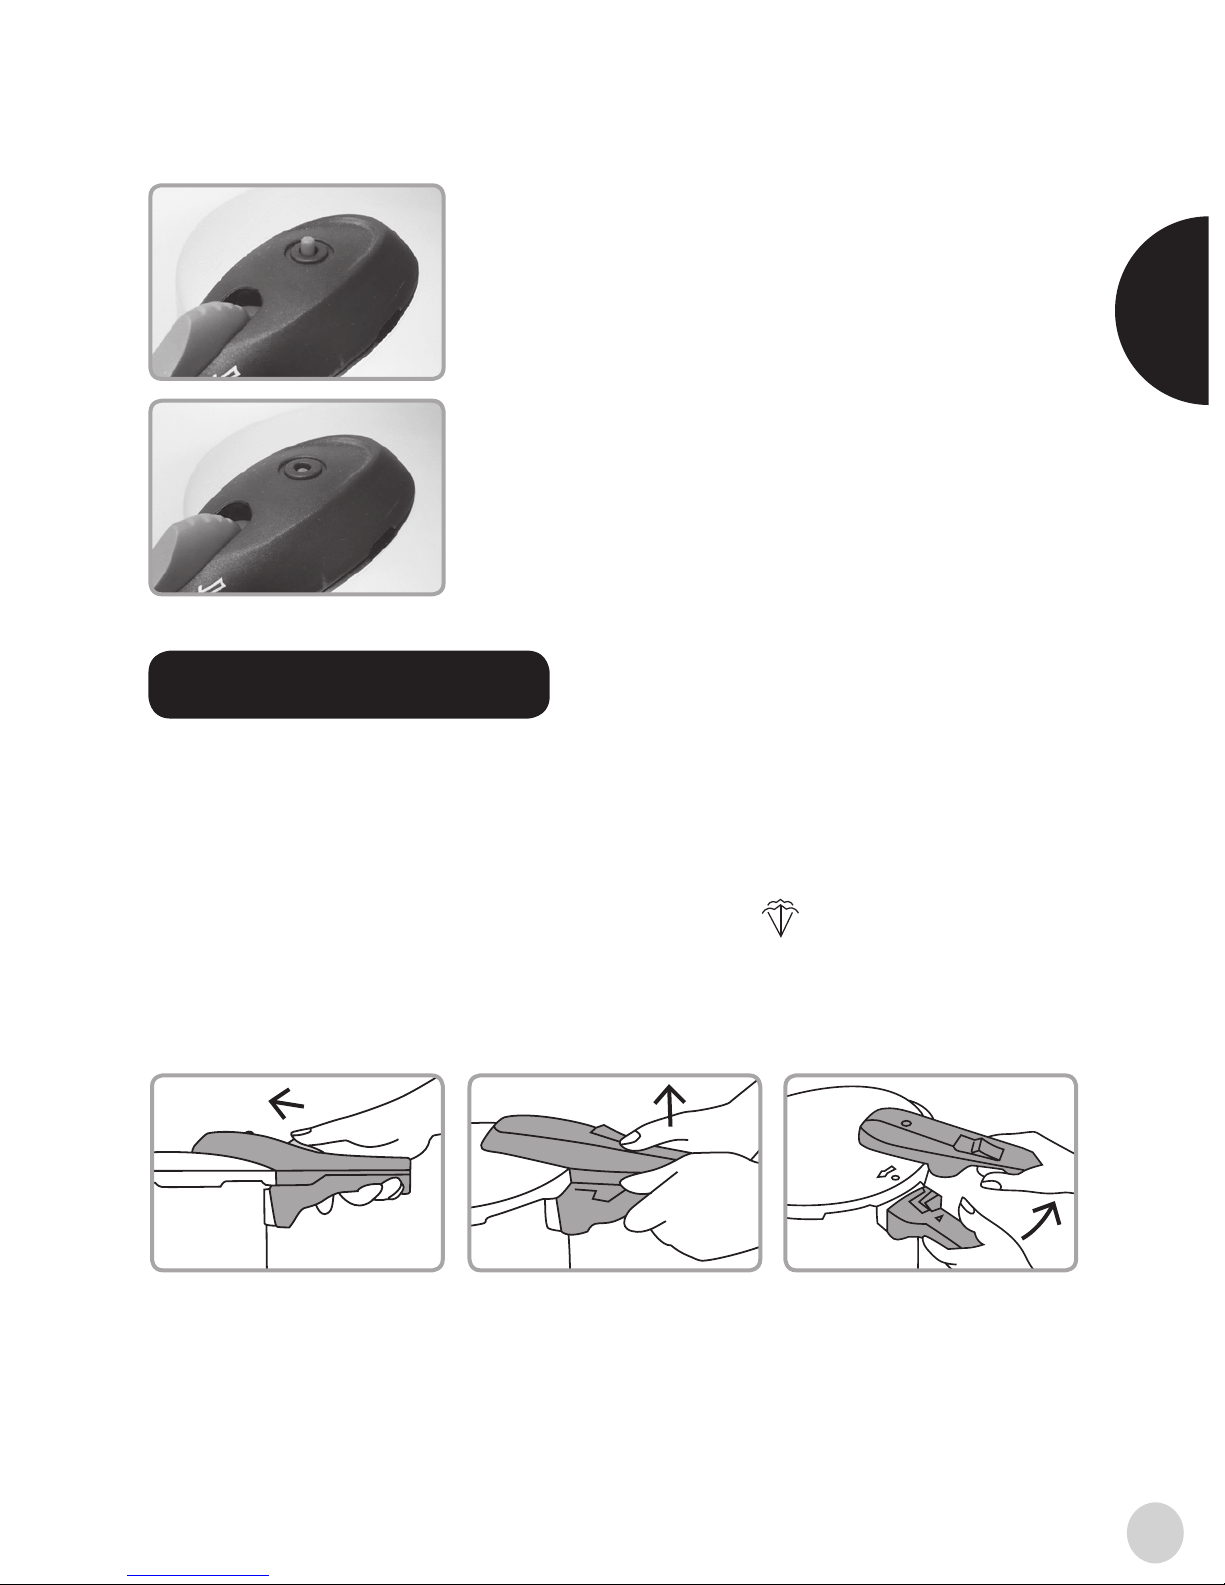
1.2.3.
Opening the lid
4.Steam escapes from the pressure regulator
as soon as the liquid starts to boil. When
the pressure indicator rises, this means that
pressure is building up in the pan.
5.As soon as the liquid is boiling, you can
adjust the heat source. However, make sure
that the pressure indicator is still raised.
Turn off the heat source after the required
cooking time.
Slide the pressure
knob forwards as
indicated.
Turn the
handle at the
top to the right,
anti-clockwise.
Link up the 0symbol
on the lid with the
∆ symbol and you
can open the lid.
1. When the heat source has been switched off, you have 2 options
for depressurising the pan:
a. Allow the pan to cool down of its own accord until the pressure
indicator has fallen completely. b. Turn the pressure regulator using
the small knob on the valve to the setting to enable the remaining
steam to escape until the pressure indicator has fallen completely.
Take care: Steam is hot. Be careful of the hands and face!
2. The lid can then be opened:
11
Pressure indicator
no pressure
in the pan
pressure
in the pan E

Cleaning
The pan
After use, remove all food remains from the pressure cooker. Wash the
pressure cooker in hot soapy water. Do not use steel wool or a scourer.
Rinse and dry the pan and put this in a dry place. Do not close the pan.
This is to prevent the pan from not opening again and prevents the
silicon ring from emitting an odour. After use, definitely do not place
the lid in the dishwasher.
The pressure regulator
To clean the pressure regulator, turn this to the Ø position.
This enables you to remove the valve from the pressure regulator.
Wash the valve carefully in warm water and put back when it is dry.
Check that the valve has been properly positioned..
Attention :
• Do not perform any repairs on the pressure cooker.
• Do not unscrew any parts of the lid.
• Do not turn the attachment screw of the pressure regulator.
• Replace the silicon ring of the lid promptly
(www.bk.nl/onderdelen)
Should you have any questions, remarks or complaints,
12
Safety valve with pressure indicator
After each use, make sure that the pressure
indicator is clean. Rinse with warm water.
If it is blocked, clean it using warm water and a
washing-up brush. Test the valve using a tooth
pick to check whether there is still clearance.
E

Category
Rice
Soup
Spare Ribs
Pork
Beef
Chicken
Fish
Lamb
Weight
(kg)
0,5
0,25
1,0
1,0
1,0
1,0
1,0
1,0
Water
(ltr)
0,8
0,8
0,8
1,0
0,5
0,8
Time
(min.)
5-6 1
31
8-10 2
22-25 2
22-25 2
12-15 2
4-5 1
12-15 2
Comments Position
Cut into
pieces
Pieces 3 cm
in size
Whole chicken
Cooking diagram
Packaging list
Body 1
Lid 1
User Manual 1
Insert basket 1
Trivet 1
13
E

Problem Cause
The heat is too low.
No liquid.
The lid is not properly closed.
The lid is not correctly closed.
The silicon ring is dirty.
The silicon ring is damaged.
The lid is damaged or broken.
Extreme heat.
Too much food.
There is internal pressure.
First time in use.
Solution
Increase the heat.
Add liquid.
Lock the lid using the
sliding knob.
Replace the silicon ring
www.bk.nl/onderdelen
Replace the lid.
Turn off the heat.
Reduce the amount of food.
Make sure that there is no
pressure.
Turn the pressure regulator
to setting .
Apply a thin layer of oil to
the silicon ring.
The pressure
indicator is not rising
and no steam is
coming out of the
pressure regulator.
Steam is escaping
from around the lid.
An explosion of
steam escapes from
the pressure regulator,
pressure indicator or
from beneath the lid.
The pressure
indicator does not
drop. The lid will
not open.
The lid will not close.
Resolving problems
14
E
Lock the lid using the
sliding knob.
Clean the silicon ring.

Steam is escaping
from the pressure
indicator.
Symbol 0 does not link
up with symbol ∆ on the
handle.
The pan is damaged
because of a fall or
because it has been
shaken.
The pressure indicator is
blocked.
The pressure indicator does
not work.
The silicon sealing ring
of the pressure indicator
is damaged
(see page 6 part 3).
The silicon ring needs
replacing.
Contact
Contact
www.bk.nl/onderdelen
Immediately turn off
the heat. Release the
steam from the pan and
open the lid to check
the reason behind the
blockage. Clean the
pressure regulator,
the pressure indicator
and the safety openings.
Contact
Link up to symbol ∆
The lid will not close.
15
Problem Cause Solution
E

Maintenance tips
Remove any labels. Before using for the first time, wash new pans in
hot water with mild washing-up liquid then rinse and dry.
Your pressure cooker is suitable for all heat sources. Do not put your
BK pressure cooker in the oven or microwave! The synthetic grips and
handles are heat-resistant up to 160˚ Celsius. Never let a pan boil dry.
In order to avoid damage, never scratch the pan with sharp or pointed
objects. After use, wash your BK pressure cooker using normal
washing-up liquid. Rinse with clean, hot water and dry immediately.
Stubborn stains can best be removed by boiling water with soda or
washing-up liquid. Avoid accumulation being left for too long.
Treat the highly polished exterior with a stainless steel cleaner if
required. Never use wire wool on your stainless steel pan! Never put
your BK pressure cooker in the dishwasher.
BK pressure cooker in use
Always position a gas flame so that it stays completely under the
bottom of the pan. Always use the size of hotplate most similar to the
size of the diameter of the pan. You can also use the capacity of your
heat source as efficiently as possible. This saves energy. You also avoid
unnecessary energy loss when you adjust the temperature of your heat
source to continue cooking at a lower setting. The handles can become
warm during cooking. You should therefore always use oven gloves or
pan holders. Never place a warm pan directly on your worktop or table,
but on a placemat. Never slide the pan over a hotplate in order to avoid
any scratches on the bottom of the pan or on the hotplate.
Maintenance and guarantee
16
E

Guarantee
This BK pressure cooker has been manufactured with the utmost care and
carefully checked. The guarantee covers manufacturing faults and/or faults
with the materials that are used. The guarantee runs for two years (only with
receipt of purchase) and doesn’t cover any damage resulting from incorrect
use, careless maintenance or natural wear.
Finally...
we wish you lots of outstanding, successful and delicious meals!
Please contact our customer services department if you have any questions
BK Service, Zilverstraat 40, 2718 RK Zoetermeer, the Netherlands www.bk.nl
17
WARRANTY CERTIFICATE
Attach your copy of the
receipt here!
I agree to
cooperate in any
market research carried
out by BK.
The above-mentioned warranty period applies to this article.
The warranty period becomes effective from the date of purchase.
We ask you kindly to fill in this warranty card and send it to :
BK Service, Zilverstraat 40, 2718 RK Zoetermeer,
the Netherlands.
You will not receive acknowledgement of receipt and your
personal details will not be passed on to third parties.
BK Pressure cooker B5927.406
Name of the buyer : ___________________________ M/F
Street : __________________________________________
Zip Code : _____________ Place : _____________________
Date : ______________________Age : _________________
E-mail address : ____________________________________
Buyer’s signature :__________________________________
E

Recipes
18
E

19
Grandma’s seasoned steaks
with raisins and gingerbread
Delicious traditional Dutch slow-braised beef!
Ingredients :
1 kg of stewing steak
salt and freshly ground pepper
75 g of butter
4 small onions cut into small rings
200 ml of cider vinegar
6 slices of gingerbread cut in pieces
100 g of raisins
50 g of apple syrup
4 cloves
4 bay leaves
Preparation
Rub salt and pepper into the stewing steak. Heat up the butter in the pressure
cooker and fry the stewing steak in the butter, in portions, until it has browned
on both sides. Fry the onions in the cooking fat until golden brown.
Add 600 ml of water to the cooking fat and, whilst stirring, dissolve the apple
syrup into the mixture. Add the cider vinegar, gingerbread, raisins, cloves
and bay leaves, grind a little pepper over the top and place the stewing steak
in the liquid. Close the pressure cooker and turn the pan to pressure setting 2.
Allow the meat to cook for 20 minutes on a medium high heat. Following
the instructions, depressurise and open the pan. Remove the meat from the pan
and stir the gravy until smooth.
Tip
Delicious when served with boiled potatoes and wine sauerkraut.
E

E
Goulash with fresh cocktail
gherkins
A traditional goulash, with a surprising flavour from the cumin and
cocktail gherkins!
Ingredients :
4 tablespoons of olive oil
3 onions, coarsely sliced
1 tin of tomato puree (70 grams)
2 garlic cloves, coarsely chopped
2 tablespoons of paprika powder
1 teaspoon of cumin or caraway seeds
600 g of shoulder steaks, cut into 4-cm pieces
50 ml of gherkin liquid
sea salt and freshly ground black pepper
300 g of potatoes, cubed
2 red sweet peppers, coarsely sliced
100 g of cocktail gherkins
3 tablespoons of crème fraîche
Preparation
Bring 1 litre of water to the boil. In the pressure cooker, heat the oil
and fry the onions until golden brown. Stir in the tomato puree and garlic
and sprinkle the paprika powder and cumin or caraway seed over the top
and stir fry for 2 minutes on a low heat. Add the meat and the gherkin
liquid, pour in the boiling water and stir everything together.
Grind some salt and pepper into the mixture and close the pressure
cooker. Turn the pan to pressure setting 2 and simmer the meat for 25
minutes until cooked. Following the instructions, depressurise and open
the pan. Add the potatoes, sweet peppers and cocktail gherkins to the
meat. Close the pan again, bring it up to pressure and cook the dish
for another 10 minutes under pressure, until the potatoes are cooked.
Following the instructions, depressurise and open the pan. Stir the crème
fraîche through the goulash and season to taste with salt and pepper.
Tip
Delicious with wholemeal farmhouse bread.
20
E
Table of contents


