Silver 1031 User manual

Livr t d'inste ructions
Handleiding
Instruction Manual
Livr t d'inste ructions
Handleiding
Instruction Manual

Fran aisç
Lors de l'utilisation d'un appareil électrique, il est important de toujours
suivre certaines précautions de sécurité dont certaines sont les suivantes :
Lire toutes les instructions avant d'utiliser votre machine à coudre :
1. Lorsque la machine est branchée, ne jamais la laisser sans
surveillance.
2. Toujours débrancher la machine à coudre de la prise de courant
immédiatement apr s l'usage et avant l'entretien.
3. Toujours débrancher la machine avant de changer l'ampoule.
Remplacer cette derni re par une ampoule de même type d'une
puissance de 10 watts (pour une alimentation de 110-120V) ou 15
watts (pour une alimentation de 120-240V).
1. Ne pas autoriser l'utilisation de la machine comme jouet. Faire tr s
attention lorsque la machine est utilisée par des enfants ou a proximité
d'enfants.
2. N'utiliser cette machine que dans le but pour lequel elle a été conçue
tel que spécifié dans ce manuel. N'utiliser que les accessoires spécifiés
dans ce manuel et recommandés par le fabricant.
3. Ne jamais utiliser cette machine à coudre si le câble d'alimentation ou
la prise sont endommagés ou si son fonctionnement n'est pas normal,
si elle est tombée par terre, dans de l'eau ou si elle a subi des
dommages. Si c'est le cas s'adresser au service apr s vente le plus
proche pour obtenir une réparation ou un réglage électrique ou
mécanique.
4. Ne jamais utiliser le machine si des ouvertures d'air sont obstruées.
S'assurer que les orifices de ventilation et la pédale de commande sont
libres de toute accumulation de poussi res ou de morceaux de tissu.
5. Ne pas approcher vos doigts de toute partie mobile. Prêter une
attention particuli re à proximité de l'aiguille de votre machine à coudre.
6. Toujours utiliser la plaque à aiguille appropriée. Une mauvaise plaque
peut entraîner la casse de l'aiguille.
7. Ne pas utiliser d'aiguilles tordues.
8. Ne pas tirer sur le tissu ou le pousser lors de la couture. Ceci pourrait
entraîner une courbure de l'aiguille causant une casse.
9. Mettre la machine hors tension (position "O") avant de faire tout réglage
dans la zone de l'aiguille, comme par exemple enfiler l'aiguille ou
remplacer celle-ci ou encore changer le pied presseur etc.
10. Toujours débrancher la machine à coudre de la prise de courant avant
d'enlever le capotage, de lubrifier ou de faire tout réglage spécifié dans
ce mode d'emploi.
11. Ne jamais laisser tomber ou introduire d'objet dans les ouvertures de la
machine.
12. Ne pas utiliser à l'extérieur.
13. Ne pas utiliser la machine dans des endroits ou des aérosols sont
pulvérisés ou de l'oxyg ne est administré.
14. Pour débrancher la machine, placer toutes les commandes sur la
position d'arrêt ("O") et ensuite, retirer la fiche de la prise de courant.
15. Ne pas débrancher la machine en tirant sur le fil. Débrancher en tirant
sur la fiche et non sur le fil.
16. Le niveau sonore est conforme aux réglementations soit de 75dB (A).
17. Veuillez éteindre la machine ou la débrancher si elle ne fonctionne pas
correctement.
18. Ne disposez jamais un objet quelconque sur la pédale.
19. Si le cordon d'alimentation qui relie la machine à la pédale est abîmé, il
doit être remplacé par le fabricant ou par un service apr s vente agrée
afin d'éviter tout danger.
20. Cet appareil ne doit pas être utilisé par les personnes (ainsi que les
enfants) aux capacités physiques, sensorielles ou mentales réduites ou
qui n'ont pas l'expérience et les connaissances requises, sauf si elles
sont supervisées ou ont reçu des instructions concernant l'utilisation de
l'appareil par une personne responsable de leur sécurité.
21. Les enfants doivent être surveillés pour assurer qu'ils ne jouent pas
avec l'appareil.
Cette machine à coudre est destinée à un usage domestique exclusif.
DANGER
AVERTISSEMENT
GARDER E MODE D'EMPLOI
- Pou
- Pour r
r éviter tout risque d'électrocution :
éduire les risques de brûlures,
d'incendie, d'électrocution ou de blessures:
INSTRU TIONS IMPORTANTES DE SÉ URITÉ

Netherlands
Bij gebruik van een elektrisch apparaat, dienen altijd de standaard
veiligheidsmaatregelen in acht genomen te worden, waaronder de
volgende:
1. Laat deze naaimachine nooit onbeheerd achter terwijl de stekker in
het stopcontact zit.
2. Verwijder de stekker altijd uit het stopcontact na gebruik of alvorens
de machine schoon te maken.
3. Haal de uit het stopcontact voordat het lampje vervangt.
Vervang het lampje altijd door een lampje van 15 Watt van hetzelfde type
(regio 220-240V).
1. Sta niet toe dat de machine gebruikt wordt als een stuk speelgoed.
Extra oplettendheid is geboden wanneer deze naaimachine gebruikt
wordt door of in de nabijheid van kinderen.
2. Gebruik deze naaimachine enkel zoals voorgeschreven in deze
handleiding. Gebruik enkel de door de fabrikant aanbevolen
accessoires vermeld in deze handleiding.
3. Gebruik de naaimachine nooit als de stekker of de stroomkabel
beschadigd is, als deze niet werkt zoals het hoort, als deze op de grond
of in het water gevallen is of als deze beschadigd is. Breng de machine
naar het dichtstbijzijnde erkende verdeelpunt of service center voor
revisie, reparatie, elektrische of mechanische afstelling.
4. Gebruik de machine nooit als één van de ventilatieopeningen
geblokkeerd is. Houd de ventilatieopeningen van de naaimachine en de
voetweerstand vrij van opeenhopingen van stof, pluisjes, losse stukjes
stof en draad.
5. Houd uw vingers verwijderd van de bewegende delen. Uiterste
voorzichtigheid is geboden in de buurt van de naaimachinenaald.
6. Gebruik steeds de juiste naaldplaat. De verkeerde naaldplaat kan de
naald doen breken.
7. Gebruik geen kromme naalden.
8. Trek niet aan de stof of duw de stof niet terwijl naait. Hierdoor kan
de naald buigen en dus breken.
9. Schakel de machine altijd uit (schakelaar op stand "O") als
aanpassingen uitvoert in de buurt van de naald zoals het inrijgen van de
naald, het wisselen van naald, het plaatsen van de spoel of het
wisselen van persvoetje, enz.
11. Laat niets vallen of steek niets in de openingen van de machine.
12. Gebruik de machine niet buitenshuis.
13. Gebruik de machine niet in ruimtes waar spuitbussen gebruikt
worden of waar zuurstof wordt toegediend.
15. Verwijder de stekker niet uit het stopcontact door aan de stroomkabel te
trekken maar grijp de stekker zelf vast en trek hieraan.
16. Het geluidsniveau bedraagt onder normale omstandigheden 75dB(A).
Deze naaimachine is enkel bestemd voor huishoudelijk gebruik.
Lees alle voorschriften goed door voordat u deze naaimachine in gebruik
neemt.
stekker altijd u
u
u
10. Haal de stekker altijd uit het stopcontact voor het verwijderen van
afdekplaten, het oliën van de machine of voor het uitvoeren van om het
even welk ander onderhoudswerk beschreven in deze handleiding.
14. Om de machine uit te schakelen, zet u alle schakelaars op de "uit"-stand
("O") en haalt u vervolgens de stekker uit het stopcontact.
17. Zet de machine uit of haal de stekker uit het stopcontact wanneer de
machine niet goed werkt.
18. Zet niets op het voetpedaal.
19. Als het snoer aan het voetpedaal is beschadigd, moet het worden
vervangen door de fabrikant, een erkende reparateur of een persoon met
vergelijkbare kennis en ervaring om gevaar te voorkomen.
20. Dit toestel is niet bedoeld voor gebruik door personen (ook kinderen)
met verminderde lichamelijke, zintuiglijke of mentale functies, of met
onvoldoende ervaring en kennis, tenzij ze onder toezicht staan of
geïnstrueerd worden over het gebruik van het toestel door een persoon
die verantwoordelijk is voor hun veiligheid.
21. Kinderen moeten onder toezicht staan, zodat ze niet met het toestel
kunnen spelen.
GEVAAR
WAARS HUWING
BEWAAR DEZE HANDLEIDING
- Om de kans op elektrische schok te minimaliseren:
- Om de kans op brandwonden, vuur,
elektrische schok of persoonlijke letsels te minimaliseren:
BELANGRIJKE VEILIGHEIDSINSTRU TIES

English
When using an electrical appliance, basic safety should always be
followed, including the following:
Read all instructions before using this sewing machine.
1. An appliance should never be left unattended when plugged in.
2. Always unplug this appliance from the electric outlet immediately
after using and before cleaning.
3. Always unplug before re-lamping. Replace bulb with same type
rated 10 watts (110-120V area) or 15 watts (220-240V area).
1. Do not allow to be used as a toy. Close attention is necessary
when this appliance is used by or near children.
2. Use this appliance only for its intended use as described in this
manual. Use only attachments recommended by the manufacturer
as contained in this manual.
3. Never operate this appliance if it has a damaged cord or plug, if it is
not working properly, if it has been dropped or damaged, or dropped
into water. Return the appliance to the nearest authorized dealer or
service center for examination, repair, electrical or mechanical
adjustment.
4. Never operate the appliance with any air openings block. Keep
ventilation openings of the sewing machine and foot controller free
from accumulation of lint, dust, and loose cloth.
5. Keep fingers away from all moving parts. Special care is required
around the sewing machine needle.
6. Always use the proper needle plate. The wrong plate can cause
the needle to break.
7. Do not use bent needles.
8. Do not pull or push fabric while stitching. It may deflect the needle
causing it to break.
9. Switch the sewing machine off ("O") when making any adjustments in
the needle area, such as threading needle, changing needle,
threading bobbin, or changing presser foot, and the like.
10. Always unplug sewing machine from the electrical outlet when
removing covers, lubricating, or when making any other user
servicing adjustments mentioned in the instruction manual.
11. Never drop or insert any object into any opening.
12. Do not use outdoors.
13. Do not operate where aerosol spray products are being used or
where oxygen is being administered.
14. To disconnect, turn all controls to the off ("O") position, then remove
plug from outlet.
15. Do not unplug by pulling on cord. To unplug, grasp the plug, not the
cord.
16. The sound pressure level under normal operating conditions is
75dB(A).
17. Please turn off the machine or unplug when the machine is not
operating properly.
18. Never place anything on the foot controller.
19. If the supply cord that fixed with foot controller is damaged, it must
be replaced by the manufacturer or its service agent or a similar
qualified person in order to avoid a hazard.
20. This appliance is not intended for use by persons (including children)
with reduced physical, sensory or mental capabilities, or lack of
experience and knowledge, unless they have been given
supervision or instruction concerning use of the appliance by a
person responsible for their safety.
21. Children should be supervised to ensure that they do not play with
the appliance.
DANGER
WARNING
SAVE THESE INSTRU TIONS
- To reduce the risk of electric shock:
- To reduce the risk of burns, fire, electric shock, or
injury to persons:
This sewing machine is intended for household use only.
IMPORTANT SAFETY INSTRU TIONS

GBNL
F
Ch re cliente, cher client,
Vous venez de faire l'acquisition d'une
machine ce dont nous vous félicitons.
Vous avez en effet opté pour un
produit de qualité qui a été fabriqué
avec le plus grand soin.
Ce livret d'instructions vous informe
sur toutes les possibilités offertes par
votre machine à coudre. Si vous
désirez recevoir un complément
d'informations, n'hésitez pas à vous
adresser aux vendeurs.
Il ne nous reste qu'à vous souhaiter
beaucoup de plaisir et de succ s.
Hartelijk gefeliciteerd met de aankoop
van uw nieuwe naaimachine!
U heeft een kwaliteitsprodukt gekocht
dat met veel zorgvuldigheid werd
vervaardigd. Uw naaimachine is
eenvoudig te bedienen en deze
handleiding helpt u om alle
mogelijkheden van uw machine te
ontdekken. Lees deze aandachtig door
voordat u met het naaien begint. Af en
toe zult u wel eens een vraag hebben
die dit boek niet kan beantwoorden.
Uw vakhandelaar is dan altijd graag
bereid om u advies en tips te geven.
Wij weensen u veel plezier bij het
naaien.
Congratulations:
As the owner of a new sewing
machine, you will enjoy precision
quality stitching on all types of fabrics,
from multiple layers of denim to
delicate silks.
Your sewing machine offers the
ultimate in simplicity and ease of
operation. For your safety and to fully
enjoy the many advantages and ease
of operation of your sewing machine,
we recommend that you read all the
important safeguards and use and
care instructions in this instruction
book.
May we suggest that before you start
to use your sewing machine, you
discover the many features and
advantages by going through this
instruction book, step by step, while
seated at your sewing machine.

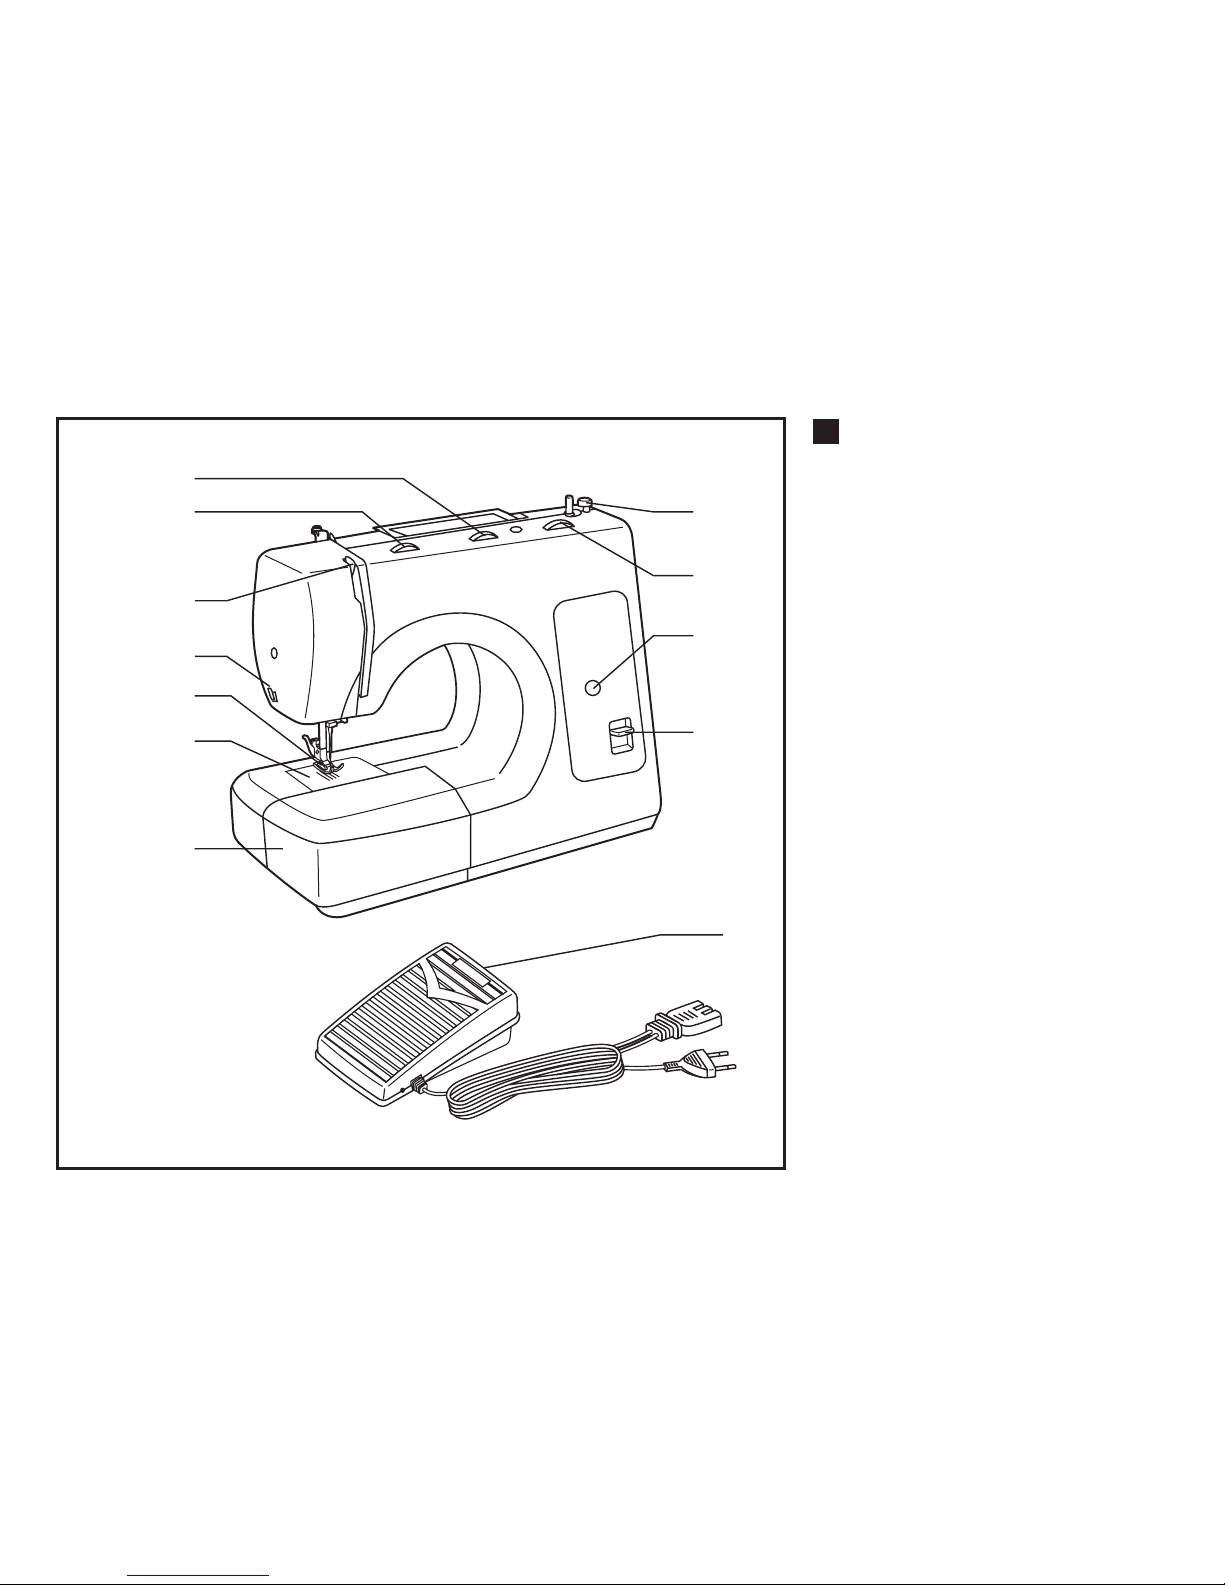
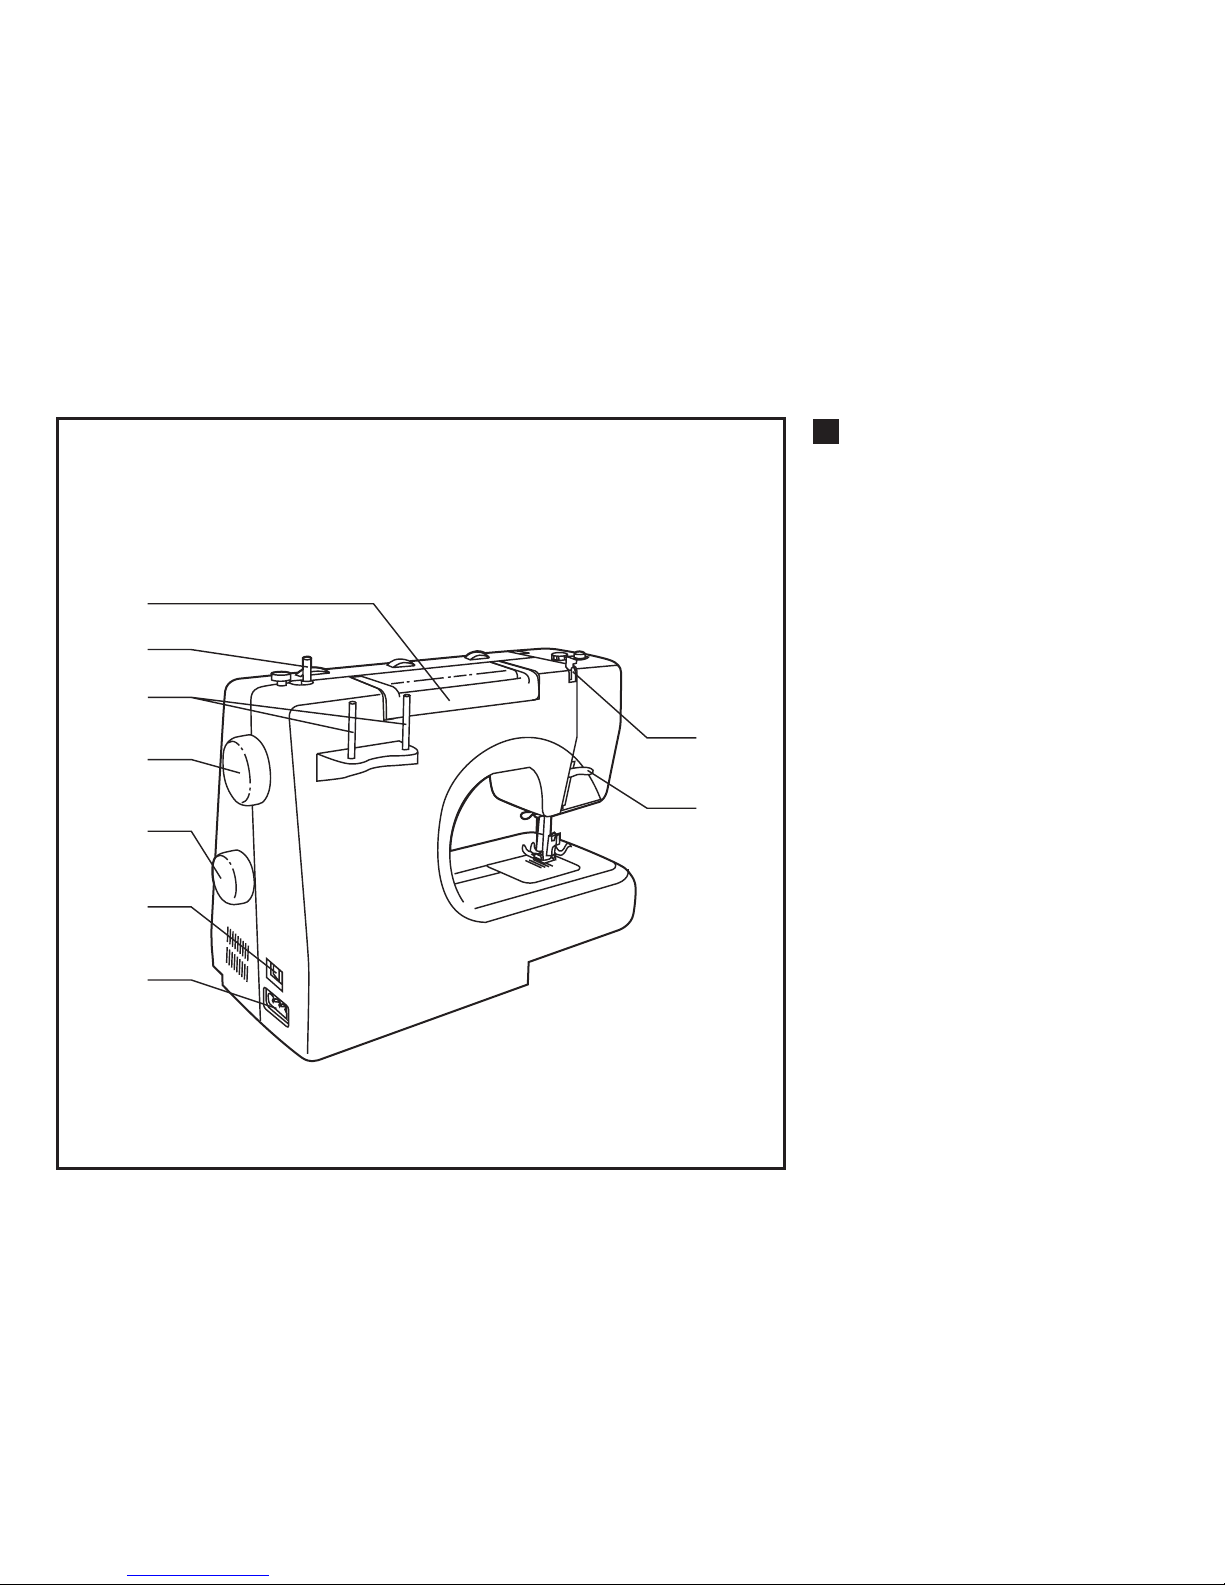
Details of the machine ............................................3/5
Accessories ...............................................................7
Fitting the snap-in sewing table .................................9
Connecting machine to power source .....................11
Changing the bulb....................................................12
Two-step presser foot lever .....................................13
Attaching the presser foot shank .............................15
Winding the bobbin..................................................17
Inserting the bobbin .................................................19
Inserting the needle (System 130/705H) .................21
Threading the upper thread .....................................23
Thread tension.........................................................25
Bringing up the lower thread....................................27
Reverse sewing .......................................................29
Matching needle/ fabric/ thread ...............................31
Straight stitching / Zigzag stitching .........................34
Blind hem/ lingerie stitch..........................................36
Overlock stitches .....................................................38
Sewing on buttons ...................................................40
How to sew buttonholes...........................................42
Zippers and piping ...................................................44
Sewing with the Hemmer foot..................................46
3-step zig-zag ..........................................................48
Stitch selection.........................................................50
Smocking stitch........................................................52
Sewing with the Cording foot...................................54
Darning ....................................................................56
Practical stitches......................................................58
Maintenance ............................................................60
Trouble shooting guide ............................................63
Korte kennismaking ................................................3/5
Accessoires ...............................................................7
Aanschuiftafel bevestigen..........................................9
Aansluiten van de naaimachine...............................11
Een lampje vervangen.............................................12
Tweetraps naaivoethevel.........................................13
Bevestigen van de naaivoethouder .........................15
Onderdraad opspoelen............................................17
Spoelklosje inzetten.................................................19
Naald inzetten (System 130/705H)..........................21
Inrijgen van de bovendraad .....................................23
Draadspanning ........................................................25
Onderdraad omhooghalen.......................................27
Achteruit naaien / Verwijderen van het naaiwerk.....29
Naald- en garentabel ...............................................31
Rechte steek / Zigzagsteek .....................................34
Blindzomen..............................................................36
Overlocksteken........................................................38
Knopen aanzetten....................................................40
Knoopsgaten............................................................42
Ritsen inzetten.........................................................44
Naaien met de zoomvoet.........................................46
Gestikte zigzag ........................................................48
Steekkeuze..............................................................50
Wafelsteek...............................................................52
Koorvote ..................................................................54
Stoppen ...................................................................56
Gebruikssteken........................................................58
Onderhoud ..............................................................60
Opheffen van storingen ...........................................62
Détails de la machine ............................................2/4
Accessoires ...............................................................6
Mise en place de la tablette de travail .......................8
Branchement de la machine à une source
d'alimentation...........................................................10
Changement de l'ampoule.......................................12
Levier du pied-de-biche à deux positions ................13
Montage du support de pied-de-biche.....................14
Bobinage du fil inférieur...........................................16
Mise en place de la canette.....................................18
Mise en place de l'aiguille Syst me 130/705H ........20
Enfilage du fil supérieur ...........................................22
Tension du fil ...........................................................24
Remonter le fil inferieur............................................26
Marche arri re / Retrait de l'ouvrage .......................28
Tableau des aiguilles et fils......................................30
Couture au point droit / Couture au point Zig-zag....33
Ourlet au point invisible ...........................................35
Point overlock ..........................................................37
Pose des boutons....................................................39
Confection des boutonni res ...................................41
Pose d'une fermeture à glissi re .............................43
Coudre avec le pied ourleur.....................................45
Point zig-zag cousu .................................................47
Sélection des points.................................................49
Point nid d'abeille.....................................................51
Coudre avec le pied pour cordonnet........................53
Reprise ....................................................................55
Points utilitaires........................................................57
Entretien .................................................................59
Comment remédier soi-même aux petits
probl mes...........................................................61
Sommaire
FNL GB
Inhoud List of contents

FDétails de la machine
2
2
3
6
7
8
9
11
12
1
10
4
5
1. Bouton pour la largeur de point
(optionnel)
2. Régulateur de tension du fil
3. Levier de tension de fil
5. Pied-de-biche
6. Plaque á aiguille
7. Table-rallonge et boîte à
accessoires (rabattues)
8. Butée bobineur
9. Bouton pour la longueur de point
(optionnel)
10. Affichage point
11. Levier de marche arri re
12. Pédala de commanda
4. Coupe fil

GB Details of the machine
NL Korte kennismaking
3
1. Zigzagbreedteknop
(Steekbreedteknop)
2. Draadspanning sknop
3. Draadhevel
4. Draadafsnijder
5. Naaivoethouder
6. Steekplaat
7. Aanschuifafel
8. Afslaghevel
9. Steeklengteknop
(Steekbreedteknop)
10. L.E.D.-scherm
11. Achteruitnaai-hevel
12. Vootweerstand
1. Stitch width dial (optional)
2. Thread tension dial
3. Thread take-up lever
4.
5.
6. Needle plate
7.
8. Bobbin stopper
9. Stitch length dial (optional)
10.
11.Reverse sewing lever
Thread cutter
Presser foot
Sewing table and accessory box
Stitch display
12.Foot speed control

4
14
15
16
17
18
19
20
21
13. Poiqnée de transport
14. Dévidoir
15. Broches à bobines
16. Volant
17. Sélecteur de points
18. Interrupteur principal
19. Branchement du réseau
20. Guidage du fil pour le bobinage
21. Levier du pied-de-biche à deux
13
FDétails de la machine

5
13. Handvat
14. Garenwinder-as
15. Garenhouder
16. Handweil
17. Steekkeuzeknop
18. Hoofdschakellar
19. Contra-stekker
20. Bovendraadgeleider
21. Presvoethevel
13.Handle
14.Bobbin winder
15.Spool pin
16.Hand wheel
17.Patten selector dial
18.Power switch
19.Main plug socket
20.Upper thread guide
21.Presser foot lever
GB Details of the machine
NL Korte kennismaking

FAccessoires
6
Accessoires standard
Extra Pieds-de-biche
a. Pied universel dans machine
b. Pied pour fermetures à glissi re
c. Pied à boutonni re
d. Pied pour poser des boutons
e. Tournevis
f. Pinceau/Découvit
g. Huileur
h. 3 aiguilles
i.
j.
k. Darning plate
l.
*Ces 10 pieds-de-biche ne font pas partie
de l'équipement standard. Mais ils sont
disponibles comme accessoires spéciaux
auprés de votre agent local.
m. Pied à broder
q. Pied ourleur
r. Pied pour cordonnet
3 canettes
Guide
Feutre de cannet (2x)
n.Pied à overlock
o. Pied pour ourlet invisible
p. Pied à repriser
s.
t.
u.
v.
Pied pour quilt
Pied fronceur
Pied de transport supérieur
Feutre de cannet
e
i
006804008
p
006800008
r
006916008
h
o
006016008
j
f
m
q
s
006803008
006810008
006917008
u
a
006806008
b
006905008
d
006914008
c
006909008
g
k
n
006812008
t
006815008
v
l

7
Accessoires GBNL
Standaardaccessoires
Extra accessoires-(optie)
a. Zigzagvoet
b. Ritsvoet
c. Knoopsgatenslede
d. Knoopaanzetvoet
e. Sommesje
f. Tornmesje
g. Olieflesje
h. Doosje naaldn (3x)
i. Iineaal
j. Spoelklosjes
k. Stopplaat
l. Klosviltje (2x)
* Deze 10 naaivoetjes behoren niet tot de standaard. Ze zijn echter bij
uw vakhandelaar als extra toebhoren verkrijgbaar.
m. Borduurvoet
n. Overlockvoet
o. Blindzoomvoet
p. Stopvoet
q. Rolzoomvoet
r. Koordvoet
s.
t.
u.
v.
Quiltvoet
Rimpelvoet
Boventransportvoet
Klosviltje
Standard accessories
Optional accessories
a. All purpose foot
b. Zipper foot
c. Buttonhole foot
d. Button sewing foot
e. L-screwdriver
f. Seam ripper/ brush
g. Oil bottle
h. Pack of needles (3x)
I. Bobbin (3x)
j. Edge/ quilting guide
k. Darning plate
L. Spool pin felt (2x)
(These 10 accessories are not supplied with this machine; they are
however available as special accessories from your local dealer.)
m.Satin stitch foot
n. Overcasting foot
o. Blind hem foot
p. Darning / Embroidery foot
q. Hemmer foot
r. Cording foot
s. Quilting foot
t. Gathering foot
u. Working foot
v. Twin needle
Accessories

1
2
8
F
Pousser la tablette de travail dans le
sens de la fl che jusquà ce qu'elle
prenne l'encoche.(1)
Si l'on doit coudre sur le bras libre, il
faut alors enlever la tablette de travail
dans le sens contraire.
L'intérieur de la tablette de travail est
prévu pour les accessoires.(2)
Mise en place de la tablette de travail

9
Fitting the snap-in sewing tableAanschuiftafel bevestigen GBNL
Houdt de aanschuiftafel horizontaal en druk hem in de
richting van de pijl. Verwijderen van de aanschuiftafel naar
links wegtrekken met vingers aan de onderzijde
vasthouden.(1)
De binnenzijde van de aanschuiftafel kan worden gebruikt
als toebehoren-bakje.
Openen, zoals de punt van de rode pijl aangeeft.(2)
Keep the snap-in sewing table horizontal, and push it in the
direction of the arrow. (1)
The inside of the snap-in sewing table can be utilized as an
accessory box.
To open, lift up at the point of the arrow. (2)

10
1
23
A
Branchez la machine tel qu'illustré en (1). La fiche de la machine est
dotée de broches normalisées et doit être utilisée avec une prise de
courant conforme aux normes en vigueur. (2)
Débranchez le fil d'alimentation lorsque la machine n'est pas utilisée.
A l'aide du rhéostat, vous contrôlez la vitesse de couture de la machine.
(3)
Consultez un électricien qualifié si vous doutez du branchement de
la machine.
Débranchez la machine quand celle-ci n'est pas en service.
Les rhéostats qui doivent être utilisés obligatoirement avec l'appareil:
4C-316B (région 110-120V)/ 4C-326G (région 230V)/ 4C-316C, 4C-
326C (région 220-240V) fabriqués par Panasonic Co., Ltd.(TW) ou
KD-1902 (région 110-120V) / KD-2902 (région 220-240V) fabriqués
par ZHEJIANG FOUNDER MOTOR CORPORATION LTD.
Appuyez sur l'interrupteur d'alimentation (A): l'ampoule s'allume et la
machine est prête à l'emploi.
La prise de la machine comporte des broches polarisées (l'une est plus
large que l'autre). Afin de réduire les risques de choc électrique, la fiche
ne se branche que dans une prise de courant polarisée et dans un sens
seulement.
Si la fiche ne peut être branchée compl tement dans la prise, l'inverser.
Si la difficulté persiste, contacter un électricien. Ne pas modifier la fiche
de quelque façon que ce soit.
Attention:
Pédale de commande
Attention:
Eclairage
REMARQUE IMPORTANTE
Polarized attachment plug
Conductor intended
to be grounded
FBranchement de la machine à une source
d'alimentation

11
onnecting machine to power source
Aansluiten van de naaimachine GBNL
Sluit de machine aan zoals hiernaast getoond wordt. (1) De
stroomkabel van de machine is voorzien van een 2-polige stekker
die enkel geschikt is voor gebruik in combinatie met een 2-polig
stopcontact. (2)
Haal steeds de stekker uit het stopcontact als de machine niet
gebruikt wordt.
Met het voetpedaal regelt U de naaisnelheid van de machine. (3)
Raadpleeg een gediplomeerde elektricien als U twijfelt over de
aansluiting. Schakel de machine uit en verwijder de stekker uit
het stopcontact als U de machine niet gebruikt.
U mag enkel volgend type voetpedaal gebruiken: 4C-316B
(110-120V zone)/ 4C-326G (230V zone)/ 4C-316C, 4C-326C
(220-240V zone) vervaardigd door Panasonic Co., Ltd. (TW),
KD-1902 (110-120V zone) / KD-2902 (220-240V zone)
vervaardigd door ZHEJIANG FOUNDER MOTOR
CORPORATION LTD. (China)
Schakel de stroomschakelaar (A) aan: het lampje gaat aan en de
machine is klaar voor gebruik.
Stroomkabels die voorzien zijn van een 2-polige stekker waarvan
de contactpennen niet rond maar plat zijn (de ene breder dan de
andere), zijn NIET geschikt voor de Belgische markt.
Contacteer uw verdeler of installateur indien U deze stekker wil
veranderen.
Opgelet:
Voetpedaal
Aandacht:
Verlichting
BELANGRIJKE OPMERKING
Connect the machine to a power source as illustrated. (1)
For appliance is equipped with a polarized plug which must be used
with the appropriate polarized outlet. (2)
Unplug power cord when machine is not in use.
Foot control regulates the sewing speed. (3)
Consult a qualified electrician if in doubt as to connect machine
to power source.
Unplug power cord when machine is not in use.
The foot control must be used with the appliance by 4C-316B
(110-120V area)/ 4C-326G (230V area)/ 4C-316C, 4C-326C
(220-240V area) manufactured by Panasonic Co., Ltd.(TW) or
KD-1902 (110-120V area)/ KD-2902 (220-240V area)
manufactured by ZHEJIANG FOUNDER MOTOR
CORPORATION Ltd.
Press main switch (A) for power and light on. (" l ")
For appliance with a polarized plug (one blade is wider than the
other).
To reduce the risk of electric shock, this plug is intended to fit in a
polarized outlet only one way. If it does not fit fully in the outlet,
reverse the plug. If it still does not fit, contact a qualified electrician
to install the proper outlet. Do not modify the plug in any way. (2)
Attention:
Foot control
Attention:
Sewing light
IMPORTANT NOTI E

2
1
12
B
A
Een lampje vervangen
GB
NL
F
Verwijder de stekker uit het stopcontact.
Vervang het lampje door een lampje van
15 watt (regio 220-240V) van hetzelfde
type.
- Draai schroef (A) los zoals getoond. (1)
- Verwijder het voorkapje (B).
- Schroef het lampje los en plaats een
nieuw lampje (C). (2)
- Plaats het voorkapje terug en schroef het
vast.
In geval van problemen, raadpleeg uw
plaatselijke verdeler.
Débranchez la machine de la prise de
courant avant de changer l'ampoule.
Remplacez cette derni re une ampoule
de 10 watts (110-120V area) ou 15 watts
(220-240V area) du même type.
- Desserrez la vis (A) comme indiqué. (1)
- Enlevez le couvercle latéral (B).
- Dévissez l'ampoule et installez une
nouvelle (C). (2)
- Replacez le couvercle et serrez la vis.
En cas de probl mes, adressez-vous à
votre revendeur local.
par
hangement de l'ampoule
Disconnect the machine from the power
supply by removing the plug from the main
socket!
Replace bulb with same type rated 10
watts (110-120V area) or 15 watts (220-
240V area).
- Loosen screw (A) as illustrated. (1)
- Remove the cover (B).
- Unscrew the bulb and fit new one (C). (2)
- Replace the cover and tighten screw.
Should there be any problem. Ask your
local dealer for advice.
hanging the bulb

13
A
NL
F
Pour la couture des tissus tr s épais, on
peut augmenter l'espace entre le pied-de-
biche et la plaque à aiguille, en relevant le
pied d'un cran. (A)
Levier du pied-de-biche à deux
positions
When sewing several layers or thick fabrics, the
presser foot can be raised a second stage for
easy positioning of the work. (A)
The presser foot pressure of the machine has
ben pre-set and requires no particular
readjustment according to the type of fabric
(light-or-heavy weight).
However, if you need to adjust the presser foot
pressure, turn the presser adjusting screw with a
coln.
For sewing very thin fabric, loosen the pressure
by turning the screw counter clockwise, and for
heavy fabric, tighten by turning it clockwise.
Adjuste presser foot pressure
Wanneer u zeer dikke stoffen naait, kan de
afstand tussen de naaivoet en de
steekplaat vergroot worden door de
naaivoethevel geheel naar teboven duwen.
(A)
Tweetraps naaivoethevel
I
GB Two-step presser foot lever

14
e
a
c
d
e
f
b
3
12
4
b
a
g
F
Relever la barre du pied-de-biche (a).
Monter le support (b) comme indiqué sur le
schéma. (1)
Abaisser le support du pied-de-biche (a)
jusqu'à ce que la rainure (c) ce trouve
positionnée juste au-dessus de la broche
(d). (2)
Appuyer lég rement le levier (e) vers
l'avant. Abaisser la barre du pied-de-biche
(a). Le pied-de-biche (f) s'encliqu te.
Relever le pied-de-biche. (3)
Appuyer lég rement le levier (e) vers
l'avant, de mani re à dégager le pied.
Introduire le guide (g) avec précaution, en
procédant comme indiqué sur le schéma.
Le guide s'utilise pour les ourlets, les plis
etc. (4)
Pour toutes ces manipulations,
interrupteur principal sur ("O").
Mise en place du pied-de-biche
Retrait du pied-de-biche
Mise en place du guide
Attention:
Montage du support de pied-de-
biche

15
GB
Raise the presser foot clamp (a). (1) Attach the presser foot shank (b) as
illustrated.
Lower the presser foot shank (b) until the cut-out (c) is directly above the
pin (d). (2)
Raise the lever. (e)
Lower the presser foot shank (b) and the presser foot ( f) will engage
automatically.
Raise the presser foot. (3)
Raise the lever (e) and the foot disengages.
Attach the edge/ quilting guide (g) in the slot as illustrated. Adjust
according to need for hems, pleats, etc. (4)
Turn power switch to off ("O") when carrying out any of the above
operations!
Attaching the presser foot
Removing the presser foot
Attaching the edge/ quilting guide
Attention:
Attaching the presser foot shankBevestigen van de naaivoethouder
NL
Naaivoetstang (a) omhoogzetten.
Naaivoethouder (b) zoals afgebeeld monteren. (1)
Naaivoetstang (a) laten zakken tot de gleuf (c) zich precies boven
het asje (d) van de naaivoet bevindt. (2)
Hevel (e) iets naar voren duwen.
Naaivoetstang (a) laten zakken. De naaivoet (f) zit automatisch
vast.
Naaivoet omhoogzetten. (3)
Hevel (e) iets naar voren drukken. Nu kunt u de naaivoet
verwijderen.
De kantlineaal (g) zoals op de afbeelding aangegeven zorgvuldig
bevestigen (bijv. voor zomen, plooien). (4)
Bij alle handelingen de hoofdschakelaar op ("O") zetten!
Naaivoet bevestigen
Naaivoet verwijderen
Kantlineaal bevestigen
Attentie:
This manual suits for next models
1
Table of contents
Other Silver Sewing Machine manuals
Popular Sewing Machine manuals by other brands

Singer
Singer 95-80 Instructions for using and adjusting

Janome
Janome DC 4030 - brochure

Brother
Brother LK3-B432E MKII Specifications

Atlanta Attachment Company
Atlanta Attachment Company 1330K Technical Manual & Parts Lists

Singer
Singer 2273 instruction manual

Global
Global UP 1515 VF-AUT Instructions & operating manual