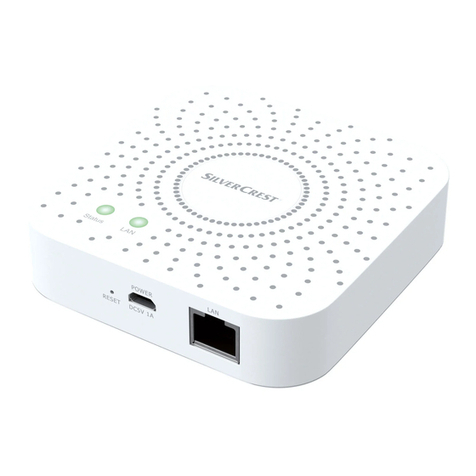
Silvercrest SGWZ 1 A1 User manual

GATEWAY
Operation and safety notes
IAN 341809_1910
GATEWAY SGWZ 1 A1

GB/IE/NI/MT/CY Operation and safety notes Page 3

3GB/IE/NI/MT/CY
GATEWAY
Warnings and symbols used ..........................................Page 4
Introduction .............................................................Page 5
Intended use ............................................................Page 5
Scope of delivery .......................................................Page 5
You will need............................................................Page 5
Safety notices ...........................................................Page 6
Description of parts.....................................................Page 8
Technical data ...........................................................Page 9
Trademark notices......................................................Page 10
Before first use ..........................................................Page 10
Connecting the product ................................................Page 11
Installing the app . . . . . . . . . . . . . . . . . . . . . . . . . . . . . . . . . . . . . . . . . . . . . . . . . . . . . . . Page 12
Pairing product and mobile device...................................Page 13
Unpairing product from mobile device ..............................Page 15
Additional functions ....................................................Page 16
Tap-to-Run / Automation ..............................................Page 21
Resetting the product manually ......................................Page 29
LED signals...............................................................Page 30
Optional – Wall mounting .............................................Page 31
Cleaning and care ......................................................Page 32
Troubleshooting.........................................................Page 33
Glossary .................................................................Page 35
Disposal..................................................................Page 35
Warranty ................................................................Page 36
Simplified EU declaration of conformity .............................Page 37

4 GB/IE/NI/MT/CY
Warnings and symbols used
The following warnings are used in the instruction manual, quick start guide,
safety instructions and on the packaging:
Observe the warnings and safety
instructions!
NOTE: This symbol in combination
with “Note” provides additional useful
information.
DANGER! This symbol in combination
with the signal word “Danger” marks
a high-risk hazard that if not prevented
could result in death or serious injury.
This symbol means that the operating
instructions must be observed before
using the product.
DANGER! This symbol in combination
with the signal word “Danger” marks
a high-risk hazard that if not prevented
could result in death or serious injury.
Use the product in dry indoor spaces
only.
CAUTION! This symbol in
combination with the signal word
“Caution” marks a low-risk hazard that
if not prevented could result in minor or
moderate injury.
Protection class II:
The power adaptor has a double
insulation.
Direct current / voltage
ATTENTION! This symbol with the
signal word “Attention” indicates a
possible property damage.
Alternating current / voltage
Zigbee 3.0 wireless technology

5GB/IE/NI/MT/CY
Introduction
We congratulate you on the purchase of your new
product. You have chosen a high quality product.
The instructions for use are part of the product.
They contain important information concerning
safety, use and disposal.
Before using the product, please familiarise yourself
with all of the safety information and instructions
for use. Only use the product as described and for
the specified applications. If you pass the product
on to anyone else, please ensure that you also pass
on all the documentation with it.
Intended use
This Gateway (hereinafter called “product”) is an
Information Technology device.
This product serves as a hub for communication
between your mobile device and other
smart Home devices.
This product is intended for private use only. Any
industrial, commercial use or operation in tropical
climates is not intended.
Any other use is considered improper. Any claims
resulting from improper use or due to unauthorised
modification of the product will be considered
unwarranted. Any such use is at your own risk.
Scope of delivery
1x Gateway
1x USB power adaptor
1x USB cable
1x Network cable
1x Mounting template
2x Dowel
2x Screw
1x Metal pin
1x Quick start guide
You will need
WiFi router with
2.4 GHz, IEEE 802.11b/g/n
Mobile device with
iOS 9.0 or higher
Android 5.0 or higher
Ø 5.5 mm
* (for optional wall mounting)

6 GB/IE/NI/MT/CY
Safety notices
BEFORE USING THE PRODUCT, PLEASE
FAMILIARISE YOURSELF WITH ALL OF THE
SAFETY INSTRUCTIONS AND INSTRUCTIONS
FOR USE! WHEN PASSING THIS PRODUCT ON
TO OTHERS, PLEASE ALSO INCLUDE ALL THE
DOCUMENTS!
Children and persons with disabilities
mWARNING! DANGER TO LIFE AND
RISK OF ACCIDENT FOR INFANTS AND
CHILDREN!
mDANGER! Risk of suffocation!
Never leave children unsupervised with the
packaging material.
The packaging material poses a suffocation
hazard.
Children frequently underestimate the dangers.
The packaging material is not a toy.
This product can be used by children aged
from 8 years and above and persons
with reduced physical, sensory or mental
capabilities or lack of experience and
knowledge if they have been given supervision
or instruction concerning use of the product
in a safe way and understand the hazards
involved. Children shall not play with the
product. Cleaning and user maintenance shall
not be made by children without supervision.
Electrical safety
mWARNING! Risk of electric shock!
The product must be checked for damage
before use. A defective or damaged product
must not be put into operation.
Do not use the product if it has been dropped.
Disconnect the power adaptor from the
power supply and contact your retailer
(see “Service”) if it is damaged.
This product does not contain any parts which
can be serviced by the user.
Do not attempt to repair the product yourself.
In case of malfunction, repairs are to be
conducted by qualified personnel only.
Do not open the power adaptor casing under
any circumstances. Do not insert any objects
into the inside of the casing.
Only use this product with the supplied power
adaptor.
Before connecting the power adaptor to the
power supply, check that the voltage and
current rating corresponds with the power
supply details shown on the power adaptor
rating label.
To avoid damaging the cord, do not squeeze,
bend or chafe it on sharp edges. Keep the
cord away from hot surfaces and open flames
as well.
Lay out cords in such a way that no
unintentional pulling or tripping over is
possible.
Keep the power adaptor and its cord out of
reach of children.
Disconnect the power adaptor from the power
supply when not in use and before cleaning.
During cleaning or operation, do not immerse
the electrical parts of the Gateway and the
power adaptor in water or other liquids. Never
hold the Gateway and the power adaptor
under running water.
If smoke or unusual sounds are observed,
immediately unplug the power adaptor from
the power supply. Have the product and the
power adaptor checked by a specialist before
using it again.
Never touch the power adaptor with wet
hands.
The product and the power adaptor shall not
be exposed to dripping or splashing water.

7GB/IE/NI/MT/CY
Power adaptor and Gateway shall not be
covered.
mATTENTION! Risk of property
damage!
When disconnecting the power adaptor from
the mains, pull the power supply and not the
cord.
The power adaptor consumes a small amount
of energy as long as it is connected to a
socket-outlet. In order to switch off the power
adaptor completely, it must be disconnected
from the socket-outlet.
The socket-outlet must remain freely accessible
at all times.
Installation location and operating
environment
mATTENTION! Risk of property
damage!
Do not place burning candles or other open
fire on or next to the product.
Sudden temperature changes may cause
condensation inside the product. In this case,
allow the product to acclimate for some time
before using it again to prevent short circuits!
Do not operate the product near heat sources,
e.g. radiators or other devices emitting heat!
The Gateway must not be operated near
sources of high-frequency or magnetic
interference.
Do not expose the product to direct sunlight.
Observe the operating temperature and
operating humidity (see “Technical data”).
Wireless data transmission
mWARNING – Radio interference
Switch the product off on airplanes, in
hospitals, service rooms, or near medical
electronic systems.
The wireless signals transmitted could impact
the functionality of sensitive electronics.
Keep the product at least 20 cm from
pacemakers or implantable cardioverter
defibrillators, as the electromagnetic radiation
may impair the functionality of pacemakers.
The radio waves transmitted could cause
interference in hearing aids.
Do not place the product near flammable
gasses or potentially explosives areas (e. g.
paint shops) with the wireless components
on, as the radio waves emitted can cause
explosions and fire. The range of the radio
waves varies by environmental conditions.
In the event of wireless data transmission,
unauthorised third parties receiving the data
cannot be excluded.
Operating system updates
In order to keep the product up to date, it is
necessary that you always keep the operating
system of your smartphone and/or tablet PC
up to date.
Update the operating system regularly.
Storage
mATTENTION!
Disconnect the USB power adaptor [] from
the power supply if the product is not going to
be used for a longer period of time.
When not in use, store the product in its
original packaging.
Store the product in a dry, secure location
away from children.

8 GB/IE/NI/MT/CY
Description of parts
21
A
POWER DC5V 1A
RESET
LAN
Status LAN
6
3
4
5
[1] LED Status
[2] LED LAN
[3] RESET button (reset and pairing)
[4] LAN port (RJ45 Ethernet)
[5] Micro USB port POWER DC5V 1A
[6] Wall mounting hole
(back side, not illustrated)
B7
9
8
10
11121314
HG06339
HG06339-BS
15
[7] Network cable
[8] USB type A plug
[9] USB cable
[] Micro USB plug
[] Metal pin
[] Screw (x2)
[] Dowel (x2)
[] Mounting template
[] USB power adaptor
Not illustrated:
[] Quick start guide
[] Safety instructions

9GB/IE/NI/MT/CY
Technical data
Gateway
USB input voltage/current 5 V , 1 A
Frequency band 2.4 to 2.485 GHz
Max. transmitted power 13 dBm
Communication protocol ZigBee 3.0
Reception range/angle approx. 70 m/360° (free area)
Operating temperature +5 to +35 °C
Operating humidity 10 to 70 %
Storage temperature 0 to +45 °C
Measurements approx. 89 x 89 x 23.5 mm
Weight approx. 78 g
Supported operating systems iOS 9.0 or higher
Android 5.0 or higher
USB power adaptor
Importer OWIM GmbH & Co. KG
District court Stuttgart: HRA 721742
Stiftsbergstraße 1
74167 Neckarsulm
GERMANY
Manufacturer Dongguan Guanjin Electronics Technology Co., Ltd.
Model identifier EU version: K05S050100G
UK version: K05S050100B
Input voltage 100–240 V∼
Input AC frequency 50/60 Hz
Input current 0.2 A
Output voltage 5.0 V
Output current 1.0 A
Output power 5.0 W

10 GB/IE/NI/MT/CY
Trademark notices
iOS and Apple are registered trademarks of
Apple Inc. in the USA and other countries.
App Store is a registered trademark of
Apple Inc.
Android, Gmail, Google Play and Google
Assistant* are registered trademarks of
Google Inc.
Zigbee is a registered trademark of The Zigbee
Alliance.
The SilverCrest trademark and trade name is
the property of their respective owners.
Any other names and products may be
trademarks or registered trademarks of their
respective owners.
* Google Assistant is not available in certain
languages and countries.
Before first use
Remove the packaging material. Check if all
parts are complete.

11GB/IE/NI/MT/CY
Connecting the product
Fig. C:
WiFi router
(not included)
C
HG06339-BS
HG06339
7
4
5
15
8
10
1. Connect LAN port [4] to WiFi router (not
included) via network cable [7].
2. Connect Micro USB plug [] to Micro USB
port [5].
3. Connect USB type A plug [8] to USB power
adaptor [].
4. Connect USB power adaptor [] to socket-
outlet.
5. LED LAN [2] lights up.
The Lidl Home app is required
to control and set up the product
(see “Installing the app“).
Important: Your mobile device needs to be
connected to the WiFi router’s wireless network
to perform the installation.

12 GB/IE/NI/MT/CY
Installing the app
Download and install the Lidl Home app
from the Apple App Store or Google Play
Store.
Lidl Home is available in multiple languages.
The language is automatically adjusted to
the language settings of your mobile device.
English is used if your language is not
available.
All screenshots are from iOS 13.3/Android 9
app versions. Older versions may have
functional limitations.
The Android version of the app follows the
same principles as the iOS version; you might
encounter discrepancies between the two
platforms, such as slightly different on-screen
commands or icons.
Heed the notifications in the app when
installing and pairing the product.
Updating the firmware might result in changes
to the app’s functionality.
An updated instruction manual can be found
here:
{
Me
}
tab:
Tap
{
User Manual
}
.
1. Open Lidl Home.
2. Lidl Home may ask for permission to send
notifications.
: Optional, depending on the mobile
device settings.
3.
{
Register
}
4. Agree to privacy policy.
(iOS + Android)
5.
{
Register
}
:
– If the preselected country does not match
your residence, tap
{
>
}
. A list of countries
will be displayed. Scroll down the list and
tap the name of the country you reside in. To
reach the entry faster, type the name of your
country in the search box or tap on the initial
letter on the right side of the screen.
– Enter email address.
– Agree to service agreement and privacy
policy (tap small box ).
The app and the product can only be used
if you have fully understood the service
agreement and the privacy policy and give
your consent.
– Tap
{
Get Verification Code
}
. You will
then receive an email with a verification
code.
6. Enter email verification code.

13GB/IE/NI/MT/CY
7. To secure your privacy, it is necessary to set
a password. Your password must meet the
following requirements:
– 10 to 20 characters
– min. 1 upper-case letter
– min. 1 lower-case letter
– min. 1 digit
– min. 1 special character
Keep the password in a safe place in case you
need it in the future.
8.
{
Done
}
9. Lidl Home may ask for permission to access
the location when using the app.
Optional, depending on the mobile device
settings. Permission is required to display
weather information in the app.
10. Installation complete.
Having problems with the
installation?
Various issues may cause the installation to fail,
for example:
Settings of the mobile device
Functional limitations of older app versions
Consult the “Troubleshooting” section.
Pairing product and mobile
device
1. Open Lidl Home.
(iOS + Android)
2.
{
Home
}
tab:
Select:
–
{
Add Device
}
or
– (add further devices)

14 GB/IE/NI/MT/CY
(iOS)
3. Select category:
{
Gateway
}
.
4. Select:
– iOS:
{
Gateway
}
– Android:
{
Gateway
}
Keep your mobile device close to the Gateway
while pairing.
5. Check if LEDs Status [1] and LAN [2] light
up.
6. Follow the App instructions.
7. Establishing connection.
(iOS)
8. Optional: Tap and rename the product.
9.
{
Done
}
.
Pairing completed.

15GB/IE/NI/MT/CY
Renaming product and setting location
(iOS + Android)
1. Tap .
Tap
{
ZigBee Gateway
}
.
(iOS + Android)
2. Rename the product and set its location.
3.
{
Save
}
.
Pairing completed.
After pairing (iOS/Android)
Additional smart Home devices can be
added (see operating instructions of the
smart Home device that you would like to
install).
Unpairing product from mobile
device
1. Open Lidl Home.
2.
{
Home
}
tab:
Tap
{
ZigBee Gateway
}
(or previously
selected device name).
3. Tap (top right).
4. Tap
{
Remove Device
}
Select:
–
{
Disconnect
}
–
{
Disconnect and wipe data
}
( “Additional functions”).
5.
{
Confirm
}

16 GB/IE/NI/MT/CY
Additional functions
Optional settings
1.
{
Home
}
tab:
Tap
{
ZigBee Gateway
}
.
2. Tap (top right).
(iOS)
3. Tap .
Select:
–
{
Icon
}
:
*
{
Take Photo
}
or
*
{
Select from Album
}
–
{
Name
}
:
Rename product.
–
{
Location
}
:
** Assign a room to the product.
* Access to the mobile devices’ camera
and photo library is required.
** To assign a room to the product, you
first need to add rooms ( “General”,
{
Home Management
}
).
4.
{
Device Information
}
:
Virtual ID, IP address, MAC address and
product’s time zone are displayed.
5.
{
Offline Notification
}
:
A notification is sent when the product is offline
for more than 30 minutes.
– Offline notification on:
Tap .
– Offline notification off:
Tap .
(iOS)
6.
{
Share Device
}
:
Share access to the product with other family
members.
To use this function, you first need to
create a user group (family) ( “General”,
{
Home Management
}
).
7.
{
FAQ
}
:
Check FAQ related to the product.

17GB/IE/NI/MT/CY
8.
{
Check for Firmware Upgrade
}
:
Display the WiFi and ZigBee modules’
firmware version and check for firmware
upgrade.
9.
{
Remove Device
}
:
Select:
–
{
Disconnect
}
Remove product from the app. Data
remaining the product’s memory.
This operation only resets the product to
offline mode and starts the pairing mode.
If you want to remove all data of the product
and the cloud, read the following point.
–
{
Disconnect and wipe data
}
Reset to factory settings.
This function deletes all data from the
product and in the cloud.
Use this function if you pass on,
dispose of or return the product to the
manufacturer.
Make sure that all data on the product
and in the cloud has been deleted.
Follow the instructions in the app.
or
–
{
Cancel
}
Cancel removing the product.
General
{
Smart
}
tab:
{
Tap-to-Run
}
tab:
The product offers the possibility to control
several smart Home devices with one click
or with a smart speaker via voice command.
{
Automation
}
tab:
Set your smart Home devices to perform
certain actions at certain times of day under
certain conditions.
{
Me
}
tab:
(iOS)
Tap the top of the screen to select a new profile
picture and user name, to manage your user
account and to select the temperature unit/time
zone.

18 GB/IE/NI/MT/CY
A blue dot in the app indicates new
notifications.
{
Me
}
tab:
{
Home Management
}
:
Create a user group.
(iOS)
1. Enter family name (or user group name).
2. Set location and tap
{
OK
}
.
Optional. Location is required to display
weather information in the app.
The location is determined automatically. If
the location cannot be determined, you can
roughly determine it by moving the map so
that your place of residence is displayed in the
centre.
3. Select rooms with smart Home devices.
= selected rooms.
Add additional rooms at bottom of list.
4.
{
Save
}
5. Select:
–
{
View Family
}
–
{
Done
}
6. After creating the family in the app, tap
{
Home Management
}
again.
(iOS)
7. Tap family name.
Newcastle
(iOS)
Change the name and location of the family, if
desired.

19GB/IE/NI/MT/CY
{
Room Management
}
: Assign your
smart Home devices to other rooms or
delete rooms from the list, if desired.
– Tap room name.
(iOS)
– smart Home devices that have already
been assigned to the room are shown in the
upper area.
– smart Home devices that have not been
assigned to the selected room are shown in
the lower area.
– Remove device from room:
Tap and then
{
Delete
}
.
– Assign device to room:
Tap .
– Change displayed sequence:
Tap and at the same time drag the device
to the desired position in the list.
– Tap
{
Save
}
.
–
{
Add Room
}
:
Enter room name and then tap
{
Save
}
.
– Delete rooms from list:
Tap (top right).
Tap and then
{
Delete
}
.
Tap
{
Done
}
.
John Smith
(iOS)
{
Add member
}
: Enter name, country/
region, email address and assign a family role
(administrator or common member) and then
tap
{
Save
}
.
The new member must have registered with
Lidl Home before.
Tap a family member to change name, to
grant/revoke administrator rights or to remove
this member from the user group.
{
Delete Home
}
: Delete home from app.
{
Add Family
}
: Create additional families in
the app.

20 GB/IE/NI/MT/CY
{
Me
}
tab:
{
Message Center
}
:
(iOS)
tab:
Notification if one of your smart Home
devices has triggered an alarm (e.g. motion
sensor has been triggered).
tab:
Notifications about family members’ activities.
tab:
General messages, e.g. if a mobile device logs
in to your user account.
tab:
Enable/disable all notifications or single
notification types.
Define time segments in which you do not want
to receive alarms.
{
Me
}
tab:
{
Help Center
}
:
FAQ (Frequently Asked Questions).
{
All
}
tab:
Specific troubleshooting tips for individual
smart Home devices.
{
Me
}
tab:
{
Settings
}
:
(iOS)
Activate/deactivate tones and notifications,
retrieve software information, start a network
diagnosis, clear the cache and log out of the
app.
Other manuals for SGWZ 1 A1
2
This manual suits for next models
1
Table of contents
Other Silvercrest Gateway manuals
Popular Gateway manuals by other brands

Avaya
Avaya Media Gateway G350 Quick start for hardware installation

NETGEAR
NETGEAR CGD24G user manual

ZyXEL Communications
ZyXEL Communications VMG1312-BX0D quick start guide

ZyXEL Communications
ZyXEL Communications P-793H 601156 user guide

KE2
KE2 SmartGate Installation and setup

Erco
Erco DALI-Casambi Gateway Mounting instructions