Silverline 675260 User manual

Users Manual
1250W Wet & Dry Vacuum
Product Code 675260
© November 2006
• This guarantee becomes effective at the date of retail purchase.
PLEASE KEEP YOUR RECEIPT.
• If this product develops a fault within 30 days of purchase, return it to the
stockist where it was purchased, with your receipt, stating details of the fault.
You will receive a replacement or refund.
• If this product develops a fault within 3 years of purchase return it to;
Silverline Tools Service Centre
PO Box 2988
Yeovil
BA21 1WU
Include your original receipt, details of the fault, your name and address, place and
date of purchase. We do not refund carriage. All product should be in a suitably
clean and safe state for repair, and should be packaged carefully to prevent damage
or injury during transportation. We may reject unsuitable or unsafe deliveries.
• You must provide proof of purchase before any work can be carried out.
• All work will be carried out by Silverline Tools or its authorised repair agents.
• Any parts which are replaced will become the property of Silverline Tools.
• The repair or replacement of the product will not extend the period of guarantee.
• The repair or replacement of your product under guarantee provides benefits which
are additional to and do not affect your statutory rights as a consumer.
What is covered:
• The repair of the product, if found to be defective due to faulty materials or workmanship
within 3 years of purchase. If any part is no longer available or out of manufacture,
Silverline Tools will replace it with a functional replacement part.
• Use of the product in the UK.
What is not covered:
Silverline Tools does not guarantee repairs required as a result of:
• Normal wear and tear eg blades, brushes, belts, bulbs, batteries etc.
• Accidental damage, faults caused by negligent use or care,
misuse, neglect, careless operation or handling of the product.
• Use of the product for anything other than normal domestic purposes.
• Change or modification of the product in any way.
• Use of parts and accessories which are not Silverline Tools genuine components.
• Faulty installation (except installed by Silverline Tools).
• Repairs or alterations carried out by parties other than
Silverline Tools or its authorised repair agents.
Silverline Tools 3 Year Guarantee
Thank you for choosing this product
675260_Instructions.indd 1 30/3/07 11:15:12

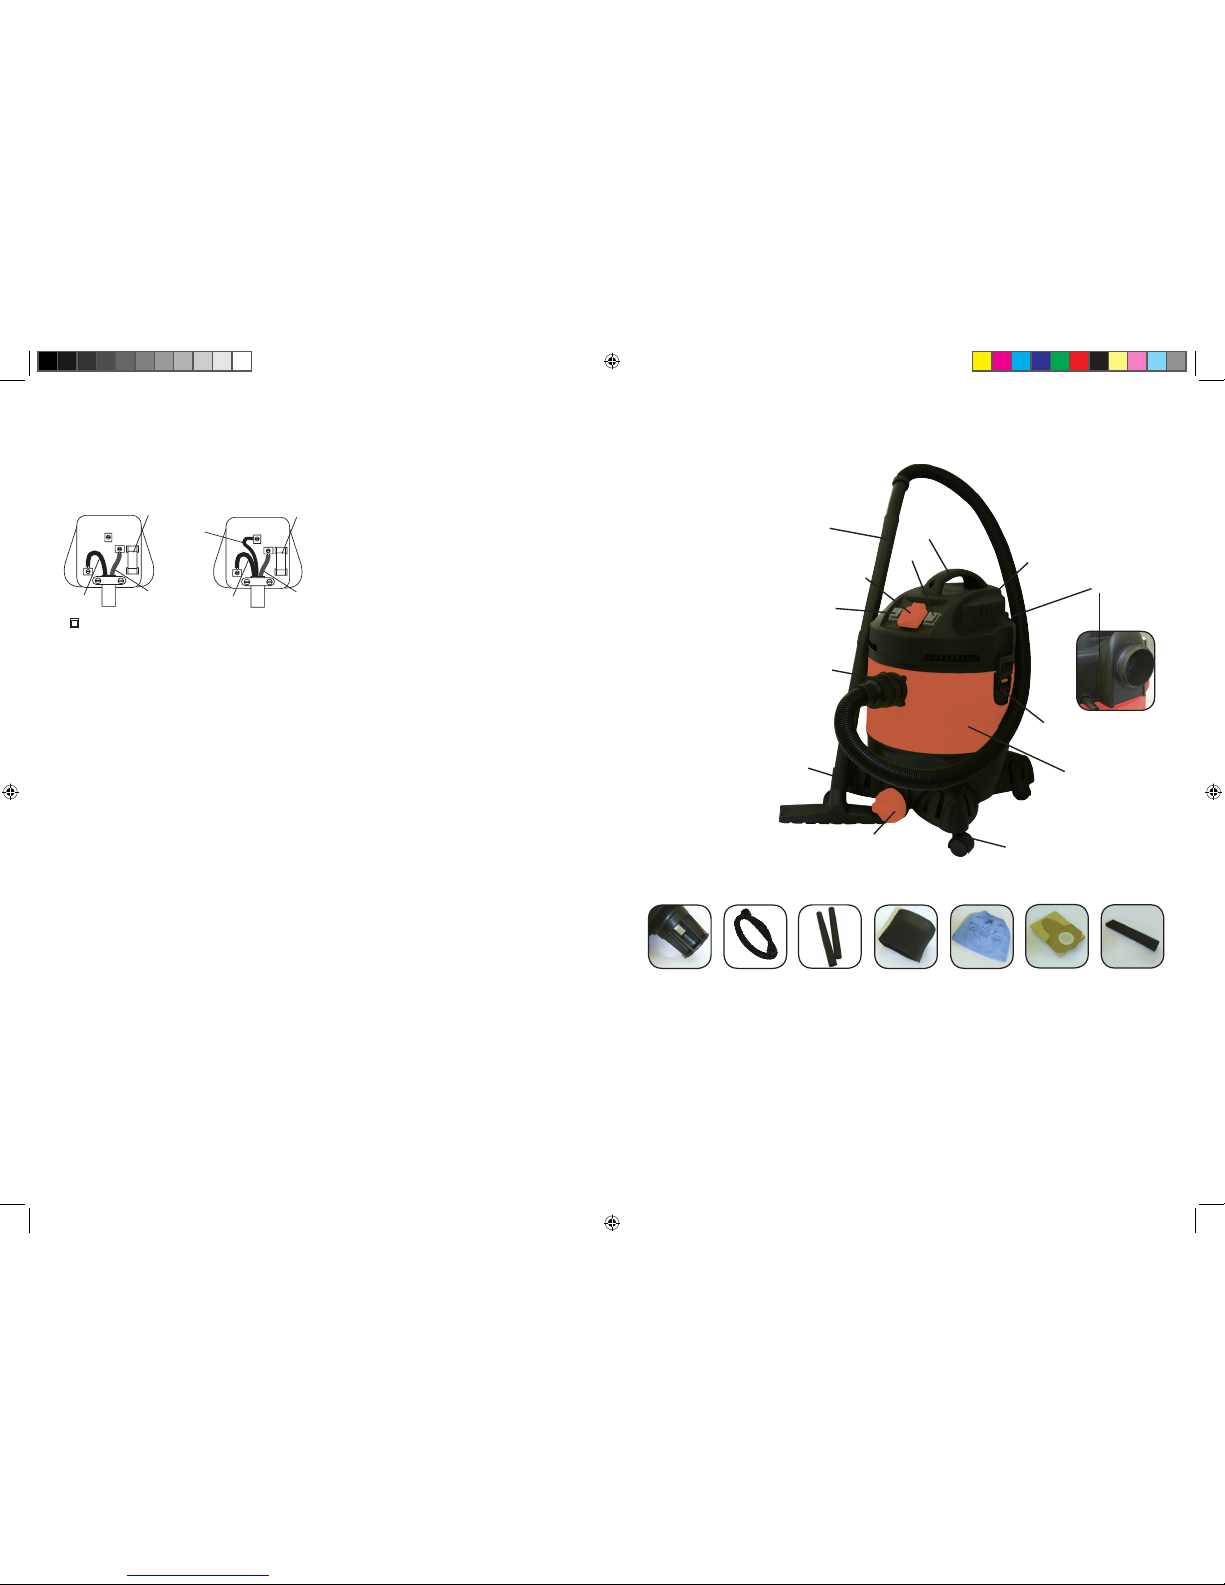
Product Familiarisation
30Ltr Wet & Dry Vacuum Cleaner
Introduction
Carefully read and understand this manual and any label attached
to the tool before use. Keep these instructions with the product for
future reference. Ensure all persons who use and service this
product are acquainted with this manual.
Electrical Safety Information
• The wires in this product are coloured:
Blue Neutral (N)
Brown Live (L)
Green & Yellow Earth (E)
• As the colours may not correspond with the coloured markings
identifying the terminals in your plug, proceed as follows.
• The wire which is coloured blue must be connected to the
terminal which is marked with the letter N or coloured black, the
wire which is coloured brown must be connected to the terminal
which is marked L or coloured red.
• This appliance must be protected by a suitable fuse.
• To prevent fire or shock hazard, do not expose this product to
rain/water or moisture. There are no user serviceable parts inside
except those referred to in this manual. Always refer servicing to
qualified service personnel. Never remove any part of the casing
unless qualified to do so; this unit contains dangerous voltages.
• Use of a residual current device (RCD) will reduce the risk of
electric shock.
NEVER CONNECT THE BROWN OR BLUE WIRE TO THE
EARTH PIN OF THE 13 AMP PLUG. IF IN DOUBT CONSULT A
QUALIFIED ELECTRICIAN
General Safety Instructions
Even when used as prescribed it is not possible to eliminate all
residual risk factors. Use with caution.
Keep guards in position
• Always keep guards in position, in good working order, correctly
adjusted and aligned. Never attempt to use a power tool without
any guard supplied with it.
Remove adjusting keys
• Always check to see that keys and adjusting wrenches are
removed from power tool before turning on.
Clean work area
• Accidents occur where benches and work areas are cluttered
or dirty, floors must be kept clear, avoid working where the floor is
slippery.
Dangerous environment
• Do not use power tools in damp or wet conditions, or expose them
to rain. Provide adequate surrounding work space and keep area
well lit. Do not use power tools where there is a risk of
explosion or fire from combustible material, flammable liquids,
flammable gases or dust of an explosive nature. When using
power tools avoid contact with any earthed items such as pipes,
radiators, cookers, refrigerators, metal baths and taps.
Children & pets
• Children and pets should always be kept at a safe distance from
your workshop child-proof. Lock tool away where children can't get
access to them. Remove batteries from cordless tools.
Use the correct power tool
• Don't force, or attempt to use a power tool for a purpose it was not
designed for. Do not use a small tool to do the job of a heavy duty
tool.
Wear correct clothing and footwear.
• Don't wear loose clothing, neckties or jewellery or other items
which may get caught in moving parts. Wear non-slip footwear,
cover or tie back long hair. Use safety footwear if necessary.
Protect your head
• Wear safety goggles at all times, every day glasses are not
sufficient for eye protection, as lenses are not impact resistant and
could shatter. Use an approved face or dust mask when operation
creates dust. Ensure dust extraction equipment is
functioning and correctly used. Hearing protection should be used
if the sound intensity level for the operator could exceed 85dB(A).
Use a hard hat where there is a risk of falling objects or striking
your head on low level obstructions.
Protect yourself from vibration.
• Hand held power tools may produce vibration. Vibration can cause
disease. Gloves to keep the operator warm and dry and therefore
maintain good blood circulation in the fingers may help. This tool
has not been designed for extended or industrial
operation.
Secure work
• Always secure work. Where practical use a clamp or vice, it will
allow you to use both hands to operate your power tool.
Keep your balance
• Don't over reach, keep proper footing at all times to ensure
correct balance.
Maintain your power tool
• Keep your power tool in good working order, keep tools sharp and
clean for best and safest performance. Ensure ventilation holes
are kept clean and unrestricted at all times.
Always disconnect.
• Before changing tools, always ensure they are disconnected from
the power source.
Accessories
• The use of any attachment or accessory other than those
mentioned in this manual could result in damage or injury. The use
of improper accessories could be dangerous.
Never stand on your power tool
• Standing on your power tool or its stand could cause serious injury
if the tool is tipped or if the cutting tool is accidentally
contacted. Do not store materials above or near the tool so that it
is necessary to stand on the tool or its stand to reach them.
Switch off before connecting.
• Ensure the power tool is switched off before connecting to the
power source. If the power tool stops unexpectedly turn the power
switch to off.
Do not abuse the power cord.
• Be sure your cable/extension cable is properly wired and in good
condition. Always replace a damaged cable/extension cable or
have it repaired by a qualified person before using it. Never yank
or pull the cable to disconnect it from the power socket. Never
carry your power tool by it’s cable. Keep the cable away from
damp, heat, oil, solvents, and sharp edges.
Check for damaged or missing parts.
• Before each use check if any part of the power tool is damaged or
missing, check carefully that it will operate properly and perform
its intended function. Check alignment of moving parts for binding.
Any guard or other part that is damaged should be correctly
repaired or replaced. Do not use if the power switch does not turn
the power on and off. Check any other condition that may affect
the safety of the power tool. DO NOT USE IF DEFECTIVE.
Direction of feed
• Feed work into a blade or cutter against the direction of rotation of
the blade or cutter only.
Don’t leave the tool running unattended
• Always wait until your power tool has come to a complete stop
before leaving it and then disconnect from power source.
FUSE
BROWN
(Live)
BLUE
(Neutral)
E
L
N
FUSE
GREEN/YELLOW
OR GREEN
FUSE
BROWN
(Live)
BLUE
(Neutral)
E
L
N
FUSE
Double Insulated Earthed
1. Handle
2. Top section
3. Blow connection
4. Safety float valve
5. Hose set
6. Extenction tube (x2)
7. Foam filter
8. Reusable filter
9. Dust bag
10.On/off switch
11.Power tool socket
12.Function switch
13.Nozzle
14.Crevice nozzle
15.Drain outlet
16.Clasp (x2)
17.Vacuum hose connection
18.Container
19.Foot with castor (x4)
1.
2.
6.
10.
12.
11.
13.
17.
3.
4. 6. 7. 8. 9. 14.
5.
15.
16.
18.
19.
SPECIFICATION:
Voltage: 230V
Frequency: 50Hz
Power: 1250W
Air flow: 25Ltr/Sec
Capacity: 30Ltr
Mains plug: Earthed
Fuse Rating: 13A
675260_Instructions.indd 2 30/3/07 11:15:27

ASSEMBLY
• Ensure the mains plug is disconnected.
• Undo clasps.
• Lift off top section.
• Remove contents from inside the container.
• Turn the container upside down and insert the two feet castors
on the front and two feet with large wheels at the rear of the tank.
Ensuring the are mounted correctly push all the way in. Screw
them in until tight
• For wet vacuum cleaning fit the supplied foam filter.
• For dry vacuum cleaning fit the supplied cartridge filter.
• Or for dry vacuum cleaning fit the optional dust bag.
• Replace the top section onto the container.
• Align the top section with the clasps and snap into place, by
applying pressure at the mid point of the clasp.
• Insert the large end of the hose into the front inlet of the container
and screw on it until tight.
• Choose the desired nozzle/extension tube(s) and push onto the
suction tube.
OPERATING INSTRUCTIONS
Switching on/off
• Connect the mains plug.
• To switch on the vacuum cleaner: select position l on switch A
• To switch on electrical appliance + vacuum cleaner: select position
l and '=' on switch A & C
• Only connect electrical appliance with a maximum power
rating of 1000W
NOTE: Switching on the electrical appliance automatically switches
on the vacuum cleaner. Once the electrical appliance has been
switched off, the vacuum cleaner switches off following a time laps.
• Switching off the vacuum cleaner: Press O
Dry vacuum cleaning
• Ensure the machine is unplugged from the power supply.
• Check your vacuum is ready for dry vacuuming.
• Place the reusable filter over the basket filter and center.
• Push down until mounting ring of reusable filter is positioned
against ribs of the top section.
• Be sure the reusable filter completely covers the filter basket.
• Check to ensure that all the edges of the reusable filter are
secure under the mounting ring.
• Push the dust bag flange onto the inlet stub, take care not to
damage the bag.
• Reposition the head onto the drum body and clip in place.
• Insert the larger end of the flexible hose into the front inlet on the
container and lock into place.
• Push the required attachment onto the free end of the hose.
• Plug in the power supply.
• Switch the motor on (Position I )
• When you have completed vacuuming, press the switch to off
(position 0), and unplug from the power supply.
NOTE: Check the units dust bag regularly and safely dispose of
contents when 2/3 full. The bag is manufactured so that only air not
dust will pass through the paper, and as such the dust bag must not
be reused.
NOTE: Do not use the dust bag for wet or sharp materials.
A: Function switch
B: Outlet socket
C: on/off Switch
675260_Instructions.indd 3 30/3/07 11:15:32

Wet vacuum cleaning:
• Ensure the unit is unplugged from the power supply. Make sure the
tank is clean and free from dust and dirt.
• Remove the cartridge filter/dust bag and fit a foam filter over
the filter basket. Replace the units top section onto the container.
• Attach the same flexible hose as used in dry vacuuming and fit the
desired nozzle.
• Ensure the unit switch is off (position 0) before plugging into the
power supply.
• Press the switch to On (position I)
• After use empty the tank, clean and dry.
NOTE: To vacuum large quantities of liquid, from a sink or tank etc.
Do not immerse the nozzle completely in the liquid. Leave a gap at
the top of the nozzle opening to allow an air inflow. The unit is fitted
with a float valve which stops the suction action when the tank has
reached its maximum capacity. The user will notice an increase in
unit motor speed. When this happens turn the unit off and disconnect
from the power supply. Remove the top of the unit and dispose of the
liquid into a suitable receptacle. To continue vacuuming refit the top
of the unit and reconnect to the power supply.
NOTE: After wet vacuuming turn the machine off and remove the
plug from the power supply. Empty the contents and clean and dry
the unit inside and out.
WARNING: After wet vacuuming the foam filter must be removed
and a cartridge filter/dust bag must be fitted before dry
vacuuming again.
Blowing
• Push the large end of the flexible hose into the blow connection
in the top of the motor housing.
• Ensure the switch is in the OFF position before plugging into
the power supply.
• Select the ON position 'l'.
• The unit will now blow through the vacuum hose and can be
used to clear obstructions within the pipe.
WARNING: If after a few seconds the hose is still blocked turn off
the unit and clear the hose manually.
MAINTENANCE
• Ensure the unit is unplugged from the power supply.
• Disconnect the hose from the unit.
• Undo the clasps and remove the motor head from the container.
• Open drain outlet cover to allow the vacuumed liquid to drain out.
• Clear out any debris or dirt from the container and hose.
• Clean the foam filter with a mild soapy solution.
• Ensure that the filter is dry.
• Check the hoses and attachments, check the power cable make
sure they have received no damage.
• Ensure the switch (10) is in the OFF position before plugging into
the power supply.
• Press the switch to the ON position.
• After use empty the tank, clean and dry well.
675260_Instructions.indd 4 30/3/07 11:15:33
Other Silverline Vacuum Cleaner manuals