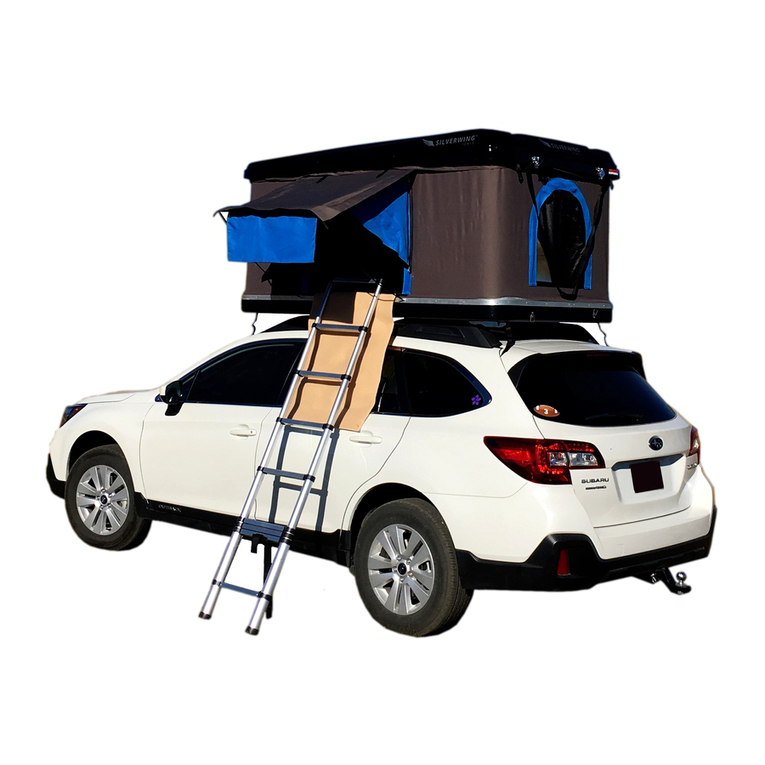
Silverwing SWT8oS User manual


The user assumes all risk and liability with use of this item. Be safe when lifting overhead.
The tent weighs approximately 90 lbs.
Care must be taken to avoid injury due to falling or other associated risks.
Use the unit with caution if you are unsteady on your feet. You must be able to climb a ladder in order to
use this tent on top of your vehicle.
This tent is designed to hold a maximum of 550lbs.
Remember to take precautions against extreme temperatures when camping as the tent is not insulated.
Do not use any heating sources in or near the tent that emit poisonous fumes to prevent poisoning or as-
phyxiation.
Always make sure the ladder is secured and on stable ground before using the tent.
General Safety Information
Packing List
1 tent with travel cover
1 ladder
8 tent awning rods
1 package of brackets, bolts, and nuts (see picture for more information)
Top mounting
brackets, 8 total
Boom mounng brackets, 4 total
Ladder mounts
shown with wash-
ers and bolts, 2
total
Tent mounting
bolts, 8 total
Ladder mount
bolts, 8 total, may
come with extra

Refer to silverwingtents.com for more videos and installation instructions
NOTE: Some rack systems have a tight clearance between the roof and the rack, or are not strong enough to
hold the tent. This may make installation difficult. You may purchase an aftermarket rack system that will
make installation easier if you choose. It is YOUR responsibility to make sure your rack is sufficient for the
tent.
CAUTION: You will need at least 2 people to install the SWT80S.
1. Unpack tent from carton. Use the cardboard as a clean surface to work on.
2. Place the tent on its side on the cardboard.
3. Attach each ladder bracket to the top of the ladder with the bolts, wash-
ers, and nuts in the following order: bolt, ladder mount, plastic washer,
ladder, nut (see Fig. 1). The ladder will lay flat on the tent top during trav-
el.
4. Attach the ladder to the tent base with the ladder mount bolts. There will
be 4 pre-drilled holes on the base to insert the bolts. Tighten the nuts.
5. Take the 8 top mounting brackets and insert 1 bolt into the top of each
bracket. Slide these brackets into the mounting extrusions at the base of
the tent such that there are 2 bolts and brackets in each corner of tent
base to match your vehicle roof rack cross bars.
6. Lift tent onto the top of your vehicle. Adjust the tent so it is square and centered on your vehicle, and ad-
just to remove interference with any doors. Place the brackets and bolts such that the car rack is in be-
tween the bolts. (see Fig. 2). You will want these brackets to be as symmetrical as possible.
7. Take the 4 bottom mounting brackets and slip them onto the
bolts, and then attach the provided nuts to the bolts. Do not
tighten all the way yet. The brackets and bolts should complete-
ly surround the car rack in each corner (see Fig. 2).
8. Adjust the tent if needed again so it is in the position you want.
9. Tighten nuts until tent is snug and cannot slide.
10. Attach the waterproof travel cover. Line up the bulge at the top
of the cover to align with your ladder orientation, then insert
the piping cording attached to the upper travel cover. It will
slide on the driver’s side if the tent is oriented to open on the driv-
er’s side. Then attach the bottom zipper by sliding in the piping at the base of the tent to match the upper
travel cover zipper, then zip up (Note: this cover can be installed two ways to place the zipper beginning
on either side of the vehicle).
Installation Instructions
Figure 1
Figure 2

General Usage Instructions
Opening the Tent
1. Remove the water proof cover from the tent by
undoing the 2 Velcro straps and unzipping the
cover. Take off of tent and then let fall to the
side.
2. Tucked between the mattress and tent base is
the packet of awning rods. Remove this packet
and place to the side for a later step.
3. There are 4 Velcro straps, one on each corner of
the tent, that hold it down. Release all of these
straps (see Fig. 3).
4. Slide the ladder out until the locking pins en-
gage, and then pull on the ladder to help open
the tent all the way (see Fig. 4). Set ladder on the
ground. Make sure ladder lock pins are secure
and will not slip.
5. It is recommended that the ladder is at an angle
when being used. If it looks too vertical, adjust
the extension until at an appropriate angle.
6. There are 8 rods, 4 for the side window awnings
and 4 for the rainfly. On the outside of the tent
are 4 flaps, 2 on each side, (see Fig. 5) that cover
pre-drilled holes on the base.
7. Place the base of each rod through the flaps and
into the pre-drilled holes, then attach the hook in
the grommet in the corner of the rain fly (see Fig.
6), with the hook facing outward.
8. The rods should bow out at an angle (see Fig. 7)
to keep tension. Finish installing the rods on each
corner of the rain fly and of each window.
Always make sure your ladder is securely fas-
tened and to the tent and securely positioned be-
fore entering or exiting the tent.
Figure 3 Figure 4
Figure 5 Figure 6
Figure 7

General Usage Instructions, cont.
Closing the Tent
1. Remove all the rods. This is most easily done by pulling on the rod so the bottom half is level with the
base and then pulling the end out of the pre-drilled hole.
2. Lift tent base with ladder and then fold base over. DO NOT use the Velcro straps to pull the base together
as the excessive force could cause the straps to break. Tuck in the tent fabric as necessary so that the cov-
er zipper is easily accessible.
3. Once base is sufficiently closed secure the Velcro straps to hold it in place. Lock the straps through the d-
rings and then Velcro ends.
4. Close and attach the travel cover over the tent.
5. Before storing the tent for any length of time, ensure tent fabric is completely dry.
Traveling with the Tent
Cover the tent with the waterproof travel cover before traveling any distance. NEVER travel with the tent
set up.
Always make sure to double check that your tent and mounting brackets are secure and tight.
After 25 miles, stop and check that the tent is secure and has not shifted. You must also periodically con-
tinue to check your tent if you are traveling long distances
You must not exceed 75 mph when traveling with the tent
Caring for Your Tent
When cleaning, only use cold water and a soft brush. Never use soap or detergent.
Do not expose fabric to oil or solvents
Expect some weeping at the seams of the fabric with the initial use. This will reduce with use and as the
fabric cures
As the tent is used, it is recommended that you occasionally re-proof the fabric with a high quality water-
proofing solution to keep the tent in good condition.
Always store tent up off the floor and away from damp areas.
Periodically and every season ensure that all bolts and nuts are tight to reduce any damage from use.
Do not drag tent on the ground as this could damage the fabric and allow water seepage when used.
Consult with your local outdoor equipment dealer, automotive dealer, or Silverwing Tents for any questions.
Contact us at info@silverwingtents.com. Go to silverwingtents.com to register and see warranty information.

Silverwing Tents will inspect any claim prior to repair to determine the defect. Misuse, adjustments, altera-
tions, abuse, overloading, improper loading, damages resulting from failure to check and secure bolts correct-
ly, acts of God, or accident is not included in the warranty.
Silverwing Tents will not be responsible for accidents, incidental, indirect, special, or liable damages to persons
or property which may result from a defect in workmanship or material. Silverwing Tents is not responsible or
liable for damages including (but are not limited to) loss of income, loss of time, and any other costs or fees
associated with any warranty issue or claim.
The purchaser will be responsible for any freight costs incurred to transport the tent as directed by Silverwing
Tents to its authorized dealer or the Silverwing Tents factory location.
Any repairs or claims must be pre-approved and authorized in writing from Silverwing Tents. The warranty
shall be null and void in the event the tent has been subject to modifications, misuse, neglect, accident, and
overloading.
See silverwingtents.com or email info@silverwingtents.com for more information.
Table of contents
Other Silverwing Tent manuals
Popular Tent manuals by other brands

Crua Outdoors
Crua Outdoors X-Tent Instruction guide
Ins'Tent
Ins'Tent Vitabri V3 Setup instructions
Ohenry Productions
Ohenry Productions 20x40 quick start guide
AUTOHOME
AUTOHOME Rolling Top R/TOP-S instructions

Mocka
Mocka Minka House Assembly instructions
Eskimo
Eskimo QUICKFISH Series Assembly and use instructions
