Simmons SDHB2 User manual

SDHB2
Hybrid electronic
Add-on pack
User Manual
www.simmonsdrums.net

FCC Statements
1. Caution: Changes or modifications to this unit not expressly approved by the party responsible for compliance could void
the user’s authority to operate the equipment.
2. Note: This equipment has been tested and found to comply with the limits for a Class B digital device, pursuant to Part 15 of the FCC Rules.
These limits are designed to provide reasonable protection against harmful interference in a residential installation. This equipment generates,
uses, and can radiate radio frequency energy and, if not installed and used in accordance with the instructions, may cause harmful interference
to radio communications. However, there is no guarantee that interference will not occur in a particular installation. If this equipment does cause
harmful interference to radio or television reception, which can be determined by turning the equipment off and on, the user is encouraged to
try to correct the interference by one or more of the following measures:
•Reorientorrelocatethereceivingantenna.
•Increasetheseparationbetweentheequipmentandreceiver.
•Connecttheequipmentintoanoutletonadierentcircuit.
•Consultanexperiencedradio/TVtechnicianforhelp.

SDHB2
www.simmonsdrums.net
… on your purchase of the Simmons SDHB2 Hybrid Electronic Add-On Pack.
To get the most enjoyment out of this product we recommend that you read over
this manual at least once, then refer back to it to learn more about specific functions.
Taking Care of Your Hybrid Drum Kit
Location
•Toavoiddeformation,discoloration,ormoreseriousdamage,donotexposeanypartoftheunittodirectsun-
light, high temperature sources, or excessive humidity.
Power Supply
•TurnthepowerswitchowhentheSDHB2isnotinuse.
•TheACadaptershouldbeunpluggedfromtheACoutletiftheSDHB2willnotbeusedforan
extended period of time.
•AvoidpluggingtheACadapterintoanACoutletthatalsopowershigh-consumptionappliances
suchaselectricheatersortelevisions.Alsoavoidusingmulti-plugadapterssincethesecanreduce
sound quality, cause operation errors, and result in possible damage.
•Toavoiddamage,turnotheSDHB2’spowerswitchandallrelateddevicespriortoconnecting
or disconnecting cables.
Handling and Transport
•Neverapplyexcessiveforcetocontrols,connectors,triggersandotherparts.
•Unplugcablesbygrippingtheplugrmly.Donotpullonthecable.
•Disconnectallcablesbeforemovingthemodule.
•Physicalshockscausedbydropping,bumping,orplacingheavyobjectsonthemodulecanresult
in scratches and more serious damage.
Cleaning
•Cleanthemodulewithadry,softcloth.
•Aslightlydampclothmaybeusedtoremovestubborngrimeanddirt.
•Neverusecleanerssuchasalcoholorthinner.
•Toavoiddiscoloration,donotplacevinylobjectsontopofmodule.
Electrical Interference
•Thismodulecontainsdigitalcircuitryandmaycauseinterferenceifplacedtooclosetoradioor
televisionreceivers.Ifthisoccurs,movetheSDHB2furtherawayfromtheaectedequipment.
Service and Modification
•Therearenouserserviceablepartsinthedrummodule.
•Donotattempttoopenthedrummoduleormakeanychangeinthecircuits
or parts of the unit. This will void the warranty.
Congratulations!
1

SDHB2 User’s Manual
Hybrid electronic add-on pack
Assembly 3
Panels 5
Top Panel 5
Rear Panel 6
Side Panel 6
Connections 7
Triggers and Pads 7
AudioEquipment 8
Headphones 8
MP3/CDPlayer 8
PowerSupply 8
PowerSwitch 8
Using the SDHB2 Triggers and Pads 9
Playing the Triggers and Pads 9
Metronome 9
Kit Mode 10
SelectingaDrumKit 10
GlobalReverb 10
Voice Mode 11
SelectingtheDrumVoice 11
AdjustingLevel 12
AdjustingPan 12
AdjustingTuning 12
SavingUserKits 12
Utility Menu 13
Pad and Trigger Sensitivity (Gain) 13
Crosstalk 13
Curve 14
Local Mode 14
Saving Trigger Settings 14
Restoring the Factory Preset 14
Song Mode 15
Selecting a Song 15
Listening to a Song 15
MutingtheDrumPart 15
AccompanimentVolume 16
DrumVolume 16
Song Source 16
Song Tempo 16
MIDI and USB 17
MIDIConnection 17
USBConnection 17
Local Mode 17
MIDIChannels 17-18
Voice List 19
Drum Kit List 21
Song List 21
General MIDI Voice List 22
Percussion Set List 23
MIDI Implementation Chart 25
Table of Contents
2

SDHB2
www.simmonsdrums.net
TheSDHB2SimmonsElectronicAdd-OnPackisauniqueproductthatallowsyoutoseamlesslymixyouracousticdrumsetwith
theuniqueelectronicdrumcapabilitiesoftheSimmonsSD7K.
This kit contains:
Attaching the Drum Module
Spread the stand’s legs and insert top of stand into base.
1.AttachthemetalrodtotheDrumModule.
2.TightenthewingscrewsecurelyontheDrumModule.
3.Attachthemetalrodtotheholderclamponthe
sidearm(L1)andadjusttheposition.
4. Tighten the wing nut on the holder clamp.
Attaching Pads to clamps
TheSDHB2padscanbemountedontheclampsandattachedtotheenclosedstandortoanyotherstandonyourdrumsetfor
maximumexibility.Toconnectthepads,attachthepadtotheL-Armontheclamp.
assembly
2x3’and2x8’cablestoconnectthe
pads and the triggers to the Brain Module
Stand and clamps to hold
the Brain Module and pads
Brain Module 2xSimmonsSDPSZPPro9”pads
2xSimmonsSDADTPiezotriggers
wing screw
metal rod
3

SDHB2 User’s Manual
Hybrid electronic add-on pack
Anoteonterminology—Here,“Trigger”and“Pads”areusedinterchangeably.
Attaching Piezo triggers to your drums
EachPiezotriggercomeswithanadhesivebackingthatstickstoyourdrumhead.TheSDHB2Brainisdesignedtotriggerboththesnare
drum and the bass drum. Place one trigger on each drum.
Toattachyourtriggers,simplyremovetheprotectivebackingoftheadhesiveandattachthetriggertoyourdrum.Werecommendplac-
ingthetriggerapproximately1”fromtherimofyoursnaredrumand1”–2”fromtherimofyourbassdrum.
Note:Inordertooptimizetheresponseandavoiddoubletriggering,it’srecommendthatyouuseinternalmuinginyourbassdrum
(i.e.apillow,blanket,orcommercialmuingsystem).
Onceset,theSDADTmountingclipensuresthattheaudiojackstaysinplace.Afterplacingyourtriggersonthedrumhead,simply
remove the closest tension rod and insert it into the mount clip before re-tightening the rod. This trigger mount fastens to any tension rod.
Bass Drum Trigger Snare Drum Trigger
4

SDHB2
www.simmonsdrums.net
Panels
Master volume knob
Controls the volume of phone and line outputs.
1
12 [+] button, [-] button
Changesvalues(kitnumber,voicenumber,
song number, etc.) when editing.
3[TEMPO+] button, [TEMPO-] button
Changes current tempo.
2Pad select buttons and indicators
InKitmode,thebuttonsplaythepadvoices.
InVoiceMode,theyselectthepadtobeedited
with indicators showing the selected pad. In Song
Mode, the indicators will display which pads
arebeingplayedbythedrumtrack.
4[CLICK] button and indicator
Turns the metronome on or off and selects the metronome
sound(clickorvoice).
5[DRUM OFF] button and indicator
Mutes the drum part of the song.
6[START/STOP] button
Starts and stops the selected song.
[SONG] button
Enters or switches Song menu pages.
7
9[VOICE] button
EntersorswitchesVoicemenupages.
10 [KIT] button
EntersorswitchesKitmenupages.
83-digit LED
ThisLEDisthemaindisplaydeviceoftheSDHB2,
which will show the parameters of the current menu.
11 [UTILITY] button
EntersorswitchesUtilitymenupages.
13 [SAVE] button
Thisbuttonisusedtosavethecurrentkit
settingsinauserkitandsavethetrigger
settingsundertheUtilitymenupages.
Top Panel
1
2
3
4
567910
811
12
13
5

SDHB2 User’s Manual
Hybrid electronic add-on pack
Rear panel
side panel
DC input
ConnectionfortheDC
9Vpoweradapter
17
14 Input jacks
Input connections for triggers, tom, aux pads, and hi-hat control pedal.
NotethatAux1isoptimizedforaSimmonsPro9”SingleZonePad(SDPSZP*).Aux2*andAux3*areoptimized
forSimmonsPro12”CymbalPads(SDPCMP*)TheHi-HatinputcanbeusedwiththeSimmonsHi-HatPedal(SDHHP*)
*Itemsoldseparately
15 Line output jacks
Stereo output connection to an
audio system or drum amplifier
suchastheSimmonsDA50or
DA200S.
16 AUX input jack
Thisstereoinputjackisusedfor
an external sound source, such
asanMP3orCDplayer.
21 Phone jack
Astereojackusedto
connect headphones.
19 MIDI IN and OUT
These ports allow communication with
otherproductsequippedwithaMIDI
interface.PleaseseetheMIDIsection
of this manual for details.
18 Power switch
Switch that turns power on and off.
20 USB port
Aportusedtoconnecttoacom-
puter.(MIDIIn/OutviaUSB)
18 19 20 21
14 15 16 17
6

SDHB2
www.simmonsdrums.net
connections
Triggers and Pads
CAUTION!
To avoid damage, turn OFF the SDHB2’s power switch and all related devices
prior to connecting or disconnecting cables.
Usingtheprovidedcables,connecteachpadandtriggertoitscorrespondingtriggerinputjack,followingthemarkingonthecables.
7
SDHB2 User’s Manual
Hybrid electronic add-on pack
equalization
volume
input
right
left/mono
druminputs
aux
drum
aux
low
mid
high
line
in
head
phones
equalization
volume
input
right
left/mono
druminputs
aux
drum
aux
low
mid
high
line
in
head
phones
audio equipment
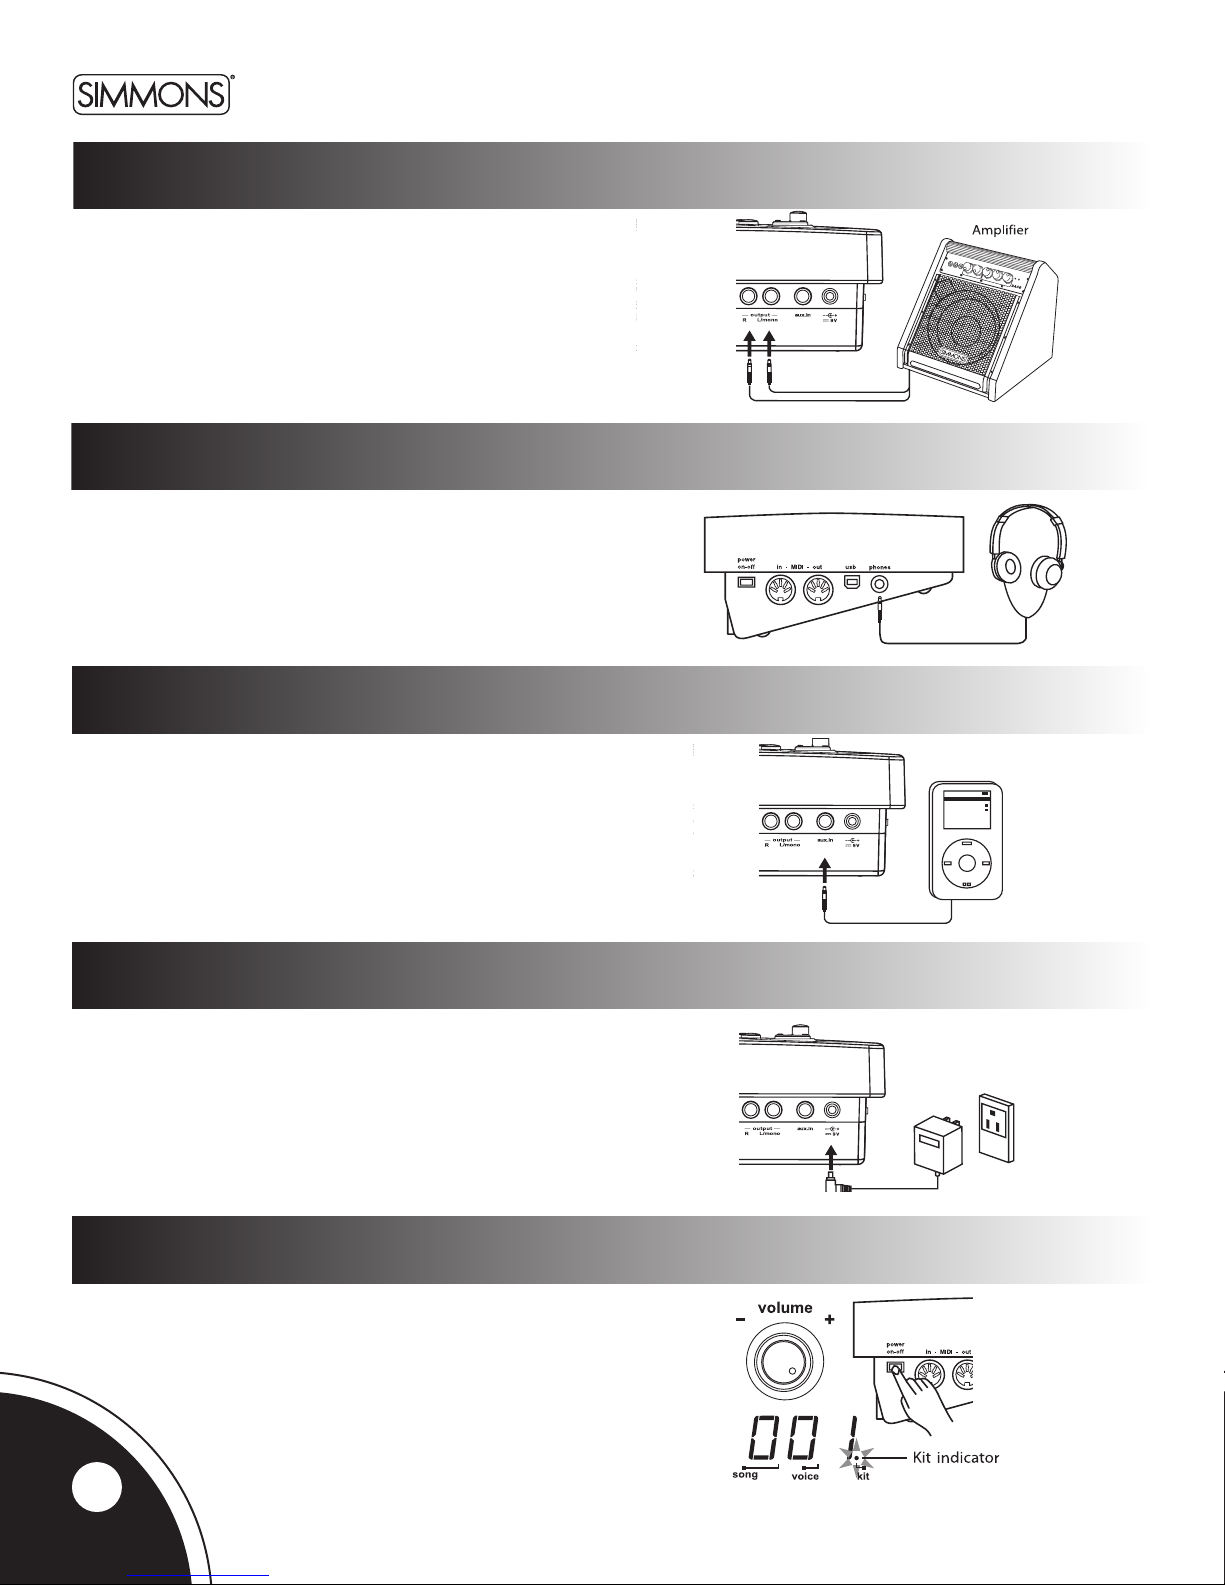
Whenusinganamplier-suchastheSimmonsDA50orDA200S-
connecttheOutputL/MONO and Rjacksontherearpaneltothe
inputoftheamplier.(Formonoplayback,usetheL/MONOjack;
forstereoplayback,connectbothL/MONO and Rjacks.)
headphones
Anoptionalsetofstereoheadphonescanbeconnectedtothe
PHONESjacklocatedonthesideofthedrummodule.
MP3/cd player
1.ConnecttheaudiooutputofanMP3/CDplayerorotheraudio
source to the stereo AUX IN TRSjackontherearpanel.
2. The input signal is now mixed with the drum signal,
so that you can play along.
power supply
Connect the power adapter to the DC INjackontherearpanel.
Note:
MakesurethepowerisswitchedOFF when connecting the
drum module with external devices.
Power Switch
Afterconrmingthatallconnectionshavebeencompleted,
rotatethevolumeknobtotheleft(itsminimumvolumelevel)
before switching the power on.
SetthepowerswitchtotheONposition.Thekitindicator
willlightupandthedisplaywillshowkitnumber001.
equalization
volume
input
right
left/mono
druminputs
aux
drum
aux
low
mid
high
line
in
head
phones
equalization
volume
input
right
left/mono
druminputs
aux
drum
aux
low
mid
high
line
in
head
phones
equalization
volume
input
right
left/mono
druminputs
aux
drum
aux
low
mid
high
line
in
head
phones
8

SDHB2
www.simmonsdrums.net
•Allthedrumtriggersandpadsuseasingletriggersensorforthewholedrumorpad.
•Allthetriggersandpadsarevelocitysensitive.Somevoicescanchangesoundsdependingonthevelocitylevel(strikingforce).
metronome
TheSDHB2includesaMetronomefeaturewithtwotypesofsounds:Click(Bellsound
ontherstbeat,andClicksoundontheotherbeats)orVocalCounting(“one,two,
three,four”).
Press the [CLICK]buttontostartthemetronomewiththeClicksound.
Press the [CLICK]buttonasecondtimetochangethemetronometoVocalCounting.
Press the [CLICK] button again to stop the metronome.
Whilethemetronomeisplaying,theBeatindicatorashesatthecurrenttempo.
Whilethemetronomeisplaying,theLEDshowsthecurrenttimesignature.
The time signature of the metronome can be changed using the [+] and [-] buttons.
Thereareveavailableoptions:2/4,3/4,4/4,5/4,and6/8.
TheSDHB2returnstothepreviousdisplaywhenthemetronomeisstopped.
Press the [Tempo +] or [Tempo -]buttonstochangethetempo(30~280).TheLED
shows the current tempo and returns to the previous display after about 2 seconds if
there is no operation of the Tempo [+] and [-] buttons.
Thevolumeofthemetronomecanbeadjustedbyholdingdownthe[CLICK] button
and pressing the [+] or [-]buttons.TheLEDshows“Cxx”(xx=metronomevolume:
0~16), and returns to the previous display about 2 seconds after releasing the
[CLICK] button. The metronome volume resets to its default value when turning
otheSDHB2.
using the SDHB2 Triggers
and pads
Playing the Triggers and pads
9
SDHB2 User’s Manual
Hybrid electronic add-on pack
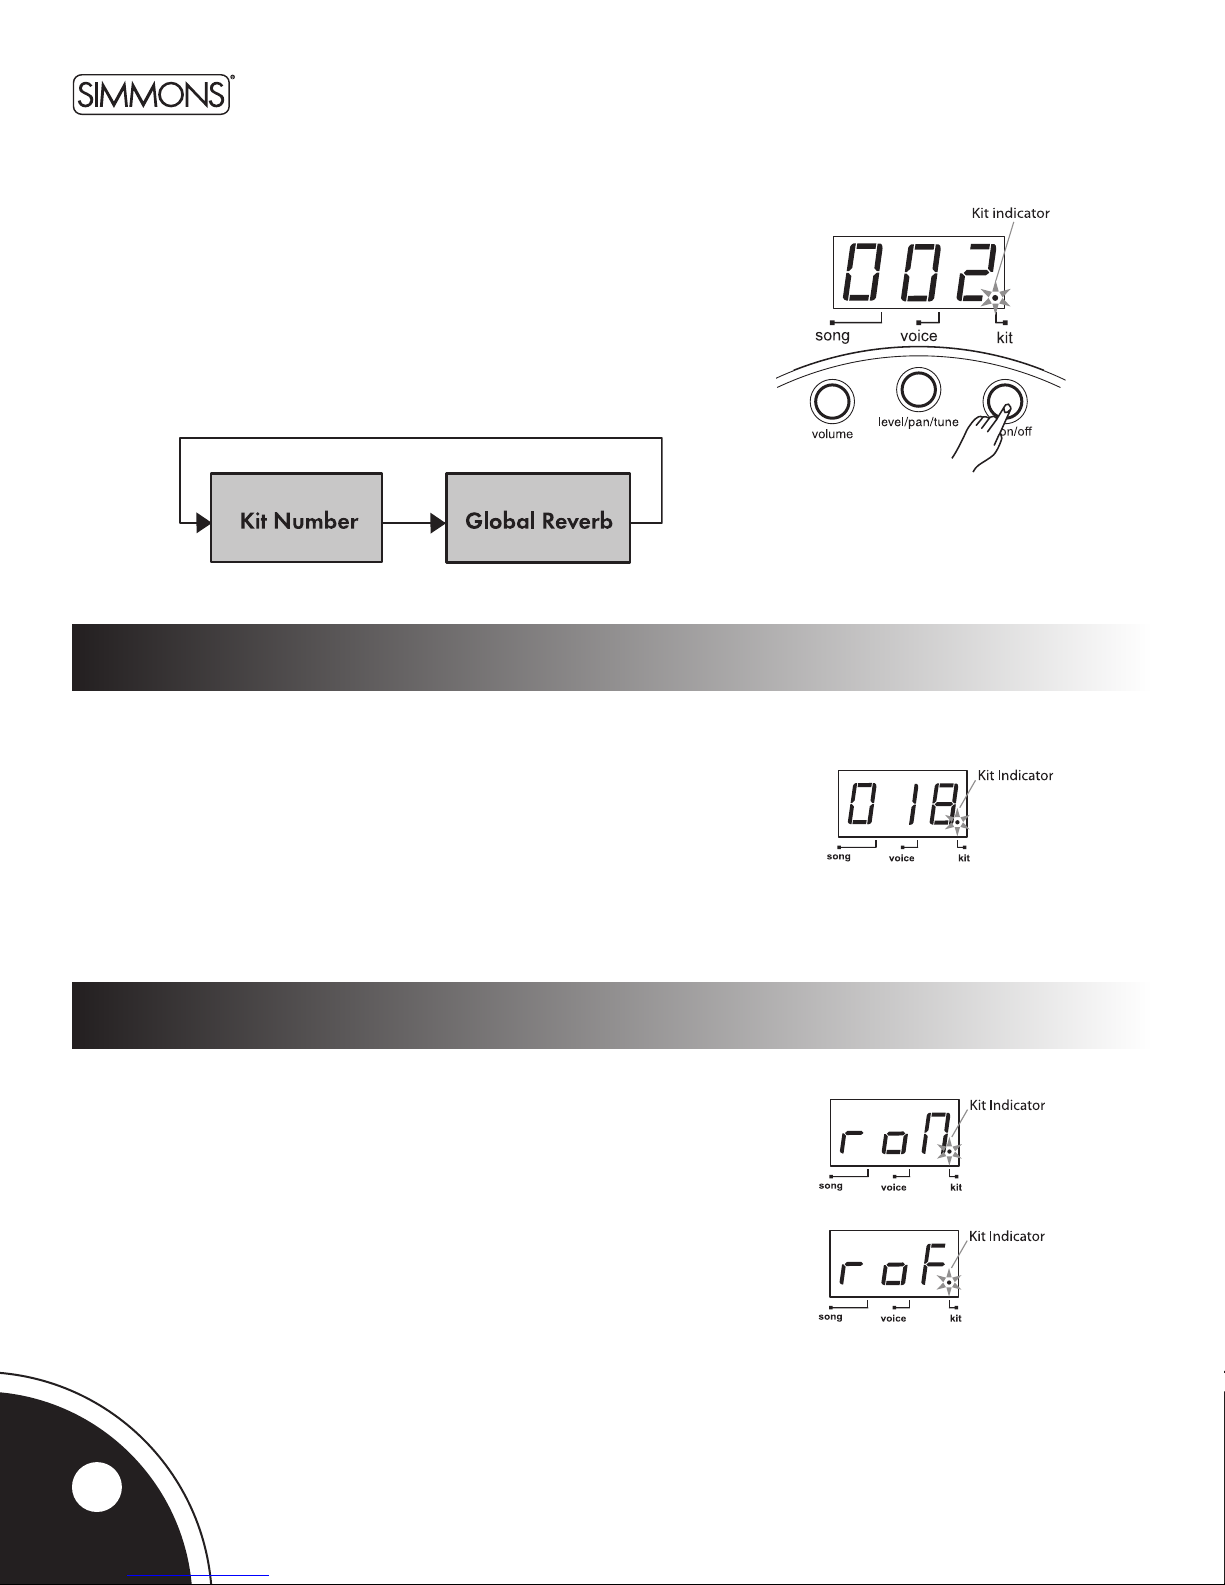
Selecting a drum kit
kit mode
IntheKitNumberpage,the3-digitLEDshowsthecurrentkitnumber.
Usethe[+] and [-]buttonstoselectanykit(1~50,looped)asthe
currentkit.
TheSDHB2includes20factorypresetkits(1~20)and30Userkits
(21 ~50).(SeeKitListonpage21.)
Note:InKITmode,youcanusethePadSelectbuttonstoplaythe
voicesassociatedwiththepadsofthecurrentlyselectedkit.
IftheSDHB2isnotyetinKITMode,pressthe[KIT]buttontoenterKitMode.
TheKitindicatorwilllightup.
IntheKITMode,youcanselecttheDrumorPercussionKittoplay.
You can also turn on or off the Reverb effect.
Global reverb
WhentheSDHB2isintheKitNumberpage,pressthe[KIT] button
again to access the Global Reverb page.
IntheGlobalReverbpage,theLEDshowsthecurrentReverbstatus
(“roN”forReverbOnor“roF”forReverbO).
GlobalReverbcanbeturnedOnorOusingthe[+] or [-] buttons.
Press the [KIT]buttonagaintoreturntotheKitNumberpage.
10

SDHB2
www.simmonsdrums.net
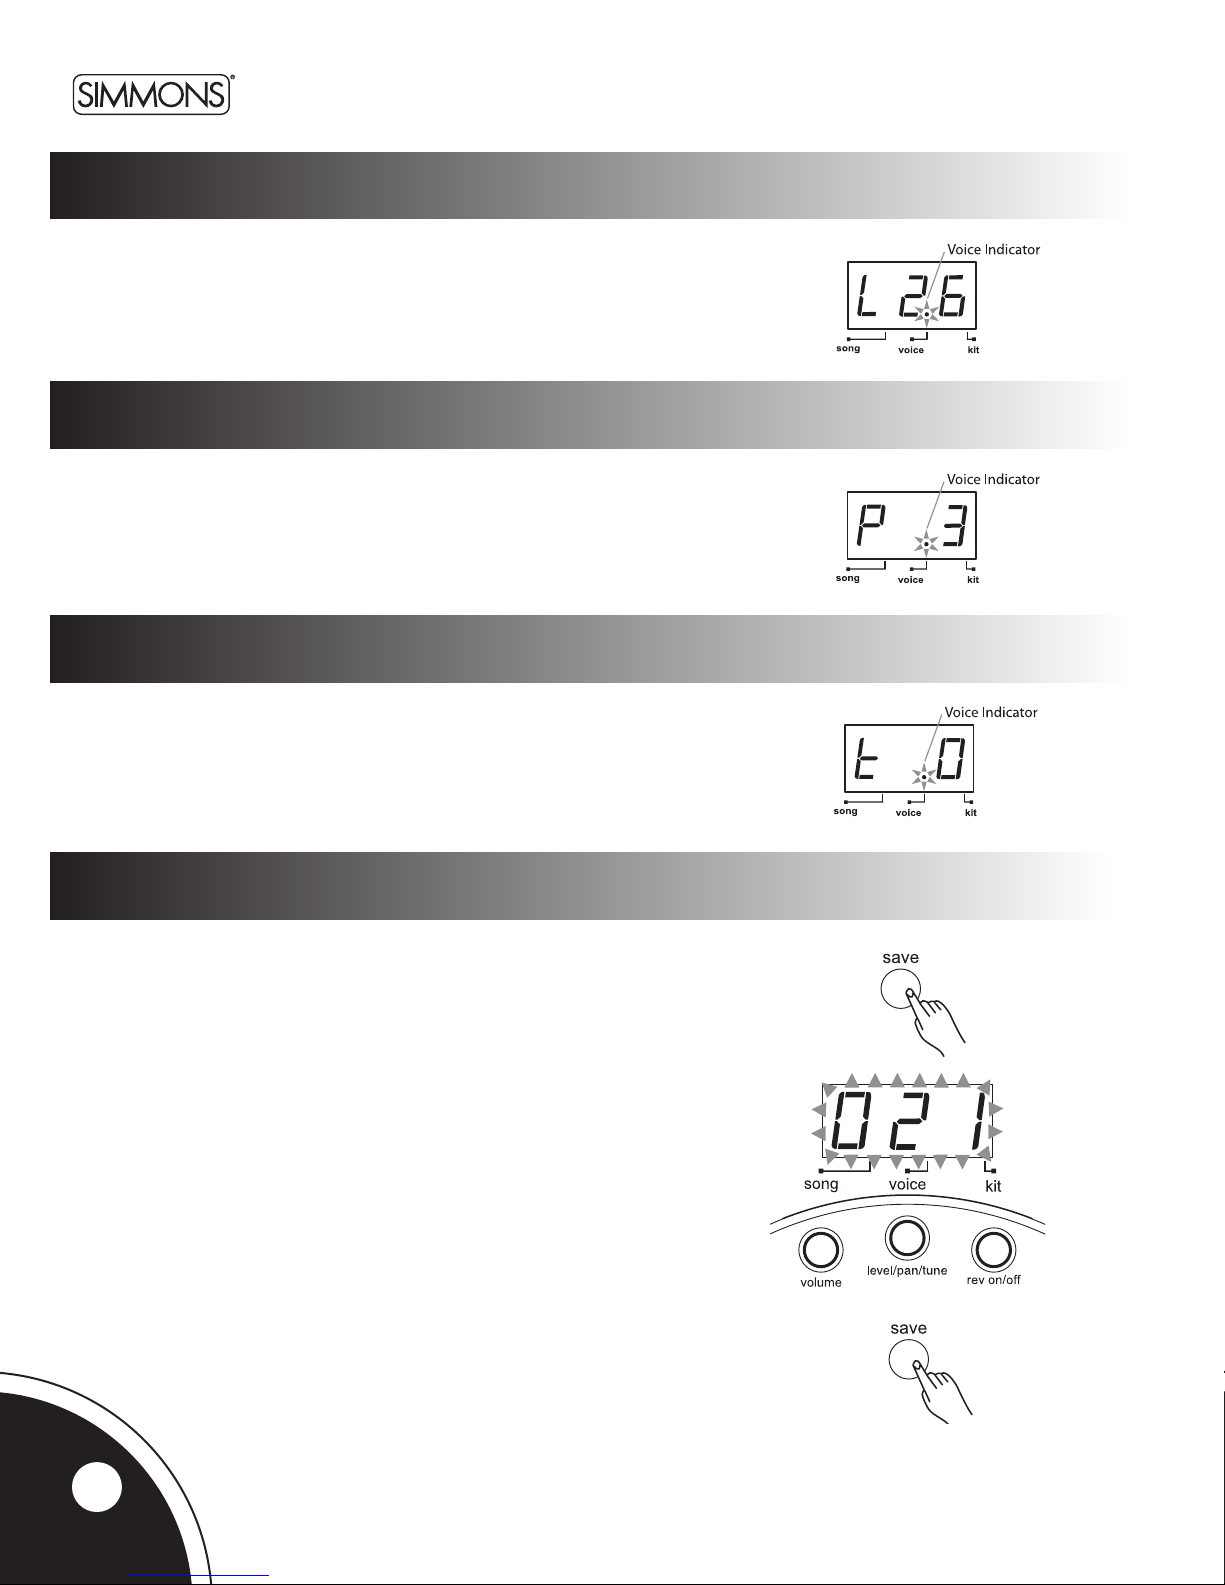
IftheSDHB2isnotyetinVoiceMode,pressthe[VOICE] button to
entertheVoiceMenu.TheVoiceindicatorwilllightup.Nowthe
[VOICE]buttonwillpagethroughtheVoiceMenu.
IntheVoiceMode,youcanselectthevoiceforeachtrigger/padand
adjustthelevel,pan,andtuning.
selecting the drum voice
IntheVoiceNumberpage,the3-digitLEDshowsthecurrentvoicenumberfortheselect-
edtrigger/pad.Usethe[+] and [-]buttonstoselectanyvoice(1300,looped)forthe
currenttrigger/pad.TheSDHB2includes300voicessortedbycategory(Kick,Snare,
Tom, Cymbal, Hi-Hat, Percussions). Each category includes a variety of acoustic, electric,
andeectsvoices.(SeeVoiceListonpages19-20.)
voice mode
The current trigger or pad to be edited can be selected either
bypressingitsPadSelectbutton,orbystrikingthepaditself.
The Pad Select indicator lights up to show which pad is currently
selected.
Note:WhileeditingVoiceVolume,level,pan,andtuning,you
can also preview the result of the current settings
by pressing the Pad Select button to play the edited voice.
11
SDHB2 User’s Manual
Hybrid electronic add-on pack
Press the [VOICE]buttonuntiltheLEDdisplayshows“Pxx”.(xx=Panvalue:-8~+8)
Usethe[+] and [-]buttonstoadjustthepanofthecurrentpad.
adjusting level
Press the [VOICE]buttonuntiltheLEDdisplayshows“Lxx”.(xx=Levelvalue:0~32)
Usethe[+] and [-]buttonstoadjustthelevelofthecurrentpad.
adjusting pan
adjusting tuning
Press the [VOICE]buttonuntiltheLEDdisplayshows“txx”.(xx=Tuningvalue:-8~+8)
Usethe[+] and [-] buttonstoadjustthetuningofthecurrentpad.
saving user kits
Makesureyousaveyourcustomizedkit;otherwise,yourchangeswillbe
lostwhenyouselectanotherkitorturnotheSDHB2.
Kits001~020arefactorypresets.Customizedkitscanbesavedin
Userkits021~050.
UserkitsstorealltheVoicesettings(VoiceNumber,level,panandtuning)
for all the pads.
TosaveyourcustomizedkittooneoftheUserkits:
1. Press the [SAVE]button.ThekitnumberashesontheLED.
2. Usethe[+] or [-]buttonstosettheUserkitnumber(021~050).
Thekitnumberwillstillbeashing.
3. Press the [SAVE]buttonagain.Thekitnumberstopsashing
andtheSDHB2returnstoKitMode.
Note:TocancelthesaveoperationwhiletheLEDisashing,pressthe
[KIT] or [VOICE] button.
12

SDHB2
www.simmonsdrums.net
Press the [UTILITY]buttontoentertheUtilityMode.Nowthe[UTILITY] button
willpagethroughtheUtilitymenu.
InUtilityMode,youcanadjustthetriggerparameters(gain,crosstalk,curve)foreachpadandtrigger.
Thoseparametersarecommontoallkits.
IntheTriggerGainpage,therstdigitofLEDwilldisplaytheletter‘E’,followed
by the gain value (1~16, not looped). Greater gain will allow you to trigger a signal,
evenifyoustrikethepadlightly.
IntheTriggerCrosstalkpage,thelast2digitswillshowthecrosstalkvalue(1~16) of the
currentpadwithaletter‘o’displayedontherstdigitoftheLED.Hittingonepadmay
trigger the sound from another pad unintentionally. This effect can be eliminated by
setting this parameter to a higher value than the mistriggered part.
Pad and trigger sensitivity (gain)
crosstalk
Utility menu
Thecurrenttrigger/padtobeadjustedcanbeselected
eitherbypressingitsSelectbutton,orbystrikingthe
trigger/paditself.ThePadSelectindicatorlightsupto
showwhichtrigger/padiscurrentlyselected.
13

SDHB2 User’s Manual
Hybrid electronic add-on pack
local mode
saving trigger settings
Afteradjustingthetriggersettings(gain,crosstalk,curve,splashsensitivity),youcansavethemintomemory.
WhileintheUtilitymode,pressthe[SAVE] button to store all trigger settings.
Note:
1.Ifyouturnothepowerwithoutsaving,youwilllosethetriggersettingchangesyouhavejustmade.
2.Theseparametersaectallkits.
restoring the factory preset
To restore the factory preset hold down both TEMPO+ and TEMPO-whentheSDHB2ispoweredup.Thisfunctionwill
replace the current settings of the following parameters by their default preset values:
•Alluserkits(includingVolume,Voice,Pan,Reverb,andTuningsetting)
•Utilityparameters(includinggain,crosstalk,curveandsplashsensitivity)
IntheVelocityCurvepage,thecurvesettingallowsyoutocontroltherelationshipbetweenthevelocity(strikingforce)and
loudness (the dynamic curve). The last digit will show the curve number (1~6)ofthecurrentpadwithletters‘CU’displayed
onthersttwodigitsoftheLED.
curve
Inlocalcontrolpage,theLEDshowsthelocalcontrolmode.
LocalONisthedefaultfunctionmode(‘LoN’).Theinternallink
betweenpadtriggersandsoundgeneratorwillbebrokenwhen
selectingLocalOFF(‘LoF’).FormoredetailsregardingtheLocal
Mode,pleaseseetheMIDI/USBsectionofthismanual.
Note:LocalControlModealwaysreturnstoOwhen
poweringuptheSDHB2.
14

SDHB2
www.simmonsdrums.net
Song mode
Selecting a song
IftheSDHB2isnotyetinSongMode,pressthe[SONG] button to enter the
Song Menu. Now the [SONG] button will page through the Song Menu. The
Song indicator will light up.
IntheSongMode,youcanselectthesongnumberwhileadjustingthevolumeofthe
song’s accompaniment and drum part. In addition, you can select whether to use
the internal songs or control an external sequencer.
InSongNumberpage,the3-digitLEDshowsthecurrentsongnumber.
Usethe[+] and [-] buttons to select any song (1 ~50,looped)asthecurrentsong.
TheSDHB2includes50factorypresetsongs.(SeeSongListonpage21.)
Press the [START/STOP]buttontostartsongplayback.TheBeatindicatorwillashatthesongtempo.
Aftercount-in,thesongwillstartplaybackfromthebeginning.Youcanstopthesongduringplaybackby
pressing the [START/STOP] button again.
If the song number is switched while playing, the new song won’t start until the end of the current bar.
Duringsongplaybackinsongmenu,thePadindicatorswillshowwhichpadsthedrumtrackistriggering.
This function can be disabled or enabled by pressing the [KICK] button while in song mode.
Press [DRUM OFF]toenableordisablethedrummutefunction.WhenDrumOisenabled,the
DrumOindicatorwilllightup,andthedrumtrackfromthecurrentplayingsongwillbemuted.
InSongmode,thePadindicatorswillstillshowthepadsplayedbythedrumtrack.Thisallows
you to practice playing the drum part along with the rest of the accompaniment.
To help you play together with the song, you can also enable the metronome function by pressing
the [CLICK] button. (See Metronome function for details.)
listening to a song
Muting the drum part
15

SDHB2 User’s Manual
Hybrid electronic add-on pack
Inthesongsourceselectionpage,theLEDwillshowthecurrentselectedsongsource.
Therearetwochoices:“LoC,”forlocalmachine(50internalsongs,defaultsetting)or“EtN,”
forcontrollinganexternalsequencerconnectedtotheMIDIOutoftheSDHB2usingMIDIClock.
SeetheMIDIsectionofthemanualfordetails.
Usethe [+] and [-] to select the song source. Song playing will stop immediately when switching
song source.
Whenexternalsequencingisselected,press[START/STOP] to start or stop the external
sequencerwithcorrespondingMIDIreal-timemessages.Theinternalsongwillnotplayback.
NOTE:Iftheexternalsequencerisselectedasthecurrentsongsource,themenupagesof
song number, accompaniment volume, and drum volume will be not selectable.
Press the [TEMPO+] or [TEMPO-] buttons to display the current tempo.
Use[TEMPO+] and [TEMPO-]buttonstoadjustthetempo.
Press both [TEMPO+] and [TEMPO-] buttons at the same time to reset
the current tempo to its default value. (This function is not available when
external song is selected.)
Ifthere’snooperation,SDHB2willreturntothepreviousmenupage
automatically after 2 seconds.
song source
song tempo
Accompaniment volume
drum volume
Press the [SONG]buttonuntiltheLEDdisplayshows“Axx”(xx=accompaniment
volume,0~32).
Usethe[+] and [-]buttonstoadjustthesong’saccompanimentvolume(i.e.all
instruments except the drum part). The volume will be restored to default value on
the next power on.
Press the [SONG]buttonuntiltheLEDdisplayshows“dxx”
(xx=drumspartvolume,0~32).
Usethe[+] and [-]buttonstoadjustthesong’sdrumvolume.
The volume will be restored to default value on the next power on.
16

SDHB2
www.simmonsdrums.net
MIDIstandsforMusicalInstrumentDigitalInterface.Thisisaworld-widestandardcommunicationinterfacethatenableselectronic
musical instruments and computers of all brands to communicate with each other so that instructions and other data can pass
betweenthem.ThisexchangeofinformationmakesitpossibletocreateasystemofMIDIinstrumentsanddevicesthatoerfar
greaterversatilityandcontrolthanwhatisavailablewithisolatedinstruments.Whetheryouinterfacewithcomputers,sequencers,
expandersorothercontrollers,you’resuretoenhanceyourmusicalhorizons.
MIDIIN:ThisterminalreceivesMIDIdatafromanexternalMIDIdevice.
MIDIOUT:ThisterminaltransmitsdatafromthisinstrumenttootherMIDIdevices.
TheUSBconnectorallowsyoutoconnecttheSDHB2directlytoyourcomputer.Itcanbeconnectedwithoutdriverinstallationunder
theWindowsXP&MACOSXenvironment.TheSDHB2willberecognizedas“USBAudiodevice”toreceiveandtransmitMIDI
messagesthroughasingleUSBcable.USBisusedonlyforMIDImessages(MIDIviaUSB).
NOTE:WhentheUSBisconnectedtoacomputer,allMIDImessageswillbereceivedandtransmittedviaUSB.
FromtheMIDI’spointofview,theSDHB2iscomposedoftwodevices:
•Acontrollertransmittingdatatothepadsandhi-hatcontrolpedal(viaaninternaltriggertoMIDIconverter)
•AsoundgeneratorreceivingMIDIdata(thesoundmodule)
Innormaloperation(LocalON,defaultmode),thosetwodevicesareconnectedtogetherinternally,allowingthepadstoplay
thevoicesfromthesoundmodulewithoutanyexternalconnection.WhensettingLocalmodetoLocalOFFmodeintheUtility
menu,thisinternallinkisdisconnected.ThesoundmodulereceivesMIDImessagesviaMIDIinputonly,andnotfromthepads.
However,thepadtriggerdataisstillsenttotheMIDIOutput,thereforeloopingexternallytheMIDIOutoftheSDHB2backtoits
MIDIInwillenablethepadstoplaythevoicesfromthesoundmodule.LocalOFFmodeisintendedtobeusedwhenboththeMIDI
inputandoutput(ortheUSBport)oftheSDHB2areconnectedtoaMIDIsequencerwithSoftThrufunction(whichloopstheMIDI
datareceivedfromtheMIDIoutputbacktotheMIDIinput).Thispreventsthedoublingorangingeectwhenplayingthepads
(causedbythesoundgeneratorreceivingthesameMIDIdata—bothdirectlyfromthepadsandbackthroughthesequencer).
TheSDHB2’stransmissionchannelisxedtoChannel10(DrumsandPercussionchannel).TheSDHB2willoutputMIDIcodesgener-
atedbythetriggerswhenhittingthepadsorsteppingontheHi-Hatcontrolpedal(ProgramChange,NoteOn/O,andFootControl
messages).Songplaybackdataandmetronomenotesarenottransmitted.
TheMIDIsystemintheSDHB2has16receptionchannelsnumberedfrom1-16.Eachchannelisresponsibleforavoice.Whenthe
instrumentreceivesMIDIinformationfromanexternaldevice,theactivechannelisdeterminedbythecontrolmessage.Channel10
isreservedfortheDrums.Channels9and16canbeusedforadditionalPercussionsounds.(SeePercussionSetlistpages23-24.)
Allotherchannels(1-8,11-15)canbeusedtoaccessthe128GeneralMIDIinstrumentsandsoundsincludedinthesoundmodule
(GM standard). These are the same instruments that are used to create the accompaniment for the internal Song player.
MIDI and USB
MIDI connection
usb connection
local mode
MIDI channels
17

SDHB2 User’s Manual
Hybrid electronic add-on pack
Using the SDHB2 as a general MIDI sound module
ConnectinganexternalkeyboardorsequencertotheMIDIInputallowsyoutousetheSDHB2asamulti-timbralsoundmoduletoplay
various instrument parts in addition to your drums (for instance, Piano on Channel 1, Bass on Channel 2, Strings on Channel 3, etc.).
ThevoicesoneachMIDIchannelareselectedusingMIDIProgramChangemessages.(SeetheGeneralMIDIVoicelistonpage22.)
NOTE:FormoreinformationonreceivedMIDImessages,seetheMIDIimplementationchart.
Using the SDHB2 to control a sequencer
InSongmode,thesongsourcecanbesettoexternal,allowingtheSDHB2tocontroltheplaybackofanexternalsequencer.
MIDIclock(0xF8)issentoutautomaticallyatthecurrenttempo,andStartandStopReal-Timecommands(0xFA,0xFC)
willbesentwhenpressingtheStart/Stopbutton.
1.ConnecttheMIDIOutoftheSDHB2totheMIDIInofyoursequencer.Ifyouareusingasoftwaresequenceronacomputer,youcan
simplyconnecttheUSBportoftheSDHB2toaUSBportofyourcomputerusingasingleUSBA-Bcable.
2.SetupyoursequencertorespondtoMIDIClockSync.
3.PresstheStart/Stopbuttontostartthesequencefromthetop.
4.PresstheStart/Stopbuttonagaintostopthesequence.
Note: YoucanadjustthetempoofyoursequencerusingtheTempobuttonsontheSDHB2.
Using a sequencer to record your SDHB2 drum performance
UsingtheMIDIIN/OUTorUSBconnectionswithaMIDIsequencerallowsyoutorecordyourperformanceontheSDHB2
padsandplayitbackwiththesamevoices.
1.ConnecttheMIDIOutoftheSDHB2totheMIDIInofyoursequencer,andtheMIDIOutofyoursequencertotheMIDIInof
theSDHB2.Ifyouareusingasoftwaresequenceronacomputer,youcansimplyconnecttheUSBportoftheSDHB2toaUSB
portofyourcomputerusingasingleUSBA-Bcable.
2.SetuptheactivetrackofyoursequenceronChannel10.
3.ActivateRECORDonyoursequencer.
4.PlaythepadsofyourSDHB2.
5. Stop recording.
6. Locate your sequencer to the start of the recording.
7.Playbacktherecordedsequence.
8.TheSDHB2willplaythesamevoicesthatwereusedduringrecording.
Notes:
1.Tomaintainthesamevoiceparameters(level,pan,tuning),youshouldselectthesameKitforplayback
astheKitthatwasactivewhenrecording.
2.Tocaptureandcorrectlyreproducethetimingofyourperformance,makesurethattheQuantizefunctionof
your sequencer is turned off.
3.IfyoursequencerhasaSoft-Thrufeature,youshouldsettheSDHB2to“LocalO”modeintheUtilitymenu.
IfyoursequencerdoesnothaveaSoft-Thrufeature,youshouldleavetheSDHB2inits“LocalOn”defaultmode.
18
Table of contents
Other Simmons Drum manuals

Simmons
Simmons SDS 9 User manual

Simmons
Simmons SD550 User manual

Simmons
Simmons SDS 8 User manual

Simmons
Simmons SDS 1 User manual

Simmons
Simmons SDS 9 User manual

Simmons
Simmons SD1500 User manual

Simmons
Simmons TITAN 20 User manual

Simmons
Simmons SD1250 User manual

Simmons
Simmons SDMK2 User manual

Simmons
Simmons SDMP1 User manual

Simmons
Simmons SDMK4 User manual

Simmons
Simmons SDXpress2 User manual

Simmons
Simmons SD1200 User manual

Simmons
Simmons SD1000 User manual

Simmons
Simmons SD 100 User manual

Simmons
Simmons SD1 User manual

Simmons
Simmons SD7K User manual

Simmons
Simmons SD81 User manual

Simmons
Simmons SD5Xpress User manual

Simmons
Simmons SD7K User manual


