Simply Elegant TM Patio Lockset User manual

070-117
070-118
070-119
070-120
TM Patio Lockset
www.simplyelegantproducts.com 1
INSTRUCTIONS (Page 1 of 3)
1 Outside Key Cylinder
2 Key Cylinder Cover Plate (Escutcheon)
3 Adjustable Deadbolt
4 Thumb Turn Mounting Plate
5 2” Pan Head Screws (Two)
6 Thumb Turn and Cover Plate
7 1/2” Oval Head Screws (Two)
8 Outside Handle Assembly
9 Adjustable Spring Latch
10 Handle Spindle
11 Deadbolt Strike
12 2 1/2” Wood Screws (Two)
13 1/2” Wood Screws (Two)
14 Inside Lever Handle
15 Handle Mounting Plate and Cover Plate
16 Plastic Washer
17 Thread Washer
18 2 1/2” Flat Head Screw
19 Screw Cover
20 Latch Plate
21 Handle Spindle Collar
22 1 1/2” Flat Head Screws (Two)
23 Handle Cover Plate
TM PATIO LOCKSET INSTALLATION INSTRUCTIONS
1 2 3 4 5 6 7
8 9 10 21
11
17 18 19
12
13
23 14
15
16
22
13
20

070-117
070-118
070-119
070-120
TM Patio Lockset
www.simplyelegantproducts.com 2
INSTRUCTIONS (Page 2 of 3)
• The deadbolt is adjustable. It is set for 2 3/8” set back,
but can be adjusted to 2 3/4”. (See the instruction sheet,
“Adjustable Deadbolt & Latch.”)
• The #3 ADJUSTABLE DEADBOLT is marked with an up
arrow on the side.
• Insert the deadbolt in the up position into the top hole on
the end of the door. Screw in place using #13 /” WOOD
SCREWS (two).
• Insert #1 OUTSIDE KEY CYLINDER into #2 KEY CYLINDER
PLATE then slide the key cylinder arm through the deadbolt
where the cross slot is located.
• Hold in place while putting #4 THUMB TURN MOUNTING
PLATE on the inside. Now insert and tighten #5 ” PAN
HEAD SCREWS (two). Next place #6 THUMB TURN AND
COVER PLATE into the #4 THUMB TURN MOUNTING
PLATE and tighten with #7 /” OVAL HEAD SCREWS (two).
DEADBOLT INSTALLATION
• The latch is adjustable. It is set for 2 3/8” set back, but the
latch can be adjusted to 2 3/4” set back. (See instruction
“Adjustable Deadbolt & Latch.”)
• The #9 ADJUSTABLE SPRING LATCH should be oriented so
that the beveled latch faces in the direction that the door
closes. With the orientation in the direction of closing, place
the latch in the bottom hole on the end of the door. Screw
in place using #13 /” WOOD SCREWS (two).
LATCH INSTALLATION
1 2 3 4 5 6 7
13
DIRECTION DOOR
CLOSES
070-117
070-118
070-119
070-120
TM Patio Lockset
www.simplyelegantproducts.com 3
INSTRUCTIONS (Page 3 of 3)
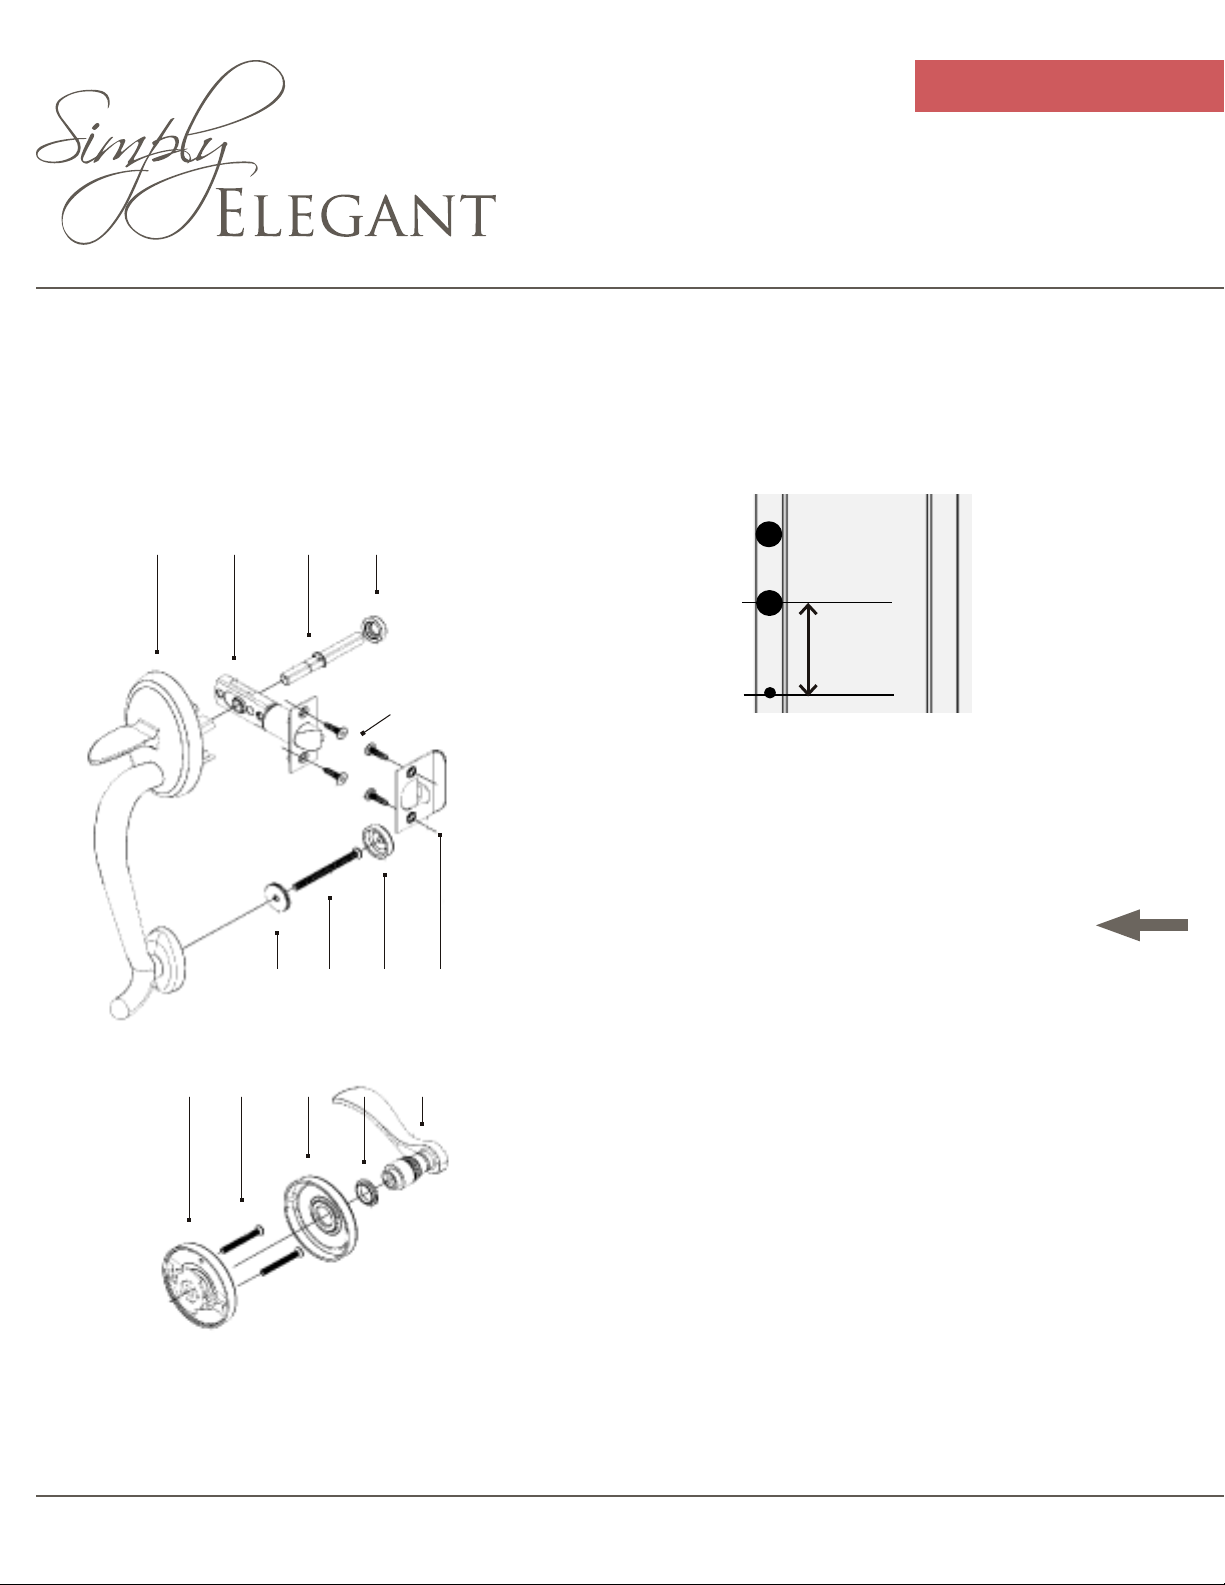
• Locate the tread hole for the bottom of #8 OUTSIDE HANDLE
ASSEMBLY by measuring from the center of the bottom hole 7
1/2”. Then drill a 5/16” hole through the active door.
• Slide #21 HANDLE SPINDLE COLLAR onto #10 HANDLE SPINDLE.
The collar should be put on from the long end moving the collar
toward the short end. Now from the inside of the door insert the
short end of #10 HANDLE SPINDLE with #21 HANDLE SPINDLE
COLLAR through #9 ADJUSTABLE SPRING LATCH with the “V”
groove facing down.
• #10 HANDLE SPINDLE is marked with an arrow on top.
• Place the top of #8 OUTSIDE HANDLE ASSEMBLY into the bottom
hole sliding #8 OUTSIDE HANDLE ASSEMBLY onto #10 HANDLE
SPINDLE. From the inside place #15 HANDLE MOUNTING PLATE
and screw #15 HANDLE MOUNTING PLATE to #8 OUTSIDE
HANDLE ASSEMBLY using #22 /” FLAT HEAD SCREWS (two).
• Attached #23 HANDLE COVER PLATE to #15 HANDLE
MOUNTING PLATE by pressing on.
• Place #16 PLASTIC WASHER over the #10 HANDLE SPINDLE then
place #14 INSIDE LEVER HANDLE onto the #10 HANDLE SPINDLE
and tighten from below with the Allen wrench provided.
• Now secure the bottom of #8 OUTSIDE HANDLE ASSEMBLY
by inserting #18 /” FLAT HEAD SCREW through the #17
THREAD WASHER then into the 5/16” drill hole. Screw #18 /”
FLAT HEAD SCREW to tighten and secure.
• Place #19 SCREW COVER onto #17 THREAD WASHER and
tighten.
HANDLE INSTALLATION
8 9 10
.
7 1/2”
21
13
17 18 19 20
15 22 23 16 14
This manual suits for next models
4
Table of contents
Other Simply Elegant Lock manuals


