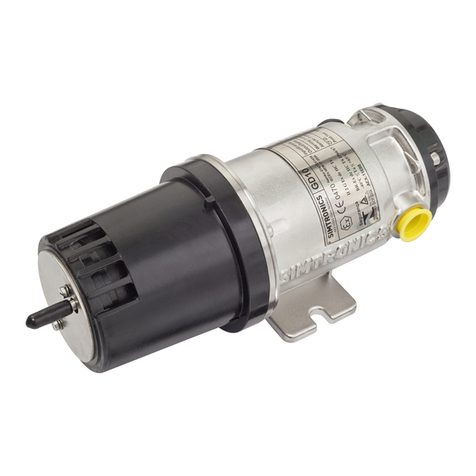
Simtronics GD10-P00 User manual

Operating Manual
P/N : 850-811250-Rev.06b
Infrared Point Gas Detector
GD10-P00

GD10P User Manual Page 2 of 44 850-811250-Rev.06b
Copyright September 2018 by Simtronics A.S.
All rights reserved. No reproduction of all or part of this document, in any form, is permitted
without the written consent of Simtronics A.S.
All of the information that is provided in this document is accurate to the best of our
knowledge.
As a result of continuous research and development, the specifications of this product may
be changed without prior notice.
Simtronics A.S.
Kabelgaten 8, Økern Næringspark
PO Box 314, Økern, NO-0511 Oslo, Norway
https://gasdetection.3M.com

GD10P User Manual Page 3 of 44 850-811250-Rev.06b
Thank you for choosing this SIMTRONICS instrument.
All of the necessary actions have been taken in order to ensure your complete satisfaction with
this equipment.
It is important that you read this entire manual carefully and thoroughly.
Limitation of Liability
The Company SIMTRONICS A.S., hereinafter referred to as “SIMTRONICS” throughout this
document, shall not be held responsible for any damage to the equipment or for any physical
injury or death resulting in whole or in part from the inappropriate use or installation of the
equipment, non-compliance with any and all instructions, warnings, standards and/or
regulations in force.
No business, person or legal entity may assume responsibility on behalf of SIMTRONICS, even
though they may be involved in the sale of SIMTRONICS products.
SIMTRONICS shall not be responsible for any direct or indirect damage, or any direct or
indirect consequence, resulting from the sale and use of any of its products UNLESS SUCH
PRODUCTS HAVE BEEN SELECTED BY SIMTRONICS ACCORDING TO THE APPLICATION.
Ownership clauses
The drawings, specifications, and information herein contain confidential information that is
the property of SIMTRONICS.
This information shall not, either in whole or in part, by physical, electronic, or any other
means whatsoever, be reproduced, copied, divulged, translated, or used as the basis for the
manufacture or sale of SIMTRONICS equipment, or for any other reason without the prior
consent of SIMTRONICS.
Warning
This is not a contractual document. In the best interest of its customers and with the aim of
improving performance, SIMTRONICS reserves the right to alter the technical features of its
equipment without prior notice.
READ THESE INSTRUCTIONS CAREFULLY BEFORE THE FIRST USAGE: these instructions
should be read by all persons who have or will have responsibility for the use, maintenance,
or repair of the instrument.
This instrument shall only be deemed to be in conformance with the published performance
if used, maintained, and repaired in accordance with the instructions of SIMTRONICS by
SIMTRONICS personnel or by personnel authorized by SIMTRONICS.

GD10P User Manual Page 4 of 44 850-811250-Rev.06b
Important Information
The modification of the material and the use of parts of an unspecified origin shall entail the
cancellation of any form of warranty.
The use of the unit has been projected for the applications specified in the technical
characteristics. Exceeding the indicated values cannot in any case be authorized.
SIMTRONICS recommends regular testing of fixed gas detection installations (read Chapter 6).
Warranty
Under normal conditions of use and on return to the factory, parts and workmanship are
guaranteed for 5 years, IR sources are guaranteed for 15 years.
Destruction of the equipment
European Union (and EEA) only. This symbol indicates that, in conformity with directive
DEEE (2002/96/CE) and according to local regulations, this product may not be discarded
together with household waste.
It must be disposed of in a collection area that is set aside for this purpose, for example at a
site that is officially designated for the recycling of electrical and electronic equipment (EEE) or
a point of exchange for authorized products in the event of the acquisition of a new product of
the same type as before.

GD10P User Manual Page 5 of 44 850-811250-Rev.06b
Table of contents
1PRODUCT DESCRIPTION......................................................................................................................................................................................7
2TECHNICAL SPECIFICATIONS ............................................................................................................................................................................9
3INSTALLATION....................................................................................................................................................................................................... 11
3.1 Positioning ................................................................................................................................................................................................11
3.2 Fixing............................................................................................................................................................................................................11
3.3 Weather Protection...............................................................................................................................................................................12
3.4 Duct or pipe mounting.......................................................................................................................................................................13
3.5 External cable........................................................................................................................................................................................... 15
3.6 Electrical connection ............................................................................................................................................................................ 15
4COMMISSIONING ................................................................................................................................................................................................17
4.1 Visual inspection .................................................................................................................................................................................... 17
4.2 Power up.................................................................................................................................................................................................... 17
4.3 Checking system functions ............................................................................................................................................................... 17
5OPERATION............................................................................................................................................................................................................. 19
5.1 Analogue Output Protocol................................................................................................................................................................ 19
5.2 HART® Interface....................................................................................................................................................................................19
6MAINTENANCE......................................................................................................................................................................................................25
6.1 Cleaning of optical lens/mirror.......................................................................................................................................................25
6.2 Function test ............................................................................................................................................................................................ 25
6.3 Calibration test........................................................................................................................................................................................ 26
6.4 Re-zero........................................................................................................................................................................................................ 26
6.5 Fault finding ............................................................................................................................................................................................. 28
7SPECIFIC INSTRUCTIONS FOR USE IN EXPLOSIVE ATMOSPHERES AND OPERATIONAL SAFETY............................... 29
8Declarations of conformity..............................................................................................................................................................................31
9PRODUCT CODING.............................................................................................................................................................................................. 35
10 ACCESSORIES AND SPARE PARTS............................................................................................................................................................... 37
11 APPENDIX 1 - generic HART® COMMANDS ........................................................................................................................................ 39

GD10P User Manual Page 6 of 44 850-811250-Rev.06b

GD10P User Manual Page 7 of 44 850-811250-Rev.06b
1PRODUCT DESCRIPTION
The GD10P has been designed with features that provide an effective response to the detection
of gas hazards in a wide range of industrial environments from boiler plant rooms to offshore
petrochemical installations.
These infrared gas detectors differ from all other models, because they utilise silicon based solid-
state infrared sources. The complete opto-mechanical design and construction is so stable that
an ultra-fast speed of response can be achieved whilst providing unparalleled service life and
detector stability, thus saving on maintenance and service costs.
We offer the longest combined detector and IR source warranty on the market.
Supplied with worldwide performance (CSA / ATEX) and hazardous area approvals.
Suitable for use in SIL 2 and SIL 3 systems.
Compared with catalytic sensors, the GD10P has the following advantages:
•Presence of oxygen is not required for correct measurement, which makes the GD10P suitable
even in an inert gas atmosphere.
•No possibility of poisoning of the detector since no chemical reaction occurs, i.e. silicon
vapours and HS have no effect on the detector or the measurement.
•The gas flow rate has no influence on accuracy.
•There are no saturation effects which could lead to false measurements. Thus, the detector
is capable of measuring gas concentrations up to 100% vol.
•The detector has a continuous self-test function, and reports dirty optics and fault conditions
to the control system.
•Total system costs can be dramatically reduced with the GD10P:
•High reliability results in low test frequency and no calibration costs.

GD10P User Manual Page 8 of 44 850-811250-Rev.06b

GD10P User Manual Page 9 of 44 850-811250-Rev.06b
2TECHNICAL SPECIFICATIONS
Version: 0-100%LEL Methane, 5 sec. response time.
(Specification for other types on request)
GENERAL
Detection method IR-absorption, dual wavelength, dual path
IR-Source Solid state IR source, 50Hz flash
Gases detected Detector versions for several hydrocarbons as well as CO2.
Self-test Continuous
Calibration Factory set, no field recalibration
PERFORMANCE
Lifetime stability(*) ±5% of full scale (FS) reading
Accuracy(*) ±3% FS between 0-50 % reading
±5% FS between 50-100 % reading
Response time T20 = 1 sec. (Optional 0.3 sec)
T50 = 2.5 sec. (Optional 0.7 sec)
T90 = 6 sec. (Optional 1.6 sec)
Start-up time(*) Less than 60 sec., measuring 30 min. full specification
(*) Refers to -20°C to + 45°C
DETECTOR WARNINGS
Early Dirty Optics 55% signal attenuation
Dirty Optics 70% signal attenuation
Detector failure Main function fault or blocked optics.

GD10P User Manual Page 10 of 44 850-811250-Rev.06b
OUTPUT SIGNAL
Standard Current source 4 –20 mA, max. load impedance 500 Ohm
Option Current sink 4 –20 mA
Maintenance HART® interface
ELECTRICAL
Power supply 24 VDC, range 18-32 VDC
Power consumption Approx. 3.5 W
Connection 3 wires (0.5mm2 - 1.5mm2)
Cable entry M20 Ex e cable gland
TEMPERATURE RANGE
Storage -40°C to + 70°C (-40°F to +158°F)
Operating -40°C to + 65°C (-40°F to +149°F)
Humidity (operation) 100% RH
HOUSING
Main compartment Ex d IIC T6 Gb
Terminal comp. Ex e
Protection category IP66/IP67 DIN 40050
Housing material Stainless steel SIS2343 (ASTM 316)
Weight Approx. 2.9 kg (6.4 Lbs)
Dimensions 264L x 104W x 106H (mm) - 10.4 x 4.1 x 4.2 (inches)
WARRANTY
5 years full warranty on complete instrument
15 years warranty on the IR-sources

GD10P User Manual Page 11 of 44 850-811250-Rev.06b
3INSTALLATION
The area in which the detector may be installed must be in accordance with the
certification of the detector and in accordance with the standards of the appropriate
authority in the country concerned
3.1 Positioning
The detector should be mounted where gas leakage is most likely to occur. To detect methane,
which is lighter than air, inside an enclosed area the detector should be mounted high in the
area to be protected or immediately above potential leakage sites.
To detect gases heavier than air, e.g. propane, the detector should be mounted below the
potential leakage site.
The detector should be mounted in a place where maintenance, i.e. cleaning of the optics, is
easily performed.
The detector may be mounted in areas where no oxygen is present. The detector may be
mounted in areas with strong airflow
The detector should NOT be mounted where it could be drenched by water.
3.2 Fixing
The detector is mounted by means of a projecting mounting leg using two M8 screws and
washers, or by means of the Duct Mounting Flange Kit (4 x M8 screws). The detector should be
mounted so that the longitudinal axis of the detector is horizontal. This will prevent accumulation
of water and dust on the optics. The Weather Protection must always be oriented correctly for
optimal performance.
Figure 1: GD10P mounting
Weather Protection
M8 screw

GD10P User Manual Page 12 of 44 850-811250-Rev.06b
3.3 Weather Protection
When the GD10P is mounted outdoors, the flow direction indicator must point
upwards
See “Flow Direction Indicator” in Figure 2 below. Orientation of the Weather Protection is
performed as follows:
•Use a screwdriver to loosen the two screws on the Weather Protection
•Rotate the Weather Protection to correct position
•Tighten the screw with a torque of max. 0.5 Nm
Figure 2 : Orientation of GD10P weather protection in relation to flow direction
Flow direction indicator
Fixing screws

GD10P User Manual Page 13 of 44 850-811250-Rev.06b
3.4 Duct or pipe mounting
If installed in a ventilation duct or pipe, the mounting arrangement and accessories shown in
Figure 3 and
Figure 4 should be used.
The Duct Mounting Bracket shown in
Figure 3 allows the GD10P to be positioned in the core of the airflow in wide ducts or pipes.
Avoid direct light on lens and mirror if the GD10P is mounted without the Weather
Protection.
In order to achieve minimum response time, the Weather Protection must be oriented with the
flow direction indicator facing into the air flow. See Figure 2 and
Figure 4.
The sensor must be mounted in straight parts of the duct with undisturbed airflow. Avoid areas
with possible turbulent flow e.g. immediately after sharp bends or junctions.
The kit includes a modified weather protection as well as piping for functional testing.
Figure 3: Exploded view, Duct Mount Flange Kit
Alternative A
Remove cap when using
alternative A

GD10P User Manual Page 15 of 44 850-811250-Rev.06b
3.5 External cable
The cable type must be chosen in accordance with applicable regulations.
The table below indicates maximum cable lengths (2-wire) restrictions due to voltage drop over
the power supply cable.
Core size cable
0,5 mm2
0,9-1 mm2
1,5 mm2
Maximum length (with a
24VDC power supply)
250m
500m
750m
3.6 Electrical connection
The terminal compartment is accessible by removing the circular terminal cover (loosen the
four M5 screws).
Figure 5: Terminal compartment
Internal earth point
External earth point
Terminal Compartment
Terminal 5 Factory use only
Terminal 4 Factory use only
Terminal 3 4-20 mA output
Terminal 2 0 V
Terminal 1 +24 VDC

GD10P User Manual Page 16 of 44 850-811250-Rev.06b
The installation wiring enters the terminal compartment via a single M20 Ex e cable gland,
which can be mounted on either side of the compartment. The unused entry is blanked with
an Ex e cover.
The detector housing must be connected to local ground via the external earth
point. The wire should be minimum 4 mm2 (8 AWG) and as short as possible.
The shield of the cable should be connected at both sides (at detector side and at the
controller). The shield must be terminated to local ground via the cable gland at the detector
and must not enter the terminal compartment.

GD10P User Manual Page 17 of 44 850-811250-Rev.06b
4COMMISSIONING
4.1 Visual inspection
The following should be checked before initial powering up:
•The axis of the detector shall be horizontal,
•Correct cable gland installation,
•Electrical connection,
•Electrical grounding,
•Termination of cable shield,
•Orientation of the weather protection,
•All bolts and screws are tight.
Please refer to Chapter 3 “INSTALLATION
” for details.
4.2 Power up
Ensure that system wiring and control system are in
working order before powering the detector. The
startup period takes about 60 seconds, a functional
self-test is performed during this time. When the self-
test is completed the detector turns over to measuring
mode. The 4-20mA output will stay at 0mA during the
60 seconds startup period and 4mA (if no gas is
present) in measuring mode. The graph on the left
shows the reading of the 4-20mA analog output
during startup period.
4.3 Checking system functions
The GD10P is factory calibrated, and does not require any adjustments before operation. A
check prior to putting into service should however consist of:
1) Clean the optical surfaces
The detector may have been collecting dirt after being initially installed. It is thus crucial to
clean the optical parts before testing the detector (refer to Paragraph 6.1 “Cleaning of optical
lens/mirror”).

GD10P User Manual Page 19 of 44 850-811250-Rev.06b
5OPERATION
5.1 Analogue Output Protocol
Gas reading and fault signals are given through the 4-20mA current loop interface. The table
below shows the analogue output level for the various conditions.
Condition
Analogue output
Comment
Normal gas reading
4 mA - 20 mA
4 mA = 0% of range
20 mA = 100% of range (or higher)
Early Dirty Optics Warning
(55% signal reduction)
2 mA(*)
Detector will still output gas concentration
if it is greater than 7 % of range (FS)
Dirty Optics Warning
(70% signal reduction)
1 mA(*)
No detection
Detector Fault
< 0,5 mA(*)
No detection
(*) Shows default factory settings. Can be configured via HART® terminal
5.2 HART® Interface
5.2.1 Introduction
Simtronics GD10P detector supports HART® version 7.
For proper operation between GD10P and the HART® communicator, a dedicated Device
Descriptor (DD) should be loaded onto the communicator. If such DD is not present, the
communicator will offer a proprietary generic interface, and the list of available functions may
be limited and variable.
The proper DD for GD10P can be downloaded from HART® Foundation website
www.hartcomm.org (select “Technologies” then click on « HART Product Registry & EDD
Database » or contact us). The loading of the DD onto a specific communicator must be done
according to the relevant user guide for that communicator.
DD has no relevance for earlier versions of GD10 (the generic HART® devices).
Customers having such detector should use generic codes as described in Appendix
1 on page 39.

GD10P User Manual Page 20 of 44 850-811250-Rev.06b
5.2.2 Connection
For access to the detectors HART® features, connect an industry standard HART® communicator
as shown in the following figures depending on the type of analogue interface (source or sink).
Note that for the HART® communication to work properly, a minimum loop resistance is
required in the current loop. The actual value of the serial resistance in the diagrams below may
vary depending on the rest of the resistance in the loop.
HART® terminal connection for source variant
HART® terminal connection for sink variant
Other manuals for GD10-P00
2
Table of contents
Other Simtronics Other manuals
Popular Other manuals by other brands

BORLA
BORLA 60605 installation guide
Gibson
Gibson 9522 instruction manual

Microchip Technology
Microchip Technology 3DTouchPad user guide

Kenwood
Kenwood Media Manager installation manual

Wilo
Wilo SiFire Installation and operating instructions

ZyXEL Communications
ZyXEL Communications NWA3560-N quick start guide


