Simulaids SMART STAT BASIC 8002 User manual

SMART STAT BASIC #8002
Instruction andCareManual
Now with iPadcontrol

2
Thank you for purchasing Simulaids’ SMART STAT Basic.
Simulaids is pleased to bring you the latest in patient simulator technology with our wireless,
battery operated, self-contained simulator that is operated by an iPad.
The intent of this document is to familiarize the user with the basic operation and care of
SMART STAT Basic. You will be able to immediately start using this unit by following a few
simple steps. These steps include installing the programming on your iPadavailable now at
the App Store; just search for SMARTSTAT.
It is recommend that you make note of, and store in a convenient location, your simulator’s
serial number, invoice date, invoice number, and the company name (Simulaids’ distributor) you
purchased it from. These three pieces of information are required for any warranty issues.
When you have questions concerning the product, don’t hesitate to call your distributor sales
representative, or Simulaids’ Customer Service Department at 800-431-4310.
The SMART STAT Basic patient simulator is intended to be used in various environmental
locations for training of emergency medical personnel. All disciplines of training can be
administered to this patient simulator, including: physicians, nurses, combat medics, ALS, and
BLS providers.
The lung, heart and abdominal sounds associated with the SMART STAT Basic patient simulator
are used under license from Cardionics of Webster, TX, and are not to be used for any
commercial purpose outside the context of the SMART STAT Basic patient simulator
programming
Model Input Voltage
8002 120VAC
240VAC

3
What you received 4
Clothing size 4
What you need 4
Charging batteries 5
Leg assembly 6
Fluids 6
Mixing Blood Powder 6
Blood Presure 6
IV Arm 7
Vein Replacement 7
Chect Tube Placement 7
Tension Pneumothorax 7
ECG Monitoring & Defibrillation 8
Turn On Smart Stat Basic 9
iPad Functions 9~11
User Interfaces 12~14
Student List 15
Skill List 15~16
Medication List 16
Scenario List 17~20
Stat Simulation Defaults 21
ECG Rates 22
Session/Recording scenario 23~24
Recordings, retrieving from iTunes25~27
Running Smart Stat Basic 28~29
Heart 30
IM Ijection Sites 30
CPR 30
Care and cleaning 30~31
Replacement Parts 32
Trouble shooting 33~34
Warranty 35
Return poloicy 35
Glossary of terms 35
table of contents

4
What you received:
SMART STAT Basic Patient Simulator
iPad®
Shorts with Simulaids’ Logo
WV IV Pro device (eliminates the use of tape at the IV site)
SMART STAT Basic B/P Cuff
Chest Post Adapter Set of Two
Manual Defibrillator Adaptors Set of Two
Laerdal Adapters Set of Two
Marquette Adapters Set of Two
Physio Adapters Set of Two
Instructions for Care and Use
Consumables:
Cricothyrotomy Neck Skins,
Tension Pneumothorax Pads
IM Injection Sites (Arm and Leg)
Replacement Teeth
Airway Lubrication Kit
Blood Powder
Reservoir Bags
Options available with SMART STAT purchase
Battery Leg, Part Number 407N
Amputated Bleeding Leg, Part Number 408
I/O Leg, Part Number 409
Xtreme Bleeding Leg, Part Number 482
To assemble a variety of clothing (not included) to fit the simulator see the sizing chart for
information.
Sizing Chart Torso
Length Sleeve
Length Chest
Size In
Seam Waist
Head
Cir. Neck Height
Foot
Length Shoe
Size
SMART STAT Basic 18" 34" 46" 32" 40" 26" 18.5" 72" 10" 13 men’s
Metric equivalent in cm 46 87 118 82 102 66 47 183 25
What you need:
iPad2 (or newer)
iTunesAccount
Computer for maintaining and printing student records

5
Product set up:
Simulaids’ authorized SMART STAT Basic distributors (who you purchased your SMART STAT
Basic from) are available to assist you with the set up.
Charging the battery (If option was purchased)
The batteries require approximately five (5) hours of charging. Before installing the leg on the
simulator fully charge the battery, which is concealed in the lower left leg. The battery is not
removable from the leg.
There are two connections necessary to charge the battery between the leg and the charger.
One large connector charges the batteries and the smaller connector is a heat sensor.
Battery Charger and connections (2)
1. Alwaysplugintheheatsensorfirst.Failuretoconnecttheheatsensortothechargermayresultin
afirehazard
2. Connectthepowerchargeconnector
3. Placethebatterylegonasurfaceuntilthebatteriesarefullycharged.Thelightonthechargerwill
turngreenwhenthechargingiscomplete.
The battery charge will last approximately 5 hours while the simulator is idling at default
features. NOTE: When operating the simulator on a/c electrical power, it is recommended to
separate the battery leg connector at the knee joint so the battery leg. When the battery
reaches an expired level of energy, the simulator will automatically shut down. To preserve the
active functions of the simulator plug into the 110 or 240 a/c source before the battery energy
expires. The plug for an extension cord is found inside the pelvic shorts on the right hand side
of the simulator. To increase battery time it is recommended to obtain an extra “battery leg”
no. 407N.

6
Leg Assembly:
1. Connect the matching colored wires and tubing
2. Check all the connectors to ensure they are securely seated, so the wires do not separate
3. Push the excess wiring into the thigh, as not to encumber the knee joint
4. Secure with the knee pin
Right Thigh Connectors
The black cord connects to the transformer power block.
The USB connection is to link to an external computer.
The category 5 cable can be used to connect to a router to make a Wi-Fi link.
Fluids:
Ink and fake blood products will permanently stain and cannot be removed.
Mixing Blood Powder: Included with the simulator is an initial supply of blood powder; mix it
according to the instructions printed on the bag. Left over blood can be stored in a refrigerator
for up to two weeks.

7
Blood Pressure (B/P)
Blood Pressure Arm
This photo shows the hole on the upper arm for the B/P cuff connection. The left arm can be
used for determining the systolic and diastolic pressures.
1. Place the B/P cuff on one arm
2. Insert the projecting connection port on the cuff bladder into the hole on the upper arm. A
very small amount of vegetable oil on the “O” ring of the connector will allow it to slide into
the arm port for an air-tight seal.
3. Wrap the cuff tightly around the arm and securely fasten the hook and loop.
IV ARM:
Caution – contains latex.
To augment the IV training, use the blood supply bags.
1. On one of the reservoir bags, close the tubing clamp and then fill the bag with pre- mixed
simulated blood or colored water.
2. Attach the bag tubing to one of the IV arm tubes that exit the simulator’s right shoulder.
3. Hang the bag on an IV pole next to the simulator, or, as in the case of patient moving in
ALS, place the reservoir bag under the shoulder of the simulator to induce pressure.
4. To the other IV arm tube attach an empty IV reservoir bag.
5. Make sure the filling port is closed and the tube clamp released.
6. Place the empty bag on the floor or ground. Gravity (or shoulder pressure) will cause the IV
veins to fill once you release the clamp on the full bag. As the scenario continues, the blood
will drain into the lower bag.
7. When the upper bag is about empty, switch the positions of the bags and the blood supply
in the arm will remain constant.
8. Before storing the simulator, flush the IV tubing of the arm by hanging a bag of warm water
and allowing it to circulate through the arm.
9. Drain the rinse water into a receptacle for disposal. Flush the IV arm until the water exiting
the tubing is clear.

8
VEIN REPLACEMENT:
1. If the water or blood oozes out of the arm where the IV catheters have been installed and
withdrawn, replace the veins with a segment from the enclosed IV Vein set.
2. Pull down the IV arm skin to access the affected area.
3. Clip with scissors the damaged section of vein tubing.
4. Install a plastic tubing connector in each of the remaining vein ends.
5. Use the new tubing in the kit and cut a piece the correct length for replacement.
6. Install it between the tubing connectors. Make sure the tubing is seated all the way onto the
connectors.
7. Pull the IV arm skin back over the veins.
The deltoid muscle of the right arm is for IM injections (
Use only water
). Pull the injection site
out of the arm after use and squeeze the foam insert dry. Let it air dry before storing.
Replacement units are included.
CHEST TUBE PLACEMENT:
This bilateral feature will allow the use of normal sized trocars during the insertion process. This
trainer is not designed to be a technique trainer; rather, it offers the opportunity to install a
chest tube to indicate that the procedure is necessary under current patient conditions as
evidenced by the practitioner’s assessment.
1. Close the tubing clamp before filling the reservoir bag.
2. Fill the bag and attach the tubing end to port C.
3. Once the tubing is securely connected elevate the reservoir bag about 30” above chest level
4. Release the tubing clamp so the water can flow into the system.
TENSION PNEUMOTHORAX:
Install the pneumothorax patches when needed. The smaller circle fits the cut out area of the
overlay. The larger circle is the shoulder that holds the patch in place.
When a needle is inserted in either of the bi-lateral chest sites, the bladder will release the
compressed air with an audible hiss.
ECG MONITORING AND DEFIBRILLATION
Four ECG limb lead connectors on the chest are attached to the rib cage for removing the
overlay skin. The ECG snaps cannot be used for defibrillation and each one is labeled, “NOT A
DEFIBRILLATION SITE”. Doing so will void the warranty.
To view limb lead ECG waveforms, attach the 3, 4, or 5-lead ECG cable to the ECG snaps at the
following locations: RA (right arm): right shoulder snap

9
LA (left arm): left shoulder snap
LL (left leg): left waist snap
RL (right leg): right waist snap
Two defibrillation sites associated with lead II are located on the chest at the apex and sternum
locations.
These two sites are not labeled and have a base to screw in the Chest Post Adapters (included
in the accessories bag). The Chest Post Adapters are two threaded, ¼” diameter, metal parts;
screw these into the two defibrillation sites and attach the training cable to the adapters.
Defibrillator with hand-held paddles will need to use a pair of Manual Defibrillator Adapters that
are inserted in the defibrillator chest sites. These adapters are 1-1/2” diameter discs and are
included with the patient simulator.
To deliver defibrillator and pacer pulses, and to view the PADS ECG waveform attach the
training cable (or hold paddles) at the following locations:
Apex: left side of chest, lower rib area
Sternum: right side of chest, middle rib area
Turn on SMART STAT BASIC: The switch is located in the recessed area of the left shoulder,
switch it so that the “−” is depressed.
The simulator will be active with default values:
Blood Pressure 120/80
Respirations Rate 10
Heart Rhythm Normal 72 BPM
Lung Sounds Normal
Bowel Sounds Normal
Pulses On

10
iPadFunctions
Connecting SMART STAT BASIC to the iPad
Steps:
1. Open your iPadbox and follow the manufacturer’s set up instructions
2. Set up an iTunesaccount
3. Go to the App store
4. Search for SMART STAT BASIC (or Simulaids)
5. Download and install the SMART STAT BASIC App on the iPad
6. Go to the iPadSettings screen
7. Turn off Wi-Fi; turn it back on
8. Select the Wi-Fi labeled “STAT-XXXX4” (a number suffix). Before it will open, a password
pop up window will appear. Type in the password: simulation01 (all lower case) and follow
the prompt. After it is connected, it will have a check mark next to the labeled Wi-Fi and the
name will show up on the left column where Wi-Fi is identified.
9. Close the Settings screen.
10. Go to the SMART STAT BASIC app and initialize it.
Wi-Fi
SMART STAT BASIC App

11
11. On the SMART STAT Basic app home screen, tap the “Patient Simulators” icon
12. If you want to name your patient simulator tap the area under the “Label” column. A text
box will display, that when tapped will bring up a keyboard to enter a name for the patient
simulator. After you type the name, tap the ‘Done’ button on the keyboard to save it.
13. Tap the switch for the “Control” column. Wait until it has connected.
14. In the upper right corner of the iPadscreen, tap the “Continue” button.
15. Tap anywhere on that line once and wait for the blue highlight to appear on that line.
Continue
Label Control
Student
Manikin Number

12
16. This will display the student screen. It is not required to select a student name to run on the
fly; it is only necessary to select a student name when running sessions and/or Recordings.
An initial run through the iPadset up will not have any student names, but if there were
any students, this is where they will display. Go to the upper right corner of the screen and
tap “Continue”.
This will display the features operation screen. Always tap the green preset arrow before
starting any operations. This automatically syncs the patient simulator and iPad.
You will hear a series of bells indicating the simulator and the iPadare connected.
O
p
eration Screen

13
User Interfaces
PRESETS
Presets allow you to create a set of feature lists that will put the simulator back into any given
set of presets with the tap of one button. Presets are especially useful when working with
scenarios that put the simulator in all kinds of conditions.
On the home screen of your SMART STAT Basic app, tap the PRESETS icon.
Edit details.
1. Selecting one of the options by tapping the title block displays a screen with all of the
features listed in one place. The screen above shows the highlighted title block, Default
Preset. Scroll down this list to see all the features listed.
2. To change/edit features listed in a Default Setting, tap the edit detail in the upper right
hand corner of the screen.
3. Tap any of the line items that you want to change and you will be given the red dot icons .
Selecting any of the features by tapping on a line will result in a highlighted blue line
through that selection.
4. Go to the right column and tap the little blue arrow icon to access the various choices you
have for that item. The program list is complete; it is recommended that you do not delete
any lines.
Title
Block

14
5. Select the rate to default to by tapping the selection. Then tap the ‘Done’ button in the
upper right corner.
6. When you are done changing the defaults to your preferences, simply press the ‘Done’
button and they will be available to you with a single tap on the Default Preset on the
control screen.
To create a new set of Defaults:
1. Start by tapping the PRESET icon on the home screen,
2. Tap the ‘Edit’ button on the upper LEFT side of the screen

15
3. Tap the green + circle icon to name your preset.
4. Press ‘Done’ on the left side.
5. Select the new Preset List and tap the Edit Detail button on the upper right corner.
6. Continue to build your preset list as you did in the above Preset steps 1 through 6.
7. When the Preset list is finished, tap the ‘Done’ button. It will be saved and available on the
control screens for immediate use.
Consider custom presets as scenarios that will be used over and over again. It is easier to use a
custom preset to reset your SMART STAT Basic rather than depending on a scenario.
16
STUDENT LIST
1. To create a list of students, go to the SMART STAT Basic app home screen.
2. Tap the Student icon
3. Tap the ‘Edit’ button on the right upper corner of the screen once.
4. Tap the green + circle and enter a name and/or a team name.
5. Tap ‘Done’.
6. To enter another name, repeat the steps for each additional name to be entered.
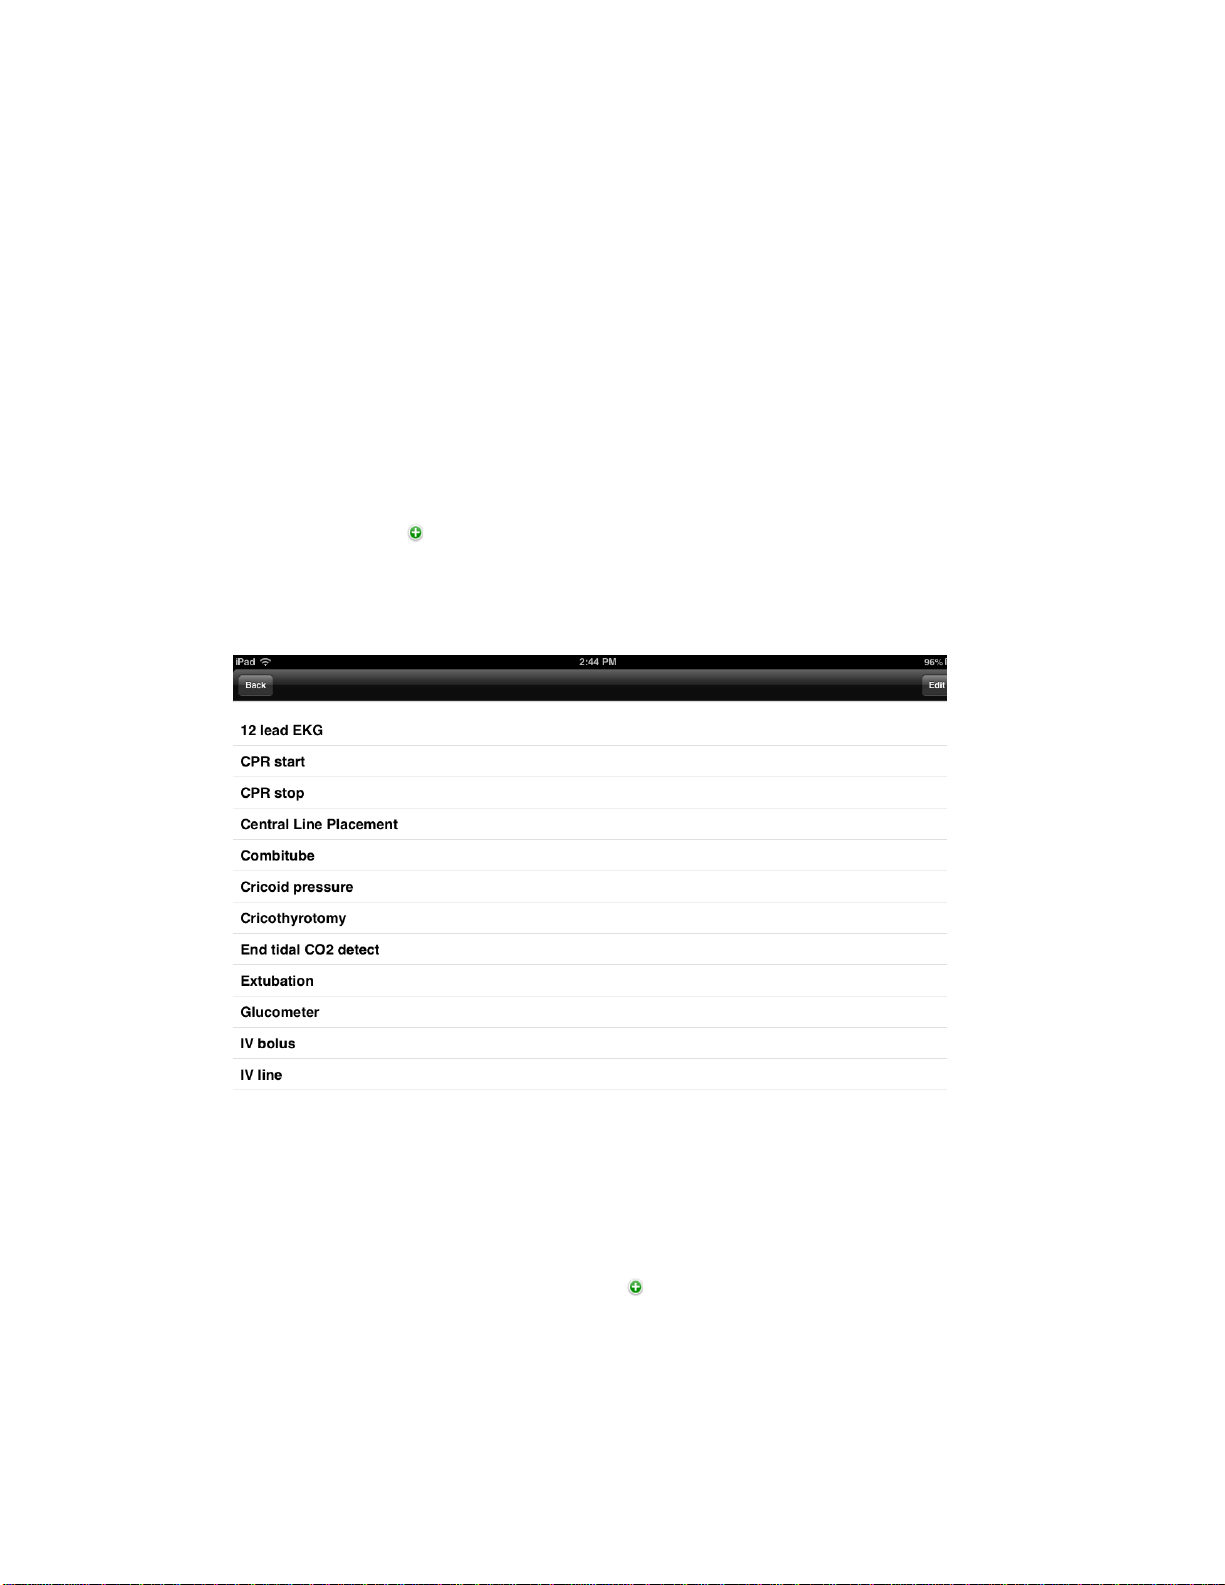
SKILLS LIST
1. To create or edit a skills check list, go to the home screen and tap the Skills icon.
2. Select a current skill by tapping it to highlight the skill.
3. In the upper right corner of the screen tap the “Edit” button.
4. You will be given the choice of editing any of the items or adding a new one.
5. To add a new skill, tap the green + circle and fill in the blank. Add as many skills as
you want for session recordings.

17
6. When you are finished, tap the ‘Done’ button in the upper left corner of the screen.
Each scenario has a place for the selected skills. The skills will appear alphabetically; to see the
entire list scroll down.
MEDICATION LIST
1. To create or edit Medications, go to the home screen and tap the Medication icon.
2. Follow create/edit ‘Skills’ steps to create/edit Medications. Scroll down the page to see the
entire list of available medications.
3. When you are finished adding medications to the list, hit the back button in the upper left
corner to return to the home screen.

18
Edit
SCENARIO LIST
This is where you create custom scenarios for any of your curriculum needs. There are simple
examples included with the app. If you have friends, who are building scenarios on their
Simulaids’ app, you can exchange files with them by using the Import/Export feature.
To view scenarios or to create a new scenario, tap on the Scenario icon to open the feature.
Your first choice is to work with a scenario. Start by tapping the ‘Edit’ button in the upper right
corner.
A list of scenarios will appear, along with a green + circle button. From this screen you can
delete, add or edit existing scenarios.
1. Delete a scenario: tap the red – circle and choose delete on the far right side.
1. Add a scenario: tap the green + circle to start with adding a name.
2. Tap the blank box, type the name and tap the keyboard ‘Done’ key to save it.
3. Tap the blue arrow circle on the right side of that line to bring up the scenario

19
4. Tap the ‘Edit’ button to begin building your scenario.
a. Select the time you want it to start; generally 00:00 (minutes/seconds)
b. Use the drop down lists to create your scenario features’ operations.
c. Create a time line of when you want certain features to be active by tapping the
individual arrow buttons for each. Then tap the ‘Done’ button.
d. To put another line on the scenario, tap the Edit button again and enter your next line.
e. Tap ‘Done’ and then ‘Edit’ to continue building and complete your scenario.
f. When you back out of the screen, your scenario is saved.
In the upper left corner of the screen, tap back until you reach the screen you need to continue
your work on the iPad.
If you enter the Scenario screen and wish to edit an existing scenario, tap the blue arrow circle
on the right side of the line you want to change and edit as explained previously.
At the bottom of the edit scenarios screen and above this text line are the two icons shown in
the black line.
When you are done editing the scenario details (left icon) you may tap the Scenario Skills
button to add a set of skills the student is expected to perform during the scenario.
Scenario
Details

20
a. Tap a skill to highlight it and then tap the left arrow to place the skill set on the scenario
file.
b. After all of the skills have been entered for a specific scenario, tap the back button at the
top.
When you play the scenario, these skill sets will display in the left column on the control
screen and can be checked off as the student performs the skills.
c. To add a skill that is not on the scenario list, back out to the home screen and go to the
Skills section to add the additional skill sets. When you return to the scenario actions
screen, the added skills will be available.
d. Eliminate skill sets from the list by highlighting the skill on the left column and tapping the
right arrow to put it back in the database column on the right side. Back out of the screen
to save it.
Scenario
Skills
Back
Table of contents
Other Simulaids Medical Equipment manuals

Popular Medical Equipment manuals by other brands

Shukla Medical
Shukla Medical Xtract-All Maxi Surgical Technique Guide

Shenzhen Mindray Bio-Medical Electronics Co., Ltd.
Shenzhen Mindray Bio-Medical Electronics Co., Ltd. DC-N2 Operator's manual

Cellink
Cellink Inkredible+ user manual

Graham Field
Graham Field GENDRON 3648 Series user manual

Envitec
Envitec MySign s Technical documentation

Newteck
Newteck Halcyon H2 user manual


