Siqura TC620 User manual

TC620 & TC840R1
Thermal IP cameras in aluminium housing
Installation Manual

Note: To ensure proper operation, please read this manual thoroughly before using the
product and retain the information for future reference.
Copyright © 2017 Siqura B.V.
All rights reserved.
TC620/TC840R1 MNVCHTV32_1511_EN
Installation Manual v3 (153103-3)
AIT55
Nothing from this publication may be copied, translated, reproduced, and/or published by
means of printing, photocopying, or by any other means without the prior written permission
of Siqura.
Siqura reserves the right to modify specifications stated in this manual.
Brand names
Any brand names mentioned in this manual are registered trademarks of their respective
owners.
Liability
Siqura accepts no liability for claims from third parties arising from improper use other than
that stated in this manual.
Although considerable care has been taken to ensure a correct and suitably comprehensive
description of all relevant product components, this manual may nonetheless contain errors
and inaccuracies. We invite you to offer your suggestions and comments by email via
[email protected]. Your feedback will help us to further improve our documentation.
How to contact us
If you have any comments or queries concerning any aspect related to the product, do not
hesitate to contact:
Siqura B.V.
Zuidelijk Halfrond 4
2801 DD Gouda
The Netherlands
General : +31 182 592 333
Fax : +31 182 592 123
E-mail : [email protected]
WWW : http://www.tkhsecurity.com
2

Contents
1 About this manual ..................................................................................... 4
1.1 Typographical conventions .................................................................... 4
1.2 Copyright and trademarks .................................................................... 4
2 Safety rules ............................................................................................... 5
3 Identification ............................................................................................ 7
3.1 Product description and type designation ................................................ 7
3.2 Product markings ................................................................................. 7
4 Preparing the product for use ................................................................... 8
4.1 Unpacking .......................................................................................... 8
4.2 Contents ............................................................................................ 8
4.3 Disposing of packaging material ............................................................ 8
4.4 Preparatory work before installation ....................................................... 9
4.4.1 Attaching the bracket ....................................................................... 9
5 Installation ............................................................................................... 10
5.1 How to open the housing ...................................................................... 10
5.2 How to install the camera ..................................................................... 10
5.3 Board description ................................................................................. 11
5.4 Connection of the power supply line ....................................................... 12
5.4.1 Type of cable .................................................................................. 12
5.5 Installation of the version with double filter for air renewal ........................ 12
6 Accessories ............................................................................................... 14
6.1 Heater ............................................................................................... 14
6.1.1 Heater installation ............................................................................ 14
6.2 Camera power supply ........................................................................... 15
6.2.1 Camera power supply installation ....................................................... 15
6.3 Blower ............................................................................................... 16
6.3.1 Blower installation ........................................................................... 16
7 Cleaning .................................................................................................... 18
7.1 Window and plastic cover cleaning ......................................................... 18
8 Disposal of waste materials ...................................................................... 19
9 Technical data ........................................................................................... 20
9.1 General .............................................................................................. 20
9.2 Mechanical .......................................................................................... 20
9.3 Housing window .................................................................................. 20
9.4 Digital I/O .......................................................................................... 21
9.5 Electrical ............................................................................................ 21
9.6 Environment ....................................................................................... 22
9.7 Certifications ....................................................................................... 22
10 Technical drawings ................................................................................... 23
Index ...................................................................................................... 24
3

1 About this manual
Before installing and using this unit, read this manual carefully. Be sure to keep it handy for
later reference.
In This Chapter
1.1 Typographical conventions....................................................................................... 4
1.2 Copyright and trademarks........................................................................................4
1.1 Typographical conventions
DANGER!
High level hazard.
Risk of electric shock. Disconnect the power supply before proceeding
with any operation, unless indicated otherwise.
CAUTION!
Medium level hazard.
This operation is very important for the system to function properly.
Please read the procedure described very carefully and carry it out as
instructed.
INFO
Description of system specifications.
We recommend reading this part carefully in order to understand the
subsequent stages.
1.2 Copyright and trademarks
The quoted names of products or companies are trademarks or registered trademarks.
4

2 Safety rules
CAUTION! The device must be installed only and exclusively by skilled
technical personnel.
CAUTION! The electrical system to which the unit is connected must be
equipped with an automatic bipolar circuit breaker. The circuit breaker
for main supply voltage phase units must have a level of intervention
of 20 A max. The circuit breaker for low voltage units must have a level
of intervention of 6 A max. This circuit breaker must be of the Listed
type. The minimum distance between the contacts must be 3 mm
(0.1 in). The circuit breaker must be provided with protection against
the fault current towards the ground (differential) and the overcurrent
(magnetothermal).
● The manufacturer declines all responsibility for any damage caused by an improper use of
the appliances mentioned in this manual. Furthermore, the manufacturer reserves the
right to modify its contents without any prior notice. The documentation contained in this
manual has been collected with great care. The manufacturer, however, cannot take any
liability for its use. The same thing can be said for any person or company involved in the
creation and production of this manual.
● Before starting any operation, make sure the power supply is disconnected.
● Do not use cables that seem worn or old.
● Never, under any circumstances, make any changes or connections that are not shown in
this handbook. Improper use of the appliance can cause serious hazards, risking the safety
of personnel and of the installation.
● Use only original spare parts. Non-original spare parts could cause fire, electrical discharge
or other hazards.
● Before proceeding with the installation, check the supplied material to make sure it
corresponds to the order specification by examining the identification labels (see "Product
markings" on page 7).
● This device was designed to be permanently installed on a building or on a suitable
structure. The device must be installed permanently before any operation. The altitude of
operation is up to 2000 metres.
● When installing the device, comply with all the national standards.
● Installation category (also called Overvoltage Category) specifies the level of mains
voltage surges that the equipment will be subjected to. The category depends upon the
location of the equipment, and on any external surge protection provided. Equipment in an
industrial environment, directly connected to major feeders/short branch circuits, is
subjected to Installation Category III. If this is the case, a reduction to Installation
Category II is required. This can be achieved by use of an insulating transformer with an
earthed screen between primary and secondary, or by fitting listed Surge Protective
Devices (SPDs) from live to neutral and from neutral to earth. Listed SPDs shall be
designed for repeated limiting of transient voltage surges, suitable rated for operating
voltage and designated as follows: Type 2 (Permanently connected SPDs intended for
installation on the load side of the service equipment overcurrent device); Nominal
Discharge Current (In) 20 kA min. For example: FERRAZ SHAWMUT, STT2240SPG-CN,
STT2BL240SPG-CN rated 120 Vac / 240 Vac, (In=20 kA). Maximum distance between
installation and reduction is 5 m.
● Any device which could be installed inside the product must comply with the current safety
standards.
● If the installation is NEMA TYPE 4X, the installer must replace the cable glands of the
product with NEMA TYPE 4X cable glands.
5

● For all connections, use cables that are able to withstand temperatures of at least 75 °C
(167 °F).
● The product is designed to house only cameras that are properly certified (7 W max).
● A disconnecting device, readily and easily accessible, must be incorporated in the electrical
system of the building for rapid intervention.
● To connect the power supply line use the appropriate junction-box (UPTJBUL). For further
information, refer to the product use and installation manual.
● Use Listed copper tube crimping lugs for the connection of the network conductors to the
terminals. The copper tube crimping lugs must be suitable for the type of installation (from
-20 °C (-4 °F) to +80 °C (+176 °F) min., V-0). Copper tube crimping lugs examples: RP,
BP or YP (Cembre).
Safety rules
6

3 Identification
In This Chapter
3.1 Product description and type designation................................................................... 7
3.2 Product markings....................................................................................................7
3.1 Product description and type designation
This housing has been designed to fit thermal cameras with compact lenses for vision even in
total darkness.
It is possible to use it for a wide range of day/night surveillance systems, such as: monitoring
and rescue in the event of a fire, public safety, along with airport, industrial and
environmental surveillance.
The frontal opening system allows an easy access to the camera and all internal connections.
A wide range of accessories for mounting the equipment is available, thereby satisfying all
installation needs.
3.2 Product markings
See the label attached to the product.
7

4 Preparing the product for use
Any change that is not expressly approved by the manufacturer will
invalidate the guarantee.
In This Chapter
4.1 Unpacking............................................................................................................. 8
4.2 Contents............................................................................................................... 8
4.3 Disposing of packaging material................................................................................8
4.4 Preparatory work before installation.......................................................................... 9
4.1 Unpacking
When the product is delivered, make sure that the package is intact and that there are no
signs that it has been dropped or scratched.
If there are obvious signs of damage, contact the supplier immediately.
Keep the packaging in case you need to send the product for repairs.
4.2 Contents
Check the contents to make sure they correspond with the list of materials as below:
● Housing
● Housing equipment:
- Allen wrench
- Spacers
- Cable glands gaskets
- Cable glands (x3)
- Bolts and screws
- Screws for camera
● Instructions manual
● Desiccant bag
4.3 Disposing of packaging material
The packaging material can all be recycled. The installer technician will be responsible for
separating the material for disposal, and in any case for compliance with the legislation in
force where the device is to be used.
When returning a faulty product we recommend using the original packaging for shipping.
8

4.4 Preparatory work before installation
4.4.1 Attaching the bracket
The product must be fastened with suitable equipment. The fastening
means must guarantee the mechanical seal when a force equal to at
least four times the weight of the device is applied.
Preparing the product for use
9

5 Installation
In This Chapter
5.1 How to open the housing....................................................................................... 10
5.2 How to install the camera.......................................................................................10
5.3 Board description..................................................................................................11
5.4 Connection of the power supply line........................................................................ 12
5.5 Installation of the version with double filter for air renewal......................................... 12
5.1 How to open the housing
Loosen the two screws on the side, turn the cover and the upper half of the body about the
opening hinge axis.
Fig. 1
At the end of installation and cabling operations close the housing.
5.2 How to install the camera
Power supply can be provided by the board supplied with the product.
Make sure the voltage values are appropriate.
Open the housing as described (see "How to open the housing" on page 10).
Partially loosening the fastening screws (01).
Remove the internal slide (02) by sliding it until the holes coincide with the slide fastening
screws.
Fasten the camera with the 1/4" screw (03). To position the camera and lens correctly, if
necessary, use the supplied spacers. (04).
Reposition the internal slide and tighten the screws that were loosened previously.
10

Fig. 2
Remove the conductors protective sheathing and connect them to terminal J5 (see "Board
description" on page 11).
The camera’s power supply cable conductors must be tied up with a cable tie next to the
terminal. Keep the signalling and power supply cables separated from each other.
5.3 Board description
Connect the safety earth to the relative terminal of the J1 connector.
The board may appear different to the one illustrated.
Depending on the product version, the board may not be equipped with
all functions.
BOARD DESCRIPTION
Connecto
r
Function Connecto
r
Function
J1 Board power supply (VIN)1J5 Camera power supply (VOUT)4
J2 Auxiliary output (VOUT)2J7 Power supply connector/jumper5
J3 Heater power supply (VOUT) J8 Fan power supply (VOUT)
J4 Tamper switch contacts3SW1 Tamper switch3
Tab. 1
1From 100 Vac - 240 Vac, 24 Vac or 12 Vdc.
2Same voltage applied to power supply terminal of the board (J1).
3Optional.
4Different alternatives are available depending on the version. VOUT = 12 Vdc or VOUT =
24 Vac, in relation to the type of power supply installed (see "Camera power supply
installation" on page 15). VOUT = VIN, only for housings powered in 12 Vdc or 24 Vac, with
jumper inserted (J7).
5For power supply in 12 Vdc or 24 Vac (see "Camera power supply installation" on page 15).
Installation
11

Fig. 3
5.4 Connection of the power supply line
Earth cable should be about 10 mm longer than the other two, so that
it will not be disconnected accidentally if pulled.
Insert the cables for the connection to the power supply line inside the housing through the
cable glands. The cable glands are suitable for conductors with diameters of between 5 mm
and 10 mm. The section of the cable inside the housing must be sufficiently long to allow
connection. Suitably lock the cable glands.
Remove the conductors protective sheathing and connect them to terminal J1 (see "Board
description" on page 11).
5.4.1 Type of cable
The cable used for the connection to the power supply line must be suitable for the intended
use. Comply with the current national standards on electrical installations.
5.5 Installation of the version with double filter for air
renewal
During installation pay attention to the orientation of the air inlet filter
fins.
Installation
12

Fig. 4
Depending on the angle of inclination of the housing, the orientation of the filter fins must
prevent water penetrating in case of rain.
To guarantee the weatherproofness, install the housing on the support following the
inclination limits as shown in the picture.
Fig. 5 Maximum tilt of the transversal axis: 0°. Maximum tilt of the longitudinal axis: ±45°.
Installation
13
6 Accessories
For further details on configuration and use, refer to the user manual.
In This Chapter
6.1 Heater.................................................................................................................14
6.2 Camera power supply............................................................................................ 15
6.3 Blower.................................................................................................................16
6.1 Heater
6.1.1 Heater installation
Open the housing as described (see "How to open the housing" on page 10).
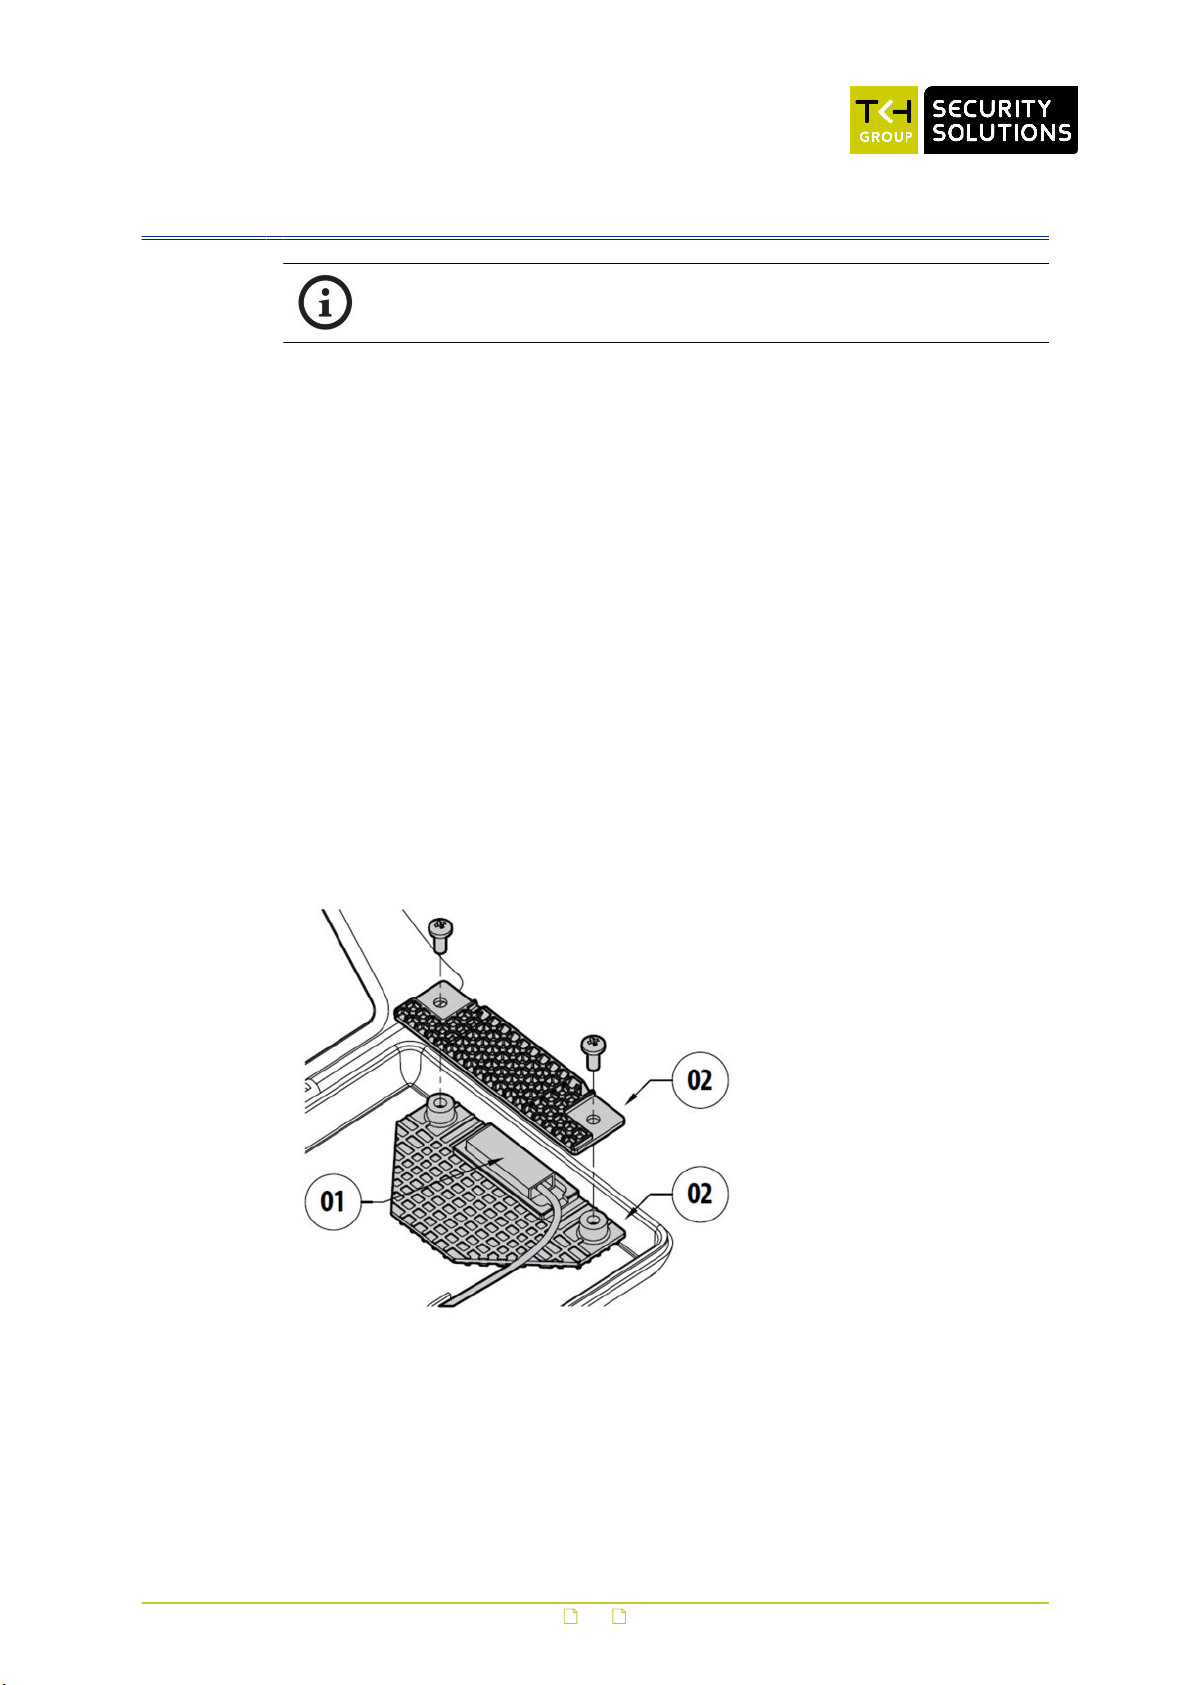
Fix the heater kit to the prearranged points on the body of the housing.
The prewired heating element (01) should be positioned between the two dissipators (02)
before attachment to ensure contact and hence guarantee correct heat transmission.
Pass the heating wiring under the fixing slide of the camera.
Fig. 6
At the end of the installation, connect the wiring to the terminal (power supply connector)
(see "Board description" on page 11).
Reposition the internal slide and tighten the screws that were loosened previously.
14

6.2 Camera power supply
6.2.1 Camera power supply installation
Not usable in housings with wiper device installed.
Pay attention to the voltage value used when the circuit is powered.
Depending on requirements use the correct power supply kit.
There are two types of camera power supply depending on requirements.
Fig. 7 VIN from 100 Vac - 240 Vac, VOUT 12 Vdc
Fig. 8 VIN 230 Vac, VOUT 24 Vac
Open the housing as described (see "How to open the housing" on page 10).
Fix the support bracket (02) using the screw (01).
Place the power supply (03) on the support bracket.
Secure it all with the screws (04) and the corner fixing bracket.
Accessories
15

Fig. 9
Plug the multipolar female connector into the corresponding male connector J7 (see "Board
description" on page 11).
Fig. 10
6.3 Blower
6.3.1 Blower installation
Not usable in versions with double filter for air renewal and wiper.
Pay attention to the voltage value used when the circuit is powered.
Depending on requirements use the correct power supply kit.
The blower kit should be assembled according to the instructions to
ensure a correct air circulation inside the housing.
Accessories
16


7 Cleaning
In This Chapter
7.1 Window and plastic cover cleaning.......................................................................... 18
7.1 Window and plastic cover cleaning
Avoid ethyl alcohol, solvents, hydrogenated hydrocarbide, strong acid
and alkali. Such products may irreparably damage the surface.
We recommend using a soft cloth with neutral soaps diluted with water or specific products to
clean eyeglasses lenses.
18

8 Disposal of waste materials
This symbol and recycle system apply to EU countries only. They are
not applicable to countries in other areas of the world.
Your product is designed and manufactured with high quality materials and components which
can be recycled and reused.
This symbol means that electrical and electronic equipment, at their end-of-life, should be
disposed of separately from your household waste.
Please dispose of this equipment at your local Community waste collection or Recycling
centre.
In the European Union there are separate collection systems for used electrical and electronic
products.
19

9 Technical data
In This Chapter
9.1 General............................................................................................................... 20
9.2 Mechanical........................................................................................................... 20
9.3 Housing window....................................................................................................20
9.4 Digital I/O............................................................................................................21
9.5 Electrical..............................................................................................................21
9.6 Environment........................................................................................................ 22
9.7 Certifications........................................................................................................ 22
9.1 General
Constructed from aluminium
Sunshield in ABS
Epoxypolyester powder painting, RAL9002 colour
Stainless steel external screws
9.2 Mechanical
Cable glands: 3x M16
Dimensions (WxHxL): 176x160x514 mm (6.9x6.3x20.2 in)
Unit weight: 4 kg (8.8 lb)
9.3 Housing window
Germanium window
● Dimensions (Ø): 55 mm (2.1 in)
● Thick: 2 mm (0.07 in)
● External scratch-resistant treatment: Hard Carbon Coating (DLC)
● Internal antireflection treatment
● Spectral range: 7.5~14 μm
● Medium transmittance (7.5~11.5 μm): 94%
● Medium transmittance (11.5~14 μm): 90%
20
This manual suits for next models
1
Table of contents
Other Siqura Thermal Camera manuals


