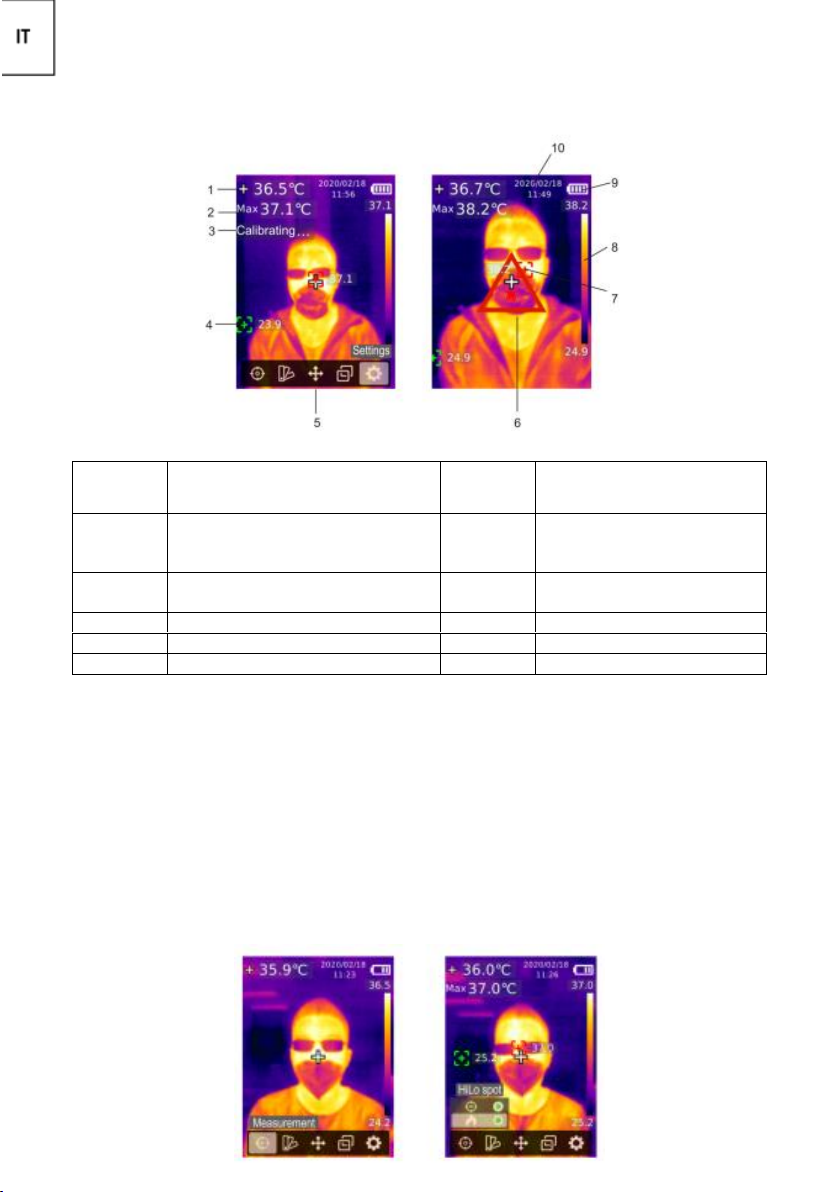
urmet domus 1099/809 User manual

DS1099-065 2
1099/809
Access Control (Bi-Spectrum)
Handheld Device
GUIDA RAPIDA
QUICK GUIDE
SCHNELLANLEITUNG

3
1
Prefazione
Grazie per aver acquistato 1099/809, telecamera mobile bispettro (termica ed ottica). Per usare il
dispositivo in modo corretto e sicuro, si consiglia di leggere attentamente questo manuale, in
particolare il paragrafo riferito istruzioni sull’uso in sicurezza.
Dopo aver letto questo manuale, si consiglia di conservarlo col dispositivo, per riferimento futuro.
Garanzia e responsabilità
URMET garantisce che il prodotto è privo di difetti nei materiali e nella lavorazione. Questa garanzia
non si può applicare a danni causati da incidente, negligenza, uso improprio, manomissione,
contaminazione o conservazione impropria.
Precauzioni d’uso
Assicurarsi dell’integrità dell’apparecchio dopo averlo tolto dall’imballo.
Tutte le operazioni elettroniche devono essere rigorosamente conformi alle norme di sicurezza
elettrica, normative antincendio e altre normative correlate alla propria regione/nazione.
Prima di effettuare qualsiasi operazione di pulizia o di manutenzione disinserire l’apparecchio dalla rete
di alimentazione elettrica. Non usare prodotti spray per la pulizia dell’apparecchio.
Controllare che la temperatura d’esercizio sia nei limiti indicati e che l’ambiente non sia particolarmente
umido.
Se fumo, odori o rumori provengono dal dispositivo, spegnere immediatamente l'alimentazione e
scollegare l'alimentazione, quindi contattare il centro assistenza.
Prima di collegare l’apparecchio alla rete di alimentazione accertarsi che i dati di targa siano rispondenti
a quelli della rete di distribuzione.
Non lasciare il prodotto incustodito mentre è in carica. In caso di surriscaldamento, disalimentarlo
immediatamente. Non caricarlo oltre 8 ore
Non collegare più dispositivi a un adattatore di alimentazione poiché il sovraccarico dell'adattatore può
causare surriscaldamento o principio di incendio.
Accertarsi che l'alimentazione sia stata scollegata prima di cablare, installare o smontare il dispositivo.
Quando il prodotto è installato a parete o soffitto o su un treppiede, il dispositivo deve essere fissato
saldamente.
Tenere le batterie nuove e usate lontano dai bambini.
Qualora la batteria fosse stata ingerita consultare immediatamente un medico.
Se il prodotto non funziona correttamente, contattare il rivenditore o il centro di assistenza più vicino,
per le riparazioni rivolgersi solo ad un centro di assistenza autorizzato.
Non tentare mai di smontare il dispositivo da soli. (Non ci assumeremo alcuna responsabilità per
problemi causati da riparazioni o manutenzioni non autorizzate).
2
Informazioni sulla batteria
Il dispositivo è dotato di una batteria contenute al suo interno che viene ricaricate tramite
alimentazione esterna. Non rimuovere la batteria.
Caricamento e scaricamento
NOTA BENE
: Non utilizzare il dispositivo senza aver prima effettuato la prima carica.
Per ottimizzare le prestazioni delle batterie si raccomanda di effettuare la prima carica di circa 8 ore.
Si noti che le batterie nuove raggiungono il massimo delle prestazioni solo dopo essere state
completamente ricaricate e scaricate per due o tre volte. La batteria può essere caricata e scaricata

DS1099-065 4
centinaia di volte, ma con l’uso diminuisce la carica massima.
Collegare l’alimentatore al dispositivo per mezzo dell’ingresso dedicato (vedi anche capitolo comandi
e regolazioni).
Verificare che il valore della tensione di rete alla quale l’alimentatore dovrà essere collegato sia
corrispondente alle caratteristiche indicate nell’alimentatore stesso.
Collegare l’alimentatore alla presa di rete.
Scollegare l’alimentatore dalla presa elettrica e il dispositivo quando non viene usato. Non lasciare una
batteria completamente carica in carica, in quanto una carica eccessiva può limitarne la durata.
Se non utilizzata, una batteria anche completamente carica si scarica con il passare del tempo.
Avvertenze
Non utilizzare le batterie per scopi diversi da quelli prescritti. Non utilizzare mai batterie o
caricabatteria che risultino danneggiati.
Non mettere in corto circuito la batteria.
Lasciare la batteria in ambienti caldi o freddi, come ad esempio in un’auto completamente chiusa in
piena estate o pieno inverno, ridurrà la capacità e la durata della batteria stessa.
Un dispositivo con la batteria calda o fredda può temporaneamente non funzionare, anche se la batteria
è completamente carica. Il rendimento delle batterie è notevolmente ridotto a temperature inferiori al
punto di congelamento.
Non gettare le batterie nel fuoco in quanto potrebbero esplodere. Le batterie potrebbero esplodere se
danneggiate. Smaltire le batterie rispettando le normative locali. Riciclarle, quando possibile. Non
gettare le batterie nei rifiuti domestici
3
Istruzioni di sicurezza
Per garantire un uso corretto di questo prodotto, leggere attentamente le istruzioni prima di usarlo.
1.
La distanza di misurazione ottimale per questo prodotto è di 1 metro.
2.
Per garantire l'accuratezza della misurazione, utilizzare il prodotto con una temperatura
ambiente di 15° C ~ 30° C, <85% RH (senza condensa)
3.
Utilizzare il prodotto in ambienti chiusi senza vento.
4.
Quando si passa a un nuovo ambiente, accendere il prodotto 10-15 minuti prima della
misurazione.
5.
La temperatura ambiente per la misurazione deve essere stabile. Non misurare in luoghi
ove presente un grande flusso d'aria come ventilatori o prese d'aria.
6.
Quando l'oggetto misurato proviene da un luogo con una temperatura molto differente
dall'ambiente di misura, tenerlo per 10-30 minuti prima della misurazione.
7.
Il prodotto verifica la temperatura superficiale dell'oggetto. Se si rende necessaria la
compensazione della temperatura lo si può fare nel menu Impostazioni.
8.
Il prodotto ha una funzione di auto-calibrazione. Se la temperatura mostrata varia in
continuazione leggere la temperatura dopo che si è stabilizzata.
9.
Dopo aver misurato oggetti a temperatura estremamente alta o bassa, si prega di lasciare
il prodotto a temperatura ambiente per 10 minuti prima del successivo utilizzo.
10.
Non utilizzare il prodotto in luoghi con forte luce solare o con emissioni/interferenze
elettromagnetiche (anche cavi elettrici o affini)
11.
Non utilizzare il prodotto in ambienti infiammabili, esplosivi, corrosivi, pieni di vapore, o
umidi.
12.
Smettere di utilizzare il prodotto se è danneggiato o manomesso per evitare misure
inaccurate

5
13.
Utilizzare l'emissività corretta per ottenere letture accurate della temperatura.
14.
Per garantire l'accuratezza del prodotto, accenderlo 10-15 minuti prima di misurare se non
è stato usato per molto tempo.
15.
La presenza di occhiali o superfici riflettenti causa errate misurazioni di temperatura.
16.
Durante la carica, la temperatura interna del prodotto aumenta, il che comporta una
misurazione della temperatura imprecisa. Quindi, non è raccomandato eseguire
misurazioni durante o subito dopo la ricarica del prodotto.
4
Dispositivo, comandi e regolazioni
Numero
Descrizione
Numero
Descrizione
1
Interfaccia USB (Tipo C)
10
Pulsante torcia
2
Slot per scheda SD
11
Pulsante sinistra
3
Copertura interfacce
12
Pulsante giù
4
Led bianchi
13
Pulsante su
5
Obiettivo fotocamera infrarossi
14
Pulsante riproduzione/conferma
6
Obiettivo fotocamera ottica
15
Pulsante destra
7
Grilletto per salvare immagine
16
Pulsante indietro
8
Monitor LCD
17
Pulsante impostazioni
9
Pulsante accensione/spegnimento
18
Foro per il montaggio su
treppiede
5
Schermo

DS1099-065 6
Dimensione dello schermo 2.8 “
Risoluzione dello schermo: 320 pixel (verticale) per 240 (orizzontale)
Numero
Descrizione
Numero
Descrizione
1
Temperatura del punto centrale
6
Segnale di allarme per
sforamento temperatura
massima
2
Massima temperatura
7
Punto a temperatura massima
(rosso)
3
Auto-calibrazione
8
Barra per colori temperatura
4
Punto a temperatura minima (Verde)
9
Stato della batteria
5
Menù principale
10
Data e ora
6
Accensione e spegnimento
Tenere premuto il pulsante di accensione per 3 secondi per accendere / spegnere il prodotto.
NOTA:
dopo che il prodotto ha avviato la procedura di spegnimento, sono necessari dai 5 ai 6 secondi
affinché sia completamente spento.
Non accendere e spegnere il prodotto continuamente per evitare danni allo stesso.
7
Menu
Misurazioni (Measurements)

7
1.
Premere il pulsante SET per accedere al menu principale.
2.
Premere il pulsante sinistra / destra per selezionare l'opzione .
3.
Premere il pulsante SET per accedere al menu di misurazione.
4.
Premere il pulsante su / giù per selezionare Center Spot (misurazione del punto centrale)
o HiLo Spot (misurazione della temperatura massima e minima).
5.
Premere il pulsante SET per attivare / disattivare Center Spot o HiLo Spot.
6.
Premere il pulsante Indietro per uscire.
Modalità dell’immagine (Image mode)
1.
Premere il pulsante SET per aprire il menu principale.
2.
Premere il pulsante sinistra / destra per selezionare l'opzione .
3.
Premere il pulsante SET per accedere al menu per definire la modalità dell’immagine.
4.
Premere il pulsante su / giù per selezionare la modalità desiderata da Thermal (immagine
solo infrarossi), Digital (immagine solo ottica) e Fusion (sovrapposizione dell’immagine
infrarossi e ottica).
5.
Premere il pulsante SET per applicare la modalità corrente.
6.
Premere il pulsante Indietro per uscire.
NOTA BENE
: se si seleziona Fusion, premendo il pulsante sinistra / destra si può selezionare il
rapporto di trasparenza desiderato tra 0% (pura immagine ottica), 25%, 50%, 75% e 100% (pura
immagine a infrarossi) all’interno del menù della termografia.

DS1099-065 8
DIRETTIVA 2012/19/UE DEL PARLAMENTO EUROPEO E DEL CONSIGLIO del 4 luglio
2012 sui rifiuti di apparecchiature elettriche ed elettroniche (RAEE).
Il simbolo del cassonetto barrato riportato sull’apparecchiatura o sulla sua confezione indica che il
prodotto alla fine della propria vita utile deve essere raccolto separatamente dagli altri rifiuti.
L’utente dovrà, pertanto, conferire l’apparecchiatura giunta a fine vita agli idonei centri comunali di
raccolta differenziata dei rifiuti elettrotecnici ed elettronici. In alternativa alla gestione autonoma è
possibile consegnare l’apparecchiatura che si desidera smaltire al rivenditore, al momento dell’acquisto di una
nuova apparecchiatura di tipo equivalente.
Presso i rivenditori di prodotti elettronici con superficie di vendita di almeno 400 m2 è inoltre possibile
consegnare gratuitamente, senza obbligo di acquisto, i prodotti elettronici da smaltire con dimensione massima
inferiore a 25cm.
L’adeguataraccoltadifferenziataperl’avviosuccessivodell’apparecchiaturadismessaalriciclaggio,altrattamento
e allo smaltimento ambientalmente compatibile contribuisce ad evitare possibili effetti negativi sull’ambiente e
sullasalute e favorisceilreimpiego e/o riciclo dei materiali dicui ècompostal’apparecchiatura.
8
QR Code
Guida rapida e manuale completo dei dispositivi sono altresì disponibile per il DOWNLOAD dal sito
URMET nella sezione DOCUMENTAZIONE E RISORSE al seguente indirizzo:

9
EN
1
Introduction
Thank you for purchasing 1099/809, Thermal & Optical (Bi-Spectrum) Handheld Camera. To use the
device correctly and safely, we recommend that you carefully read this manual, in particular the
paragraph referring instructions and safe use.
After reading this manual, we recommend that you keep it with your device for future reference.
Warranty and liability
URMET guarantees that the product is free from defects in materials and workmanship. This warranty
does not apply to damage caused by accident, neglect, misuse, tampering, contamination or improper
storage.
Precautions
Make sure that the device is intact after removing it from the package.
All the electronic operation should be strictly compliance with the electrical safety regulations,
fire prevention regulations and other related regulations in your local region.
Disconnect the device from the mains before cleaning or maintenance. Do not use spray products to
clean the device.
Check that the working temperature is within the indicated range and that the environment is not
particularly humid.
If smoke, odors or noise rise from the device, turn off the power at once and unplug the power
cable, and then please contact the service centre.
Disconnect power by means of the circuit breaker in the event of a failure and/or bad operation.
Exclusively contact an authorised service centre for repairs.
Make sure that the rating plate data correspond to the power specifications before connecting the
device to the mains.
do not leave it unattended when charging the device. lf the battery becomes seriously hot, the power
shall be cut off immediately. lts charging time should not be more than 8 hours
Do not connect several devices to one power adapter as adapter overload may cause over-heat
or fire hazard.
Please make sure that the power has been disconnected before you wire, install or dismantle the
device.
When the product is installed on wall or ceiling, the device shall be firmly fixed.
Do not ingest battery, Chemical Burn Hazard.
Keep new and used batteries away from children. If the battery compartment does not close
securely, stop using the product and keep it away from children. If you think batteries might have
been swallowed or placed inside any part of the body, seek immediate medical attention
If the product does not work properly, please contact your dealer or the nearest service center.
Never attempt to disassemble the device yourself. (We shall not assume any responsibility for
problems caused by unauthorized repair or maintenance.)

DS1099-065 10
EN
2
Battery information
The device has battery inside which are recharged by receiving external power. Do not remove the
battery.
Loading and unloading
IMPORTANT NOTE:
Complete the initial charge before using the device. An initial charge of
approximately 8 hours is recommended to optimise battery performance.
Note that new batteries reach top performance only after having been fully recharged and discharged
twice or three times. The battery can be charged and discharged hundreds of times but will wear out
with use.
Plug the power supply unit included into the DC.
Check that the voltage of the mains to which the power supply unit is connected corresponds to the
ratings indicated on the power supply unit itself.
Disconnect the battery charger from the electric socket and the device when not in use. Do not leave
the fully charged battery connected to the battery charger because excessive charge may limit
duration.
If not used, even a completely charged battery may discharge in time.
Warnings
Do not use batteries for purposes others than those specified. Do not use batteries or battery chargers
which are damaged.
Do not short circuit the battery.
Leaving the battery in very hot or very cold places, e.g. in a locked car in the summer or in the winter,
may reduce the capacity and duration of the battery itself.
A device with a hot or cold battery may temporarily not work, even if the battery is fully charged.
Battery efficiency is considerably reduced at temperatures lower than freezing.
Do not throw batteries into the fire: they could explode. Batteries may explode if damaged. Dispose
of batteries respecting local regulations in force. Recycle, when possible. Do not dispose of batteries
with domestic waste.
3
Safety instructions
To ensure proper use of this product, please read the instructions carefully before using.
1.
The optimal measuring distance for this product is 1 meter.
2.
To ensure measurement accuracy, please use the product in an operating environment of
15°C~30°C, <85% RH (non condensing)
3.
Please use the product indoors without wind.
4.
When changing to a new environment, please turn on the product and leave it for 10 to 15
minutes before measuring.
5.
The ambient temperature for measuring must be stable. Do not measure in places with
large airflow such as fans and air outlets.
6.
When the measured object comes from a place with a large temperature difference from
the measurement environment, keep it in the measurement environment for 10 to 30
minutes before measuring.
7.
The product tests the surface temperature of the object. If temperature compensation is
needed, please adjust in the Settings menu.
8.
The product has a self-calibration function. If the reading jumps quickly, please read the
temperature after it gets steady.

11
EN
9.
After measuring extremely high or low temperature objects, please leave the product for
10 minutes before next use.
10.
Do not use the product in places with strong sunlight or electromagnetic interference.
11.
Please do not use the product in flammable, explosive, steamy, wet or corrosive
environments.
12.
Please stop using the product if it is damaged or modified to avoid inaccurate
measurement results.
13.
Please use the correct emissivity to obtain accurate temperature readouts.
14.
To ensure accuracy of the product, please warm it up for 10 to 15 minutes before
measuring if it has not been used for a long time.
15.
The presence of glasses or reflective surfaces causes incorrect temperature measurements
16.
When being charged, the internal temperature of the product rises, which will lead to
inaccurate temperature measurement. So, it is not recommended to take measurements
during or right after charging the product.
4
Device, operating features
Item
Description
Item
Description
1
USB (Type-C) interface
10
Flashlight button
2
SD card slot
11
Left button
3
Interface cover
12
Down button
4
Led light
13
Up button
5
infrared camera lens
14
Play button
6
Visual light camera lens
15
Right button
7
Trigger
16
Back button
8
LCD display
17
SET button
9
Power button
18
Tripod mounting hole

DS1099-065 12
EN
5
Display
Display size: 2.8"
Display resolution: 320 (vertical) x 240 (horizontal) pixels
Item
Description
Item
Description
1
Center point temperature
6
High temperature Alert sign
2
Maximum temperature
7
Maximum temperature point (Red)
3
Auto-calibration
8
Temperature bar
4
Minimum temperature point (Green)
9
Battery status
5
Main menu
10
Date and time
6
Power ON/OFF
Press and hold the power button for 3 seconds to turn on/off the product.
NOTE
: After the product starts the shutdown procedure, it takes 5 to 6 seconds.
Please try to avoid turning on and off the product continuously to avoid damage

13
EN
7
Menu
Measurements
1.
Press the SET button to open the main menu.
2.
Press the left/right button to select the option .
3.
Press the SET button to enter the Measurement menu.
4.
Press the up/down button to select Center Spot (center point measurement) or HiLo Spot
(maximum and minimum temperature measurement).
5.
Press the SET button to turn on/off Center Spot or HiLo Spot.
6.
Press the back button to exit.
Image mode

DS1099-065 14
EN
1.
Press the SET button to open the main menu.
2.
Press the left/right button to select the option .
3.
Press the SET button to enter the Image Mode menu.
4.
Press the up/down button to select the desired mode from Thermal (infrared image),
Digital (visual light image), and Fusion (image blending).
5.
Press the SET button to apply the current mode.
6.
Press the back button to exit.
NOTE
: If Fusion is selected, users can press the left/right button to select the desired blending ratio
from 0% (pure visual light image), 25%, 50%, 75%, and 100% (pure infrared image) under the
thermal imaging page.

15
EN
DIRECTIVE 2012/19/EU OF THE EUROPEAN PARLIAMENT AND OF THE COUNCIL of
4 July 2012 on waste electrical and electronic equipment (WEEE).
The crossed-out wheeled bin symbol on the product or on its packaging indicates that the
product must not be disposed of together with ordinary household waste.
The user must therefore dispose of the waste equipment by taking it to a designated
collection centre for the recycling of waste electrical and electronic equipment. As an
alternative to independent disposal, you can hand in the equipment you wish to dispose of to the
retailer when purchasing a new appliance of the same type.
Electronic products up to 25 cm in size can also be handed in for free disposal, with no purchase
obligation, at electronics stores with sales areas of over 400 m
2
.
Adequate separate collection for recycling, treatment and environmentally friendly disposal of the
scrapped equipment helps to prevent negative impacts on the environment and on human health, and
promotes recycling and/or reuse of the materials with which the equipment is made.
8
QR Code
Quick guide and complete user manual of the products are also available for DOWNLOAD from
the URMET website under the section DOCUMENTATION AND RESOURCES at the following links:

DS1099-065 16
DE
1
Einleitung
Danke, dass Sie die Bispektrum-Handkamera 1099/809 (thermisch und optisch) gekauft haben. Zur
korrekten und sicheren Verwendung des Geräts wird empfohlen, dieses Benutzerhandbuch und
insbesondere den die Anweisungen zur sicheren Verwendung betreffenden Absatz aufmerksam zu
lesen.
Es wird empfohlen, dieses Handbuch nach dem Lesen zum späteren Nachschlagen mit dem Gerät
aufzubewahren.
Garantie und Haftung
URMET garantiert, dass das Produkt frei von Material- und Bearbeitungsfehlern ist. Diese Garantie
kann nicht auf durch Unfall, Nachlässigkeit, unsachgemäßen Gebrauch, Beschädigung, Kontamination
oder unsachgemäße Lagerung verursachte Schäden Anwendung finden.
Vorsichtsmaßnahmen
Stellen Sie nach dem Auspacken des Geräts sicher, dass es unbeschädigt ist.
Sämtliche elektronischen Vorgänge müssen streng den Bestimmungen zur elektrischen Sicherheit, den
Brandschutzvorschriften und sonstigen im jeweiligen Gebiet/Land geltenden Gesetzesvorschriften
entsprechen.
Trennen Sie das Gerät vor jeglichen Reinigungs- oder Wartungsvorgängen vom
Stromversorgungsnetz. Verwenden Sie für die Reinigung des Geräts keine Sprays.
Überprüfen, ob die Betriebstemperatur sich innerhalb der angezeigten Grenzwerte befindet und die
Umgebung nicht besonders feucht ist.
Sollten Rauch, Gerüche oder Geräusche aus dem Gerät austreten, ist die Stromversorgung
unverzüglich abzuschalten und zu unterbrechen und dann das Kundendienstzentrum zu verständigen.
Überprüfen Sie die Angaben auf dem Typenschild des Geräts auf Übereinstimmung mit den
Anschlussdaten des Stromnetzes, bevor Sie die Kamera an die Stromversorgung anschließen.
Lassen Sie das Produkt während des Ladens nicht unbeaufsichtigt. Trennen Sie es bei Überwärmung
unverzüglich von der Versorgung. Laden Sie es nicht länger als 8 Stunden auf.
Schließen Sie nicht mehrere Geräte an einen Versorgungsadapter an, da die Überlast des Adapters
Überwärmung oder einen Brandherd verursachen kann.
Vergewissern Sie sich vor dem Verkabeln, Installieren oder Zerlegen des Geräts, dass die
Stromversorgung unterbrochen wurde.
Wird das Produkt an Wand, Decke oder auf einem Stativ installiert, muss das Gerät fest angebracht
werden.
Bewahren Sie neue und Altbatterien außerhalb der Reichweite von Kindern auf.
Sollte die Batterie verschluckt worden sein, wenden Sie sich umgehend an einen Arzt.
Sollte das Produkt nicht korrekt funktionieren, wenden Sie sich bitte an den Fachhändler oder das
nächstgelegene Kundendienstzentrum, für Reparaturen nur an eine autorisierte Kundendienststelle.
Versuchen Sie nie, das Gerät selbst zu zerlegen. (Wir haften in keiner Weise für durch nicht autorisierte
Reparatur- oder Wartungseingriffe verursachte Probleme).
2
Informationen zur Batterie
Das Gerät ist mit einer in seinem Inneren enthaltenen Batterie ausgestattet, die mittels externer
Versorgung wieder aufgeladen wird. Entfernen Sie die Batterie nicht.
Laden und Entladen
WICHTIGER HINWEIS: Verwenden Sie das Gerät nicht, ohne es zuvor zum ersten Mal
aufgeladen

17
DE
zu haben.
Um die Batterieleistungen zu optimieren, wird empfohlen, einen ersten Ladevorgang von ca. acht
Stunden auszuführen.
Es ist zu beachten, dass die neuen Batterien ihre volle Leistungsfähigkeit erst erreichen, nachdem sie
zwei oder drei Mal vollständig geladen und entladen wurden. Die Batterie kann hunderte Male geladen
und entladen werden, mit der Verwendung nimmt jedoch die maximale Ladung ab.
Schließen Sie das Netzteil über den dafür vorgesehenen Eingang an das Gerät an (siehe auch Kapitel
Steuerungen und Einstellungen).
Überprüfen Sie, ob die Netzspannung, an die das Netzteil angeschlossen werden muss, mit den direkt
auf dem Netzteil angegebenen Eigenschaften übereinstimmt.
Schließen Sie das Netzteil an die Netzversorgung an.
Stecken Sie das Netzteil und das Gerät aus, wenn diese nicht verwendet werden. Laden Sie eine
vollständig aufgeladene Batterie nicht weiter auf, da eine zu hohe Ladung deren Dauer verringern
kann.
Bei Nichtverwendung entlädt sich auch eine vollständig aufgeladene Batterie mit der Zeit.
Warnhinweise
Verwenden Sie die Batterien nicht zu anderen als den vorgeschriebenen Zwecken. Verwenden Sie nie
Batterien oder Batterieladegeräte, die sich als beschädigt erweisen.
Schließen Sie die Batterie nicht kurz.
Die Batterie in warmen oder kalten Umgebungen wie zum Beispiel im Sommer oder Winter in einem
vollständig geschlossenen Auto zu lassen, verringert die Leistung und die Dauer der Batterie.
Ein Gerät mit warmer oder kalter Batterie kann vorübergehend nicht funktionieren, auch wenn die
Batterie vollständig geladen ist. Die Batterieleistung nimmt bei Temperaturen unter dem Gefrierpunkt
erheblich ab.
Werfen Sie die Batterie nicht in Feuer, da sie explodieren könnte. Die Batterie könnten bei
Beschädigung explodieren. Entsorgen Sie Altbatterien gemäß den vor Ort geltenden Bestimmungen.
Recyceln Sie sie, wo dies möglich ist. Entsorgen Sie Batterien nicht mit dem Hausmüll.
3
Sicherheitsanweisungen
Lesen Sie, um eine korrekte Verwendung dieses Produkts zu gewährleisten, vor seiner Verwendung
zuerst die Anleitung.
1.
Der optimale Messabstand für dieses Produkt beträgt einen Meter.
2.
Verwenden Sie das Produkt, um die Genauigkeit der Messung zu garantieren, bei einer
Umgebungstemperatur von 15° C ~ 30° C, <85% RH (ohne Kondensatbildung)
3.
Verwenden Sie das Produkt in geschlossenen Räumen ohne Wind.
4.
Wird die Umgebung gewechselt, muss das Produkt 10-15 Minuten vor der Messung
eingeschaltet werden.
5.
Die Umgebungstemperatur muss für die Messung stabil sein. Messen Sie nicht an Orten
mit starkem Luftstrom wie durch Ventilatoren oder Luftauslässen.
6.
Kommt das von der Messung betroffene Objekt von einem Ort, dessen Temperatur stark
von der Messumgebung abweicht, muss dieses 10-30 Minuten vor der Messung in der
Messumgebung verbleiben.
7.
Das Produkt prüft die Oberflächentemperatur des Objekts. Sollte der Temperaturausgleich
erforderlich sein, kann dies im Menü Einstellungen eingegeben werden.

DS1099-065 18
DE
8.
Das Produkt weist eine Selbstkalibrierungsfunktion auf. Ändert sich die angezeigte
Temperatur kontinuierlich, lesen Sie die Temperatur erst ab, nachdem sie sich stabilisiert
hat.
9.
Nachdem Objekte mit extrem hoher oder niedriger Temperatur gemessen wurden, wird
gebeten, das Produkt vor der nächsten Verwendung 10 Minuten lang bei
Umgebungstemperatur zu lassen.
10.
Verwenden Sie das Produkt nicht an Orten mit starker Sonneneinstrahlung oder mit
elektromagnetischen Emissionen/Störungen (auch Elektrokabel und Ähnliches).
11.
Verwenden Sie das Produkt nicht in entzündlichen, explosionsgefährdeten, korrosiven,
Dampf ausgesetzten oder feuchten Atmosphären.
12.
Verwenden Sie das Produkt nicht mehr, wenn es beschädigt oder verändert wurde, um
ungenaue Messungen zu vermeiden.
13.
Verwenden Sie den korrekten Emissionsgrad, um genaue Temperaturablesungen zu
erhalten.
14.
Schalten Sie das Produkt, um seine Genauigkeit zu garantieren, 10-15 Minuten vor dem
Messen ein, wenn es längere Zeit nicht benutzt wurde.
15.
Brillen oder reflektierende Oberflächen ergeben fehlerhafte Temperaturmessungen.
16.
Während des Ladens erhöht sich die Innentemperatur des Produkts, was eine ungenaue
Temperaturmessung mit sich bringt. Es wird daher davon abgeraten, während oder sofort
nach dem Aufladen des Produkts Messungen vorzunehmen.
4
Gerät, Bedienung und Einstellungen

19
DE
Anzahl
Beschreibung
Anzahl
Beschreibung
1
USB-Schnittstelle (Typ C)
10
Taste Taschenlampe
2
Steckplatz für SD-Karte
11
Linke Taste
3
Schnittstellenabdeckung
12
Taste nach unten
4
Weiße Leds
13
Taste nach oben
5
Objektiv Infrarotkamera
14
Wiedergabe-/Bestätigungstaste
6
Objektiv optische Kamera
15
Rechte Taste
7
Auslöser
16
Taste zurück
8
LCD-Monitor
17
Taste Einstellungen
9
Ein-/Ausschalttaste
18
Öffnung für Stativmontage
5
Bildschirm
Bildschirmgröße 2,8"
Bildschirmauflösung: 320 (vertikal) x 240 (horizontal) Pixel
Anzahl
Beschreibung
Anzahl
Beschreibung
1
Mittelpunkttemperatur
6
Alarmsignal bei
Höchsttemperaturüberschreitung
2
Höchsttemperatur
7
Höchsttemperaturpunkt (rot)
3
Autokalibrierung
8
Temperaturleiste
4
Mindesttemperaturpunkt (grün)
9
Batteriestatus
5
Hauptmenü
10
Datum und Uhrzeit
6
Ein-/Ausschalten
Halten Sie die Einschalttaste 3 Sekunden lang gedrückt, um das Produkt ein-/auszuschalten.
HINWEIS:
Nachdem das Produkt den Ausschaltvorgang begonnen hat, benötigt es bis zum
vollständigen Ausschalten 5 bis 6 Sekunden.
Schalten Sie das Produkt nicht kontinuierlich ein und aus, um Schäden daran zu vermeiden.

DS1099-065 20
DE
7
Menü
Messungen (Measurements)
1.
Betätigen Sie die Taste SET, um zum Hauptmenü zu gelangen.
2.
Betätigen Sie die linke / rechte Taste zum Auswählen der Option .
3.
Betätigen Sie die Taste SET, um zum Messmenü zu gelangen.
4.
Betätigen Sie die Taste nach oben / unten, um Center Spot (Mittelpunktmessung) oder
HiLo Spot (Messung der Höchst- oder Mindesttemperatur auszuwählen).
5.
Betätigen Sie die Taste SET, um Center Spot oder HiLo Spot zu aktivieren / deaktivieren.
6.
Betätigen Sie zum Verlassen die Taste Zurück.
Bildmodus (Image mode)
1.
Betätigen Sie die Taste SET, um das Hauptmenü zu öffnen.
2.
Betätigen Sie die linke / rechte Taste zum Auswählen der Option .
3.
Betätigen Sie die Taste SET, um in das Menü zu gelangen und den Bildmodus festzulegen.
Other manuals for 1099/809
1
Table of contents
Languages:
Other urmet domus Thermal Camera manuals