SIRETTA Oscar 40 User manual

Registered in England No. 08405712
VAT Registration No. GB163 04 0349
Siretta Ltd
Basingstoke Road
Spencers Wood
Reading
Berkshire RG7 1PW
sales
email
web
+44(0)118 976 9000
www.siretta.com
Ø22 - Ø52
Materials Supplied:
• 1x L-shaped bracket (tted to the antenna)
• 2x spring washers
• 2x M6 nuts
• 2x at washers
• 1x clamp
• 1x M6 U-bolt
Required Tools: 10mm spanner or
adjustable wrench.
Oscar 40 Antenna Installation Guide
Pole Mounting
1. Preparing the Pole
Pole Requirements: Ensure the pole is
sturdy and securely anchored. The diameter
should be compatible with the supplied clamp
and U-bolt (between 22 - 52 mm).
2. Attaching the Clamp and U-Bolt
Positioning the Clamp: Place the clamp around the pole
at the desired height (a).
Securing the U-Bolt: Thread the U-bolt through the clamp
and around the pole (b). Secure with the supplied nuts and
washers, ensuring even pressure on both sides (c).
3. Mounting the Antenna
Attaching to the Clamp: Align the
L-shaped bracket with the clamp and
secure it using the remaining nuts and
washers.
Alignment: Adjust the antenna to the
desired orientation, ensuring it’s vertical
for optimal signal reception.
4. Post-Installation Check
Inspection: Conrm the antenna is rmly
mounted and aligned correctly.
Maintenance: Periodically inspect for any
looseness or corrosion, especially in harsh
weather environments.
a. b.
c.
Disclaimers and Waivers
Safety Disclaimer: The installation of this antenna should be carried out in
accordance with local safety regulations. The manufacturer is not responsible
for damages or injuries resulting from improper installation or use.
Professional Recommendation: For optimal performance and safety, we
recommend installation by a qualied professional. Improper installation may
void the warranty and could lead to poor performance or safety hazards.
Compliance Statement: Ensure compliance with all local building codes
and electrical safety standards. The manufacturer is not liable for any
violations of such regulations.
General/Ongoing Maintenance: Regular maintenance checks are essential
for sustained performance and safety. Failure to conduct these checks could
result in unexpected performance issues and safety risks.
Installation Conrmation: Upon installation, it is the responsibility of the
installer to ensure that the antenna is securely mounted and functioning as
intended. The manufacturer is not liable for issues arising from installation
errors or oversights.
30
12 Nm
Ø8
Oscar 40 Antenna Installation Guide
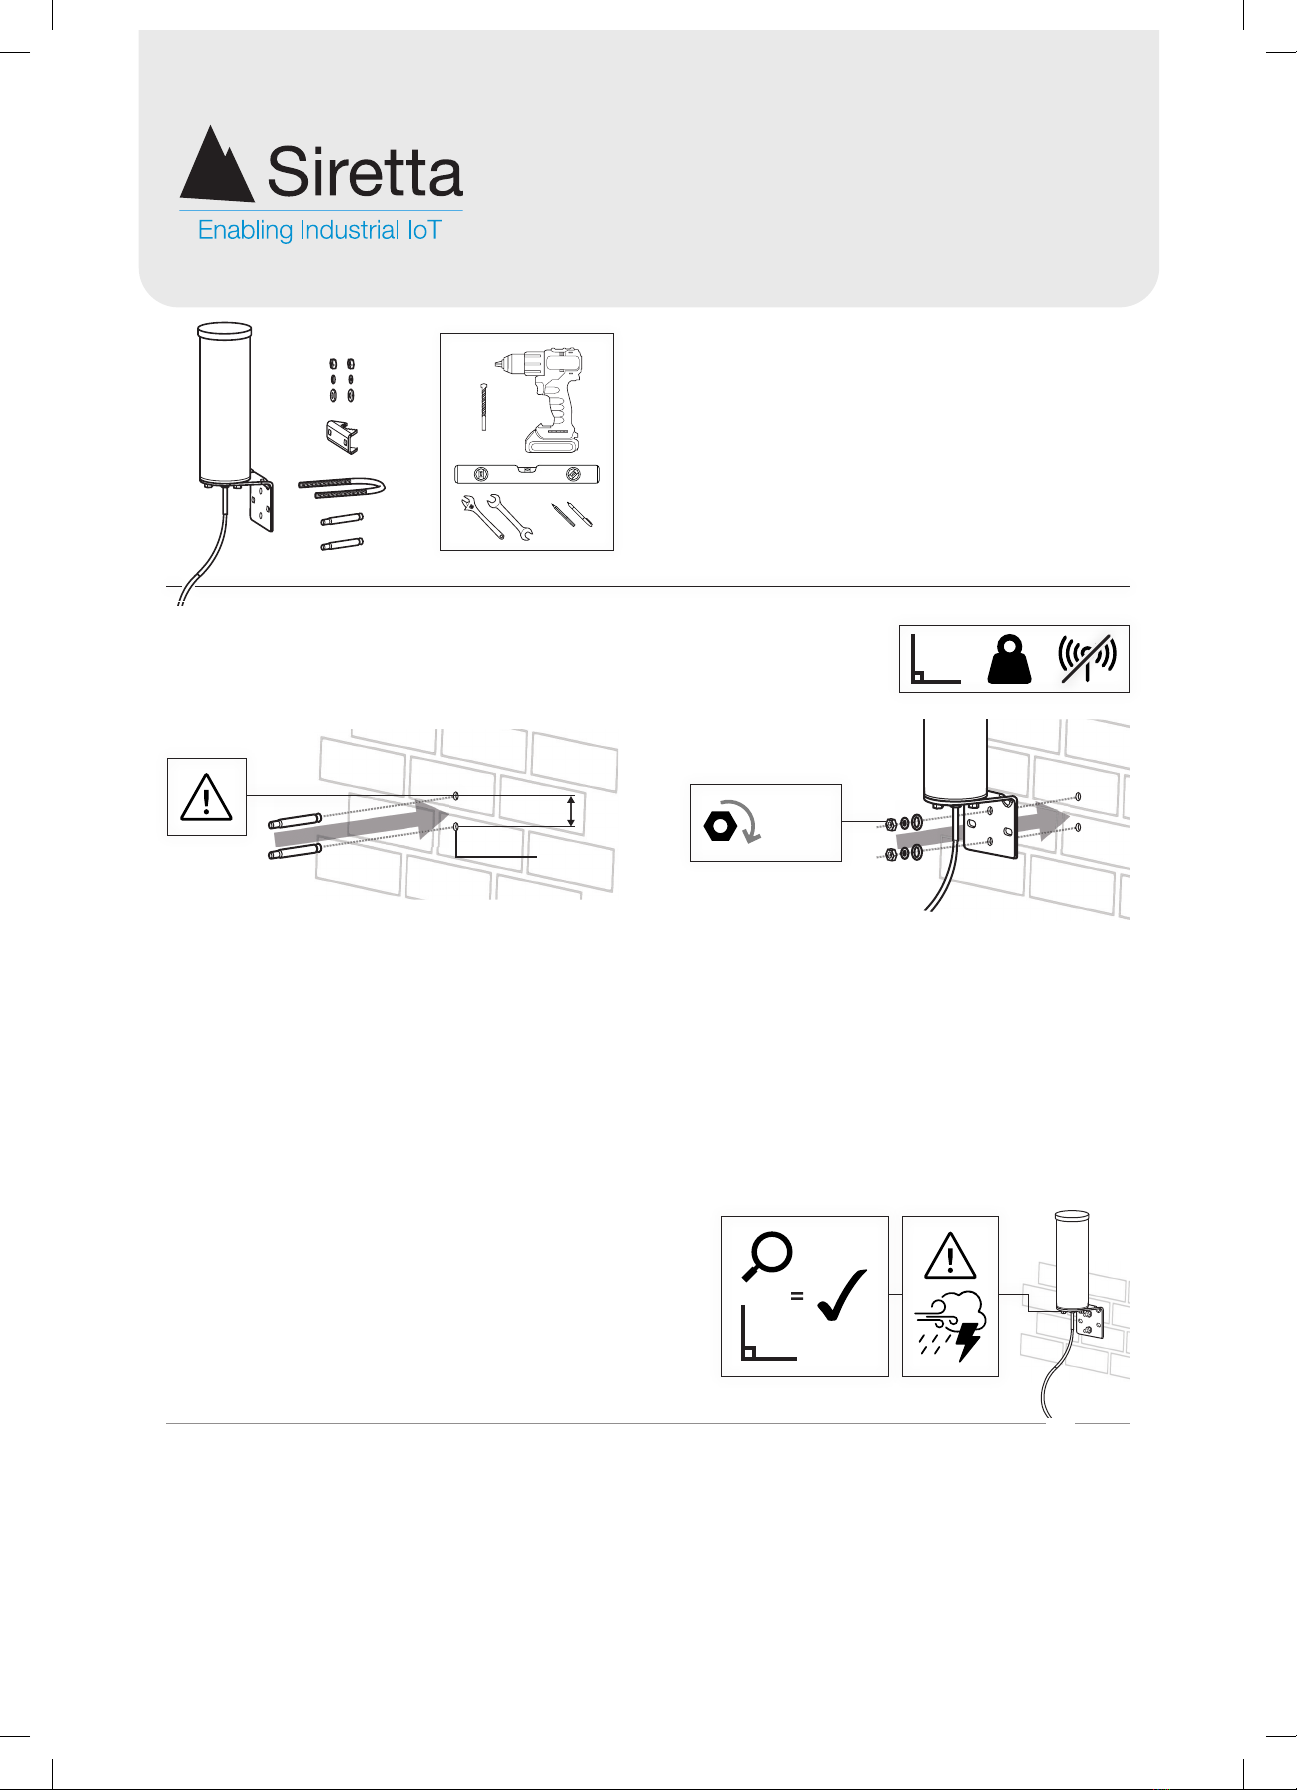
Wall Mounting
Materials Supplied:
• 1x L-shaped bracket (tted to the antenna)
• 2x spring washers
• 2x M6 nuts
• 2x at washers
• 1x clamp
• 1x M6 U-bolt
Required Tools: Drill, 8mm drill bit, 10mm spanner
or adjustable wrench, level, pencil or marker.
2. Preparing the Surface
Marking Drill Points: Using a level, mark two
vertical points 30mm apart where the holes will
be drilled.
Drilling: Drill two 8mm diameter holes at the
marked points. Be cautious to avoid any internal
wiring or piping.
Inserting Frame Anchors:
Place the frame anchors into the drilled holes.
3. Mounting the Antenna
Attaching the Bracket: Align the L-shaped
bracket’s holes with the frame anchors. Insert the at
washers onto the M6 bolts and secure the bracket
to the wall using the spring washers and nuts.
Final Adjustments: Ensure the antenna is vertical
and tighten the nuts rmly but avoid over-tightening
to prevent damage. Siretta’s recommended torque
for fastening the nuts is 12 Nm or 8.85 ft-lbs.
4. Post-Installation Check
Inspection: Verify that the antenna is securely attached and
correctly aligned.
Maintenance: Regularly check the antenna for stability and
signs of wear, especially after severe weather conditions.
1. Choosing the Mounting Surface
Surface Selection: Ensure the chosen wall surface is even and capable of
supporting the antenna’s weight. Avoid mounting near metallic objects or other
antennas to reduce interference.
Other SIRETTA Antenna manuals


Popular Antenna manuals by other brands

SCAN-LINK
SCAN-LINK SLAU-UV-NB-04 user manual

Maxview
Maxview MXL002 user manual

Ubiquiti
Ubiquiti AirFiber X AF-5G34-S45 quick start guide

Barkan
Barkan HA35 installation instructions

Wireless Extenders
Wireless Extenders zBoost YX500 Series installation guide

SOTABEAMS
SOTABEAMS Bandspringer Midi quick start guide


