manuals.online logo
Brands
  1. Home
  2. •
  3. Brands
  4. •
  5. Sirio Antenne
  6. •
  7. Antenna
  8. •
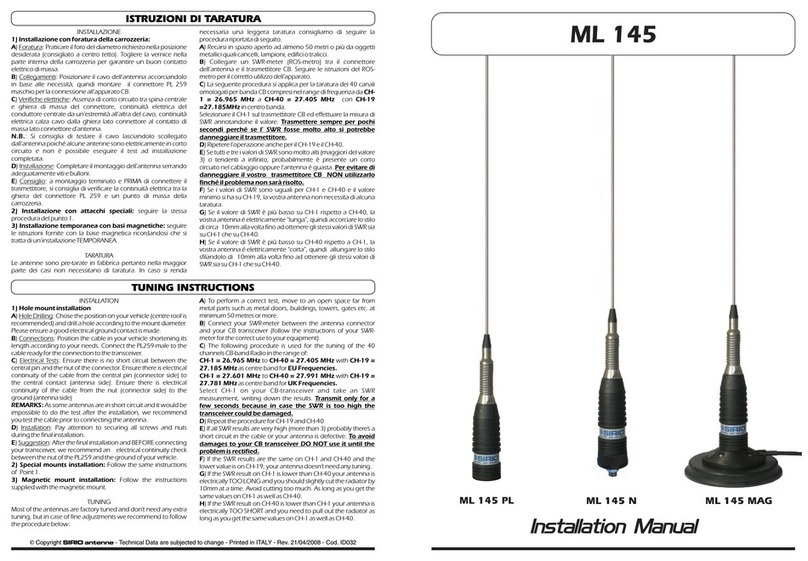
  9. Sirio Antenne ML 145 User manual

Sirio Antenne ML 145 User manual

B Copyright SIRIO antenne - Technical Data are subjected to change - Printed in ITALY - Rev. 17/03/2023 - Cod. ID032/HU
ML 145 PL ML 145 N
ML 145
HANGOLÁSI UTASÍTÁSOK
MEGJEGYZÉSEK: Mivel néhány antenna rövidzárlatos, és a
telepítés után lehetetlen lenne elvégezni a tesztet, javasoljuk,
hogy az antenna csatlakoztatása elött tesztelje a kábelt.
E) Javaslat: A végleges beszerelés után és az adó-vevö
csatlakoztatása ELÖTT javasoljuk az elektromos folytonosság
ellenörzését a PL259 anyája és a jármü földje között.
1) Lyukasztásos szerelés:
BEÁLLÍTÁS
C) Elektromos vizsgálatok: Gyözödjön meg róla, hogy nincs
rövidzárlat a központi csap és a csatlakozó anyája között.
Gyözödjön meg arról, hogy a kábel elektromos folytonossága
megvan a központi csap (csatlakozó oldala) és a központi
érintkezö (antenna oldala) között. A kábel elektromos
folytonosságának biztosítása az anya (csatlakozó oldala) és a
földelés (antenna oldala) között.
B) Kapcsolatok: Helyezze el a kábelt a jármüvében, az igényeinek
megfelelöen lerövidítve annak hosszát. Csatlakoztassa a PL259-
es csatlakozót az adó-vevöhöz való csatlakozásra kész kábelhez.
A) Fúrás: Válassza ki a jármüvön a pozíciót (a tetö közepe
ajánlott), és fúrjon egy lyukat a tartó átméröjének megfelelen.
Kérjük, gondoskodjon a jó elektromos földelésröl.
D) Telepítés: A végleges beszerelés során ügyeljen az összes
csavar és anya rögzítésére.
2) Speciális szerelvények beszerelése: sKövesse az 1.
pontban leírtakat.
3) Mágneses rögzítés: Kövesse a mágneses tartóhoz mellékelt
utasításokat
HANGOLÁS
A) A helyes vizsgálat elvégzéséhez menjen egy nyitott helyre,
Az antennák többsége gyárilag be van hangolva, és nem igényel
semmilyen extra hangolást, de finombeállítások esetén
javasoljuk, hogy kövesse az alábbi eljárást:
F) Ha az SWR eredmények megegyeznek a CH-1 és a CH-40
csatornán, és az alacsonyabb érték a CH-19 csatornán van, akkor
az antennának nincs szüksége hangolásra.
B) Csatlakoztassa az SWR-méröt az antennacsatlakozó és a CB
adó-vevöje közé (kövesse az SWR-mérö utasításait a
berendezéséhez való helyes használathoz).
E) Ha az összes SWR eredmény nagyon magas (több mint 3),
valószín leg rövidzárlat van a kábelben, vagy az antenna hibás. ü
A CB adó-vevöje károsodásának elkerülése érdekében NE
használja azt, amíg a probléma nem kerül orvoslásra.
D) Ismételje meg az eljárást a CH-19 és CH-40 esetében.
G) Ha az SWR eredmény a CH-1-en alacsonyabb, mint a CH-40-
en, akkor az antennája elektromosan TÚL HOSSZÚ, és a sugárzót
egyszerre 10 mm-rel kissé le kell vágni. Kerülje a túl nagy vágást.
Mindaddig, amíg a CH-1-en és a CH-40-en is ugyanazokat az
értékeket kapja.
H) Ha az SWR eredmény a CH-40-en alacsonyabb, mint a CH-1-
en, akkor az antennája elektromosan TÚL RÖVID, és ki kell húznia
a sugárzót, amíg a CH-1-en és a CH-40-en is ugyanazokat az
értékeket kapja.
legalább 50 méterre vagy annál távolabb a fém részektöl, például
fém ajtóktól, épületektöl, tornyoktól, kapuktól stb.
C) A következö eljárás a 40 csatornás CB-sávú rádió hangolására
szolgál a következö tartományban: CH-1 = 26.965 MHz töl CH-
40 = 27.405 MHz-ig, a CH-19 =27.185MHz-cel, mint az
Egyesült Királyság frekvenciáinak középsö sávja. Válassza ki a
CB adó-vevön a CH-1-et, és végezzen SWR mérést, majd
írja le az eredményeket. Csak néhány másodpercig
sugározzon, mert túl magas SWR esetén az adó-vev
megsérülhet.
TUNING INSTRUCTIONS
H) If the SWR result on CH-40 is lower than CH-1 your antenna is
electrically TOO SHORT and you need to pull out the radiator as
long as you get the same values on CH-1 as well as CH-40.
B) Connect your SWR-meter between the antenna connector
and your CB transceiver (follow the instructions of your SWR-
meter for the correct use to your equipment).
Select CH-1 on your CB-transceiver and take an SWR
measurement, writing down the results. Transmit only for a
few seconds because in case the SWR is too high the
transceiver could be damaged.
D) Repeat the procedure for CH-19 and CH-40
A) To perform a correct test, move to an open space far from
metal parts such as metal doors, buildings, towers, gates etc. at
minimum 50 metres or more.
E) If all SWR results are very high (more than 3) probably there’s a
short circuit in the cable or your antenna is defective. To avoid
damages to your CB transceiver DO NOT use it until the
problem is rectified.
G) If the SWR result on CH-1 is lower than CH-40 your antenna is
electrically TOO LONG and you should slightly cut the radiator by
10mm at a time. Avoid cutting too much. As long as you get the
same values on CH-1 as well as CH-40.
C) The following procedure is used for the tuning of the 40
channels CB-band Radio in the range of:
CH-1 = 26.965 MHz to CH-40 = 27.405 MHz with CH-19 =
27.185 MHz as centre band for EU Frequencies.
F) If the SWR results are the same on CH-1 and CH-40 and the
lower value is on CH-19, your antenna doesn’t need any tuning.
CH-1 = 27.601 MHz to CH-40 = 27.991 MHz with CH-19 =
27.781 MHz as centre band for UK Frequencies.
E) Suggestion: After the final installation and BEFORE connecting
your transceiver, we recommend an electrical continuity check
between the nut of the PL259 and the ground of your vehicle.
3) Magnetic mount installation: Follow the instructions
supplied with the magnetic mount.
D) Installation: Pay attention to securing all screws and nuts
during the final installation.
2) Special mounts installation: Follow the same instructions
of Point 1.
Most of the antennas are factory tuned and don’t need any extra
tuning, but in case of fine adjustments we recommend to follow
the procedure below:
TUNING
INSTALLATION
1) Hole mount installation
A) Hole Drilling: Chose the position on your vehicle (centre roof is
recommended) and drill a hole according to the mount diameter.
Please ensure a good electrical ground contact is made.
B) Connections: Position the cable in your vehicle shortening its
length according to your needs. Connect the PL259-male to the
cable ready for the connection to the transceiver.
C) Electrical Tests: Ensure there is no short circuit between the
central pin and the nut of the connector. Ensure there is electrical
continuity of the cable from the central pin (connector side) to
the central contact (antenna side). Ensure there is electrical
continuity of the cable from the nut (connector side) to the
ground (antenna side)
REMARKS: As some antennas are in short circuit and it would be
impossible to do the test after the installation, we recommend
you test the cable prior to connecting the antenna.
ML 145 MAG
Telepítési Kézikönyv
ELOÍRÁSOK
Sávszélesség @ SWR £2: ³ 1340 KHz
Tömeg (kb.) : 310 gr
: ML 145 MAG mágneses
Szerelés : ML 145 PL UHF-mael (PL 259)
: ML 145 N furat Æ 12.5mm
: ML 145 MAG 3.6m /RG 58
Polarizáció : Függöleges
SWR @ frekvencia : £ 1.2
: ML 145 N 4m / RG 58
Telepítési kézikönyv:
Impedancia : 50 W
Tipus : Alap terhelésü
Frekvenciatartomány : 27 ... 28.5 MHz
Max. Teljesítmény : 300 Watts (CW) folyamatosan
: 900 Watts (CW) rövid idö
Magasság (kb.) : 1420 mm
Kábelhossz / típus : ML 145 PL Nem tartozék
ID032/HU
Tuning beállítása
MÁGNESES RÖGZÍTÉS: PM 125 PL
Frekvenciatartomány: DC-töl 500 MHz-ig
Teljes méret: 127 mm
Anyagok: krómozott sárgaréz, nejlon, gumi
Kábel: RG 58 / PL 259 hímvesszö
Antennacsatlakozás: UHF-csatlakozó
P/N 2502602.05 PM 125 PL
MEGJEGYZÉS:
használat elött
óvatosan zárja le
a rozsdamentes
acélradiátort a
h a t l a p f e j ö
állítócsavarral!
3. It is recommended that your magnetic mount is removed after each time it is used, so that any dirt can be removed
before the magnet is used again. Also do not leave the vehicle parked in direct sunlight for long periods with the
magnet installed as high temperatures (70 / 80 °C) can damage the magnetic base and car body. We strongly
recommend that you always remove your magnetic mount after each use and before visiting a car wash
1. A mágneses rögzítők csak ideiglenes felszerelésre alkalmasak, és nem biztonságosak vagy erősek, mint a
fix karosszéria rögzítők, ezért saját és a többi közlekedő biztonsága érdekében kérjük, NE lépje túl a 110
Km/h vagy 70 MPH sebességkorlátozást.
3. Javasoljuk, hogy a mágneses tartó minden egyes használat után távolítsa el a mágnest, hogy az esetleges
szennyeződések eltávolíthatók legyenek, mielőtt a mágnest újra használná. Továbbá ne hagyja a járművet
hosszabb ideig közvetlen napfényben parkolni a mágnes felszerelésével, mivel a magas hőmérséklet (70/80
°C) károsíthatja a mágneses alapot és a karosszériát. Nyomatékosan javasoljuk, hogy minden használat
után és az autómosó felkeresése előtt mindig távolítsa el a mágnestartót.
1. Magnetic mounts are only suitable for temporary installation and are not safe or strong as fixed body mounts so
for your own safety as well as the safety of other road users please DO NOT EXCEED THE SPEED LIMITS OF
110 Km/h OR 70 MPH.
2. Az optimális eredmény érdekében a mágneses alapot a gépkocsi tetejének közepén kell rögzíteni,
azonban alternatív rögzítési pozíciók is használhatók, amennyiben a felület elég sík ahhoz, hogy garantálja
az erős rögzítést. A vezetés közbeni biztonság érdekében fordítson különös figyelmet a mágneses tartó
stabilitására.
2. For optimum results the magnetic base should be fixed on the centre of the car roof, however alternative
mounting positions can be used as long as the surface is flat enough to guarantee a strong installation. Pay
particular attention to the stability of your magnetic mount to ensure safety during driving.
Általános utasítás a mágneses rögzítésekhez / General instruction for magnetic mounts
Low freq.
High freq.
HI-QUALITY ANTENNAS MADE IN ITALY
antenne
SIRIO
S
Szerelje össze a gumivédelmet
”N-PL“ tartó
ML 145 PL
UHF-csatlakozóra való felszereléshez
(mint például mágneses vagy
SO-239 csatlakozó) ”N“ kábel
(müanyag kupak)
ML 145 N

This manual suits for next models

5

Other Sirio Antenne Antenna manuals

Sirio Antenne GPA 66-108 User manual

Sirio Antenne

Sirio Antenne GPA 66-108 User manual

Sirio Antenne SY-906 User manual

Sirio Antenne

Sirio Antenne SY-906 User manual

Sirio Antenne P 5000 LED User manual

Sirio Antenne

Sirio Antenne P 5000 LED User manual

Sirio Antenne SKA 140-230 User manual

Sirio Antenne

Sirio Antenne SKA 140-230 User manual

Sirio Antenne HP 2070 User manual

Sirio Antenne

Sirio Antenne HP 2070 User manual

Sirio Antenne SA 270 LN User manual

Sirio Antenne

Sirio Antenne SA 270 LN User manual

Sirio Antenne SKA 900 1/4 User manual

Sirio Antenne

Sirio Antenne SKA 900 1/4 User manual

Sirio Antenne HGO 433 User manual

Sirio Antenne

Sirio Antenne HGO 433 User manual

Sirio Antenne SY-910 User manual

Sirio Antenne

Sirio Antenne SY-910 User manual

Sirio Antenne SB 1 S User manual

Sirio Antenne

Sirio Antenne SB 1 S User manual

Sirio Antenne GPS 27 1/2 ECO User manual

Sirio Antenne

Sirio Antenne GPS 27 1/2 ECO User manual

Sirio Antenne TG 9-1820 User manual

Sirio Antenne

Sirio Antenne TG 9-1820 User manual

Sirio Antenne 827 User manual

Sirio Antenne

Sirio Antenne 827 User manual

Sirio Antenne TG 819 User manual

Sirio Antenne

Sirio Antenne TG 819 User manual

Sirio Antenne SA 270 MN User manual

Sirio Antenne

Sirio Antenne SA 270 MN User manual

Sirio Antenne TAIFUN 118-480 User manual

Sirio Antenne

Sirio Antenne TAIFUN 118-480 User manual

Sirio Antenne New Vector 4000 User manual

Sirio Antenne

Sirio Antenne New Vector 4000 User manual

Sirio Antenne SDB 270 User manual

Sirio Antenne

Sirio Antenne SDB 270 User manual

Sirio Antenne GPA 27-45M User manual

Sirio Antenne

Sirio Antenne GPA 27-45M User manual

Sirio Antenne TORNADO 27 5/8 User manual

Sirio Antenne

Sirio Antenne TORNADO 27 5/8 User manual

Sirio Antenne GPA 27-45 User manual

Sirio Antenne

Sirio Antenne GPA 27-45 User manual

Sirio Antenne GP 3-F User manual

Sirio Antenne

Sirio Antenne GP 3-F User manual

Sirio Antenne HP 140-175 User manual

Sirio Antenne

Sirio Antenne HP 140-175 User manual

Sirio Antenne SDB 270 User manual

Sirio Antenne

Sirio Antenne SDB 270 User manual

Popular Antenna manuals by other brands

Labgear LABHG32T user guide

Labgear

Labgear LABHG32T user guide

Horizon Fitness Loop 20 Assembly and operation

Horizon Fitness

Horizon Fitness Loop 20 Assembly and operation

Maxview ANT2 installation instructions

Maxview

Maxview ANT2 installation instructions

Jegs 89504 installation instructions

Jegs

Jegs 89504 installation instructions

Antenex VOYAGER Assembly & Tuning Information

Antenex

Antenex VOYAGER Assembly & Tuning Information

WiMo 18007 manual

WiMo

WiMo 18007 manual

Hemisphere GPS C321 user guide

Hemisphere GPS

Hemisphere GPS C321 user guide

COBHAM SAILOR 900 Ka installation manual

COBHAM

COBHAM SAILOR 900 Ka installation manual

MFJ 1801 quick start guide

MFJ

MFJ 1801 quick start guide

Airlink101 ASB-8DA user manual

Airlink101

Airlink101 ASB-8DA user manual

MFJ MFJ-1736 instruction manual

MFJ

MFJ MFJ-1736 instruction manual

Directive Systems & Engineering DSE2345LY quick start guide

Directive Systems & Engineering

Directive Systems & Engineering DSE2345LY quick start guide

Winegard YA7000C instruction manual

Winegard

Winegard YA7000C instruction manual

Wilson Electronics 304201 installation guide

Wilson Electronics

Wilson Electronics 304201 installation guide

Philips MANT901 user manual

Philips

Philips MANT901 user manual

Linksys HGA7T Product data

Linksys

Linksys HGA7T Product data

BEST BUY essentials BE-ANT716 Quick setup guide

BEST BUY essentials

BEST BUY essentials BE-ANT716 Quick setup guide

Eaton 94608-1 instruction manual

Eaton

Eaton 94608-1 instruction manual

manuals.online logo
manuals.online logoBrands
  • About & Mission
  • Contact us
  • Privacy Policy
  • Terms and Conditions

Copyright 2025 Manuals.Online. All Rights Reserved.