Sirocco SR101 User manual

IROCCO
MODELS: SR101,SR102
LX1602-10000200Y
1
2
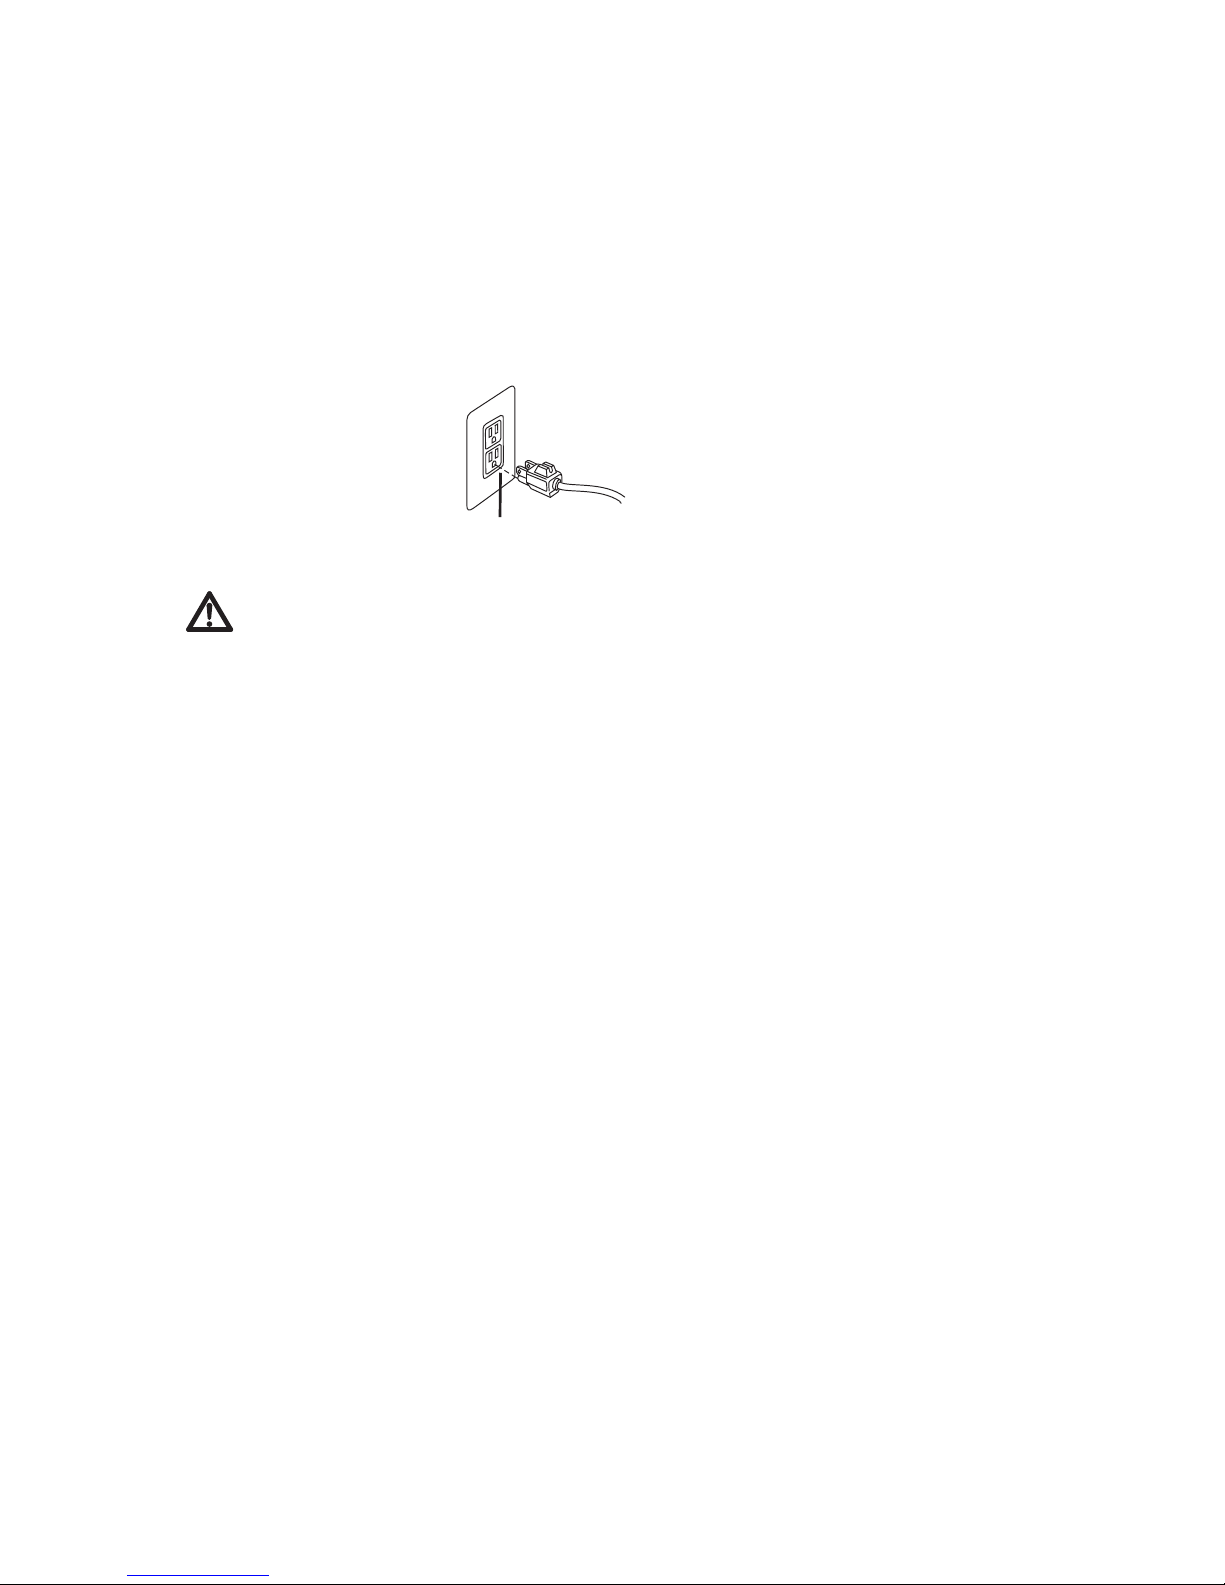
GROUNDING INSTRUCTIONS
WARNING:
Grounded
Outlets
Grounding Pin
This appliance must be connected to a grounded wiring system. If it should malfunction or break down,
grounding provides a safe path of least resistance for electrical current, reducing the risk of electrical shock.
The cord for this appliance has an equipment grounding conductor and a grounding plug. It must only be
plugged into an outlet that is properly installed and grounded in accordance with all local codes and
ordinances.
Improper connection of the equipment-grounding conductor can result in a risk of electrical shock. Check
with a qualified electrician or service person if you aren’t sure if the outlet is properly grounded. DO NOT
MODIFY THE PLUG. If it will not fit the outlet, have a proper outlet installed by a qualified electrician. This
appliance is designed for use on a nominal 120-volt circuit, and has a grounding attachment plug that
looks like the plug in the drawing above. Make certain that the appliance is connected to an outlet having
the same configuration as the plug. No plug adapter should be used with this appliance.
3

INSTRUCTIONS DE MISE À LA TERRE
Prises de courant
Mises à la terre
Branche de mise à la terre
Cet appareil doit être branché à une installation électrique munie d’un contact de mise à la
terre. En cas de fonctionnement défectueux ou de panne, la mise à la terre assure un parcours
sécuritaire de faible résistance pour le courant électrique, réduisant les risques de choc
électrique. Le cordon de cet appareil possède un l pour la mise à la terre de l’équipement et
une che de mise à la terre. Il doit être branché dans une prise de courant correctement
installée et mise à la terre conformément aux codes et règlements locaux.
Une mauvaise connexion du l de mise à la terre de l’appareil peut entraîner un risque de choc
électrique. En cas de doute, consultez un électricien qualié ou une personne affectée à l’entretien.
NE PAS MODIFIER LA FICHE. Si elle ne peut pas être insérée dans la prise, faites installer une
prise appropriée par un électricien qualié. Cet appareil est conçu pour être utilisé avec un circuit
nominal de terre semblable à celle illustrée
ci-dessus. Assurezvous que l’appareil est branché dans une prise de courant ayant la même
conguration que la che. Aucun adaptateur de che ne doit être utilisé avec cet appareil.
4
Removing and Emptying Cloth Bag
FAN CHAMBER
1. Unclip the spring at the top of the vacuum bag from the upper cord hook.
2. Unlatch the bottom of the bag from the base of the vacuum.
3. Remove the metal clasp and spring by sliding it off the top of the bag.
4. Empty the contents of the bag.
5. Slide the metal clasp and spring back onto the top of the cloth bag.
6. Attach bag back onto vacuum by finding hook on the bottom of the bag
and hooking it to the clip on the back of the vacuum base. Align latch with
the back of the vacuum and bring the collar forward. Turn latch so that bag
locks onto rivet.
7. Reinstall the spring on the top of the bag to the upper cord hook.
The clear fan chamber attached to the underside of the base may be
removed and cleaned. Remove the bottom metal plate and brush roll
belt from pulley. Remove the two screws on either side of the clear
chamber, press the cam locks outward and lift the clear chamber from
the base. Dirt should clear easily, though some scraping may be
needed. Be sure the gasket is in place, reinstall by placing the rear end
between the rear wheels and seat firmly. Reinstall belt and the metal
plate.
NOTE: Turn off all switches and unplug the electrical cord
when not in use and before servicing
NOTE: Very fine powders and substances may clog the
cloth bag. Please remember to empty bag often so that
vacuum
5
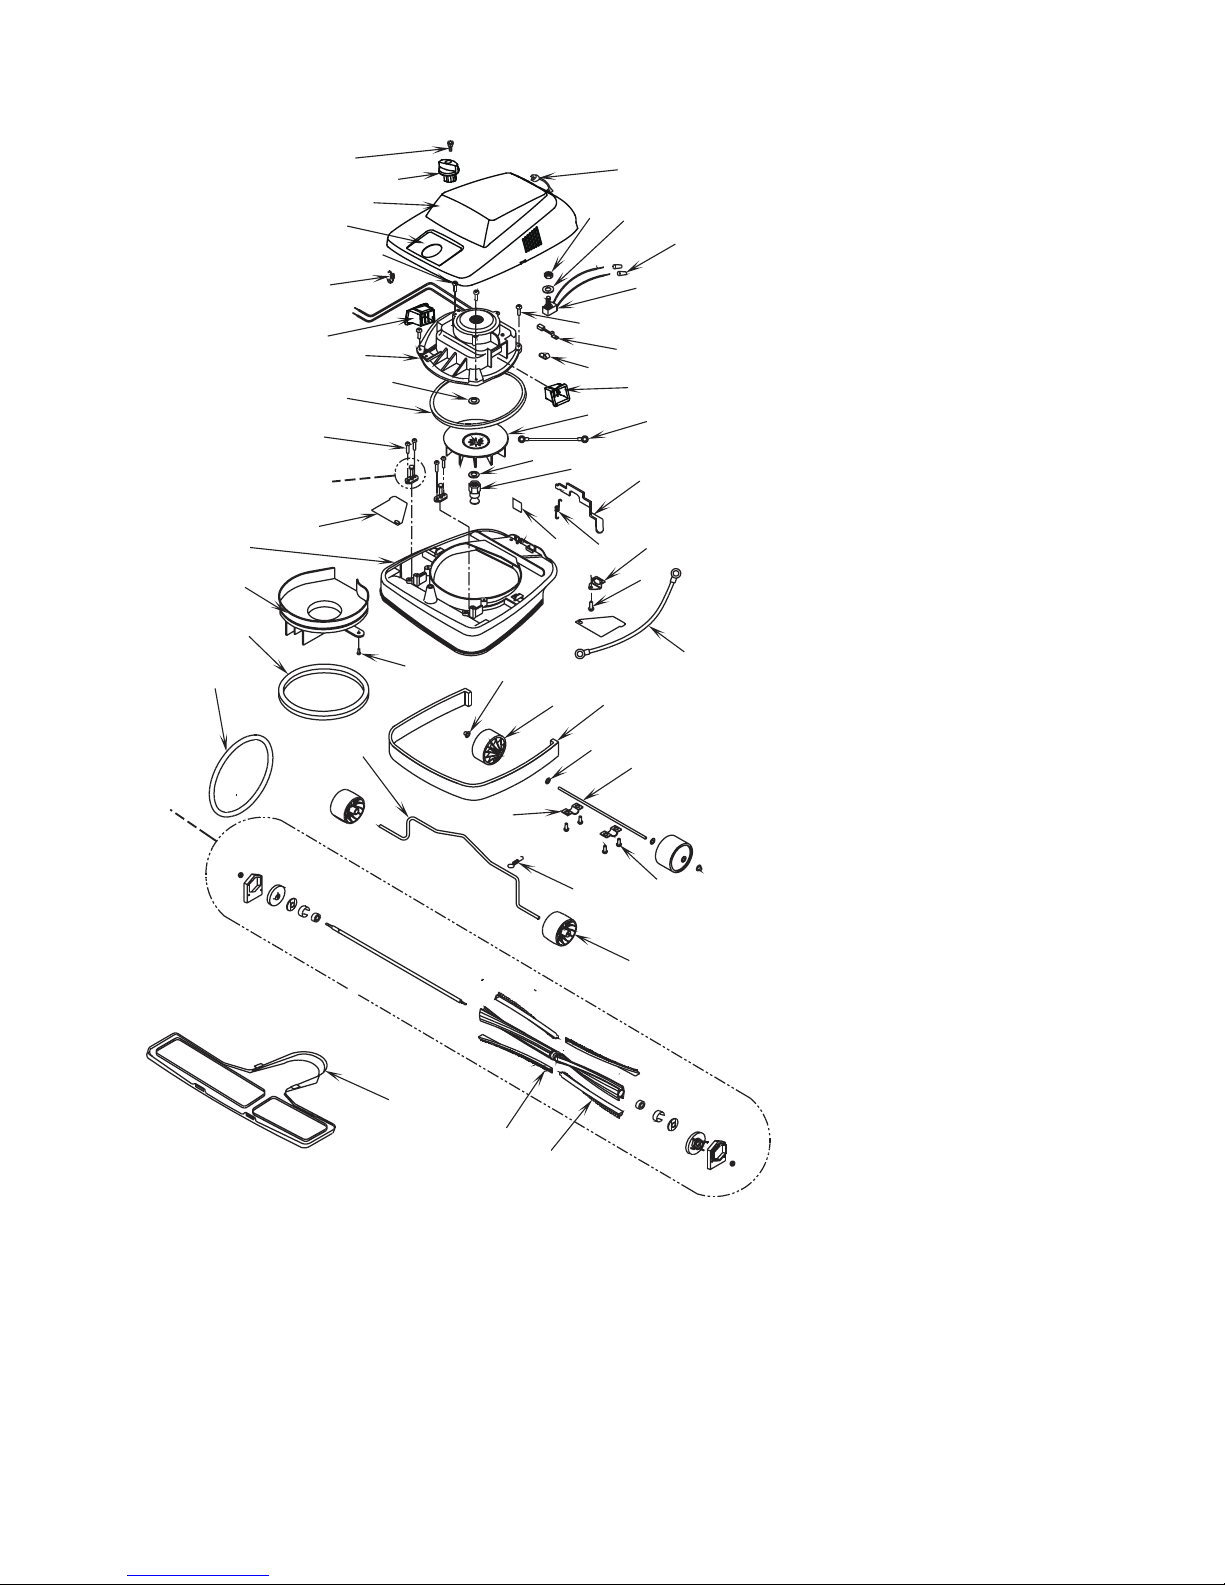
power metal
metal plate
metal
6
PS1 Shoulder screw
PS2 Adjustment knob
PS3 Chrome hood
PS4 Name plate
PS5 ST4.8*20 screw
PS6 Hood spring
PS7 R.H. air duct
PS8 Motor
PS9 Fan washer
PS10 Motor seal
PS14 12" Base Assy
PS14A 16" Base Assy
PS15 Fan chamber
PS16 Motor mount gasket
PS17 Belt
PS18 12" Disturbulator Assy
PS18A 16" Disturbulator Assy
PS19 12" Bottom plate
PS19A 16" Bottom plate
PS20 12" Brush strip sets
PS20A 16" Brush strip sets
PS21 12" Beater bar sets
PS21A 16" Beater bar sets
PS22 Front wheel
PS23 Front axle spring
PS27 Rear axle
PS28 Rear wheel washer
PS29 12" Furniture guard
PS29A 16" Furniture guard
PS30 Rear wheel
PS31 Rear wheel Push nut
PS5 ST4.8*20 screw
PS33 Grounding wire-Base
PS24 ST4.8*12.5 screw
PS35 Adapter retainer
PS36 Foot pedal spring
PS5 ST4.8*20 screw
PS12 Front axle clamp assy
PS13 Wheel cover
PS24 ST4.8*12.5 screw
PS25 Rear axle clamp
PS26 Front axle
PS37 Warning lable - Base
PS38 Foot pedal
PS39 Pully
PS40 Fan washer
PS41 Grounding wire-Hood
PS42 Fan
PS43 L.H. air duct
PS44 Wire clamp
PS45 Motor carbon brush assy
PS46 ST4.8*15.5 screw
PS47 Push switch
PS48 Wire connector
PS49 Switch washer
PS50 Switch nut
PS51 Strain relief bushing
PS1
PS2
PS3
PS4
PS5
PS6
PS7 PS8
PS9
PS10
PS5
PS12
PS13
PS14
PS15
PS16
PS17
PS18
PS19
PS20
PS21
PS22
PS23 PS24
PS25
PS26
PS27
PS28
PS29
PS30
PS31
PS5 PS33
PS24
PS35PS36
PS37
PS38
PS39
PS40
PS41
PS42
PS43
PS44
PS45
PS46
PS47
PS48
PS49
PS50
PS51
PS66
PS65PS52
PS64
PS53
PS55
PS57
PS54
PS56
PS58
PS63
PS62
PS46
PS60
PS61
7
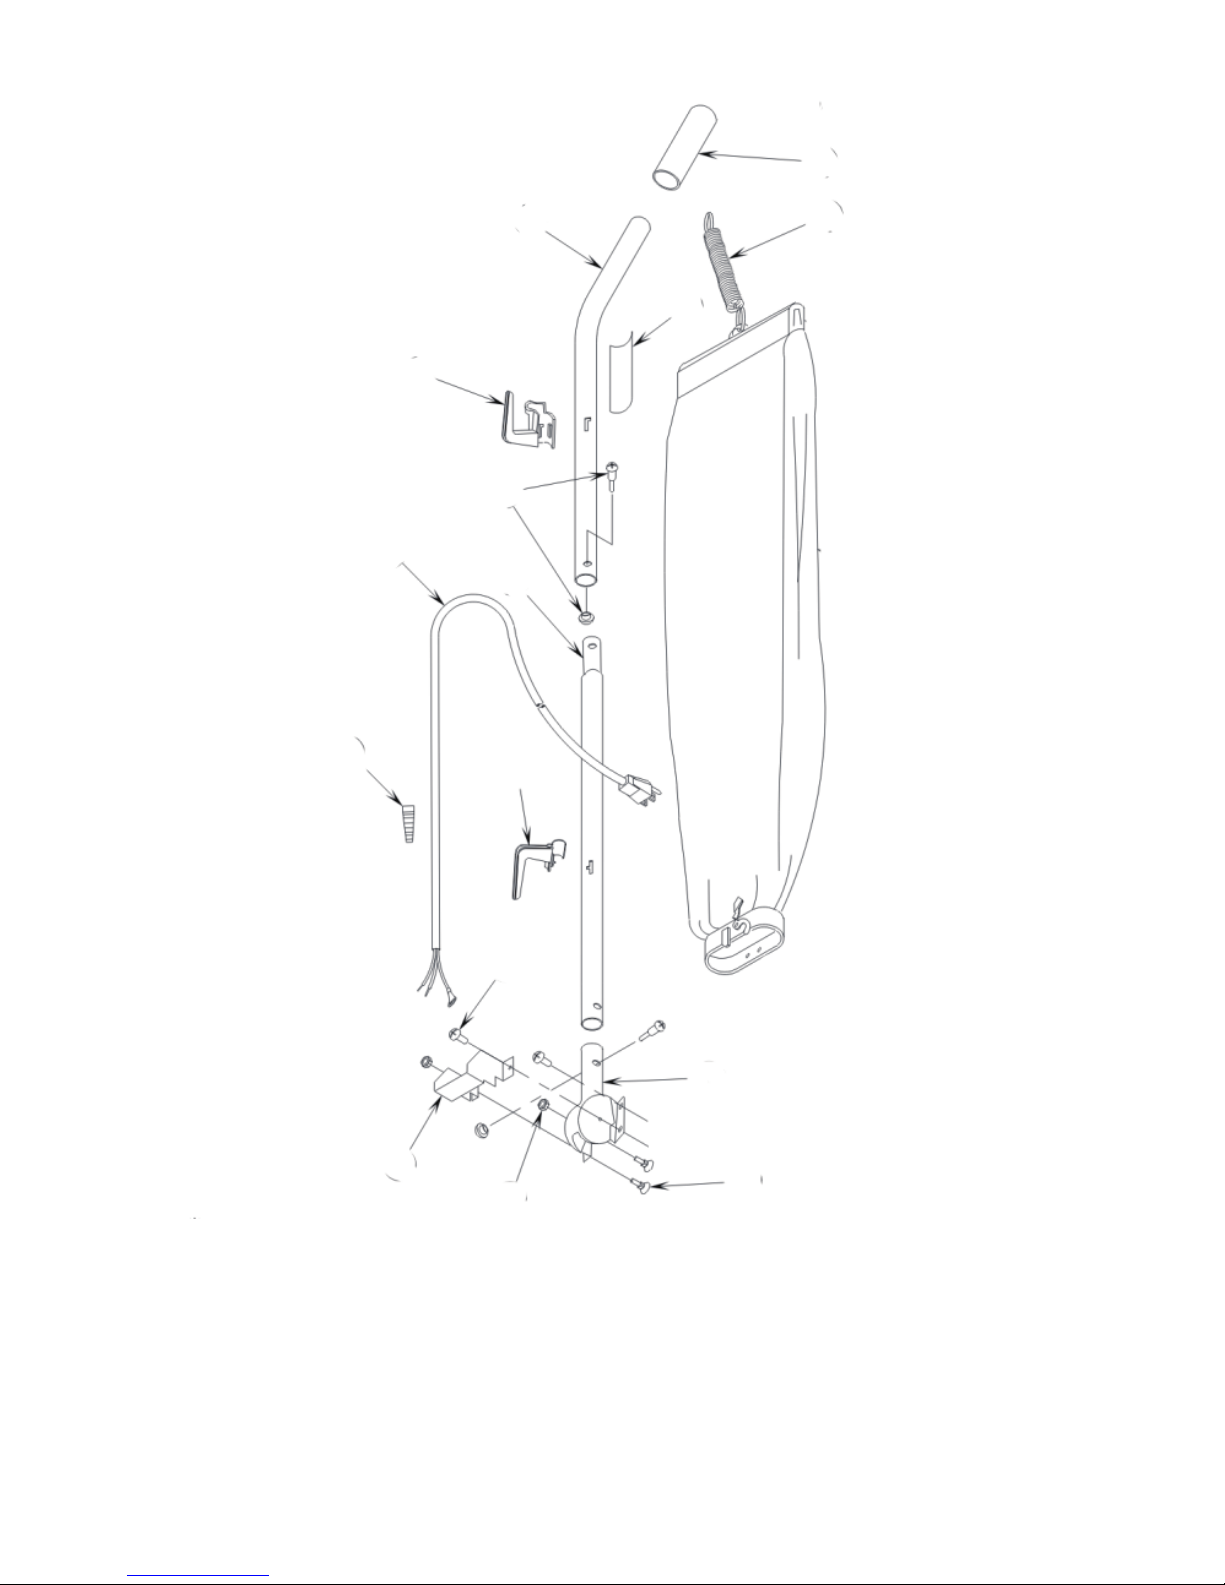
PS52 Upper handle tube PS56 Lower handle tube PS60 Protective board
PS53 Upper cord hook
PS54 Bolt and nut
PS55 Power cord
PS57 Strain relief spring
PS58 Lower cord hook
PS46 ST4.8*15.5 screw
PS61 Retaining nut
PS62 Carriage bolt
PS63 Handle socket assy
PS64 Warning lable - Handle tube
PS65 Cloth bag assy
PS66 Handle grip
Table of contents
Other Sirocco Vacuum Cleaner manuals


