Sirona Schick WiFi User manual

Getting Started
Getting Started
with Schick WiFi
with Schick WiFi
Schick Technologies, Inc.
30-30 47th Avenue
Long Island City, New York USA 11101
Please Read This First
Compliance and Safety
FCC Compliance Statement
This device complies with Part 15 of the FCC Rules. Operation is subject to the following two
conditions: (1) This device may not cause harmful interference, and (2) This device must accept any
interference received, including interference that may cause undesired operation.
Changes or modications not expressly approved by the party responsible for compliance could void
the user’s authority to operate the equipment.
The maximum wireless signal rate for the system is derived from IEEE Standard 802.11a/b/g
specications. Actual data throughput will vary. Network conditions and environmental factors,
including the volume of network trac, building materials, and construction, and network overhead,
may lower actual data throughput rate. Environmental conditions will adversely aect wireless signal
range.
Observe Proper Handling, Storage, and Disposal for Batteries
Schick WiFi Interfaces are equipped with disposable lithium ion batteries. Be sure to read and
understand the special instructions relating to battery usage and follow all of the guidelines for
usage, storage, and disposal. Improper use can result in serious injury, re, or death. Refer to the user
manual for complete details regarding battery usage
Do not short circuit, disassemble, or modify the batteries. Do not place them near high-temperature
locations. Do not place the batteries in re or apply heat to them. Do not subject the batteries to
strong impacts or shocks. Do not expose the batteries to water or allow them to get wet. A re
extinguisher must be used if a lithium ion battery is burning. Do not use water. Refer to the user
manual for complete details regarding battery usage.
Check Sensor Before Using It
Before each use, check the Sensor for any signs of physical damage or defect. If you are using a
recommended positioning system for Schick Sensors, such as the Schick WiFi Holder system, refer to
appropriate documentation for the proper use of sheaths, holders, and tabs before taking X-rays. This
information can be found in the holder system kits and on our website.
Radio Frequency (RF) Interference Considerations
Although the Schick WiFi System equipment is designed to provide a reasonable degree of
protection from electromagnetic interference according to International Electrotechnical
Commission (IEC) regulations, it must be installed at an adequate distance from electricity
transformer rooms, static continuity units, two-way amateur radios and cellular phones. To ensure
proper operation, the latter can be used only at a minimum distance of 5 feet (1.5m) from any part of
the equipment.
Any instrumentation or equipment for professional use located near the Schick WiFi system must
conform to Electromagnetic Compatibility regulations appropriate to this type of equipment.
Non-conforming equipment, with known poor immunity to electromagnetic elds, may not operate
properly unless they are installed at a distance of at least 10 feet (3m) and supplied by a dedicated
electric line.
Installers to Ensure that Schick WiFi System Operates Optimally
Installers must ensure that the Schick WiFi system provides the user with the optimal use of the
equipment. This includes, but is not limited to, ensuring that the system operates as described in
this document. Installers must also ensure that the system presents no physical obstacles or hazards
during operation and when not in use. To verify this requirement, installers shall conrm that the
Schick WiFi system is installed as described in this User Guide and shall perform the appropriate
procedures therein.
Ensure Proper System and PC Workstation Installation and Operation
The Sensor and Schick WiFi Interface have been determined to be in accordance with international
safety standards and are deemed suitable for use within the patient area, which extends from the
patient for a distance of 5 ft (1.5m). To comply with these standards, do not operate non-medical
equipment (such as a PC workstation) inside the patient area. Outside the patient area, the presence
of approved non-medical grade equipment and Listed / Approved / IEC 60950-1 certied Information
Technology Equipment (ITE) computer equipment is acceptable.
Recommended system requirements for the PC are: Windows 7, Vista, or XP operating systems, x32
or x64 editions, Pentium D processor or Intel Core2Duo processor, 2 GB RAM, 250 GB hard drive Raid
Level 1, Intel USB chipset with at least 2 powered USB 2.0 ports. A WiFi-compliant wireless router or
access point is required also, compatible with 802.11b/g
The host computer (PC workstation) should be CE-approved and conform with the Low Voltage
[73/23/EC] and EMC Directive [89/336/ERC]. Also, to help ensure optimal performance, verify that all
software programs residing on the workstation are virus-free and have been adequately tested so
they will not impact imaging applications after installation.
Only Dentists or Authorized Designees Permitted to Operate the System
To ensure the correct use of the Schick WiFi system in a clinical environment, for purposes that
correspond to its intended design and application, only dentists, or their designees, are authorized to
operate the system.
Operate the Schick WiFi System as Directed
Always use the Schick WiFi system in accordance with the directions and recommendations
contained in this User Guide. Do not attempt to modify the system or use it in congurations not
specied or permitted in this document.
Protect Sensor from Potential ESD Damage
Like other electronic devices, your Sensor is susceptible to electrostatic discharge (ESD), particularly
when the device is used in or around carpeted areas or low-humidity environments. Sensor contacts
are exposed when replacing the CDR Elite Sensor cable, so it is especially important to protect it from
potential ESD damage. Touching a metal surface prior to installing the replaceable cable will reduce
the risk of damaging Sensor components by accidental static discharge. The use of anti-static oor
mats or oor treatments (for example Staticide 2005/2002) will also help eliminate static build-up in
your oce.
Do Not Use Snap-A-Ray Holders with Sensors
Any type of clamping holder, or equivalent instrument, can exert damaging pressure on the Sensor
case, including the material and components enclosed inside. This type of damage is not covered by
warranty.
Observe Proper Handling and Placement for Sensors
As with any dental device or instrument placed intraorally, proper care must be taken when using
Sensors to ensure they are handled and positioned properly. Practitioners should observe standard
guidelines, use recommended holders and other Sensor positioning elements, and follow accepted
clinical methods to make sure that the patient does not bite down on or damage the Sensor during
the X-ray examination.
Do Not Stack Schick WiFi Equipment or Connect it to Items that are Not Part of the System
The Schick WiFi system equipment should not be used adjacent to or stacked with other equipment,
nor should other items be connected to it that are not part of the system. If adjacent or stacked use is
necessary, normal operation shall be observed and veried in that conguration.
Wait for Appropriate Prompts before Operating X-ray Source
To avoid exposing the patient to unnecessary X-rays, ensure that the CDR exam window viewbox
is ashing green (default color) in AutoTake mode, or that the message, “Waiting to take X-ray,” is
displayed before triggering the X-ray Source.
Always Use Sheaths with Schick WiFi Sensors
Use Schick Technologies sheaths every time the Sensor is used. Never use the Sensor without a
protective sheath. Never use a damaged sheath. Always dispose of the sheath after every patient.
Take Appropriate Precautions during X-ray Operation
Always observe the safety guidelines and precautions supplied with your X-ray generator and by
local regulatory authorities.
Product Manuals from Schick Technologies
The contents of this manual are subject to change without prior notice. For the latest version of this
user guide and other product manuals from Schick Technologies, please consult our website: www.
schicktech.com.
For complete details about your Schick WiFi system,
please refer to the User Guide on the software CD
or our website at www. schicktech.com
EU Authorized Representative
Sirona Dental GmbH
General Counsel Europe /Asia Pacic
Wasserfeldstraße 30
A - 5020 Salzburg, Austria
Part Number B1051084 Rev.-
Copyright © 2011 by Schick Technologies, Inc.
All Rights Reserved (Publication date 9/20/2011)
What’s in the Boxes
CDR Elite Sensor *
Sensor cable replacement kit
Schick WiFi Interface
RFID reader
Software CD
Schick WiFi Docking Station
Power supply kit
USB cable and extension
The following items are shipped with your Schick WiFi system.
AimRight Grip Holder kit
AimRight Adhesive Holder kit
Sensor holster,
apron clip,
wall and chair-side mounts
Sheaths
Documentation
* Not supplied with upgrade kits
Getting Started
The Schick WiFi system acquires and transmits intraoral X-ray images wirelessly over WiFi. There are two main parts of the system: the Schick WiFi
Interface, which provides power to the CDR Elite Sensor and transfers intraoral X-ray images wirelessly, and the Schick WiFi Docking Station, which
recharges the battery inside the Schick WiFi Interface and is also used during initial setup.
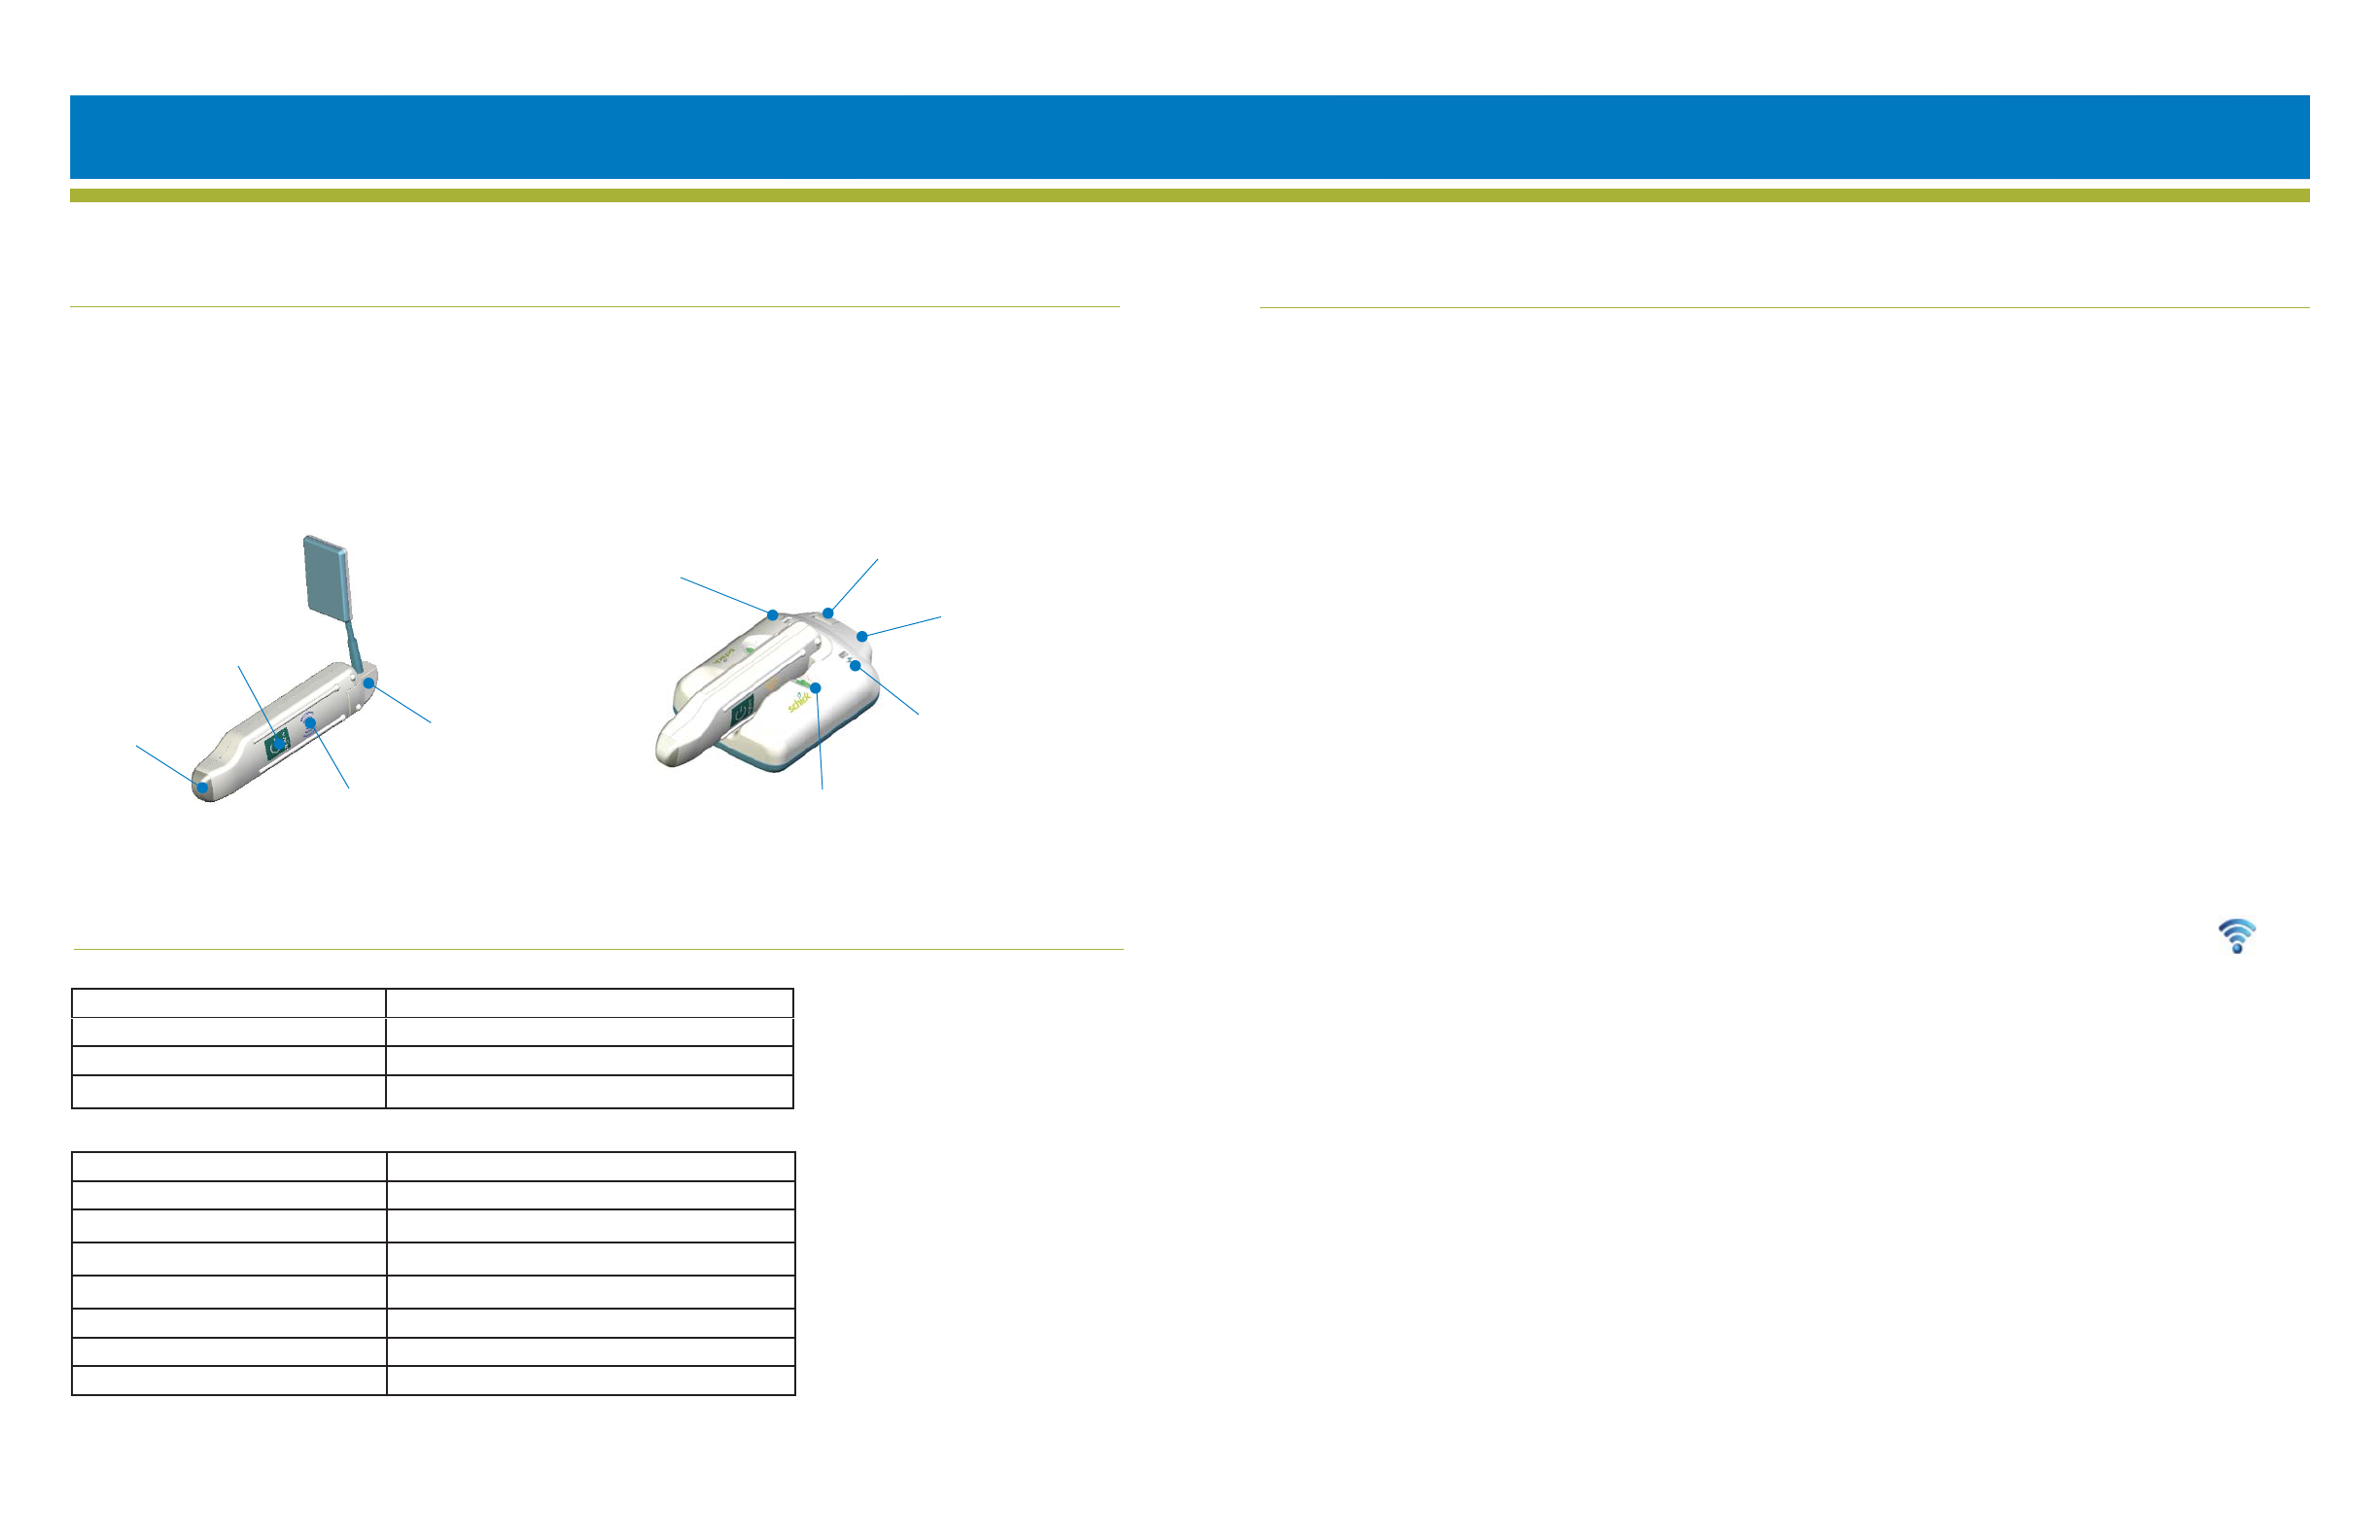
Refer to the graphics below for the location of the power button, visual indicators, and connections to your Schick WiFi system. The LED at the tip
of the Schick WiFi Interface provides continuous feedback on battery strength and dierent ashing patterns to describe system status.
Installing and Operating the Schick WiFi System
password for your WiFi network.
Press Connect and wait for the confirmation»
message.
Click OK to confirm the wireless network the»
Schick WiFi Interface is connecting to.
Click OK when the message,“New network»
settings were written successfully”is displayed.
Remove the Schick WiFi Interface from»
the Docking Station and close the WiFi
Configuration Utility.
Disconnect the USB cable from the Docking»
Station.
Launch the Wireless Monitor by either starting»
your imaging software (which opens the
monitor automatically), or by clicking on
Windows Start>Programs>Startup>Wireless
Monitor. (If a Windows Firewall message appears,
click Unblock.)
Pairing5.
Make sure that the Schick WiFi Interface is ON»
and its LED is flashing.
Click on the Wireless Monitor icon located in»
the Windows System Tray and select Schick
WiFi Interface Management.
Click the Schick WiFi Interface to be paired.»(It
may take up to 45 seconds to appear on the list
after it is turned on.)
Click the Pair button.»
When the pairing message appears, press the»
Schick WiFi Interface button to confirm pairing.
The Schick WiFi Interface Management»
window will show that the Schick WiFi
Interface is paired.
Verify Installation and Operation6.
Prior to initial use, charge the Schick WiFi»
Interface in the Docking Station for 2 hours.
Start your particular imaging program.»
Connect the CDR Elite sensor to the Schick WiFi»
Interface.
Create or open a sample X-ray exam and place»
a radio-opaque object like a clip on the active
side of the Sensor.
Take several sample exposures and verify»
image quality.
Install the WiFi Conguration Utility1.
Only one computer is needed to configure the»
Schick WiFi Interface.
Insert the Schick WiFi CD into your CD-ROM or»
DVD drive.The Schick WiFi Start page should
display automatically. If it doesn’t, browse the
CD and double-click on Setup.exe.
Click the Install WiFi Configuration Utility»
button. (If prompted,install the .NET
Framework.)
Click Next at the Welcome screen and at the»
two screens that follow.
Click Close when installation is complete.»
Install the Schick WiFi Wireless Software2.
Install this Schick WiFi driver on every PC used»
to acquire images.
Click the Install Wireless Software button on»
the Schick WiFi Start page.
Click Next at the Welcome screen and at the»
screen that follows.
Click Finish and close the Schick WiFi Start»
page.
Connect the Schick WiFi Docking Station3.
Connect the power supply cable to the Schick»
WiFi Docking Station.
Connect the power supply adapter to a wall»
outlet in the operatory.
Open the compartment on the Docking»
Station and connect the USB cable to the
Docking Station and to the imaging PC
with the WiFi Configuration utility installed.
(Please wait a few seconds while drivers install
automatically.)
Congure the Schick WiFi Interface4.
Insert the Schick WiFi Interface into the»
Docking Station and wait for the LED to start
flashing.
Start the WiFi Configuration Utility (Windows»
Start>Programs>Schick Technologies,
Inc.>Schick WiFi>WiFi Configuration Utility).
Select your wireless network from the»
Networks Available window and type in the
Schick WiFi at a Glance
Power On / O
RFID Tag
Sensor and
Docking Station
Connection
LED
USB Connection
USB LED
Power Connection
Power LED
Schick WiFi Interface Connection LED
To install the system, please follow the steps in this Guide (full details are in the user manual). Installation includes conguring
the Schick WiFi Interface to connect to your oce wireless network, and pairing it to a desktop or laptop PC. Pairing connects the
Schick WiFi Interface to an imaging PC, enabling X-rays to be sent there wirelessly.
Schick WiFi Interface LED Color Battery Power Level
Green Full
Yellow to Amber Medium
Red Low
Schick WiFi Interface LED Flashing Status
Solid, purple Powering on and booting up
Short ashes Searching for WiFi connection
Long ash followed by two short ones WiFi connected, waiting to pair (unpaired)
Solid, no ashes Pairing with computer (“conrming”)
Short ash every second Paired, no Sensor connected
Glows from dim to bright (“breathing”) Paired, Sensor connected
Rapid ashes Transferring image
Battery Power and Status Indications
Other Sirona Accessories manuals


Popular Accessories manuals by other brands


ROSE DISPLAYS
ROSE DISPLAYS SPIDER RING WITH CABLE AND SAUCER manual

ESIT
ESIT SMART user manual

IFM Electronic
IFM Electronic Efector500 PF2058 operating instructions

CommScope
CommScope AMP NETCONNECT 553947 Series instruction sheet

Cutler-Hammer
Cutler-Hammer 11100A6513 instruction manual

ENFORCER
ENFORCER Enforcer SD-927PKC-NEQ manual