manuals.online logo
Brands
  1. Home
  2. •
  3. Brands
  4. •
  5. Siterwell
  6. •
  7. Smoke Alarm
  8. •
  9. Siterwell GS401 User manual

Siterwell GS401 User manual

Page 1 of 2
HEAT ALARM User’s Manual
Type: GS401
SPECIFICATION:
Power source: DC9V battery
Battery specification: 9Vdc Alkaline or Carbon Zinc Battery- GOLD PEAK
GP1604P, GOLDEN POWER 1604D
Battery Life: at least 1 year.
Alarm current: <30mA
Standby current: <30uA
Maximum ambient: 50℃
Recommended coverage: 200 ㎡
Recommended spacing: 13.5m
Maximum distance from wall: 7.7m
Alarm sound level: 85 Decibels at 3 meters (10ft)
Locating the alarm
Heat alarms are intended to be supplementary to smoke alarms and should be placed
in areas where smoke alarm cannot be used.
If your dwelling is on a single storey, for a minimum protection you should fit a
smoke alarm in a corridor or hallway between the sleeping and living areas, place it as
near to the living areas as possible and ensure the audible alarm can be heard when the
bedrooms are occupied. See figure 1 for example/
If your dwelling is multi-storey, for minimum protection one smoke alarm should be
fitted at the bottom of the staircase with further alarms fitted on each upstairs landing.
This includes basements but excludes crawl spaces and unfurnished attics. See Figure 2
for example.
Note: for maximum protection smoke alarms should be fitted in every room (except
kitchen, bathroom and garage). Heat Alarms located in kitchens, garages, boiler rooms
etc. within 5.3m (17ft) of potential fire sources.
Do not fit an heat alarm in the bathroom, shower rooms or other room where the unit
may be triggered by steam or condensation.
Positioning the alarms
mounting(See diagram 1,2)
On a sloping ceiling
In areas with stopping or peaked ceilings install your smoke alarm 900mm from the
highest point measured horizontally because “dead air” at the apex may prevent
Areas to be avoided included the following:
 situations where the temperature may fall below 4℃ or rise above 44℃
 Humid areas such as bathrooms, kitchens, shower rooms where the relative humidity
may exceed 90%.
 Near a decorative object, door, light fitting, window molding etc. that may prevent
smoke or heat from entering the alarm.
 Adjacent to or directly about hot components such as radiators or wall vents that can
Page 2 of 2
Holes of ceiling or wall
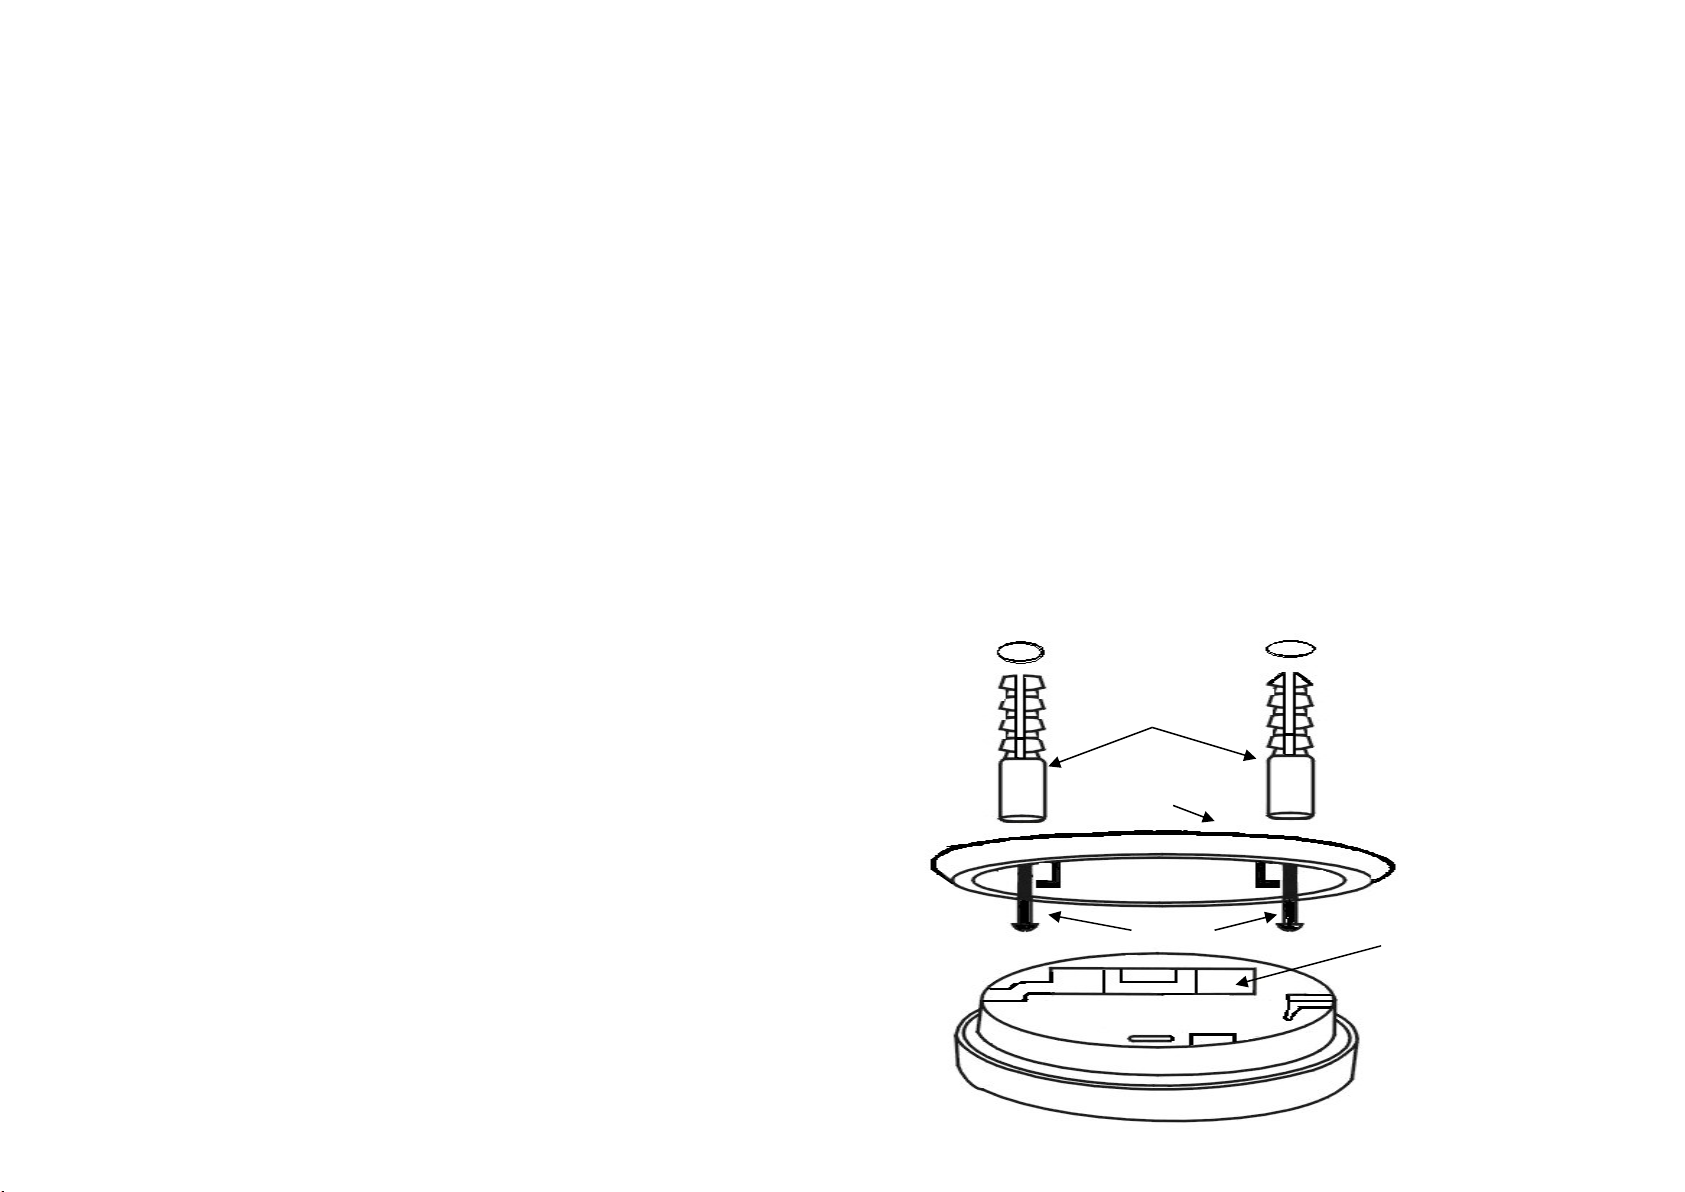
Plastic plug
Bracket
two screws
Battery box
effect the direction of air currents.
 In very dusty or dirty environments such as workshops.
 Locate unit at least 1.5m and route wiring at least 1m away from fluorescent light
fittings as electrical “ noise” and/or flickering may affect the unit. Do not wire into
the same circuit as fluorescent lights or dimmers.
 Do not locate in insect infested areas. Insects and contamination on the heat alarm
sensor can increase its response time.
OPERATING YOUR HEAT ALAR
Once the heat Alarm has been installed a Red LED light flash approximately once a
minute in normal operation .
When the Heat Alarm senses the temperature rise beyond the fixed temperature, the unit
will emit a loud (85dB) pulsating alarm. During the alarm condition, the RED indication
light (LED) will flash quickly.
Installation:
1: Mark the proper location on the wall or ceiling, according to the two holes of the
bracket of alarm.
2: Drill two ф5.0mm holes in the ceiling or wall, then insert two plastic plugs into the
holes.
3: Attach the bracket to the plastic plugs and fix tightly the screws into the plastic plugs.
4: Fit the alarm on the bracket and turn the alarm body clockwise, until matching well on
the bracket.
5: After installing or replacing the battery, reinstall your alarm. Test your alarm by using
the test button and check that the red LED flashing about every 30 seconds.
6: Test heat alarm using test button. The horn pattern is 3 short beeps followed by 2
second pause and then repeats.
TESTING YOUR HEAT ALARM
It is recommended that you test your heat alarm once a week to ensure the detector is
working correctly.
Push and hold the test button for approximately 3 seconds. A loud pulsating alarm should
sound to indicate the correct function .During the alarm condition the indicator light will
flash quickly.
MAINTAINING YOUR HEAT ALARM
If the heat Alarm emits a short ‘beep’ once a minute the battery is at the end of its life and
should be replaced immediately. This low voltage warming will be given for at least 7
days. the battery should last for approximately one year.
If the red indicator light (LED) does not flash every minute then replace the battery.
Clean your alarm at least once every six months to prevent dust build up. This can be
done using a vacuum cleaner with the brush attachment . Clean gently around the front
grilled section and sides.
BATTERY REPLACEMENT
Replace the battery at least once annually, or immediately when the battery signal sounds
once a minute.
NOTE:
this instruction leaflet contains important information on the correct installation and
operation of your heat alarm. Read and retain for future reference
INISTALLATION SKETCH MAP

Other Siterwell Smoke Alarm manuals

Siterwell GS888W User manual

Siterwell

Siterwell GS888W User manual

Siterwell GS528A-MG User manual

Siterwell

Siterwell GS528A-MG User manual

Siterwell GS536G User manual

Siterwell

Siterwell GS536G User manual

Siterwell GS559B User manual

Siterwell

Siterwell GS559B User manual

Siterwell GS559B User manual

Siterwell

Siterwell GS559B User manual

Siterwell GS528A User manual

Siterwell

Siterwell GS528A User manual

Siterwell GS517A User manual

Siterwell

Siterwell GS517A User manual

Siterwell GS559A User manual

Siterwell

Siterwell GS559A User manual

Siterwell GS558A User manual

Siterwell

Siterwell GS558A User manual

Siterwell GS592 User manual

Siterwell

Siterwell GS592 User manual

Siterwell GS508C User manual

Siterwell

Siterwell GS508C User manual

Siterwell GS546 User manual

Siterwell

Siterwell GS546 User manual

Siterwell GS517 User manual

Siterwell

Siterwell GS517 User manual

Siterwell GS522C User manual

Siterwell

Siterwell GS522C User manual

Siterwell GS529 User manual

Siterwell

Siterwell GS529 User manual

Siterwell GS519 User manual

Siterwell

Siterwell GS519 User manual

Siterwell GS517A User manual

Siterwell

Siterwell GS517A User manual

Siterwell GS511-B-H01 User manual

Siterwell

Siterwell GS511-B-H01 User manual

Siterwell PVS22A User manual

Siterwell

Siterwell PVS22A User manual

Popular Smoke Alarm manuals by other brands

First Alert SA4120 user manual

First Alert

First Alert SA4120 user manual

CALECTRO Uniguard Superflow UG-3-J Installation instruction

CALECTRO

CALECTRO Uniguard Superflow UG-3-J Installation instruction

SEBSON GS558 operating instructions

SEBSON

SEBSON GS558 operating instructions

Sygonix SY-5040174 operating instructions

Sygonix

Sygonix SY-5040174 operating instructions

Notifier CP-651 Installation and maintenance instructions

Notifier

Notifier CP-651 Installation and maintenance instructions

diagral DD355 manual

diagral

diagral DD355 manual

Honeywell IPGSM-DP Installation and setup guide

Honeywell

Honeywell IPGSM-DP Installation and setup guide

GEV FlammEx FMR 3026 manual

GEV

GEV FlammEx FMR 3026 manual

LEGRAND Tynetec FireAngel ZXT810 quick start guide

LEGRAND

LEGRAND Tynetec FireAngel ZXT810 quick start guide

Bosch FERION 1000 O manual

Bosch

Bosch FERION 1000 O manual

Universal Security Instruments 3303 instructions

Universal Security Instruments

Universal Security Instruments 3303 instructions

Ei Electronics EIB650i Series manual

Ei Electronics

Ei Electronics EIB650i Series manual

aguilera electronica AE/C5-OP quick start guide

aguilera electronica

aguilera electronica AE/C5-OP quick start guide

Honeywell Notifier VESDA-E VEA Series Product guide

Honeywell

Honeywell Notifier VESDA-E VEA Series Product guide

Kidde i9040EU user manual

Kidde

Kidde i9040EU user manual

Jung RWM200 operating manual

Jung

Jung RWM200 operating manual

Siemens OP921 installation instructions

Siemens

Siemens OP921 installation instructions

Silent Alert UM3A-2212-EU-PSU quick start guide

Silent Alert

Silent Alert UM3A-2212-EU-PSU quick start guide

manuals.online logo
manuals.online logoBrands
  • About & Mission
  • Contact us
  • Privacy Policy
  • Terms and Conditions

Copyright 2025 Manuals.Online. All Rights Reserved.