Siterwell GS888W User manual

Combo Smoke & CO Alarm Instruction Manual
Table of Contents
1. What to do if the smoke alarm sounds
4. Installation instructions
2. What to do if the CO alarm sounds
3. Product important information
5. Understanding your Combo Smoke & CO alarm
1) The TEST/SILENCE button accurately tests the device functions. Do not use any other
test method. Test the device weekly to ensure proper operation. Do not install in non-
residential buildings. And the device is not a substitute for a complete alarm system.
2) If you're sure it isn't a real alarm, open windows or fan the air around the device to
silence it.
3) Observe and follow all local and national electrical and building codes for installation.
4) This Combo Smoke & CO alarm is designed to be used inside a single family only. In multifamily
buildings, each individual living unit should have its own smoke alarm devices. Do not install in
non-residential buildings. The device is not a substitute for a complete alarm system.
5) Install a Combo Smoke/CO alarm in every room and on every level of the home. Smoke
may not reach the smoke alarm for many reasons. For example, if a fire starts in a remote
part of the home, on another level, in a chimney, wall, roof, or on the other side of a closed
door, smoke may not reach the device in time to alert household members. This Combo
Smoke/CO alarm will not promptly detect a fire or CO danger except in the area or room in
which it is installed.
6) This Combo Smoke/CO alarm may not alert every household member every time. The
alarm horn is loud in order to alert individuals to a potential danger. However, there may be
some circumstances where a household member may not hear the alarm (i.e. outdoor or
indoor noise, sound sleepers, drug or alcohol usage, the hard of hearing, etc.). If you
suspect that this device may not alert a household member, should install and maintain
other specialty smoke alarm or/and CO alarm devices. Household member must hear the
alarm’s warning sound and quickly respond to it to reduce the risk of damage, injury, or
death that may result from fire. If a household member is hard of hearing, install other
special smoke alarm or/and CO alarm with lights or vibrating devices to alert occupants.
7) This Combo Smoke/CO alarm can only sound their alarms when they detect smoke or
detect combustion particles or dangerous level of CO in the air. They do not sense heat,
flame, or other gas. The device is designed to give audible warning of a developing fire.
However, many fires are fast - burning, explosive, or intentional, and others are caused by
carelessness or safety hazards. In this circs, Smoke may not remake the unit alarm
QUICKLY ENOUGH to ensure safe escape.
8) This Combo Smoke/CO alarm have limitations. The device is not foolproof and is not
warranted to protect lives or property from fire. Smoke alarm or/and CO alarm are not a
substitute for insurance. Homeowners and renters should insure their lives and property. In
addition, it is possible for the device to fail at any time. For this reason, you must test the
device weekly and replace every 10 years.
4.2 Recommended location for alarms
The following suggestions are intended to help you with the placement and installation of
your Combo Smoke/CO alarm.
1). Drilling two φ5.0mm holes in the ceiling or wall, the distance between two holes cent er
i
2). Attach the bracket to the plastic plugs and fix tightly the screws into the plastic plugs. Do
NOT over-tighten screws.
3). Install and rotate the alarm body on the bracket.
4). Test the device by using the TEST/SILENCE button. Ensure the device sound is alarm
pattern.
As you install the device, it may sound for several minutes, then stop and enter in
normal operation mode. If it always sounds, please call our agent.
4.4 U n-ins tallation i ns truc tions
Rotate clockwise for installation
Rotate counter clockwise for un-installation
1.POWER indicator (green)
The green indicator is used to indicate power status of the device. The green indicator will
flash every 40 seconds.
2.FAULT indicator (yellow)
The yellow indicator is used to indicate malfunctions or low battery warning status of the
device.
3.ALARM indicator (red)
The red indicator is used to indicate alarm status of the smoke alarm or CO alarm.
4.TEST/HUSH button
The TEST/SILENCE button is used to test the device and to silence the unit during a
Smoke alarm/carbon monoxide alarm. Press to keep it longer than 1s to enable TEST
function, or press to enable HUSH function.
5
1. Start-up
.Sounder
The sounder is used to send out smoke alarm, CO alarm warning and abnormal warning information.
The device start-up after connecting the battery, with the green indicators will light up briefly and LCD
screen full segment code display then countdown 60 seconds.After power on, 60 seconds before the
POWER indicator (green) flash every 2 seconds. This is pre-heated state, 60 seconds later the POWER
indicator (green) flashing every 40 seconds indicates the device is functioning properly.
2. Normal operation
The POWER indicator (green) flashing every 40 seconds. The LCD doesn’t display.
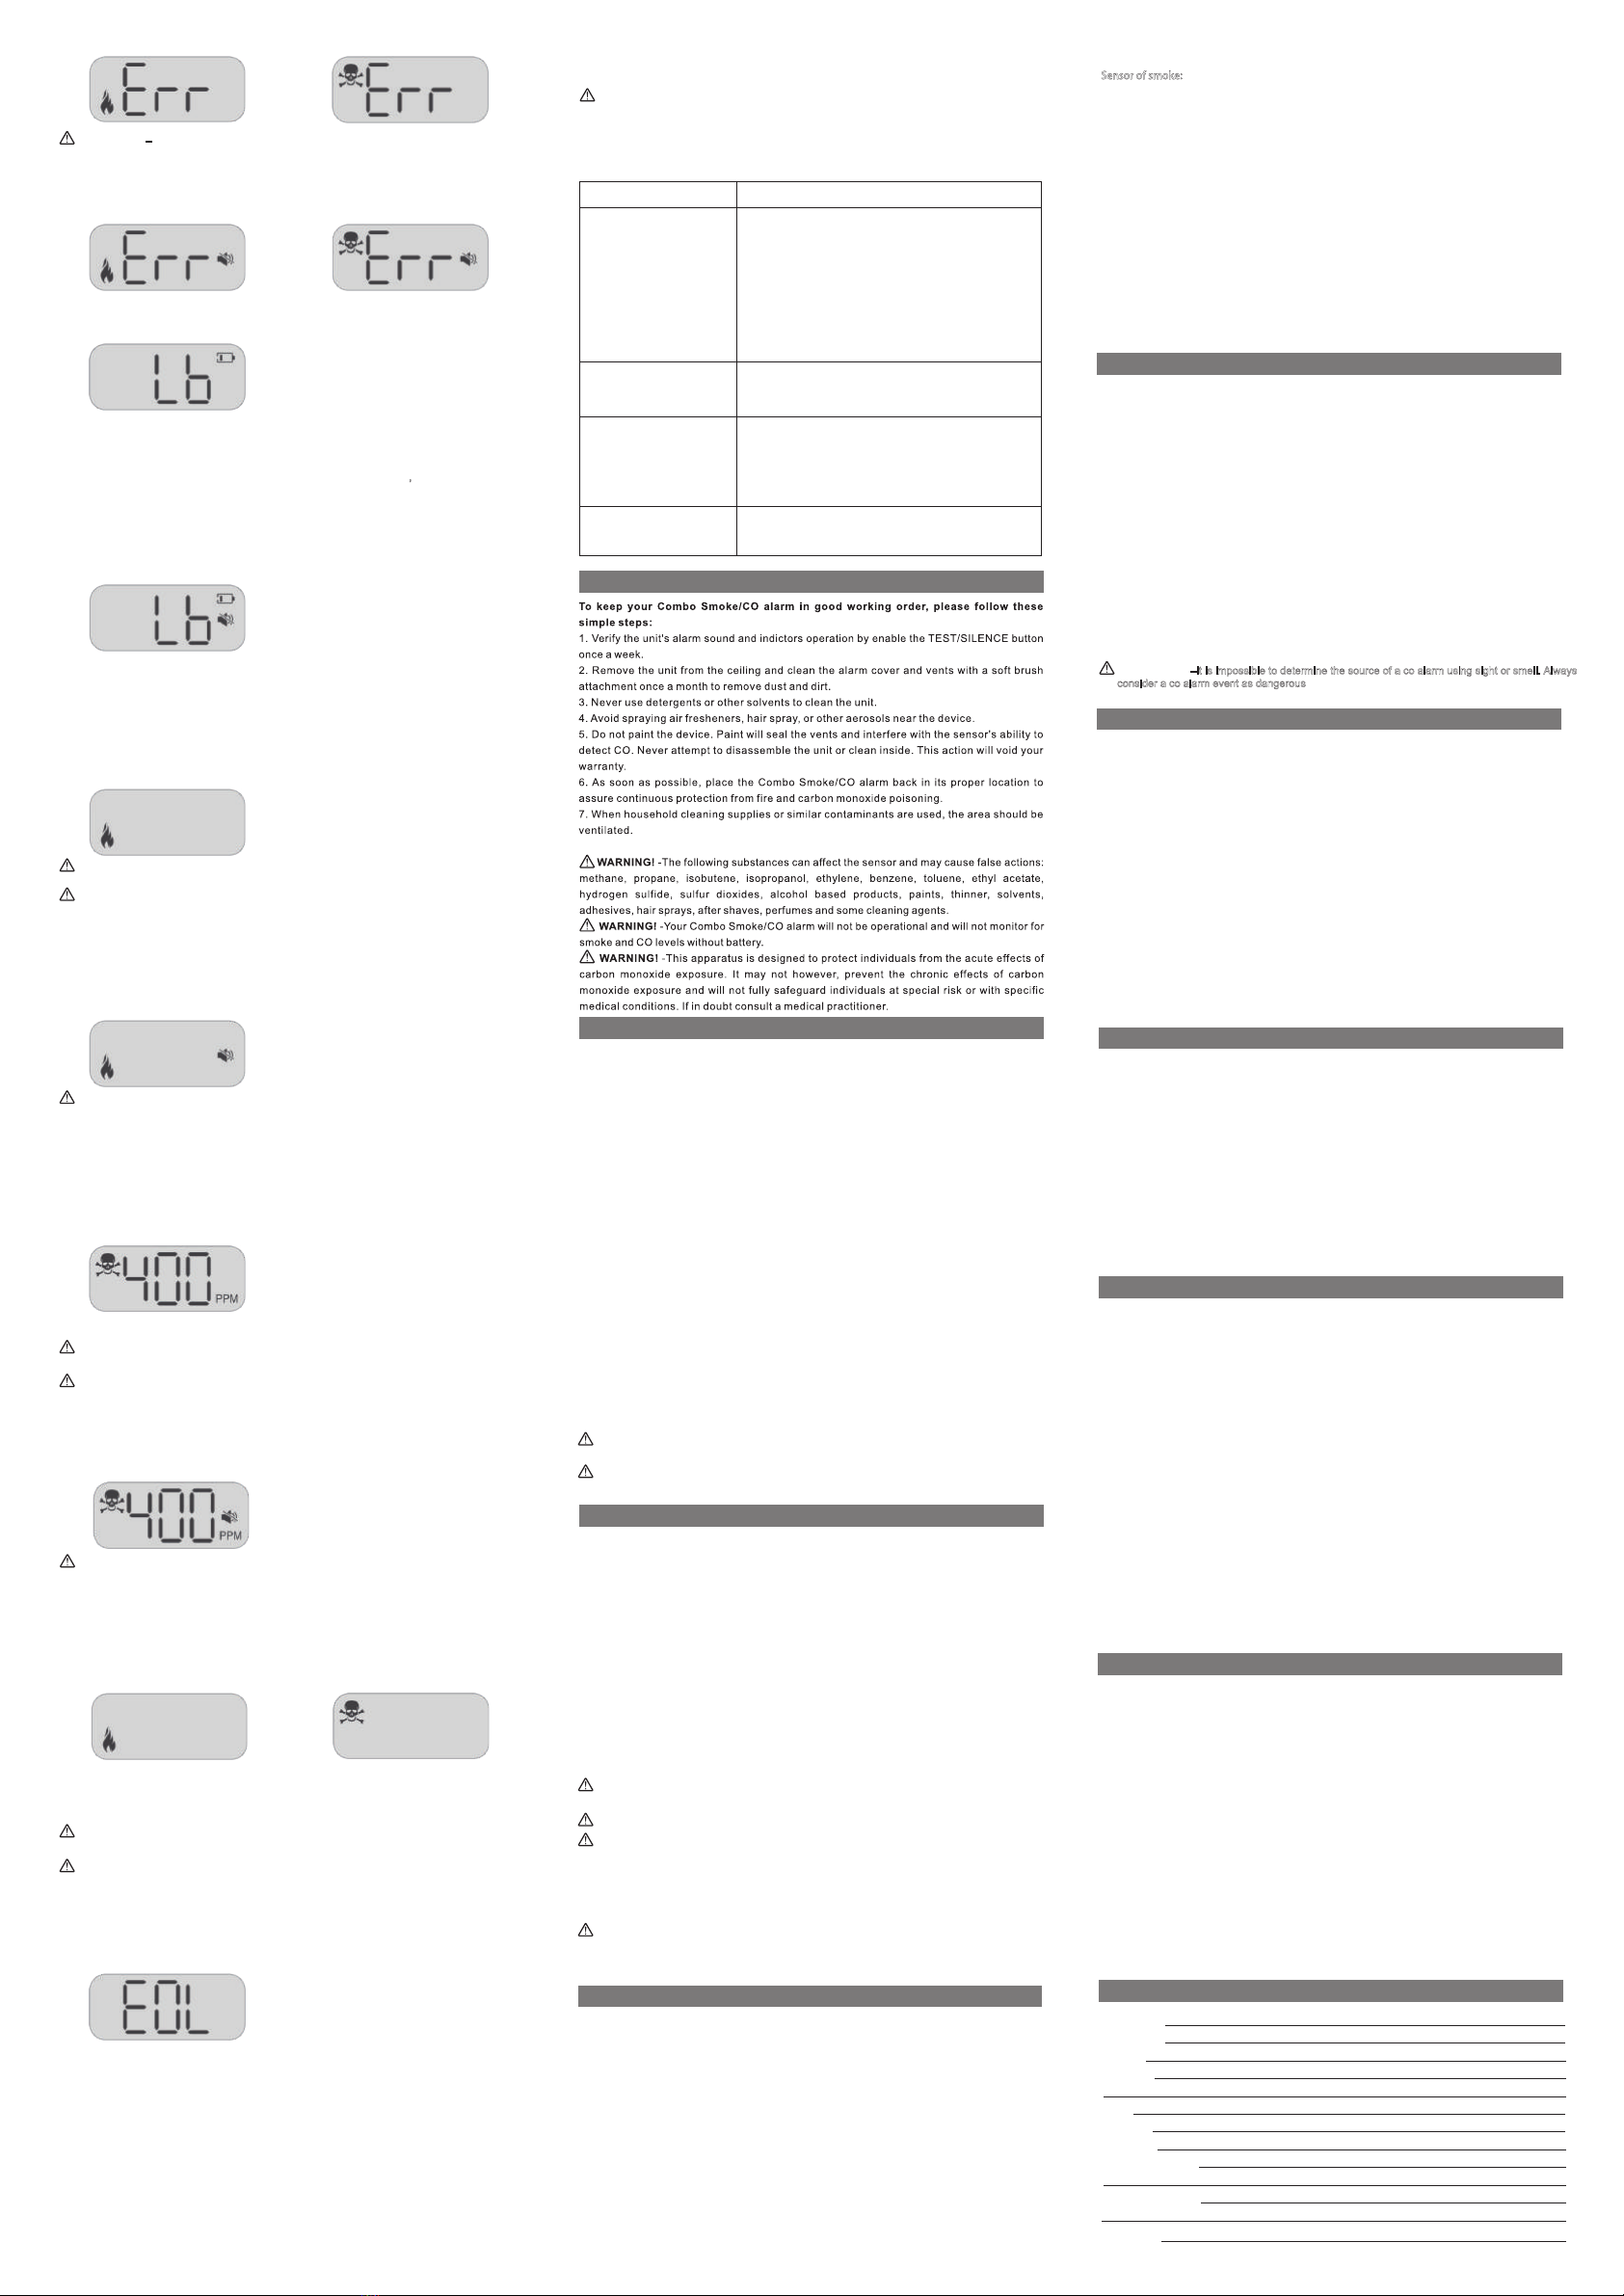
3. Fault warning
If the device chirps twice every 40 seconds, with FAULT indicator (yellow) will be flashing. It indicates
the device is in a malfunctioning condition. If the word “Err” and flame symbol on the LCD screen is on,
it means that your device does not have the function to detect smoke and is not responding to smoke.
If the word “Err” and toxic symbol on the LCD screen is on, it means that your device does not have the
function to detect CO and is not responding to CO.
un-ins tallation ins tallation
5.1 P roduc t overview
GREEN=POWER
YELLOW=FAULT
RED=ALARM
LCD Display
TEST/HUSH button
Tricolor indicator
Sounder
5.2 Operation and testing
1. What to do if the smoke alarm sounds
2. What to do if the CO alarm sounds
3. Product important information
4. Installation instructions
5. Understanding your Combo Smoke/CO alarm
6. General maintenance
7. Carbon monoxide overview
8. Battery information
9. Product Specifications
10. Recognizing nuisance alarms
11. Good safety habits - develop and practice a plan of escape
12. Manufacturer and C
The smoke alarm pattern is three long beeps, a 1.5 second pause, and three long beeps repeating.
The ALARM indicator (red) will flash once a second.
THE CARBON MONOXIDE (CO) ALARM PATTERN IS FOUR QUICK BEEPS, REPEATING EVERY
5 SECONDS. THE ALARM INDICATOR (RED) WILL FLASH THE SAME PATTERN.
WARNING! –ACTUATION OF YOUR CO ALARM INDICATES THE PRESENCE OF
CARBON MONOXIDE (CO) WHICH CAN KILL YOU.
ustomer service information
14.
15
. Warranty I
For ensure the Combo Smoke & CO Alarm work properly and provide detection performance, do
not install the device in the following places:
nformation
. Warranty Card
XXXXXXX
CAUTION!
-This device should be installed by a competent person.
– This device should be located in an open and unobstructed area and shall not
be located behind furniture, drapes, or any other object where it might not be seen or heard. The
alarm shall be heard from all sleeping areas.
WARNING!
– Alarm users should add the phone numbers of their emergency service providers
and qualified technicians on the two self-adhesive labels provided by the alarm manufacturer. Users
should place one label next to the alarm and another near the source of fresh air they plan to gather.
When the alarm indicates the presence of carbon monoxide, the user can escape as planned.
WARNING! – This product is intended for use in ordinary indoor locations of family living
units. It is not designed to measure compliance with Occupational Safety and Health
Administration (OSHA) commercial or industrial standards.
WARNING!
CAUTION!
–This Combo Smoke & CO alarm was designed to detect both smoke and carbon
monoxide from any source of combustion in a residential environment. It is not designed for use
in recreational vehicle (RV) or boat.
CAUTION!
–This Combo Smoke & CO alarm was designed for indoor use only. Do not
expose to rain or moisture. Do not knock or drop the alarm. Do not open or tamper with the
alarm as this could cause malfunction.
CAUTION!
–This Combo Smoke & CO alarm is designed to detect carbon monoxide gas from
ANY source of combustion. It is NOT designed to detect any other gas.
CAUTION!
–This Combo Smoke & CO alarm will not protect against the risk of smoke or
carbon monoxide poisoning when the battery has drained.
CAUTION!
–Installation of the alarm should not be used as a substitute for proper installation,
use and maintenance of fuel burning appliances including appropriate ventilation and exhaust
systems.
CAUTION!
– This device will only indicate the presence of carbon monoxide gas at the sensor.
Carbon monoxide gas might be present in other areas.
WARNING!
WARNING!
– Individuals with medical problems may consider using warning devices which
provide audible and visual signals for carbon monoxide concentrations under 30 ppm. This alarm
has not been investigated for carbon monoxide detection below 70 PPM.There are situations where
a smoke alarm may not be effective to protect against fire as stated in the NFPA Standard 72. For
instance: a) Fires where the victim is intimate with a flaming initiated fire; for example, when a
person’s clothes catch fire while cooking; b) Fires where the smoke is prevented from reaching the
smoke alarm due to a closed door or other obstruction; c) Incendiary fires where the fire grows so
rapidly that an occupant’s egress is blocked even with properly located smoke alarms.
WARNING!
– Smoke alarms are not to be used with smoke alarm guards unless the
combination has been evaluated and found suitable for that purpose.
WARNING!
– This device is designed to protect individuals from the acute effects of carbon
monoxide exposure. It will not fully safeguard individuals with specific medical conditions. If in
doubt consult a medical practitioner.
CAUTION!
– This device should be installed by a competent person.
CAUTION!
– This Combo Smoke & CO alarm is not intended to alert hearing impaired individuals.
WARNING! –ACTION OF THIS DEVICE INDICATES THE PRESENCE OF DANGEROUS
LEVELS OF CO! CO CAN BE FATAL!
. DO
REENTER
THE
AIRED
steps 1 – 3
of CO from
If
. Note any
equipment.
garage or
If alarm signal sounds:
1) Operate TEST/SILENCE button;
2) CALL YOUR EMERGENCY SERVICES [fire department or 911]; EMERGENCY PHONE#:
3) IMMEDIATELY MOVE TO FRESH AIR – OUTDOORS OR BY AN OPEN DOOR/WINDOW
A HEAD COUNT TO CHECK THAT ALL PERSONS ARE ACCOUNTED FOR. DO NOT
THE PREMISES NOR MOVE AWAY FROM THE OPEN DOOR/WINDOW UNTIL
EMERGENCY SERVICES RESPONDERS HAVE ARRIVED, THE PREMISES HAVE BEEN
OUT, AND YOUR ALARM REMAINS IN ITS NORMAL CONDITION.
4) After following steps 1 – 3, if your alarm reactivates within a 24 hour period, repeat
and call a qualified appliance technician (Telephone Number) to investigate for sources
fuel burning equipment and appliances, and inspect for proper operation of this equipment.
problems are identified during this inspection have the equipment serviced immediately
combustion equipment not inspected by the technician and consult the manufacturers’ instructions,
or contact the manufacturers directly, for more information about CO safety and this
Make sure that motor vehicles are not, and have not been, operating in an attached
adjacent to the residence.
NOTE: See Section RECOGNIZING NUISANCE ALARMS, for nuisance alarm situations.
When choosing your installation locations, make sure you can hear the alarm from all sleeping areas.
If you install only one device in your home, install the device near bedrooms, not in the basement or
furnace room.
4.4 Ins tallation i ns truc tions
Model No.: GS888W
RD-888W
-39-001 Rev A
THIS EQUIPMENT SHOULD BE INSTALLED IN ACCORDANCE WITH THE NATIONAL FIRE
PROTECTION ASSOCIATION’S STANDARD 72 (National Fire Protection Association, Battery
march Park, Quincy, MA 02269).
a) Typical installation drawing layouts for the unit(s) indicating recommended locations and wiring
methods which shall be in accordance with the applicable requirements outlined in the following:
1) C22.1-12, Canadian Electrical Code, Part I, Safety Standard for Electrical Installations; and
2) CAN/ULC-S553, Standard for Installation of Smoke Alarms.
The National Fire Protection Association (NFPA) and the manufacturer recommend replacing this
alarm ten years from the date code on back of alarm. This instruction manual contains important
information on starting operation and using the devise.
Please take a few minutes to thoroughly read the instruction manual and familiarize yourself and
your family with its operation. And save it for future reference.
1) In all sleeping rooms and guest rooms.
2) Outside of each separate dwelling unit sleeping area, within 21 feet ( 6.4m) of any door to a
sleeping room, the distance measured along a path of travel.
7) Smoke, heat, and combustion products rise to the ceiling and spread horizontally. Mounting the
smoke alarm on the ceiling in the centre of the room places it closest to all points in the room Ceiling
mounting is preferred in ordinary residential construction.
4) On every level of a residential board and care occupancy (small facility), including basements
and excluding crawl spaces and unfinished attics.
3) On every level of a dwelling unit, including basements.
5) In the living area(s) of a guest suite.
6) In the living area(s) of a residential board and care occupancy.
Thank you for purchasing this Combination Smoke & CO alarm GS888W. This model is powered by
three 1.5V AA battery. It is a single-station alarm with Wi-Fi which can report to the Tuya platform,
you can see the working status of the alarm through the mobile APP. It also contains a LCD
graphical display and SMARTHUSH Control to temporarily silence nuisance alarms.
Sin
la
n
ge floor plan e floor plan
Multipl
r p
8)In an enclosed space (for example in a cupboard or behind a curtain).
3
13. FCC&IC warning
– Do NOT try to repair the device, it has the risk of electric shock or malfunction if
the device is tampered with.
1)Near appliances or areas where normal combustion regularly occurs (kitchens, near furnaces, hot
water heaters). Install at least 10 feet(3 m)away from these areas. Use specialized smoke alarm
device with unwanted alarm control for this areas.
2)In areas with high humidity, like bathrooms or areas near dishwashers or washing machines or
directly above a sink. Install at least 10 feet(3 m)away from these areas.
3)Avoid spraying aerosols near the device.
4) Next to a door or window, an extractor fan, air returns or heating and cooling supply vents. Install
at least 3 feet (0.9) away from these areas. The air could blow smoke away from the device,
interrupting its alarm.
10) Less than 4 inch (10 cm) from the peak of an "A" frame type ceiling.
is 2.76 inch (70 mm), then inserting two plastic plugs provided into the holes.
– To prevent injury, this device must be securely attached to the ceiling/wall
in accordance with the installation instructions.
NOTE: Install the battery and test to see if the alarm works normally, before installing on a
ceiling or wall.
4.1 Installation of TuyaSmart APP
Scan the QR code as below, get and install TuyaSmart APP for IOS and Android system.
1) Click on the top right corner of the app interface "+"--Security & Sensor--Smoke Alarm--Smoke
Detector(Wi-Fi)--Confirm indicator rapidly blink--input Wi-Fi password--Confirm.
2) Smoke devices is in standby mode, Press the button three times within 2 seconds, the LCD will
display “E-L” as the picture below, when the green LED is flashing quickly, connecting to the network.
3) When APP shows "Adding device succeeded", click “Done”, device added successfully.
4) Logout operation, Press the button 5 times within 3 seconds, LCD flashes “C-L” slowly. At this point,
keep the TEST button pressed, when the buzzer beeps once, the green LED lights up for about 1
second and then off, the LCD lights off at the same time, and the network is disconnected successfully.
NOTE: Repeat the same process with all the alarms you have on hand.
NOTE: If the device cannot connect to the APP, you can press the button three times within 2
seconds, the LCD will display “E-L”. Then press the button three times again within 2 seconds,
the LCD will display “A-L”. Finally, follow the APP instructions to connect the device to Wi-Fi.
TuyaSmart APP
–
WARNING!
6. General maintenance
7. Carbon monoxide (CO) overview
11. Good safety habits - develop and practice a plan of escape
10. Recognizing Nuisance Alarms
8. Battery information
Problem Method of disposal
4. Fault warning silence
When the device is under the fault warning, pressing the TEST/HUSH button, it will come into a fault
warning silence status for about 10 hours. FAULT indicator (yellow) continue to flash, and the LCD
displays flame/toxic symbol and the word “Err” and mute symbol. The mute symbol blinks.
5. Low battery voltage warning
If the device chirps once every 40 seconds and FAULT indicator (yellow) will be flashing, with LCD
displays the word “Lb”, and low battery symbol blinks. It indicates the battery is low.
6. Low battery voltage warning silence
When the device is under the low battery warning, pressing the TEST/HUSH button, it will come into
a low battery voltage warning silence status for about 10 hours. FAULT indicator (yellow) continue to
flash, and the LCD displays low battery symbol and the word “Lb” and mute symbol. The mute symbol
and low battery symbol blinks.
7. Smoke alarm
When the device detects a dangerous level of smoke, the device will emit a smoke alarm pattern. The
smoke alarm signal pattern is 3 long beeps followed by 1.5 seconds of silence. This cycle repeats as
long as a dangerous smoke condition exists. The ALARM indicator(red) will flash once a second. The
LCD displays flame symbol.This signal will repeated until dissipation of smoke or the alarm signal is
manually silenced.
8. Smoke alarm silence
During the device under smoke alarm mode, push the TEST/HUSH button, it will pause the device alarm
sound for about 8 minutes. The ALARM indicator (red) will keep flashing in smoke alarm mode, the LCD
displays flame symbol, and mute symbol blinks. It indicates the device is running into the smoke alarm
silence mode. The Combo Smoke & CO alarm will automatically reset after approx. 8 minutes, if after this
period, particles of combustion are still present, the alarm will sound again.The smoke alarm silence (smoke
alarm silence mode) can be repeatedly used until the air has been cleared of the condition causing the alarm.
9. CO alarm
When the device detects a dangerous level of CO, the device will emit a loud alarm pattern. The alarm
signal pattern is 4 short beeps followed by 5 seconds of silence. This cycle repeats as long as a dangerous
CO condition exists. The ALARM indicator (red) will flash the same pattern. The LCD keeps showing toxic
symbol and real-time CO concentration. This signal will repeat until dissipation of CO.
10. CO alarm silence
During the device under CO alarm mode, pressing the TEST/HUSH button, it will be paused alarm sound
of the device about 5 minutes. The ALARM indictor (red) will keep flash as CO alarm mode, the LCD
displays toxic symbol and real-time CO concentration, and mute symbol blinks. It indicates the device is
running into the CO alarm silence mode.
This alarm is powered by 3 replaceable 1.5V (AA) battery located in a battery compartment. Under
normal conditions, a fresh battery should last at least one year.
70ppm between 60 to 240 minutes
150ppm between 10 to 50 minutes
400ppm between 4 to 15 minutes
11. Test the device
To test the device, pressing TEST/HUSH button, you should hear alarm sound patterns and with a
corresponding ALARM indicator (red) flashes. In smoke alarm mode, LCD displays flame symbol; In CO
alarm mode, LCD displays toxic symbol. The alarm sound patterns will stop until a test alarm cycle finished
after releasing TEST/HUSH button.The test alarm sound pattern includes: 3 long beeps and 1.5 seconds
pause for 2 repeat, 4 long beeps and 5 seconds pause for 2 repeat, repeat this pattern until releasing
TEST/HUSH button.
If the device is not operating properly, and is still under warranty, return it to the place of purchase. Pack
it in a well-padded carton, and ship to the place of purchase. If the alarm is no longer under warranty,
have a licensed electrician replace it immediately with a comparable alarm.
The device does not sound
when TEST/HUSH is pressed.
The device chirps once with
FAULT indicator (yellow)
flashing once every 40 seconds.
The device chirps twice with
FAULT indicator (yellow)
flashing twice every 40 seconds.
The device sounds unwanted
alarms when residents are
cooking, taking showers, etc.
The battery is under low battery status, please replace the
battery.
1.Ensure device is powered off.Replace new battery and
confirm that it has normal function after replacement.
2. The device is under "Smoke alarm silence" or "Low battery
voltage warning silence" or "Fault warning" mode.Please
ensure the device is under "Normal operation" mode then test
the device.
3. Clean the device. Please refer to "6. General maintenance".
4. If there are still failures during warranty, you can return it to
your retailer.
5. If the unit is out of warranty, please replace with another
new device.
12. End-of-life warning
If the product continues to work for 10 years, the device will chirp 3 times every 40 seconds, with a FAULT
indicator (yellow) flash, while displaying “EOL” on the LCD. It indicates this Combo alarm is in end-of-life.
That means your device has no detecting feature and no response to smoke and CO.
When the low battery voltage warning occurs the device is capable of producing a smoke
alarm signal for at least 4 minutes, or CO alarm signal for at least 12 hours, and 7 days of low battery
voltage warning signal operation.
The silence feature of low battery voltage warning is temporary action to cancel warning
sound effect, you need to replace the batteries as soon as possible.
NOTE:
The smoke alarm takes precedence when both smoke and carbon monoxide are present.
NOTE: Constant exposure to high or low humidity or temperatures may reduce battery life.
NOTE:
Do not use lithium batteries in this unit, a good safety measure is to replace the battery at
least once a year.
NOTE: Battery installation or replacement is necessary for the life of the device.
You need to replace the battery as soon as possible when the device enters this status.
The device will not protect against the risk of smoke and carbon monoxide poisoning when
the battery has drained.
CAUTION! –When Fault warning occurs, replace the device immediately.
Please contact us to more service.
CAUTION! –Do not attempt to repair the device. It will affect your warranty.
LOW BATTERY VOLTAGE SIGNAL
Clean this device. Please refer to "6. General maintenance ".
1. If the device is under warranty, please return it to your
retailer for replacement.
2. If the device is out of warranty, please replace with another
new device.
1. Press TEST/HUSH button to pause alarm.
2. Clean the smoke around the device.
MALFUNCTION SIGNAL
WARNING! –It is impossible to determine the source of a co alarm using sight or smell. Always
consider a co alarm event as dangerous
CAUTION!
–Refer to “1. What to do if the smoke alarm sounds” when you hear the sounds of
the smoke alarm warning.
CAUTION!
–Refer to “2. What to do if the CO alarm sounds” when you hear the sounds of the CO
alarm warning.
DANGER!
–If the smoke alarm sounds, and it is not being tested, it means the unit is sensing
smoke, THE SOUND OF THE ALARM REQUIRES YOUR IMMEDIATE ATTENTION AND ACTION.
WARNING!
–Exposure to high levels of carbon monoxide can be fatal or cause permanent
damage and disabilities.
WARNING!
–Use only the battery specified. Use of different battery may have a detrimental
effect on the alarm.
WARNING!
–Fire, explosion and severe burn hazard. Do not recharge, crush disassemble,
heat above 100
℃
, incinerate or expose contents to water.
1. Not to dispose of battery (or the device) as unsorted municipal waste but collect it separately.
2. Dispose of in accordance with all applicable federal, state and local regulations.
CAUTION!
–Please replace new 3pcs same type batteries in the meantime.
CAUTION!
–Test the alarm for correct operation using the TEST/HUSH button, whenever the
battery is replaced!
WARNING!
–The device may not prevent the chronic effects of carbon monoxide exposure
and that the device will not fully safeguard individuals at special risk.
DANGER!
–Before using the smoke alarm silence (silence), identify the source of the smoke and
be certain a safe condition exists.
CO alarm sensitivity setting (conforms to ul2034):
DANGER!
–If the CO alarm sounds, and it is not being tested, it means the unit is sensing a dangerous
level of CO, THE SOUND OF THE ALARM REQUIRES YOUR IMMEDIATE ATTENTION AND ACTION.
NOTE:
After the TEST/HUSH button is enabled, the alarm sounds and the red alarm light flashes. This
does not indicate that CO is present.
NOTE: This Combo Smoke & CO alarm is designed to detect carbon monoxide gas from any
source of combustion. It is not designed to detect any other gas.
NOTE:
Test the unit weekly! If at any time your unit does not perform as described, replace it immediately.
WARNING!
–Do NOT use an open flame to test your alarm, it could damage the alarm or ignite
combustible materials and start a structural fire.
WARNING!
–Due to the loudness (85 decibels) of the alarm, Always stand an arms-length away
from the unit when testing.
DANGER!
–Before enable feature of CO alarm warning silence, you should be confirmed that the
alarm is due to dangerous levels of carbon monoxide and the dwelling should be ventilated.
5.3. Troubleshooting
Troubleshooting guide:
Sensor of smoke: Multi-Criteria Optical
CO alarm silence: About 5 minutes
Product life: 10 years after manufacture
Operation ambient condition: 40℉(4.4°C)~100℉(37.8°C), 30~93%RH non-condensing
Storage/Transport ambient condition:14℉(-10°C)~113℉(45°C), 20~95% RH non-condensing
Alarm sound:≥85dB at 10ft @3.0 to 3.5kHz
Low battery warning silence: About 10 hours
Installation Location: Ceiling or wall
Detection range: Max. 40 m2within a room
Size: About Φ140*45mm
Weight:240±10g (net)
Sensor of CO: Electrochemical
Smoke alarm sensitivity:1.44%/ft +/-33% OBS
Smoke alarm silence: About 8 minutes
CO alarm sensitivity setting (conforms to ul2034):
70ppm between 60 to 240 minutes
150ppm between 10 to 50 minutes
400ppm between 4 to 15 minutes
9. Product specifications
Product standards:
UL 217 – Smoke Alarms [UL 217 8th Ed]
UL 2034 – CO Alarms [UL 2034, 4th Ed]
ULC S531 – Smoke alarms for Canada [3rd Ed (Feb 2014)]
CSA 6.19 – CO Alarms for Canada [2016]
Power supply: 4.5V (3*AA alkaline batteries)
Recommend battery type: Energizer E91, Gold Peak GN15A
Model: GS888W
Smoke Nuisance
SILENCE: If you know why the alarm is sounding, and you can verify that it is not a life threatening
situation, you can push the button silence the alarm for 8-10 minutes. If the smoke is not too dense,
that unit will silence. After the SILENCE period, the smoke alarm will automatically reset and sound
the alarm if particles of combustion are still present. You can use SILENCE repeatedly until the air
has been cleared of the condition causing the alarm.
RESET: Pushing the button during CO alarm allows the unit to reset calculations and double check
for the presence of CO. If the unit re-alarms within 6 minutes, it is sensing high levels of CO which
can quickly become a dangerous situation. Move to fresh air and call 911.
NOTE: Dense smoke will override SILENCE and sound a continuous alarm. If no fire is present,
check to see if one of the reasons listed in “Locations to avoid” may have caused the alarm. If a fire
is discovered, get out and call the fire department or 911.
This alarm is designed to minimize nuisance alarms. Cigarette smoke will not normally cause the unit
to alarm, unless the smoke is blown directly into the alarm. Combustion particles from cooking may
set off the alarm if it is located too close to a cooking appliance.
Large quantities of combustible particles are generated from spills or when broiling. Using the fan on
a range hood which vents to the outside (non-recirculating type) will also help prevent nuisance alarms
from occurring by removing these combustible products from the kitchen.
Prepare and practice a home escape plan twice a year, including drills at night. Know of two ways out
of every room (door & window) and identify a meeting place outside the home where everyone will
gather once they have exited the residence. When two people have reached the meeting place, one
should leave to call the fire department's telephone number ( ______________ ) while the second
person stays to account for additional family members.
Establish a rule that once you're out, you never
re-enter under any circumstance!
12. Manufacturer and customer service information
12.1 Manufacturer:
SITERWELL ELECTRONICS CO., LIMITED
ADDRESS: No.666 Qingfeng Road, Jiangbei District, Ningbo, Zhejiang Province, China
TEL: 0086-574-87729581
FAX: 0086-574-87729581
E-MAIL: sales@china-siter.com
12.2 Customer service:
SITERWELL ELECTRONICS CO., LIMITED
ADDRESS: No.666 Qingfeng Road, Jiangbei District, Ningbo, Zhejiang Province, China
TEL: 0086-574-87729581
FAX: 0086-574-87729581
E-MAIL: sales@china-siter.com
8.1 Battery type
This alarm is equipped with a low battery monitor circuit. If the battery capacity is near the point where
it can no longer provide adequate power for all alarm functions, the low battery condition will occur.
See Troubleshooting Guide. The battery must be replaced within 7 days of the first occurrence of the
"Low Battery Warning" to provide continuous alarm protection. To install or replace the battery in unit,
please perform the following steps:
8.2.1 Take down the unit from bracket heads of the wall.
8.2.2 Open battery compartment.
8.2.3 Remove the old battery, and replaced by new battery.
8.2.4 Put the battery into the battery box.
8.2.5 Reinstall the alarm on the wall or ceiling.
8.2.6 Test alarm using the TEST/HUSH button, if the testing alarm is ok, means the product can work
normally.
8.2 Battery deactivation
8.3 Battery disposal
Dear customer,
Our products are subject to strict quality controls. However
, if this device should unexpectedly not
function perfectly, please contact the customer services address given on warranty service
information. This is the only way for you to be able to return your device of have it picked up free.
The warranty period is 36 months and begins on the day of purchase.
Please always keep your till receipt as proof of purchase. Warranty claims can only be made for
possible defects caused by material and production faults.
During the warranty period, defective devices can be sent to the service address given overleaf for
you (post paid). Y
ou will then receive a new or repaired device back free. After the warranty period
has expired you still have the possibility of sending the defective device for repair to the address
given overleaf. Repairs carried out after the warranty period must be paid for.
In the event of misuse or improper treatment, use of force or intervention not carried out by our
authorized service branches, the warranty is no longer valid. This warranty does not restrict your
legal rights.
NOTE: In the event of a warranty claim, please return the till receipt and completed warranty
card with fault description together with the defective device.
NOTE: The warranty does cover the batteries supplied.
THREE YEARS LIMITED W ARRANTY
15. Warranty Card
14. Warranty Information
C arbon Monox ide (C O) N uis anc e
2) Extended operation of unvented fuel burning devices (range, oven, fireplace, etc.).
3) Temperature inversions which can trap exhaust gasses near the ground.
4) Car idling in an open or closed attached garage, or near a home.
7.2 Symptoms of CO Poisoning
1. MILD EXPOSURE:
Slight headache, nausea, vomiting, fatigue (often described as “Flu-like” symptoms).
2. MEDIUM EXPOSURE:
Severe throbbing headache, drowsiness, confusion, fast heart rate.
3. EXTREME EXPOSURE:
Unconsciousness, convulsions, cardio respiratory failure and death.The above
levels of exposure relate to healthy adults. Levels differ for those at high risk. Many cases of reported
carbon monoxide poisoning indicate that while victims are aware they are not feeling well, they become
so disoriented they are unable to save themselves by either exiting the building, or calling for assistance.
Also, young children and household pets may be the first affected.
Last Name:
F irst Name:
Ph one:
Address:
City:
Co unt ry:
Zip Code:
Faul t descript ion:
Date of purcha se :
Signature:
NOTE:
NOTE:
NOTE:
NOTE:
NOTE:
7 days after Low Battery begins, the notifications cannot be silenced.
Initial carbon monoxide poisoning symptoms are similar to the flu with no fever and can include
dizziness, severe headaches, nausea, vomiting and disorientation. Everyone is susceptible but
experts agree that unborn babies, pregnant women, senior citizens and people with heart or
respiratory problems are especially vulnerable. If symptoms of carbon monoxide poisoning are
experienced seek medical attention immediately. CO poisoning can be determined by a
carboxyhemoglobin test.
The following symptoms are related to CARBON MONOxIDE POISONING and should be
discussed with ALL members of the household:
Carbon monoxide (CO) is a colorless, odorless, and tasteless poison gas that can be fatal when
inhaled. CO inhibits the blood's capacity to carry oxygen.
7.1 Possible Sources of CO
1) Excessive spillage or reverse venting of fuel burning appliances caused by: i) Outdoor ambient
conditions such as wind direction and/or velocity, including high gusts of wind; heavy air in the vent
pipes (cold/humid air with extended periods between cycles), ii) Negative pressure differential
resulting from the use of exhaust fans, iii) Simultaneous operation of several fuel burning
appliances competing for limited internal air. iv) Vent pipe connection vibrating loose from clothes
dryers, furnaces, or water heaters, v) Obstructions in or unconventional vent pipe designs which
amplify the above situations.
13. Local smoke or CO alarm memory
72 hours alarm memory function. When the device detects Smoke & CO and alarms, when the device
return to standby mode, ALARM indicator (red) flash per 40 seconds. The LCD doesn’t display.After
quickly press TEST/HUSH button for 3 times, or after 72 hours, will reset the historical memory function
and enter normal operation status.
You need to replace the device as soon as possible when the device enters this status.
NOTE:
Radio frequency: 2.4GHz
Wi-Fi module brand: TUYA
Wireless distance: Minimum 30m open air
This device complies with part 15 of the FCC Rules and Industry Canada licence-exempt RSS
standard(s). Operation is subject to the following two conditions:
(1) This device may not cause harmful interference, and (2) this device must accept any interference
received, including interference that may cause undesired operation of the device.
FCC warning:
Any Changes or modifications not expressly approved by the party responsible for compliance could
void the user's authority to operate the equipment.
Note: This equipment has been tested and found to comply with the limits for a Class B digital device,
pursuant to part 15 of the FCC Rules. These limits are designed to provide reasonable protection
against harmful interference in a residential installation. This equipment generates uses and can radiate
radio frequency energy and, if not installed and used in accordance with the instructions, may cause
harmful interference to radio communications. However, there is no guarantee that interference will not
occur in a particular installation. If this equipment does cause harmful interference to radio or television
reception, which can be determined by turning the equipment off and on, the user is encouraged to try to
correct the interference by one or more of the following measures:
-Reorient or relocate the receiving antenna.
-Increase the separation between the equipment and receiver.
-Connect the equipment into an outlet on a circuit different from that to which the receiver is connected.
-Consult the dealer or an experienced radio/TV technician for help.
This equipment complies with FCC radiation exposure limits set forth for an uncontrolled environment.
This equipment should be installed and operated with minimum distance 20cm between the radiator &
your body.
IC warning:
This equipment complies with IC RSS-102 radiation exposure limits set forth for an uncontrolled
environment. This equipment should be installed and operated with minimum distance 20cm between
the radiator & your body.
■ Make a floor plan indicating all doors and windows and least two escape routes from each room.
Second story windows may need a rope or chain ladder.
■ Have a family meeting and discuss your escape plan, showing everyone what to do in case of fire
and where to meet after they leave the house.
■ Ensure that small children hear the alarm and wake when it sounds. They must wake up on order to
execute the escape plan. Practice allows all occupants to test your plan before an emergency. You may
not be able to reach your children. It is important they know what to do.
■ Familiarize everyone with the sound of the smoke/CO alarm and train them to leave you home when
they hear it.
■ Current studies have shown smoke/CO alarms may not awaken all sleeping individuals, and that it is
the responsibility of individuals in the household that are capable of assisting other to provide
assistance to those who may not be awakened by the alarm sound, or to those who may be incapable
of safely evacuating the area unassisted.
■ Install and maintain fire extinguishers on every level of the home and in the kitchen, basement and
garage. Know how to use a fire extinguisher prior to an emergency.
13. FCC & IC warning
Other Siterwell Smoke Alarm manuals

Siterwell
Siterwell GS529 User manual

Siterwell
Siterwell GS528A-MG User manual

Siterwell
Siterwell GS592 User manual

Siterwell
Siterwell GS522C User manual

Siterwell
Siterwell GS559B User manual

Siterwell
Siterwell PVS22A User manual

Siterwell
Siterwell GS517A User manual

Siterwell
Siterwell GS519 User manual

Siterwell
Siterwell GS559A User manual

Siterwell
Siterwell GS536G User manual

Siterwell
Siterwell GS517 User manual

Siterwell
Siterwell GS517A User manual

Siterwell
Siterwell GS508C User manual

Siterwell
Siterwell GS559B User manual

Siterwell
Siterwell GS401 User manual

Siterwell
Siterwell GS546 User manual

Siterwell
Siterwell GS558A User manual

Siterwell
Siterwell GS528A User manual

Siterwell
Siterwell GS511-B-H01 User manual


