Siterwell GS511-B-H01 User manual
-10- -11-
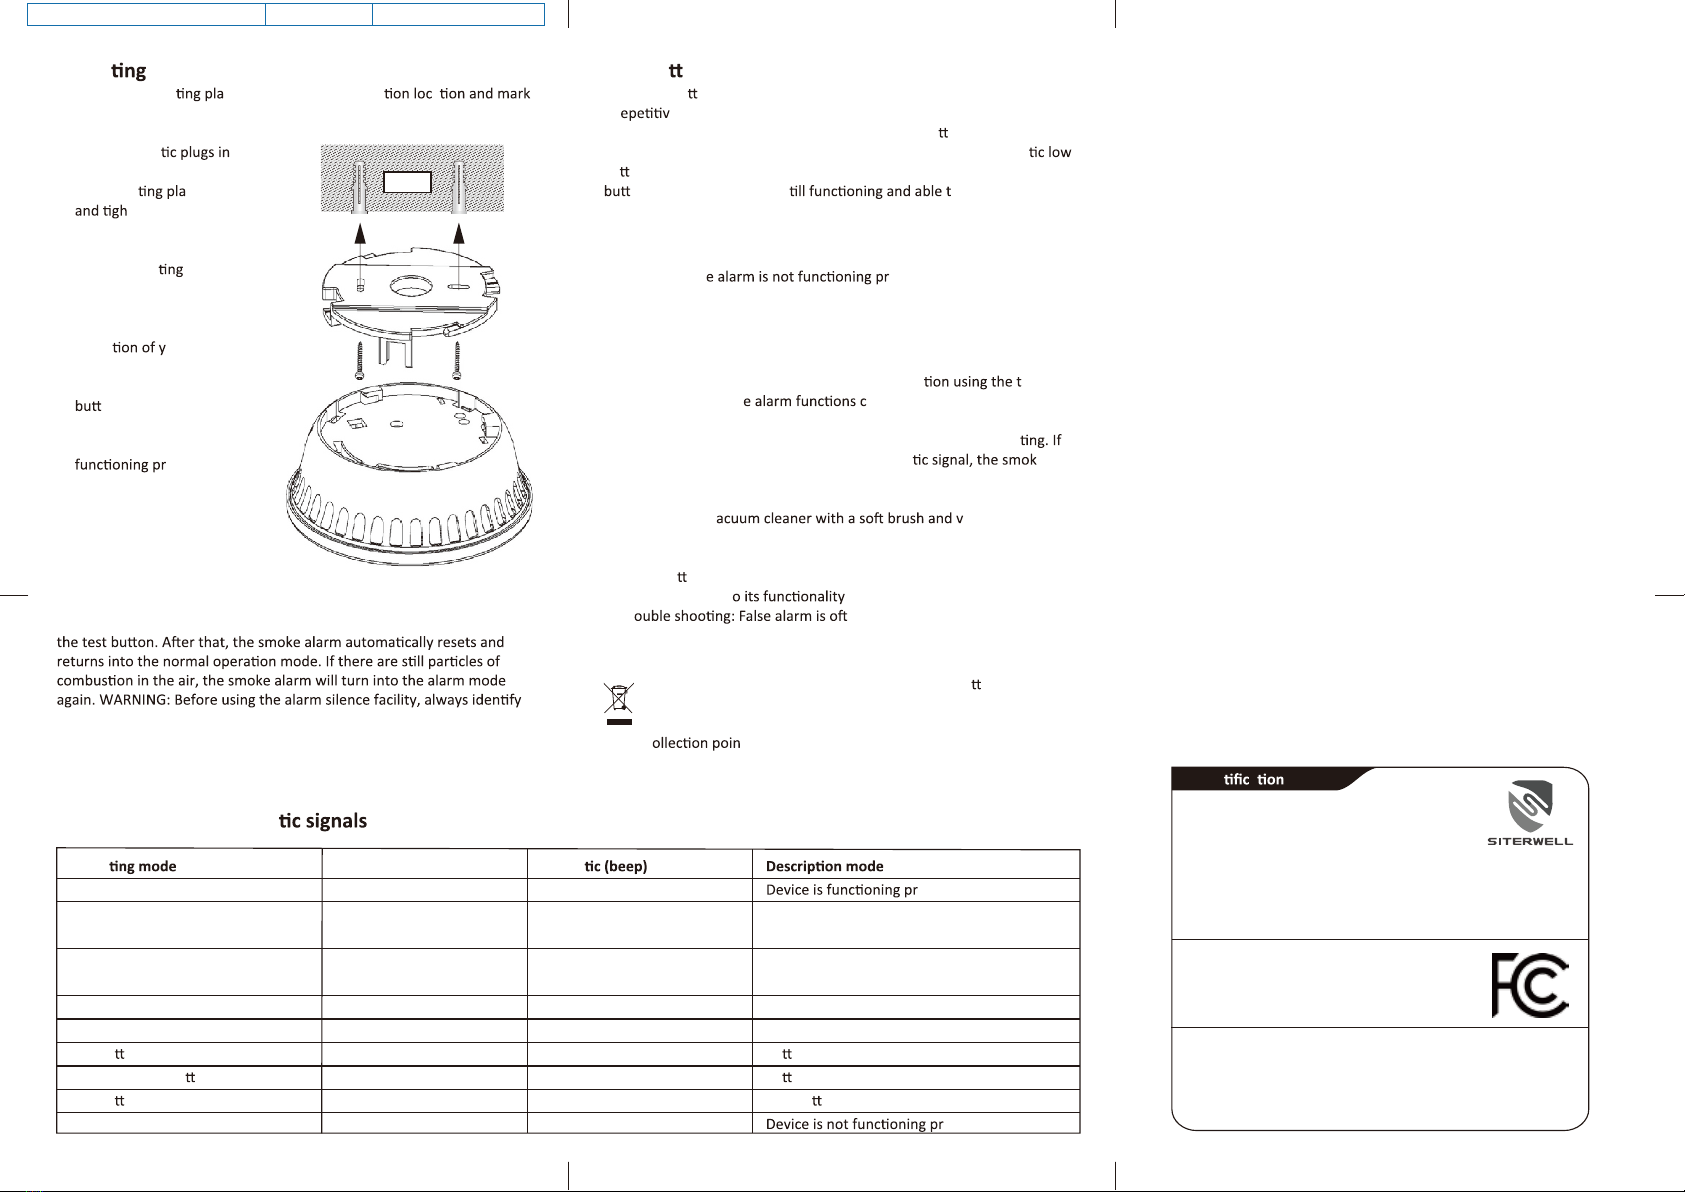
Moun
•Place the moun te on the desired installa a
where the holes should be drilled.
•Drill two holes with a diameter of 5 millimetres.
•Push the plas to the holes.
•Insert the screws into
the moun te,
ten them
firmly into the plugs.
•Place the smoke alarm
on the moun
bracket and secure it
by turning it clockwise.
•Test the correct
opera our
smoke alarm by
pressing the test
on. If no sound is
generated, the smoke
alarm is not
operly
and should not be
used!
Alarm silence facility
When the smoke alarm has detected smoke and turns into the alarm
mode, you can mute the alarm for approx 10±1 minutes by pressing
the cause of the alarm and make sure that the circumstances are safe.
Low ba ery mode
When the ba ery is running low, the smoke alarm will indicate this with
a r e beep and flash for approximately 30 days. WARNING: This
smoke alarm is equipped with a non-replaceable ba ery. When this
warning occurs, replace the device as soon as possible! The acous
ba ery warning signal can be muted for ten hours by pressing the test
on. The smoke alarm is s o detect smoke
when it's in this mode.
Fault warning mode
When the smok operly, it will turn into the
fault warning mode. Try cleaning the smoke alarm (see paragraph
maintenance) or replace the smoke alarm!
Maintenance
•Test this smoke alarm weekly for correct opera est
facility. If the smok orrectly, it will generate a loud
beep. Due to the loudness of the alarm, make sure that you always
stand at arm’s length distance from the unit when you are tes
the smoke alarm does not generate an acous e
alarm must be replaced immediately!
•Clean the smoke alarm at least once per month to remove dirt, dust or
debris. Use a v acuum all sides
and covers of the smoke alarm. Do not remove the top cover of the
smoke alarm to clean it inside.
•Do not a empt to repair this smoke alarm. If the smoke alarm shows a
damage related t , it must be replaced!
•Tr en caused by dust or steam.
Recycling and disposal
The WEEE symbol means that this product and ba eries
must be disposed separately from other household waste.
When they reach their end of life, take them to a designated
waste c t in your area to guarantee a safe disposal or
recycling. Protect the environment, human health and natural resources!
Overview visual & acous
Opera Visual (flash) Acous
Normal 1 x per 40 seconds None operly
Test 1 x per second (3 x) / 1 x per seconds (3 x) / Device is being tested
pause of 1,5 seconds pause of 1,5 seconds
Alarm 1 x per second (3 x) / 1 x per seconds (3 x) / Device has detected smoke
pause of 1,5 seconds pause of 1,5 seconds
Wireless alarm None 2 x per seconds Connected device detected smoke
Alarm silence 1 x per 8 seconds None Smoke alarm is muted
Low ba ery warning 1 x per 40 seconds 1 x per 40 seconds Ba ery is running low
Connected low ba ery warning 1 x per 3 hours 1 x per 3 hours Ba ery of connected device is running low
Low ba ery warning silence None None Low ba ery warning is muted
Fault warning None 1 x per 40 seconds operly
Revision date: 22 12 2020
Ceiling
SMOKE ALARM
GS511-B-H01 USER MANUAL
Document nr.: GS511-B-H01_Manual Revision nr.: B
FCC warning:
Any Changes or modifications not expressly approved by the party responsible for
compliance could void the user's authority to operate the equipment.
Note: This equipment has been tested and found to comply with the limits for a Class B
digital device, pursuant to part 15 of the FCC Rules. These limits are designed to provide
reasonable protection against harmful interference in a residential installation. This
equipment generates uses and can radiate radio frequency energy and, if not installed
and used in accordance with the instructions, may cause harmful interference to radio
communications. However, there is no guarantee that interference will not occur in a
particular installation. If this equipment does cause harmful interference to radio or
television reception, which can be determined by turning the equipment off and on, the
user is encouraged to try to correct the interference by one or more of the following
measures:
-Reorient or relocate the receiving antenna.
-Increase the separation between the equipment and receiver.
-Connect the equipment into an outlet on a circuit different from that to which the receiver
is connected.
-Consult the dealer or an experienced radio/TV technician for help.
This equipment complies with FCC radiation exposure limits set forth for an uncontrolled
environment. This equipment should be installed and operated with minimum distance
20cm between the radiator & your body.
IC warning
- English:
This device complies with Industry Canada licence-exempt RSS standard(s).
Operation is subject to the following two conditions: (1) This device may not cause
interference, and (2) This device must accept any interference, including interference that
may cause undesired operation of the device.
- French:
Le présentappareilestconforme aux CNR d'Industrie Canada applicables aux appareils
radio exempts de licence. L'exploitationestautorisée aux deux conditions suivantes:
(1) l'appareil ne doit pas produire de brouillage, et
(2) l'utilisateur de l'appareildoit accepter tout brouillageradioélectriquesubi, mêmesi le
brouillageest susceptible d'encompromettre le fonctionnement.
Dop: (GS511-B-H01)-CPR-001
EN 14604:2005/AC:2008 0359
Fire Safety
FCC ID: 2ASYYGS511BH01
Product type : Smoke alarm
Item number : GS511-B-H01
Manufacturer : Siterwell Electronics CO.,LIMITED
Limited : No.666 Qingfeng Road,Jiangbei District,
Ningbo Zhejiang Province, China
Website : www.china-siter.com
Iden a
ESSENTIAL CHARACTERISTICS: PASSED
Nominal activation conditions/ Sensitivity, Response delay (response time) and
Performance under fire condition - Operational reliability - Tolerance to supply voltage
-Durability of operational reliability and response delay, temperature resistance,
vibration resistance, humidity resistance, corrosion resistance, electrical stability
Download the Declaration of Performance at www.china-siter.com
-1- -2- -3-
Thank you for purchasing our smoke alarm!
Please read these ins arefully and store them in a safe place
where you can access them easily.
Pr tended use
This is a smoke alarm with r al sensor for
installa esiden ts and rooms with
residen e use. Smoke alarms are designed to provide an early
warning of fire smoke and fires to persons present, so that these persons
can react appropriately to the hazardous event. Always consult local
regula or smoke alarms.
Product specifica
Det : al
Power supply : Sealed ba ery 3V DC
Ba ery lif sraey01:
Alarm volume : ≥ 85 dB (A) at 3 meters
Monitored area : 40 m²
Opera emperature : 0 °C - 45 °C
Opera : < 93 %
Date of replacement : See product label
Individual alarm indicator : Yes
Alarm silence facility :
Low ba ery warning : Yes
Low ba ery silence facility : Y : 10 hours
Installa e
accommoda ehicles
Moun a
Interconnectable
Wireless frequency
Wireless distance
: No
: Ceiling or wall
: Yes | max. 40 Devices
: 915.3 MHz
: Max. 100 meters
Warnings:
•To prevent injury, this apparatus must be securely a ached to the
ceiling/wall in accordance with the installa
•Ba eries should not be exposed to excessive heat such as sunshine,
fire or the like.
•Do not paint or cover the smoke alarm.
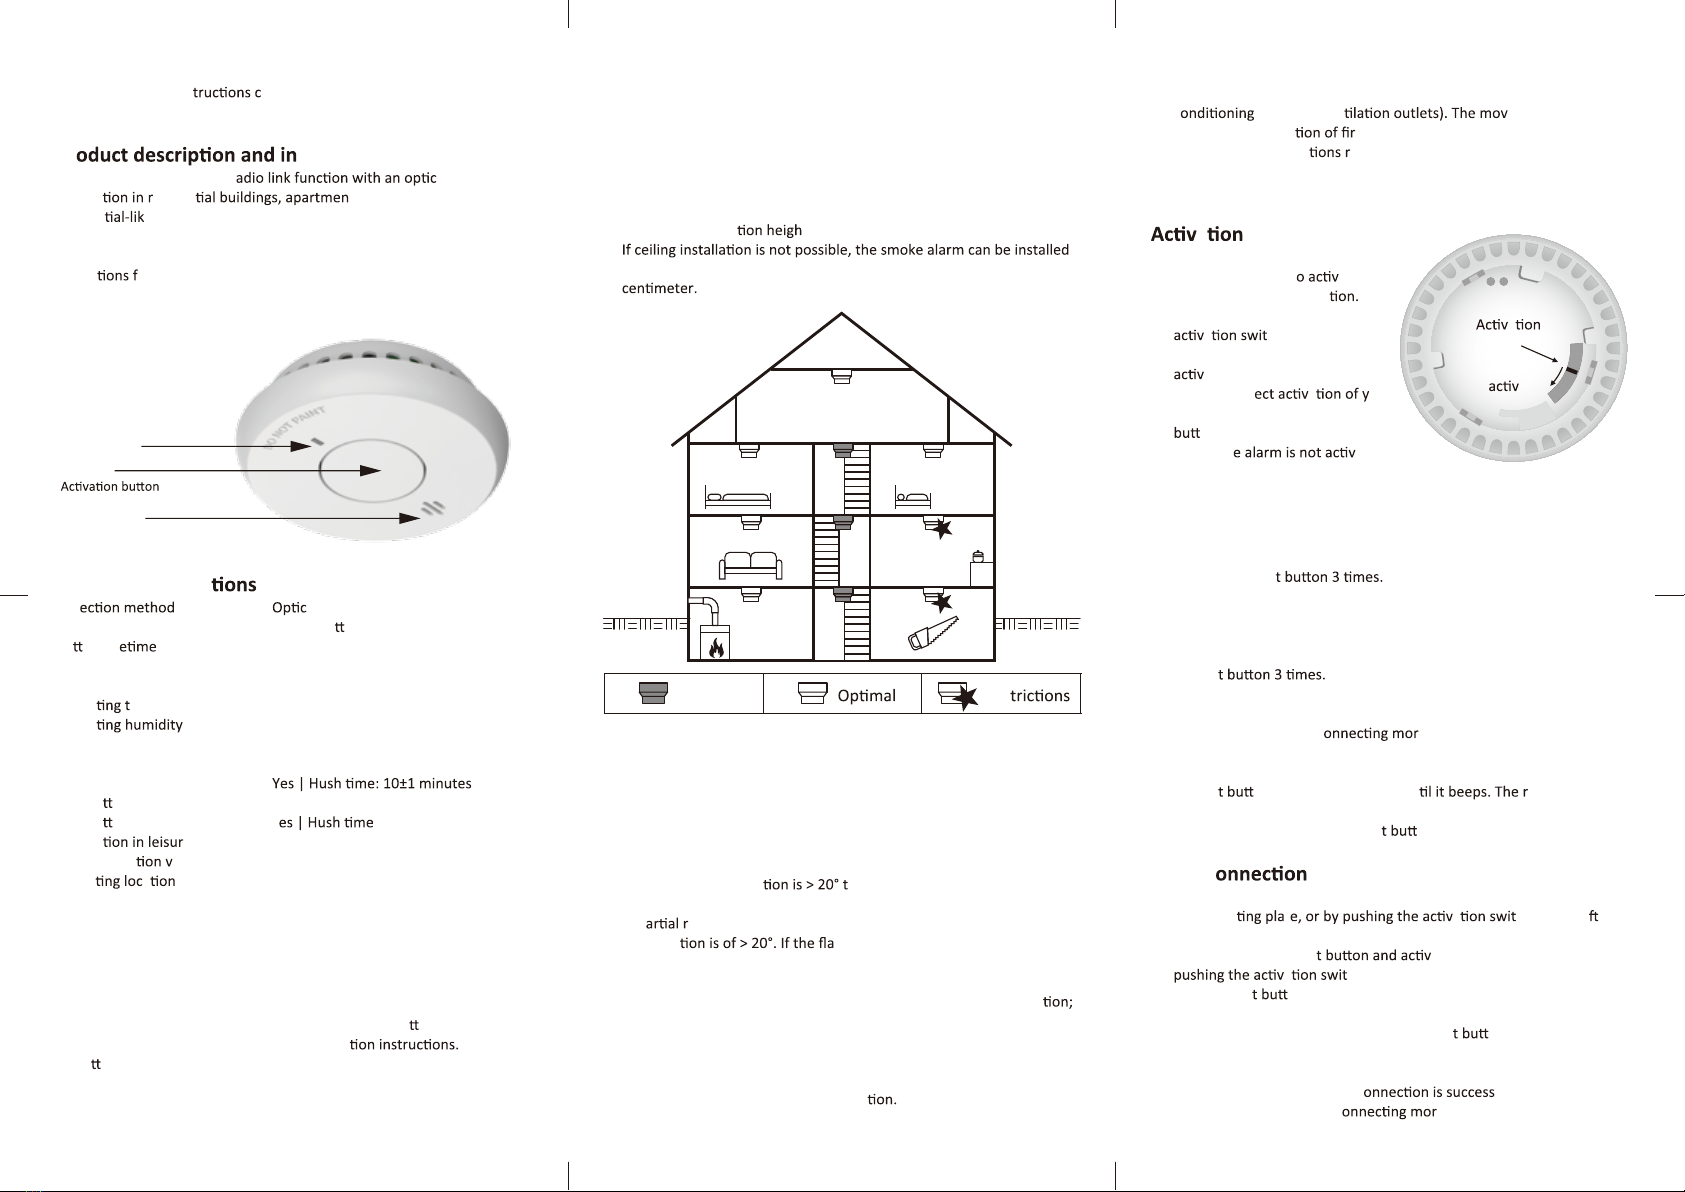
Where to install a smoke alarm
Smoke alarms must be installed in such a way that they can be reached
unhindered by the fire smoke so that fires can be reliably detected during
the development phase.
•Install at least in sleeping areas (especially children's rooms).
•Install at least in escape rooms.
•In the middle of the ceiling of a room.
•At least 50 cm away from the wall and other objects.
•Maximum installa t of 6 meter.
•
on the wall. The distance to the ceiling should be between 30 and 50
Where to install a smoke alarm in rooms
with special geometries
•Corridors with a maximum width of 3m: Max. 15m between 2 smoke
alarms. Max. 7,5m to the front side of the gallery and smoke alarms
at edges/crossings of corridors.
•Rooms with sloping ceilings:
- If the ceiling inclina o the horizontal: Smoke alarms
must be installed at least 0.5 m and at most 1 m from ceiling top.
- P oof slopes: If the flat ceiling is ≤ 1m wide, consider as ceiling
inclina t ceiling is >1m wide, consider as flat
ceiling.
•Rooms with subdivided ceilings:
- Height of the subdivisions is ≤ 0.2 m: Beams without considera
smoke alarm may be installed on the beams as well as on ceiling.
- Height of subdivisions is > 0.2 m and area of ceiling panels > 36 m²:
Smoke alarm should be installed in each ceiling panel.
- Height of subdivisions > 0.2 m and area of ceiling panels ≤ 36 m²:
Individual ceiling without considera
Where not to install a smoke alarm
•In an environment with a high risk of draught (e.g. close to air
c, fans and ven ement of air can
impair the penetra e smoke into the smoke alarm.
•Areas where combus egularly occurs, such as kitchens.
•Areas with high humidity such as bathrooms, or close to devices such
as dish washers or washing machines.
a
Before commissioning the smoke
alarm, it is important t ate it
and test it for correct opera
•Use a screw driver to push the
a ch to the right.
When the smoke alarm is
ated, the LED lights up.
•Test the corr a our
smoke alarm by pressing the test
on. If no sound is generated,
the smok ated
properly and should not be used!
Connect your smoke alarms
1. Choose one smoke alarm as the master smoke alarm.
2. Turn your master smoke alarm into the connect mode by quickly
pressing the tes
3. The red LED will light up red, followed by the blue LED. This indicates
that the smoke alarm turned into the connect mode in which it
remains for 30 seconds.
4. Turn the next smoke alarm into the learn mode by quickly pressing
the tes
5. The red LED will light up, followed by the green LED. This indicates
that the smoke alarms are connected to each other.
6. Repeat step 1 to 5 for c e smoke alarms. Make sure that
you always use the same master smoke alarm!
7. Test if the your smoke alarm were connected successfully by pressing
the tes on of a random device un ed LED of all
connected devices will flash twice per second for five minutes. Stop
these alarms by pressing the tes on of each alarm.
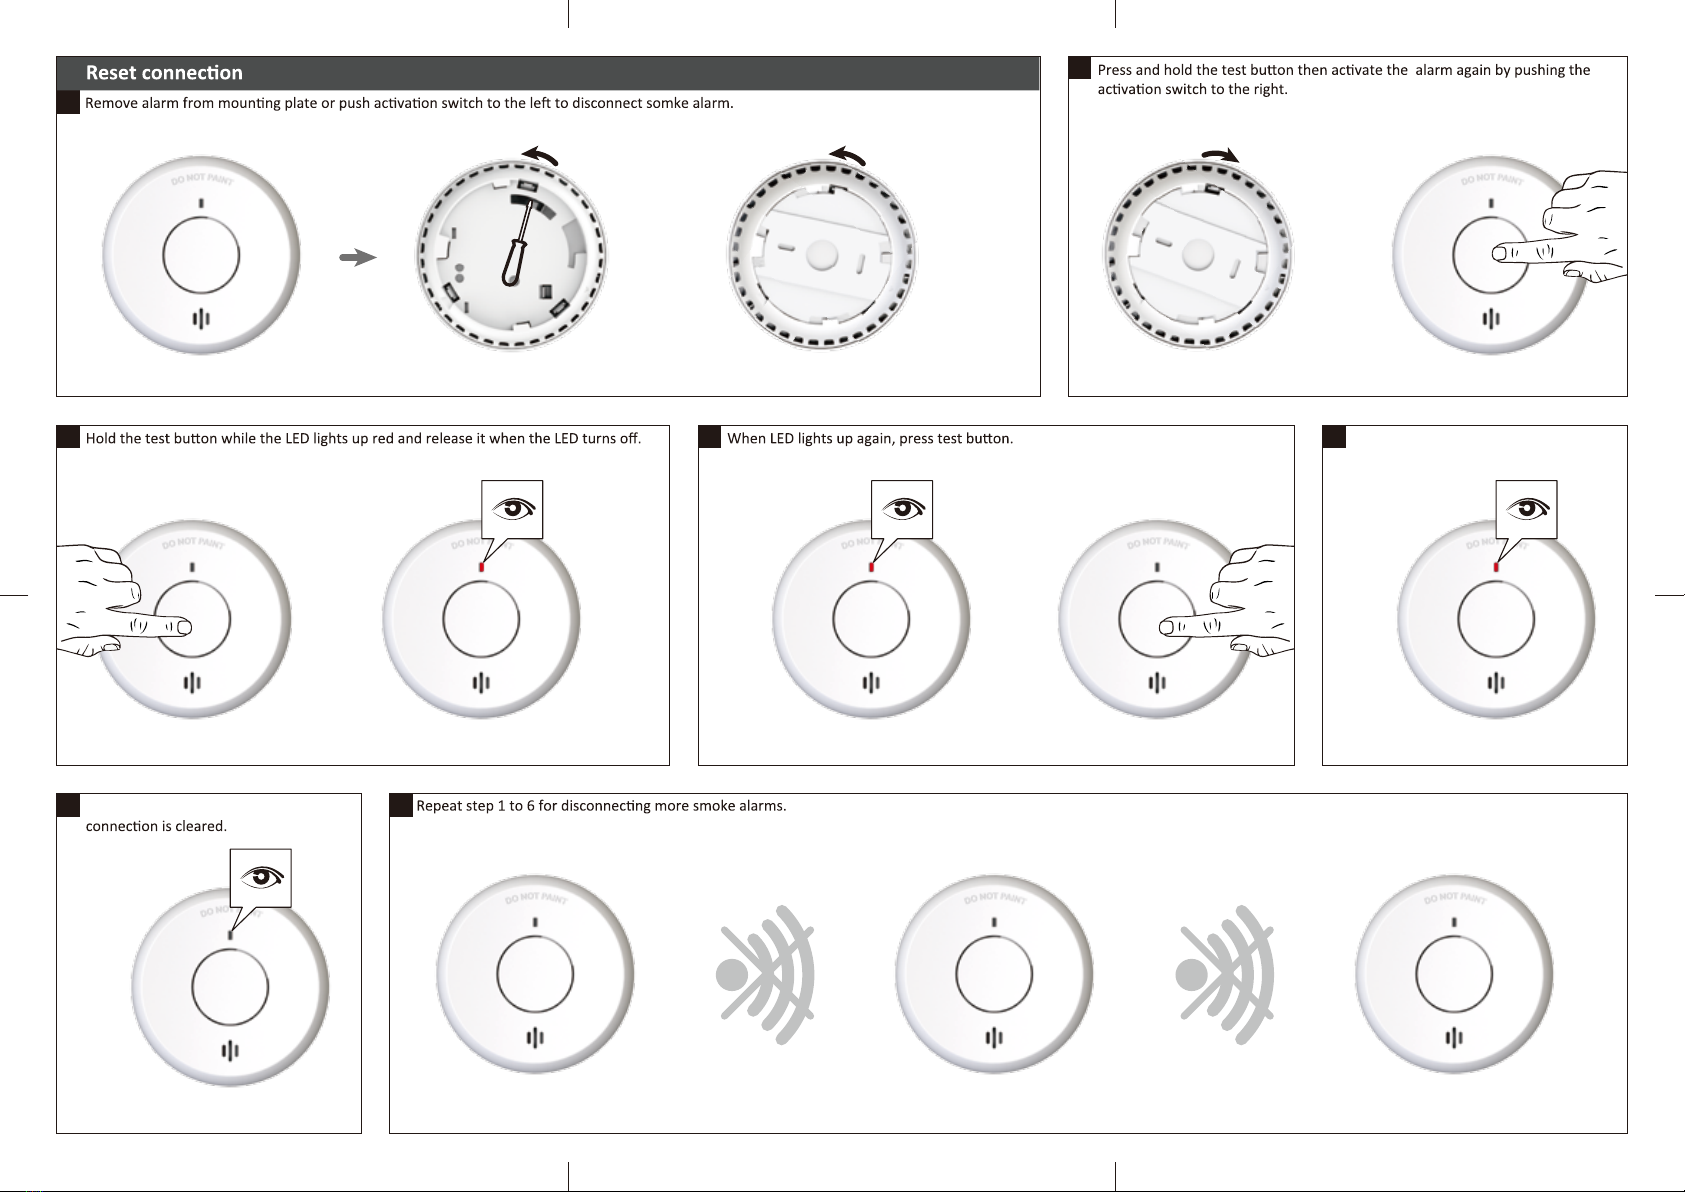
Reset c
1. Disconnect the smoke alarm you want to reset by removing it from
the moun t a ch to the le
with a screw driver.
2. Press and hold the tes ate the smoke alarm again by
a ch to the right.
3. Hold the tes on while the LED lights up red and release it when
the LED turns of.
4. When the LED lights up again, press the tes on.
5. The LED will start flashing to indicate that it the network is being
cleared.
6. When the LED turns off, the c fully cleared.
7. Repeat step 1 to 6 for disc e smoke alarms.
Minimum Res
a
switch
ated
backside smoke alarm
Test &
LED indicator
Sound output

-4- -5- -6-
+
!
1. Choose one smoke alarm as the master smoke alarm
master smoke alarm smoke alarm
3. Red LED follwed by blue LED
master smoke alarm master smoke alarm
master smoke alarm
6.
smoke alarmmaster smoke alarm
2.
master smoke alarm
4.
smoke alarm
5.
smoke alarm smoke alarm
Testif the your smoke alarm were
connected successfully by pressing the
beeps. the red LED of all connected
devices will flash twice per second for
five minutes.Stop these alarms by
Connect your smoke alarms
-7- -8- -9-
1.
2.
7.
3. 4. 5. LED will flash to indicate that the
network be cleared.
6. LED turns off indicate that the
or
Other Siterwell Smoke Alarm manuals

Siterwell
Siterwell GS559B User manual

Siterwell
Siterwell GS536G User manual

Siterwell
Siterwell GS517A User manual

Siterwell
Siterwell GS888W User manual

Siterwell
Siterwell GS592 User manual

Siterwell
Siterwell GS517 User manual

Siterwell
Siterwell GS401 User manual

Siterwell
Siterwell GS508C User manual

Siterwell
Siterwell GS546 User manual

Siterwell
Siterwell GS528A-MG User manual

Siterwell
Siterwell PVS22A User manual

Siterwell
Siterwell GS559B User manual

Siterwell
Siterwell GS519 User manual

Siterwell
Siterwell GS558A User manual

Siterwell
Siterwell GS528A User manual

Siterwell
Siterwell GS529 User manual

Siterwell
Siterwell GS517A User manual

Siterwell
Siterwell GS559A User manual

Siterwell
Siterwell GS522C User manual


