Siwa & Figli Hey-di User manual
1
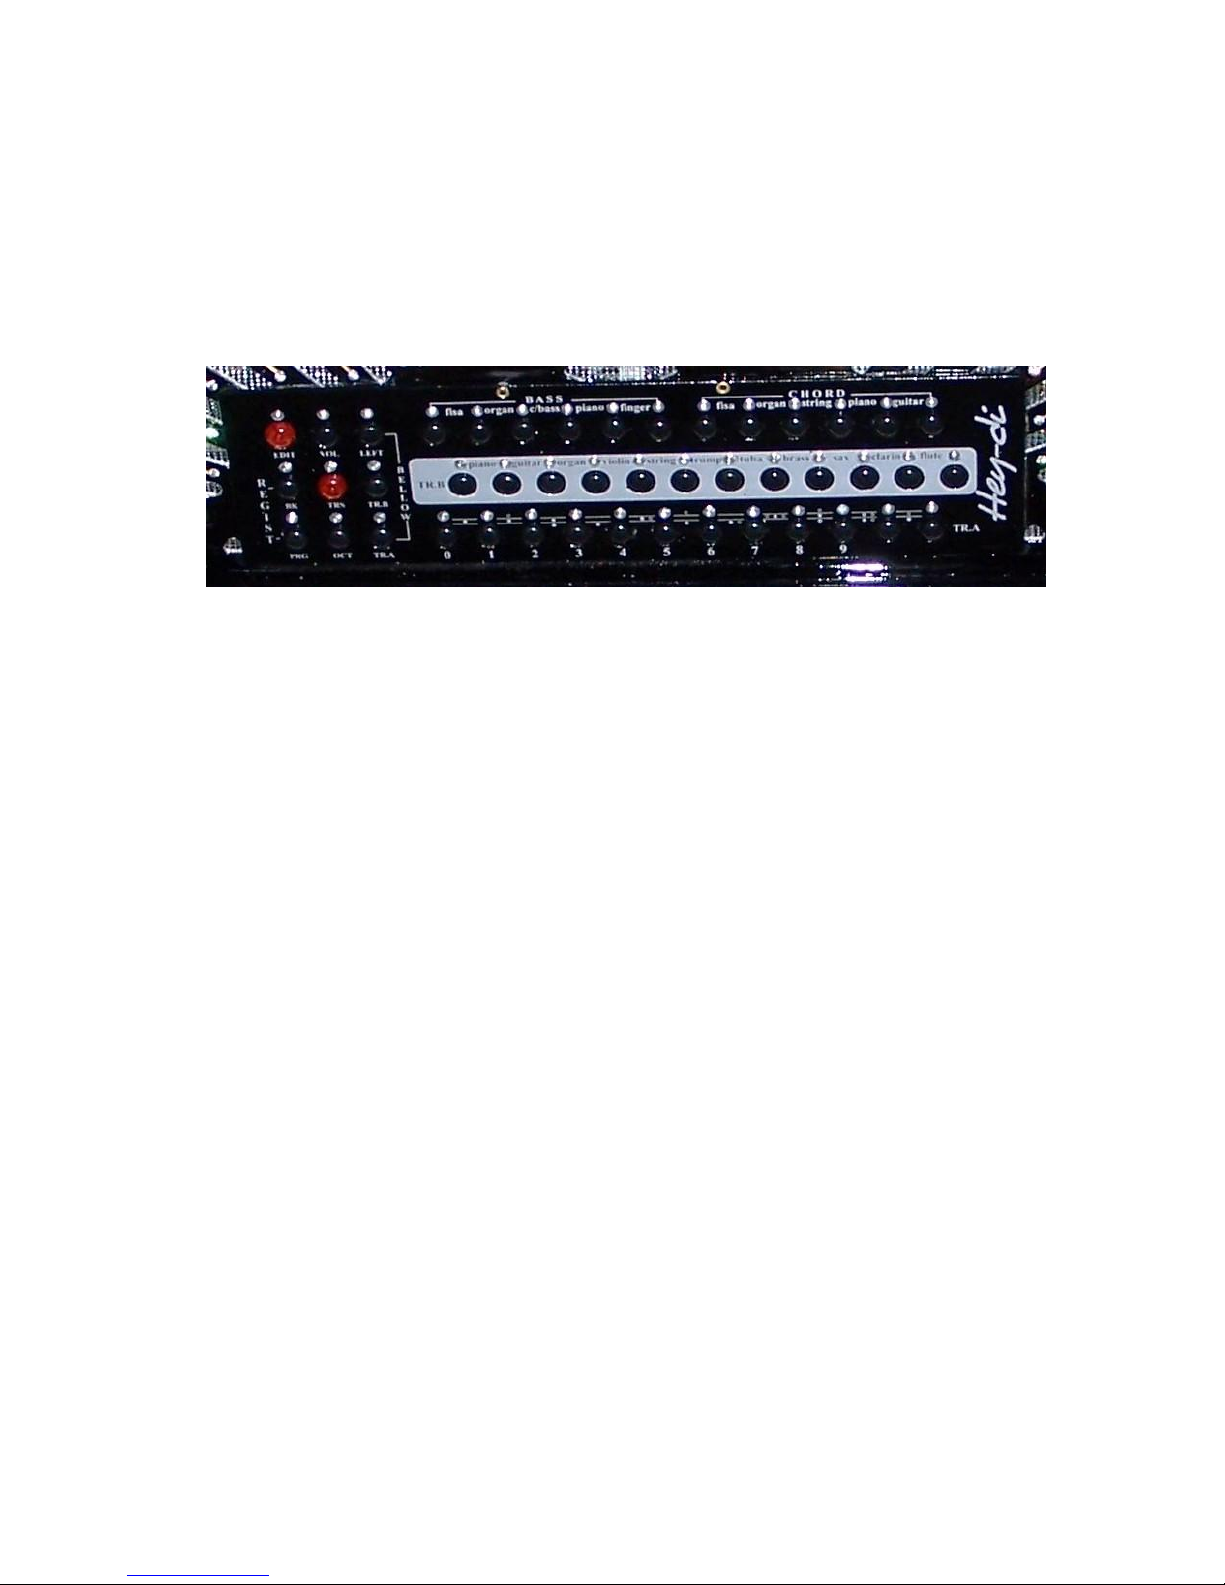
Siwa & Figli Hey-di MIDI Controller
GENERAL CHARACTERISTICS
The Hey-di MIDI controller offers 4 independent and polyphonic sections as
described below.
Treble A –This section is used exclusively to access the internal sounds of the
instrument. It consists of 12 buttons that can recall 12 user programmable
presets and additional 11 factory set (in a ROM) sounds. To access the factory
presets, please press 2 adjacent buttons simultaneously. The 2 corresponding
LEDs will light up.
Treble B –This section could be configured upon initial power up to either control
an external MIDI module or to access the internal sound card. The default state
is access to the internal sound card. The 12 buttons allow access to 12 user-
defined orchestral sounds or to 11 factory presets (press 2 adjacent buttons
simultaneously).
BASS –Controls the bass section of the accordion. Can be used to access both
the internal sound card and an external (optional) MIDI arranger. There are 6
programmable presets and 5 factory settings. To access the factory presets,
please press 2 adjacent buttons simultaneously.
CHORD –This section is for the chord buttons of the accordion. It can access
simultaneously the internal sound card and an optional external MIDI module.
There are 6 programmable presets and 5 factory settings. To access the factory
presets, please press 2 adjacent buttons simultaneously.

2
FUNCTION COMMANDS
VOLUME: To adjust the volume, press the Volume button. The current volume
level for each section will be shown by a certain number of LEDs that will light
up. (Often when bellows dynamics is activated the volume is set to its maximum
level corresponding to all LED for the particular section switching on upon
pressing “Volume”.) There are 6 levels for volume adjustment of the bass and
chord channels and 12 levels for adjustment of the 2 treble channels. For
example, if you would like to decrease the volume of Treble B from its current
level of 12 in increments of 1, press buttons 11, 10, 9, 8 etc. from the
corresponding Tr. B section until you achieve the desired volume level. At the
end, press Volume again.
OCTAVE regulates the octaves of any section. Press OCT to display the current
state of all sections through the first 3 LEDs in each section:
Led 1: low octave
Led 2: central octave
Led 3: high octave
To modify the octave of a particular section press the button which corresponds
to the wanted octave and press OCT again to exit.
TRASPOSE transposes the instrument into any desired key. Press TRS followed
by pressing the desired key on the treble side. For example, if you would like to
play a song in the key of C and prefer the instrument to sound in the key of D#
(electronic sounds only) press TRS and the D# key in the middle of the
keyboard. The default setting (matching the reeds) is middle C on the keyboard.
BELLOW –To activate bellows dynamics (volume control through bellows
pressure) for more natural expression effects press the corresponding button
from the “BELLOW” group on the grill controller. (Tr. A, Tr. B, LEFT). The
bellows dynamics is active when the corresponding LED is lit up.

3
PROGRAMMING
The accordion has been pre-programmed to allow access to the most popular
orchestral sounds. However, the user could change the presets except for the ROM
settings. The general sequence is given below. Particular examples will be provided
as needed.
Press the button you want to programme in every section.
Press EDIT. The LED for the selected button to be programmed will begin to
flash.
Press BANK (BK).
Select the bank number with the numeric buttons of treble A (0-9). Use a 3-
digit format, for example “0” is entered as “000”, “11” is entered as “011” etc.
Press PROGRAME (PRG).
Select the program number with the numeric buttons of treble A (0-9). Use a
3-digit format, for example “0” is entered as “000”, “11” is entered as “011”
etc.
If desired, it’s possible to select bellows expression, the octave, or to adjust
the volume.
Press EDIT again to save the new setting. The LED for the selected button to
be programmed will stop blinking and the changes have been saved.
PROGRAMMING OF THE REGISTRATIONS
Press together BK and PRG to access the registration function.
Choose one of the 12 presets of Treble A where you wish to save the registration.
Press EDIT (EDT).
Assign the desired sounds to each section. You can select from the pre-
programmed sounds by pressing the corresponding buttons from Tr. A, Tr. B,
Bass, and Chord sections. At this time one can also set the volume, octave, and
bellows dynamics.
Press EDT to save the new registration.
Examples:
1. To disable bellows dynamics on a particular program or registration.
-Select the desired program or registration through one of the presets.
-Press EDIT.
-Disable bellows dynamics for any or all of the sections by pressing the
corresponding button(s) from the BELLOW section.
-Press EDIT again to save the changes
2. To modify any of the existing presets.
-Select the preset
-Press EDIT
-Make all necessary changes to Volume, Octave, Sounds etc as already
explained above
-Press EDIT to save the changes

4
DIRECT RECALL OF THE SOUNDS
The Treble A section can be used to recall any of the built-in sounds using the
assigned bank / program number. This feature is very useful if you would like to explore
the huge content of the sound library as well as to custom-program the MIDI controller.
Select the memory bank to which you would like to assign a particular sound or
effect from the Hey-di Sounds Library. This could be any button from Tr. A, Tr.
B, Bass, or Chords sections. For example, just for the sake of exploring the
system let’s select/press the first button (labelled 0) from Treble-A. After pressing
the EDIT the corresponding LED for button 0 from Treble-A will start blinking.
Select the bank number by pressing BK and then the number using treble A
keypad. Use a 3-digit format, i.e. “0” is entered as “000”, “11” is entered as
“011” etc.
Press PRG, then use the numeric keypad (0-9) of the treble A section to select
the program number. Use a 3-digit format, for example “0” is entered as “000”,
“11” is entered as “011” etc.
Example: If you need a Hammond Jimmy Smith sound, find it in the Hey-di Sounds
Library. It is in Bank 1 under number 33.
-Press button 0 on Treble-A section.
-Press EDIT. The LED for button 0 of Treble-A will start blinking.
-Press BK.
-With the buttons from Treble-A select the Bank Number, in this case 001.
-Press PRG.
-Using the Treble-A keypad enter the Program Change (PC) number, 033.
At this time you can play the Jimmy Smith Hammond organ sound on the accordion
keyboard. (If we had selected a button from the Bass section in the beginning of this
example, the Jimmy Smith Hammond organ sound would have been assigned to the
bass section and played with bass and counter-bass buttons of the accordion.)
Please, note the LED for button 0 of Treble-A is still blinking. If you like to store
the new sound to this location press EDIT. The LED will stop blinking and the
change has been saved. If you don’t want to change the original assignment of
button 0, then simply press any other button from Treble-A and then press EDIT.
Nothing has been changed. You simply tried one of the available sounds from
the library.
REAL TIME USE OF THE REGISTRATIONS (USER DEFINED)
The Hey-di controller comes with 12 pre-programmed registrations that can be changed
by the user as described earlier. A registration is a complete set of MIDI parameters
including the sounds assigned to each section, corresponding volume, octave, and
special effects (like bellows dynamics). To use any of the current registrations:
Press together BK and PRG to access the registration function.
Choose one of the 12 buttons (presets) of Treble A. Note that the content of each
preset will be shown by the state of the LEDs in each section.

5
POWER-UP SEQUENCES FOR ACCESS TO SOME SPECIAL FUNCTIONS
The Hei-di MIDI controller combined with the built-in sound card is a user friendly
system that allows access to more than a hundred orchestral sounds without the need
to carry an external MIDI module. The MIDI accordion is ready for use by simply
connecting all cables and powering up the system.
Some global parameters can be accessed and changed during initial powering up of the
system as described below.
1. Assignment of the transmission midi channels
Press and hold button number 0 (the first one) from the treble A section while powering
up the system. After initialization the grill MIDI controller will have one LED on in each
section. This represents the current transmission MIDI channel for that section. Treble
A and Treble B sections can be assigned to channels 1-12. Bass and Chord sections
can be assigned to channels 1-6.
The default MIDI channels are:
-Treble A = 4 (or 12 on Ver.2)
-Treble B = 1 (or 11 on Ver.2)
-Chord = 2 (the LED for the second button in the chords section is ON)
-Bass = 3 (the LED for the third button in the bass section is ON)
If you have MIDI controller Version 2 (Treble A set to channel 12 and Treble B set to
channel 11) and would like to use the accordion with an external MIDI module, change
the Treble-B transmission channel from 11 to 1 by pressing the first button from Tr-B
group. Press EDIT to exit.
If you have Ver. 1 MIDI controller (Treble A assigned to channel 4 and Treble B to
channel 1), please read below how to use the instrument with external MIDI module.
Before making any changes to the default MIDI channels, please record the current
settings. The default channels match the default receiving channels of all MIDI
expanders. We don’t recommend changing the transmission channels for Bass and
Chord sections since then you will not be able to access the internal sound card. If
you still need to match these channels with your external MIDI module, please
consider making the change on the external MIDI module receiving side.
2. General reset of the instrument –restores the factory state of all parameters. Any
custom user presets that you have saved will be lost.
Press and hold button number 1 (the second one) from the treble A section while
powering up the system.
3. Reverberation and Chorus effects.
Press and hold button number 2 (the third one) from the treble A section while
powering up the system to disable the effect. Repeat the procedure to enable them.
4. Bellows dynamics.
Press and hold button number 3 (the fourth one) from the treble A section while
powering up the system to disable the bellows dynamics. To enable, repeat the power-
up sequence. The bellows dynamics could be disabled/enabled in real time for any
channel from the BELLOW controls on the grill controller

6
5. Toggle Treble B section between the internal sound card and an external MIDI
module. Please, note this is only needed for MIDI controller Version 1 (Treble-A
assigned to channel 4 and Treble-B assigned to channel 1). You can check the
channel assignment as described in section 1 above.
In the default state of the instrument both Tr-A abd Tr-B sections access the internal
sound card. If you would like to use the accordion with external MIDI module you can
assign Tr-B section to MIDI Output 2 of the power supply box. Press and hold button
number 4 (the fifth one) from the treble A section while powering up the system.
Repeat the procedure to reassign treble B section to the internal sound card.
By default treble B section is assigned to the internal sound card.
Button 5: Separates the treble A and treble B outputs to different audio channels
for stereo effect.

7
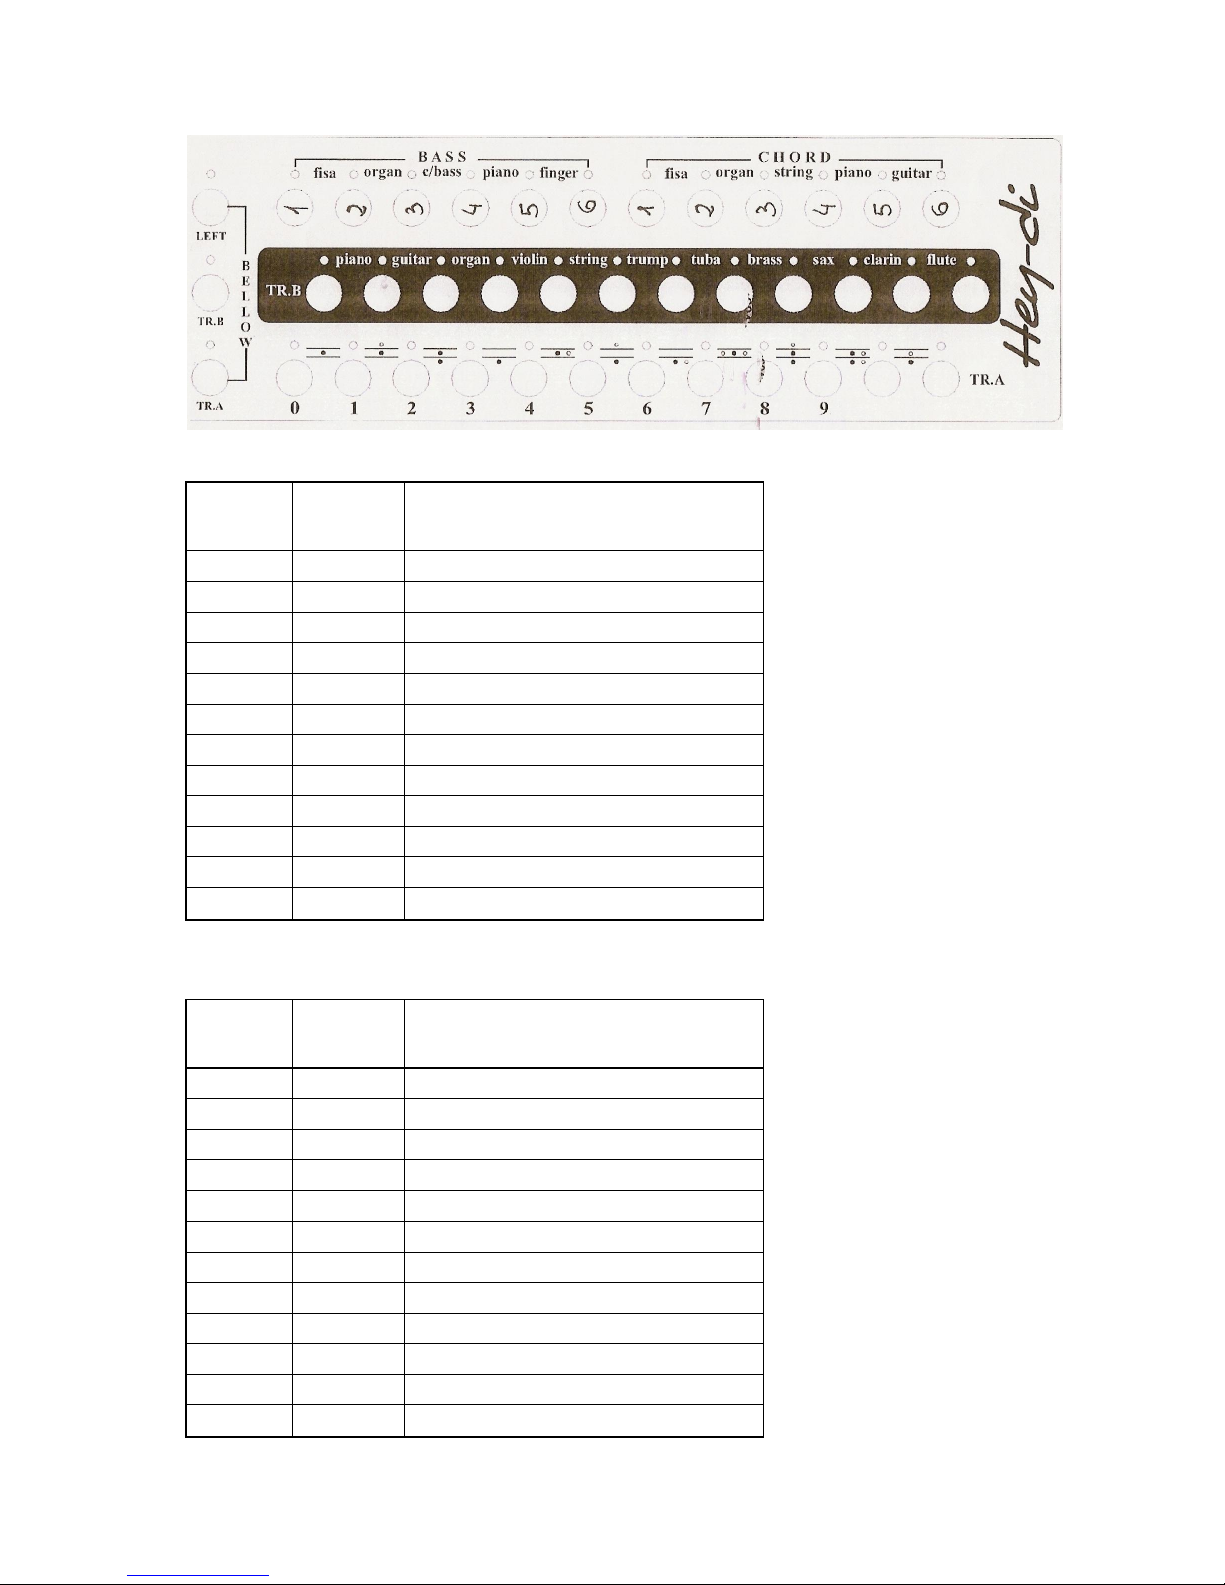
Figure 1: Hey-di Grill Controller
Table 1: Bass Section User Presets
Preset
Number
Bank /
Program
Program Change Name
1
8 / 39
Synth Bass 2
2
8 / 36
Slap Bass 1
3
0 / 97
Double Bass + Ride
4
0 / 98
Double Bass + Tamburine
5
0 / 99
Double Bass + HH Open
6
8 / 34
Double Bass - Pick
Table 2: Chords Section User Presets
Preset
Number
Bank /
Program
Program Change Name
1
8 / 39
Synth Bass 2
2
8 / 36
Slap Bass 1
3
0 / 77
Guitar
4
0 / 81
Guitar + HH
5
0 / 78
Guitar + Strings
6
8 / 76
Guitar + Tamburine
8
Table 3: Treble A Section User Presets
Preset
Number
Bank /
Program
Program Change Name
0
11 / 7
Accordion Flute 8'
1
0 / 26
Accordion Espana
2
11 / 10
Accordion Oboe 8' + 4'
3
11 / 1
Accordion Bassoon 16'
4
11 / 33
Accordion French Tremolo
5
0 / 12
Accordion Master
6
0 / 19
Acc. Jazz + Bass + Vibes
7
0 / 2
Accordion Violin
8
11 / 65
Accordion + Mandolin
9
2 / 95
8' + 8' + 8' Scozia
10
1 / 7
Acc. French Tremolo + Organ
11
2 / 63
16' + 16' + 8"
Table 4: Treble B Section User Presets
Preset
Number
Bank /
Program
Program Change Name
0
0 / 61
Piano + Strings
1
0 / 54
Guitar + Voice
2
0 / 44
Theather Organ
3
0 / 48
Soft Sax
4
0 / 57
Mandolin
5
1 / 63
Tromba
6
1 / 69
Tromboe + Strings
7
1 / 85
Brass 1
8
0 / 49
Soft Sax + Strings
9
1 / 73
Sax Tenor
10
1 / 89
Bagpipe
11
8 / 104
Sitar Cimbalo

9
User Registrations
Please, note that in the above table the numbers indicate the buttons number from each
section as counted from 1. For example the button from Treble Section A labeled “0” I s
referred to as “1”. The preset number 12 can be also written as:
Treble A: Not Used
Treble B: Guitar + Voice (see Table 4)
Bass: Guitar (see Table 1)
Chord: Guitar (see Figure 1)
PACKAGE CONTENT
The following components are included with the instrument:
Power supply box (also used as a sound generator)
Multi-pin data cable which connects the accordion to the power supply
Transformer with a power cable that plugs to a standard wall outlet
Power cable connecting the power supply to the transformer box
Stereo audio cable to send the output of the internal sound card to an amplifier
Mono audio cable for built-in microphones (can be used independent from the
MIDI)
Travel bag for the accessories
Optional accessories (not provided)
-Volume pedal
-Head phones
-Foot switch board
Table of contents
Popular Recording Equipment manuals by other brands


PRESONUS
PRESONUS FIRESTUDIO TUBE Connection instruction

Honeywell
Honeywell Farenhyt Series Installation and maintenance instructions

Vidicode
Vidicode V-Tap VoIP manual

Furuno
Furuno IF-2550 installation guide

Behringer
Behringer AES8024 installation guide

Dedicated Micros
Dedicated Micros DV-IP HD Installation and operation guide