Wet & Dry Vacuum cleaner 1160
INTRODUCTION
• This appliance is intended for the collection and
vacuuming of non-ammable liquids as well as dry
materials and is intended for domestic use only
• Read this instruction manual carefully before use and
save it for future reference 2
• Check whether the packaging contains all parts as
illustrated in drawing 4
• When parts are missing or damaged, please contact
your dealer
TECHNICAL SPECIFICATIONS 1
APPLIANCE ELEMENTS 4
ALocking latch (2)
BMotor head
CContainer
DCaster (4)
E Dust lter
FVacuum hose
GHose connection
HExtension tube
JFloor brush nozzle
KRound brush nozzle
LCrevice nozzle
M On/o switch
N Foam sleeve lter
PVentilation slots
SAFETY
ELECTRICAL SAFETY
• Always check that the supply voltage is the same as the
voltage indicated on the nameplate of the appliance
(appliances with a rating of 230V or 240V can also be
connected to a 220V supply)
• Connect this earthed appliance only to a properly earthed
power supply system; ensure that socket and extension
cable have a functional protective conductor
• When operating the appliance in damp environments,
use a residual current device (RCD) with a triggering
current of 30 mA maximum
• Always disconnect plug from power source during work
breaks, when not in use or when working on the
appliance (e.g. changing/cleaning lters), in order to
prevent accidental starting
• Switch o the appliance before disconnecting the plug
• Do not use the appliance when the power supply cable,
plug or switch is damaged
• If the power supply cable is damaged while working, do
not touch it, but immediately disconnect the plug
• Do not drive over, crush or stretch the power supply cable
• Do not pull the power supply cable to disconnect the plug
or to move the appliance
• A damaged power cord shall be replaced at a SKIL
service centre only in order to avoid a hazard
EXPLANATION OF SYMBOLS ON TOOL
2Read the instruction manual before use
3Double insulation (no earth wire required)
When servicing use only identical replacement parts
PERSONAL SAFETY
• This appliance is not intended for use by persons
(including children) with reduced physical, sensory or
mental capabilities, or lack of experience and knowledge,
unless they have been given supervision or instruction
concerning use of the appliance by a person responsible
for their safety
• Ensure that children do not play with the appliance
• Never vacuum materials that contain asbestos
(asbestos is considered carcinogenic)
• Donotvacuuminflammableorexplosivefluids
(such as gasoline, oil, alcohol, solvents)
• Donotvacuumexplosivedusts(suchascoaldust,
magnesiumdust,graindust)
• Donotvacuumtoxicmaterials
• Nevervacuumhotashesorpointed/sharpobjects
• Donotoperatetheapplianceinroomswherethe
dangerofanexplosionexists
• Provide for good ventilation at the working place
• Never operate the appliance without the necessary lters
as described in this manual
• Do not leave the appliance unattended when plugged in
• Use extra care when cleaning on stairs
• Regularly check the proper condition of the vacuum hose
(when doing so leave the vacuum hose mounted to
prevent dust from coming out)
• Keep the ventilation slots uncovered during vacuuming
WHEN CONNECTING NEW 3-PIN PLUG (U.K. ONLY):
• Do not connect the blue (= neutral) or brown (= live) wire
in the cord of this tool to the earth terminal of the plug
• If for any reason the old plug is cut o the cord of this tool,
it must be disposed of safely and not left unattended
USE
BEFORE USE
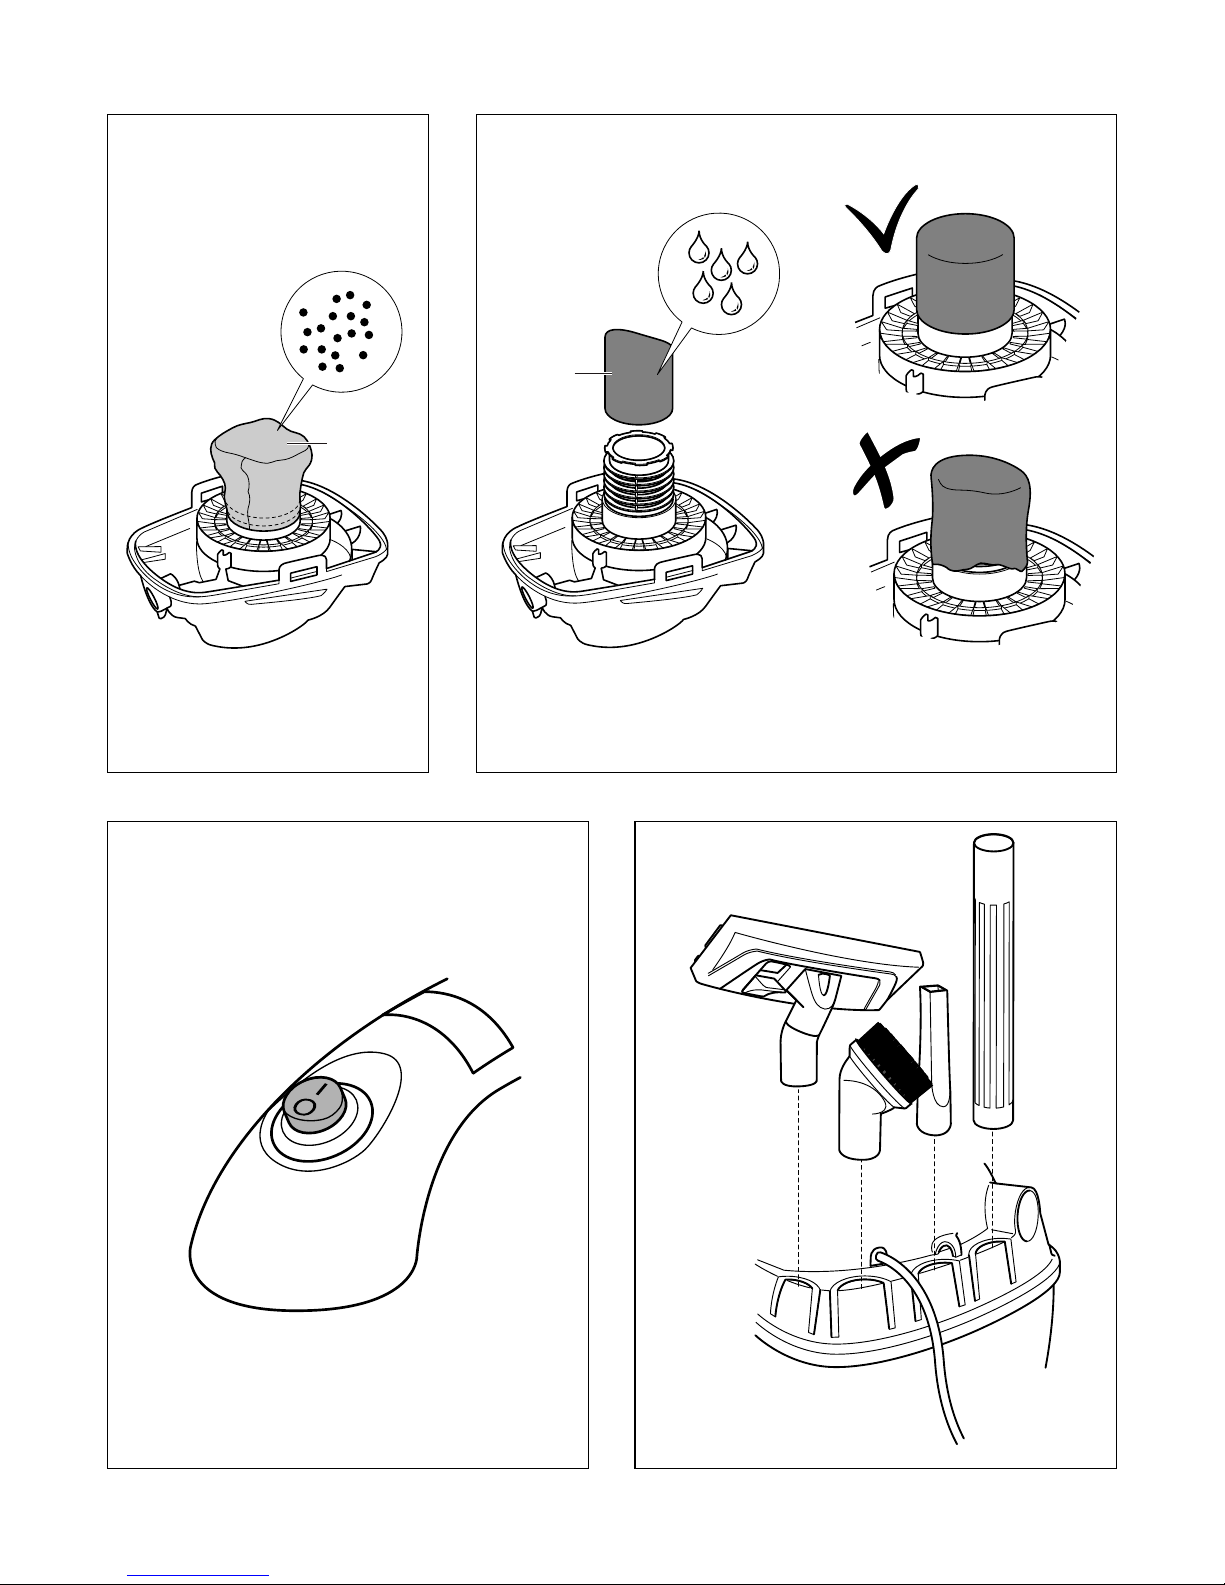
• Assembly 45
! ensurethattheplugisdisconnectedfromthe
powersourcebeforeassemblingtheappliance
- unlock latches A and lift motor head B o container C
- remove contents from container and turn it upside down
- mount 4 casters D as illustrated
- place motor head back onto container and secure it
into place by using both latches A
- mount vacuum hose F onto hose connection G and
screw it into place
- connect extension tube H to the vacuum hose
- mount desired nozzle J, K or L onto suction tube
• Dry vacuum cleaning 6
! ensurethatallinformationmentionedinthe
chapter“SAFETY”isreadandunderstood
! informyourselfbeforehandaboutthehandlingof
materialsthatarehazardoustoone’shealth
- the appliance is ready for dry vacuum cleaning with
dust lter E pre-installed
- verify that dust lter E is securely mounted
- ensure that container C 4is emptied and clean