SKiVE V9 User manual

User Manual

Please keep the User Manual in a proper
place for future reference
IMPORTANT SAFETY INSTRUCTIONS ---------------------------1-3
STRUCTURE AND FUNCTION----------------------------------------3-7
OPERATE STEPS--------------------------------------------------------7-10
VACUUM SEALER OPTIMAL OPERATE GUIDELINE--------11-12
TROUBLE SHOOTING------------------------------------------------12-13
REPAIR AND MAINTENANCE-------------------------------------------14
FOOD VACUUM PRESERVATION COMPARISON GUIDE------15
PACKAGING LIST-----------------------------------------------------------15
SPECIFICATIONS-----------------------------------------------------------16
ENVIRONMENT FRIENDLY DISPOSAL------------------------------17
.
CONTENTS

1
IMPORTANT SAFETY INSTRUCTIONS
Read and understand all instructions before using this product,and
follow all warnings and cautions as below.
W
CAUTION
1.This product is designed for household use only.
2.The use of different power sources is prohibited.
3.This product is not suitable for children or people who do not know how
to operate. Please keep it out of reach of children.
4.If there is any damage to the machine body or power line, please stop
using it immediately and replace it with professional personnel.
5.Please do not try to repair the machine by yourself. If you need to
repair it, please send it to the corresponding after-sales service center
and leave it to the professional.
6.Stay away from hot gas, heating oven,electric heater and any high
temperature, do not use in humid or high temperature environment.
7.When using machine to plug power,be sure to be safe and keep your
hands dry.
8.It is recommended that the extension cord should not be used. If not,
please match the extension cord with various technical indicators.
9.When the machine is working,keep it in a flat,firm,and heat-resistant
surface. Please be careful not to tip over.
10.It is not recommended to use non-designated bags or accessories.
It is not recommended to use the device for other purposes other than
functions.
ARNING

11.Do not touch the sealing tape on the machine to prevent scalding.
12.Any part of the machine including the power cord or plug can immerse
in the liquid, the power cord and plug must be kept dry, such as wet in
use, should wear insulating gloves unplug the power supply, it is
prohibited to use before the water is not completely dry.
13.This product does not require any lubricant or lubricating oil, and is
prohibited to use organic solvent for wiping.
14.Users shall not leave the product during the power supply.
15.When the machine is not in use for a long time, disconnect the power
cord and cut off the power supply.
16.It's suggested that customer put the support card back into the
vacuum chamber after using the machine. Please keep the machine
cover unlock to prevent compression deformation to the sealing gaskets.
This will help to keep good vacuum effect.
17.Avoid the following: when transporting machine pulling the power
cord, strong pulling stuck the main power cord, take the power cord
when the handle, the sharp edges on the power cord wrapped around
the object, hold the power cord directly pull off the plug, in the case of
wires or plugs is wet operating the machine.
2
PLACEMENT PROBLEM
When using, be sure to place this product on a flat, stable, heat-resistant
workbench. Do not use it outdoors or near water.
Warning: Do not place the vacuum sealer on a metal tray or metal
surface while it is in use.

3
LIMITATION OF LIABILITY
All technical information, data, and instructions contained in this manual
regarding installation, connection, and operation are consistent with the
latest information we obtain at the time of printing and take into
consideration our previous experience and technology.
The manufacturer assumes no responsibility for damage resulting from
non-compliance with this instruction manual, improper use, unqualified
repairs, unauthorized modification or use of unapproved replacement parts.
Note: When using the product for the first time, remove all internal and
external packaging, protective film and accessories.
A. Sealing silicone strip
B. Vacuum sealer Gaskets
C. Open button
D. Cutter Button
E.Vacuum key
F. Seal key
G. Food key
H. Vac Seal key/Cancel Key
I. Slide Cutter
J. Vacuum chamber
K. Vacuum sealing strip
L. Vacuum hole
A
B
C
D
E F G I
J K
H
L
STRUCTURE AND FUNCTION

4
BUTTON
Vacuum
Press to only vacuum package
SEAL
Press this button in standby mode to achieve a separate sealing function.
FOOD
Dry-For vacuum sealing of dry foods, touch this button.
Moist-For vacuum sealing of wet foods, touch this button.
VAC SEAL /CANCEL
Vac Seal-When this button is pressed in the standby mode, the
machine will perform a vacuum and automatically heat seal after this
action is completed.
Cancel-One-touch stop function when any function is performed.
Safety Protection:
When the Vacuum Seal or Seal indicator flashes, it means the appliance
start the Safety Protection and forced to stop for 2 minutes before it can
resume normal use.

5
VACUUM STRUCTURE
Vacuum sealer gaskets
After the upper cover and the base are buckled together, the upper
and lower Vacuum sealer gaskets fit together to form a vacuum
chamber.
If you need to remove the vacuum sealer gaskets for installation and
cleaning, be careful not to distort or damage it.
Vacuum chamber
Place opening end of the vacuum bag into the vacuum chamber,after
the upper and lower Vacuum Sealing strip fit together to form a vacuum
chamber, when the vacuum operation is performed, the air in the bag
is drawn out.
Food residue,dust and other fines will be pumped out and concentrated
at the bottom of the vacuum chamber, please pay attention to cleaning
in time.
Heat sealing strip
When sealing work,this part is in high temperature heat to seals the
vacuum bag together with the sealing silicone strip.
Do not touch it with your hands to avoid burns.
Sealing strip
When the lid is closed,it fits with the heat sealing strip and completes
the function of sealing the bag together with the heat sealing strip.
SEALING STRUCTURE

6
Vacuum pipe
Equipped with one vacuum pipes for external pumping, it is suitable
for most vacuum canister and bags as well as wine bottles on the
market.
After inserting matching end of the outer suction tube to the vacuum
hole, connect it to the container to be evacuated.
Press the vacuum button to start the vacuum.
After the vacuum is completed, it can be automatically stopped or
pressed again to manually stop the evacuation.
External vacuum function
Cutter
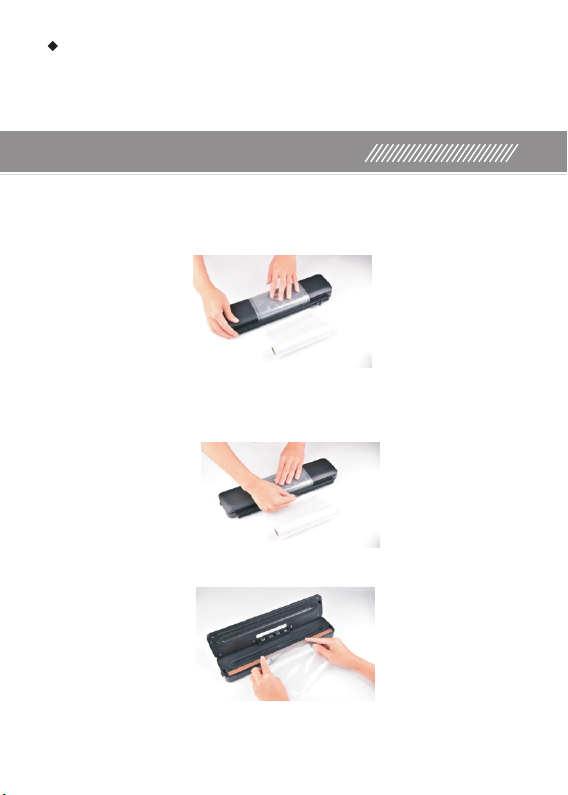
Operate: Open one end of the roll cutter,put the vacuum bag roll
between the roll cutter and appliance.Hold the bag with your left hand,
and slide the cutter button from left to right with your right hand to get
a bag with open. Close and lock the lid,please make sure lid is well
closed. Then press seal button,when Seal Indicator Light turns off,
unlock the lid and remove bag.The bag with an open end is
completed.
CUTTER
COVER LOCK
Buckle
For locking the cover and the base, hold the vacuum bag in tight.
Close the upper and lower covers, and use your hands to press down
on the lock position of the cover to lock it.It is advisable to close the
lid only and keep it unlock when not in use.
Vacuum hole and switch
7
Cover open button
Press the buttons on both sides at the same time to unlock the locked
upper and lower covers.
OPERATE STEPS
BAG MAKING STEP
1.Open one end of the roll cutter, put the vacuum bag roll between the
roll cutter and appliance.
2.Hold the bag with your left hand, and slide the cutter button from left to
right with your right hand to get a bag with open ends.
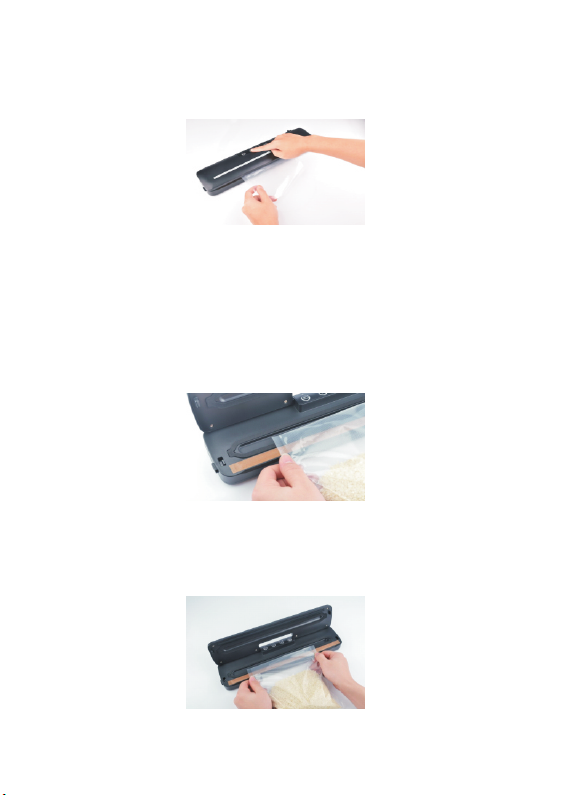
3.Open appliance lid and place one end of the bag across sealing strip.
8
4.Close and lock the lid, please make sure lid is well closed. Then press
seal button,when Seal Indicator Light turns off, unlock the lid and remove
bag.Now you are ready to vacuum package with your new bag.
VACUUM & SEALING BAG STEP
1.Take out a piece of bag (or make a piece of bag according to the
method described above), put the food that needs to be packaged into
the bag, and ensure that there is at least 7 cm gap between the food
and the bag mouth.
2.Open the lid, pull the open end of the vacuum bag with both hands,
and place the curling direction downwards in the vacuum chamber.
Note: Keep the bag straight

9
3.Close the lid and lock both sides. Select Dry/Moist mode. Press the
‘Food’ button to switch.
The position where the blue light is on is the current mode.Press Vacuum
Seal button to begin vacuum and sealing process. Appliance will
automatically complete the full process.
Note: The machine defaults to the "dry" mode. For wet food, switch to
moist mode.
4.When Vac Seal Indicator Light turns off, unlock, lift the lid and remove
bag. Refrigerate or freeze if needed.
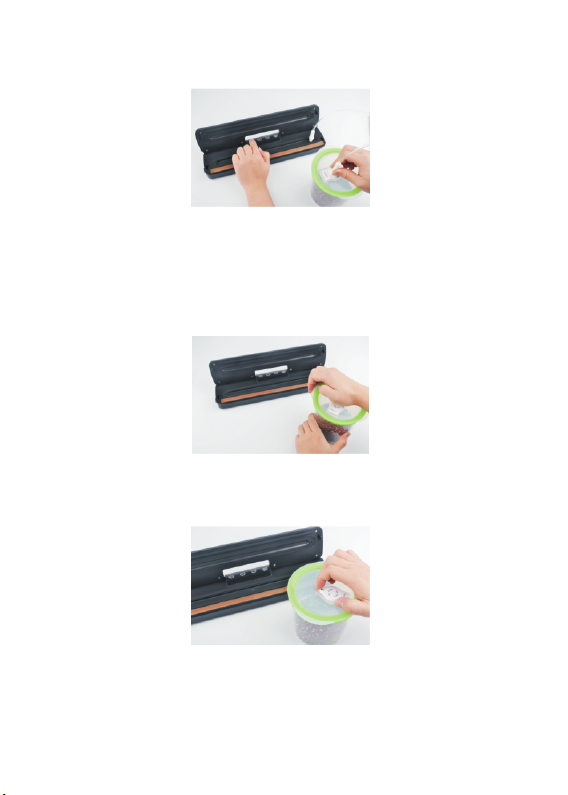
VACUUM CANISTER STEP
1.Wipe the vacuum container clean and keep it dry. Put the item into it.
Do not put it too full and cover it. Open the upper cover and locate the
vacuum hole on the right side of the vacuum chamber. Insert the two
ends of the suction tube into the vacuum hole on the machine and
canister lid.
If you want to stop the running halfway, press the switch button again
to cancel vacuum.
1
4.To release the vacuum in the Container,simply lifting the Vacuum
Valve gently.
0
2.After ensuring that there is no air leakage between the lid and the
3.After the vacuum is completed, remove the pipe. now the lid can't be
opened,which means the air was removed from the container.
container, press the vacuum button of the start external pumping.

11
VACUUM SEALER OPTIMAL OPERATE GUIDELINE
1.Don’t put too many items in bag so that the open end of bag can be
placed in the vacuum chamber. It is suggested that there be at least 7cm
gap between food and the open end.
2.Ensure that the vacuum bag is dry at the opening, otherwise it is
difficult to seal. If the food has moisture, you can choose “Moist” mode,
which will delay sealing time and the effect will be better.
3.Before packaging, please clean and straighten the mouth of the bag
to ensure that no foreign matter is caught in the seal. Do not allow the
bag to wrinkle when vacuuming. Do not let outside hard objects wipe
the bag.
4.Before the vacuum is drawn, press the bag to discharge part of the
air, which will reduce the evacuation load of the machine.
5.For items packed in vacuum storage bags, if there are sharp bones
resembling fish bones, apply a thorn-proof package and insert in a
vacuum bag to vacuum seal.
6.Vacuum sealing is not a substitute for the canning process. Perishables
still need to be refrigerated or frozen after vacuum sealing.
7.During the vacuum sealing process, if a small amount of liquid or
debris in the packaging bag is accidentally pumped into the vacuum
chamber, this may cause problems with plugging the vacuum pump and
damaging the appliance. To avoid this, fold some paper towels in the
vacuum chamber.
8.Fresh fruits and vegetables are not suitable for vacuum preservation
at room temperature. Because fresh fruits and vegetables have a
respiration effect, they will release heat and make them easy to grow.
It is recommended that such items be packed in a vacuum container
and placed in a refrigerator for optimal preservation.

12
Check whether the power supply is plugged in, whether the power
plug is in good contact with the power socket, and ensure that the
outlet power is normal.
TROUBLE SHOOTING
Check the power cord for damage.
Check if the sealing edge is reached on the other side of the
sealing cavity, the sealing line is straight and wrinkle-free.
Make sure that the open end of bag is put into the vacuum
chamber and there is 7cm gap between bag mouth and food in
the bag. Place the curling direction downwards.
Check whether bag mouth that protrudes into the vacuum chamber
is wrinkled. To avoid wrinkling, pull both ends of the bag with your
hands to make the bag straight.
Vacuum sealer does not respond
Vacuum pump is running but it cannot vacuum
9.Do not create your own side seams for a Vacuum bag. These bags
are manufactured with a special side seam,which is sealed all the way
to the outer edge.
10.Perishable foods are generally frozen or refrigerated, and their shelf
life can be extended after vacuum packaging, but they cannot be
guaranteed to be permanent。
11.Fill the vacuum bag with 2/3 of water, seal it alone (do not empty it),
and then freeze it for a period of time. Use it in an ice bucket or as an
ice cube to treat wounds.
12.Many foods such as cheese and cooked food are packaged in
commercial bags. When they are opened, they can be stored in a
vacuum bag to seal them.

13
Check whether the bag is wrinkled or damaged. If there is foreign
matter in the bag mouth, it will cause the bag to leak; open the bag,
wipe the port part, and flatten the bag to ensure that there is no
wrinkle or damage and then vacuum sealing operation.
If the heat wire is too hot for continuous use that is too dense,
please stop for 20 seconds until the heating element cools.
Remove it, clean it and reinstall it or replace it.
Sealing line is hot and melted
Vacuum Sealing Gasket is loosed or broken
The machine can’t seal after vacuum
Leakage or swelling bag after vacuum encapsulation
Check the vacuum bag for any damage resulting in air leakage;
whether the bag is properly placed in the vacuum chamber; whether
the sealant strip and the upper and lower vacuum cotton are
covered; remove the sealant strip and the upper and lower vacuum
cotton shield. And put it in the correct position to operate again.
Make sure that the sealing strip and the silicone strip are not
deformed or damaged.
If the package contains a small amount of liquid food, adjust the
mode to the “Moist” position. A lot of liquid or pure liquid, please
freeze into a solid before sealing.

The used vacuum bag can be cleaned with warm water and proper
amount of detergent, rinsed with clean water, dried and used again.
Turn the inner layer of the bag inside out and wash it on the top of
the dishwasher
14
.
The used vacuum canister can be cleaned with warm water and
proper amount of detergent, rinsed with clean water, dried and u
sed again.
For safety reasons, the container should be placed on the top of
the dishwasher, but the lid should be wiped with a rag.
Before opening the container, you should find the deflation device
on the lid, dial or press so that the air will enter the container before
opening. Do not use force to open the container to avoid reducing
the service life.
Vacuum bag
Vacuum canister
Before cleaning the machine, make sure that the machine is
powered off.
No part of the machine can be soaked in liquid for cleaning.
Do not scrub the body with a brush so as not to scratch the
surface of the body.
Do not allow the sharp objects to touch the shell so as not to
scratch the surface and affect the appearance.
After the product cools, wipe the surface of the product and the
vacuum chamber with a damp sponge or a damp cloth.
Wipe the food residue or liquid in the vacuum chamber with a
paper towel or rag to prevent odor.
Make sure to use the product after thoroughly drying the inside
and outside of the body.
Machine
REPAIR AND MAINTENANCE

15
Storage
FOOD VACUUM PRESERVATION COMPARISON GUIDE
method T
Food category emperature Conventional
storage
Vacuum
storage
Refrigeration
Fresh raw meat 5±3℃2~3 days 8~9 days
Fresh seafood 5±3℃1~3 days 4~5 days
Cooked meat 5±3℃4~6 days 10~14 days
Vegetables 5±3℃3~5 days 7~10 days
Fruit 5±3℃5~7 days 14~20 days
Eggs 5±3℃10~15 days 30~50 days
Freezing
Meat -16~20℃3~5 months 12 months
Fish -16~20℃3~5 months 12 months
Seafood -16~20℃3~5 months 12 months
Conventional
Bread 25±2℃1~2 days 6~8 days
Cookies 25±2℃4~6 months 12 months
Rice/Flour 25±2℃3~5 months 12 months
Peanuts/Beans 25±2℃3~6 months 12 months
Drug 25±2℃3~6 months 12 months
Tea 25±2℃5~6 months 12 months
PACKAGING LIST
Item 12 3
Name Vacuum
sealer
Operating
manual
Slide
Cutter
Quantity 1 1 1
4 5
Vacuum
pipe
Packaging
bag
11
16
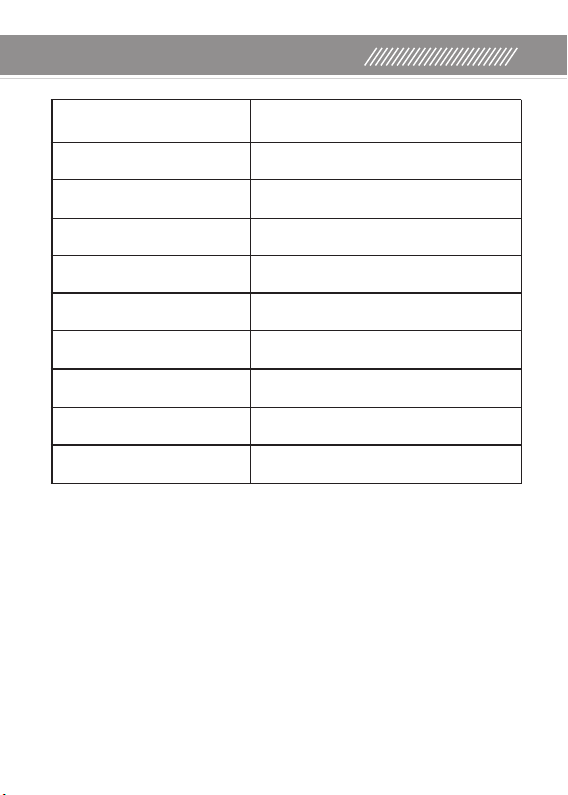
SPECIFICATIONS
Rated voltage
Rated power
Vacuum degree
Max sealing width
Suction value
Noise level
Sealing line width
Safety Protection
Product Size
Product Weight
110-120V 50 Hz/60 Hz
100 W
-55Kpa~ -60Kpa
≥
= 300 mm
3.8L/min
2.5
= 65 dB(m)
mm
Yes
370*84*50 mm
1.2 kg
17
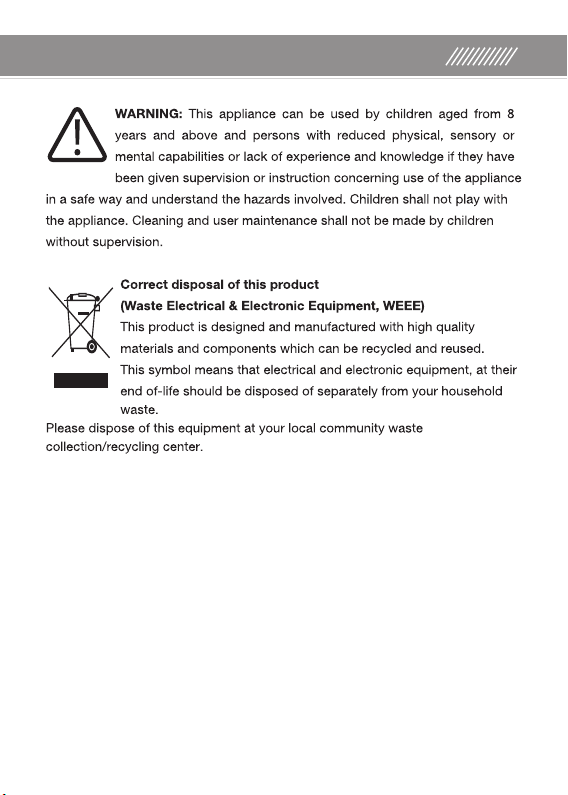
ENVIRONMENT FRIENDLY DISPOSAL
Table of contents


