SKY PARAGLIDERS Gii 5 User manual

User manual for Gii 5 S, M and L
Bedienungsanleitung für Gii 5 S, M und L
Návod k obsluze pro Gii 5 S, M a L
2023
Gii 5

Thank youfor using SKY PARAGLIDERS products. Thank you for buying Gii 5.
We hope you will be satised with this product and wish you a lot of awesome ights. It is strongly recommended to consult
the manual before the rst ight. This manual might help you to familiarize yourself with the product faster.
Danke, dass Sie sich für ein Produkt von Sky Paragliders entschieden haben. Danke für den Kauf des Gii 5.
Wir hoffen, dass Sie mit diesem Produkt zufrieden sein werden und wünschen Ihnen viele glückliche Flüge. Wir empfehlen dringend,
das Handbuch vor dem ersten Flug sorgfältig zu lesen. Dieses Handbuch kann Ihnen helfen, sich schneller mit dem Produkt vertraut
zu machen.
Děkujeme, že používáte produkty Sky Paragliders. Děkujeme Vám za zakoupení sedačky Gii 5.
Doufáme, že budete s tímto výrobkem spokojeni. Přejeme Vám krásné lety. Důrazně Vám doporučujeme, abyste si manuál velmi
důkladně přečetli. Pomůže Vám k rychlejšímu seznámení s výrobkem.
Team Sky Paragliders

Contents 5
Inhalt 15
Obsah 24
Version 1.0 20/1/2023
3
Gii 5
ENG / DE / CZ

User manual / Handbuch / Navod k obsluze
Gii 5
INTRODUCTION
Congratulations on becoming part of the Sky family. We are very pleased to welcome you to
the world of Sky and hope that you will enjoy many hours of fantastic flying aboard your Sky
Paragliders harness. Sky Paragliders is based in the heart of Europe and we pride ourselves on our
own, purpose built, state of the art production facilities in the Czech Republic. Our management
and development teams are located just 19 steps above the glider production facility. This close
contact is incredibly important to us and helps to ensure that our products are of the highest quality
possible and with minimal air miles on our raw materials.
DISCLAIMER
Please read this Manual carefully and note the following details: The purpose of this Manual is to
offer guidelines to the pilot using this harness. We advise that you only fly with this harness when
qualified to do so. Pilots are personally responsible for their own safety and their equipment’s
airworthiness. The use of this harness is solely at the user's own risk! Neither the manufacturer
nor dealer accept any liability connected with this activity. This harness, on delivery, meets all the
requirements of the EN and NfL regulations and has an airworthiness certificate issued by Sky
Paragliders. Any alterations to the harness will render its certification invalid.
Gii 5
ENG
4

User manual / Handbuch / Navod k obsluze
Gii 5
Contents
1. GENERAL INFORMATION 7
1.1. Product Overview
1.2. Certification
1.3. Pilot´s profile
1.4. Scope of delivery
1.5. Features
2. SET UP 8
2.1. Fitting the reserve
2.2. Adjusting the harness
2.3. Fitting the speed kit
3. TECHNICAL SPECIFICATION 11
4. CARING FOR YOUR HARNESS 12
4.1. Use
4.2. Towing
4.3. Maintenance
5. GUARANTEE 13
6. DISPOSAL 13
5
User manual / Handbuch / Navod k obsluze
Gii 5
6

User manual / Handbuch / Navod k obsluze
Gii 5
1. GENERAL
INFORMATION
• Model name: Gii 5 - S, M and L
• Total maximum weight in flight: see the technical data.
• This user manual version dated 20 January 2023.
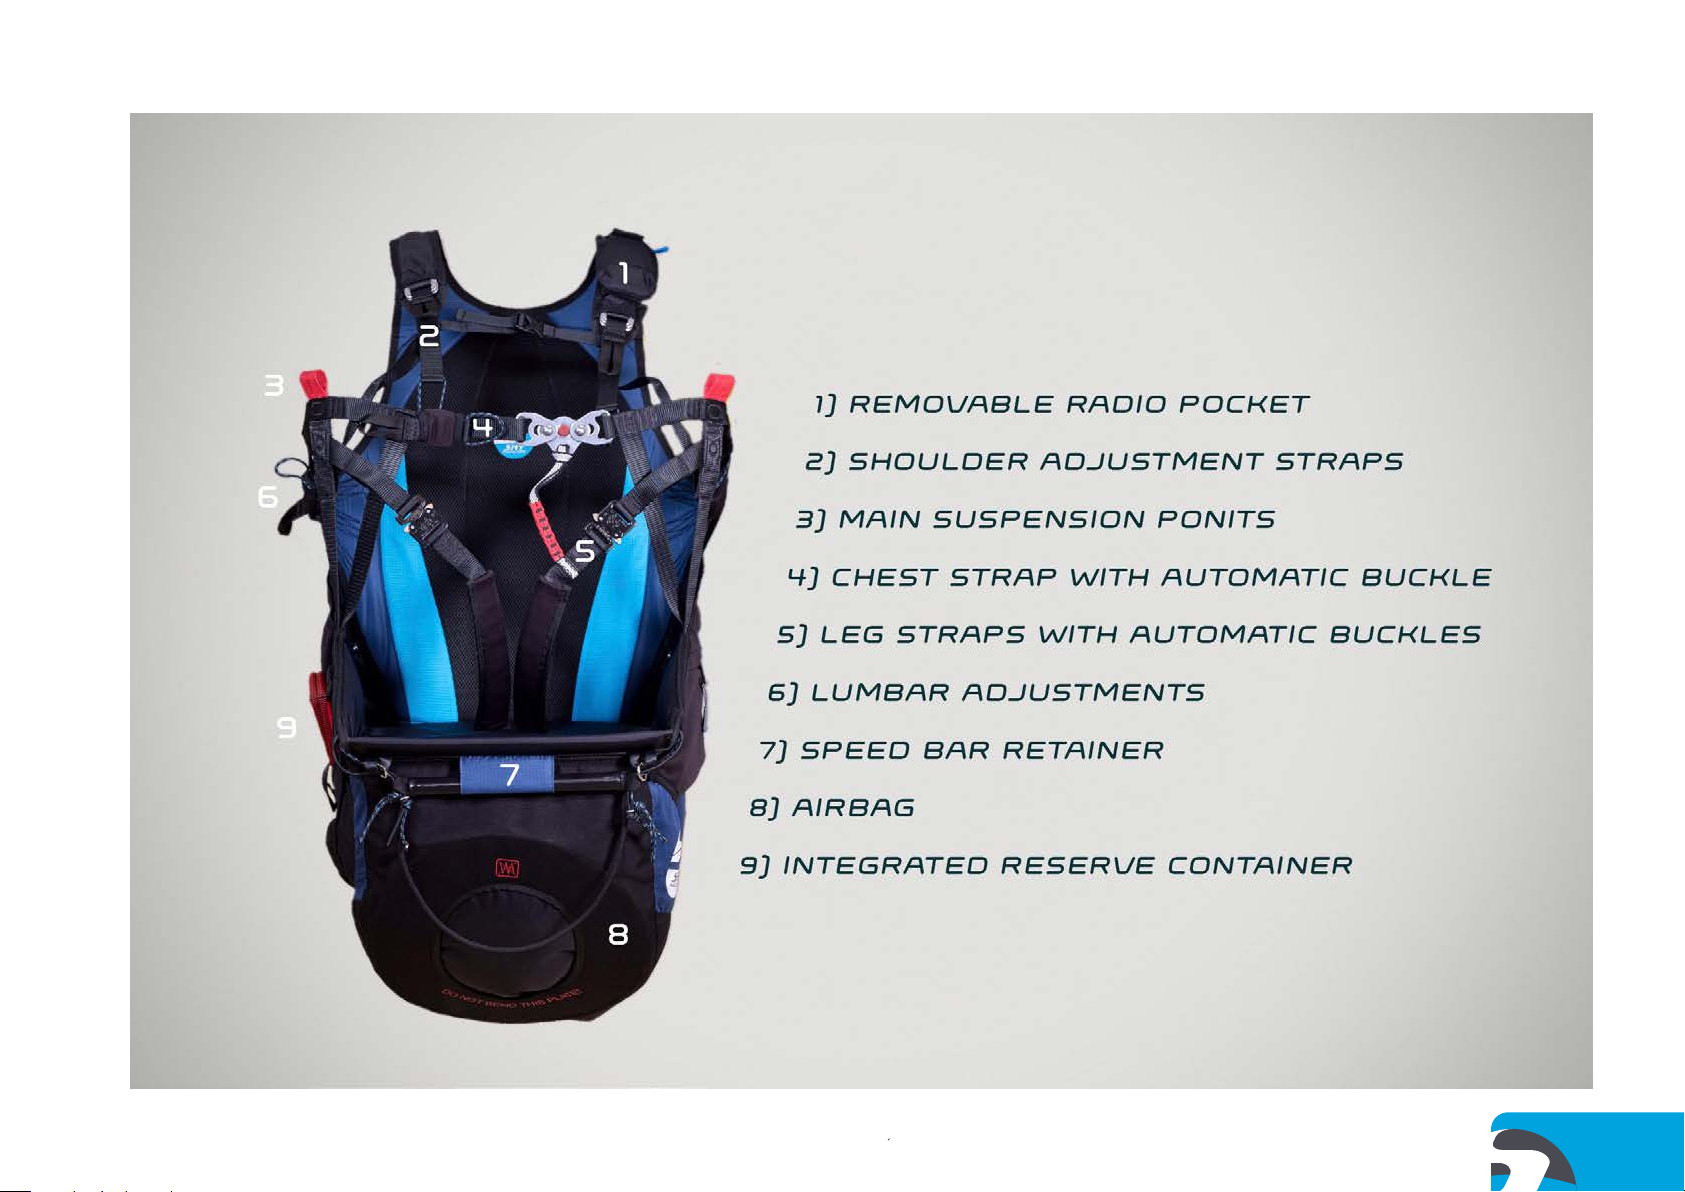
1.1 Product Overview
Gii 5 is a comfortable universal harness with integrated airbag
back protection.
7

User manual / Handbuch / Navod k obsluze
Gii 5
1.2 Certification
Gii 5 has passed the certification according to test EN
1651:1999 and this harness conforms to the testing criteria of
the NfL 2-565-20. Any alteration of the harness can invalidate
all the aforementioned certifications.
Please note: Use of this harness is at your own risk. Any
liability of the manufacturer or distributor is excluded. The pilot
is responsible for airworthiness of the aircraft. The pilot must
comply with legal regulations.
1.3 Pilot‘s Profile
• Pilots who prefer “upright“ position.
• Paragliding schools and novice pilots.
• Pilots who like simple solutions and low weight harness.
1.4 Scope of delivery
• Harness
• Rescue handle
• Integrated rescue V-bridle
• Handy reserve fitting and maintenance kit
• Removable pocket for radio
1.5 Features
• simple strap system and easy adjustment
• low weight - for its category
• integrated airbag protection
• integrated rescue container
2. SET UP
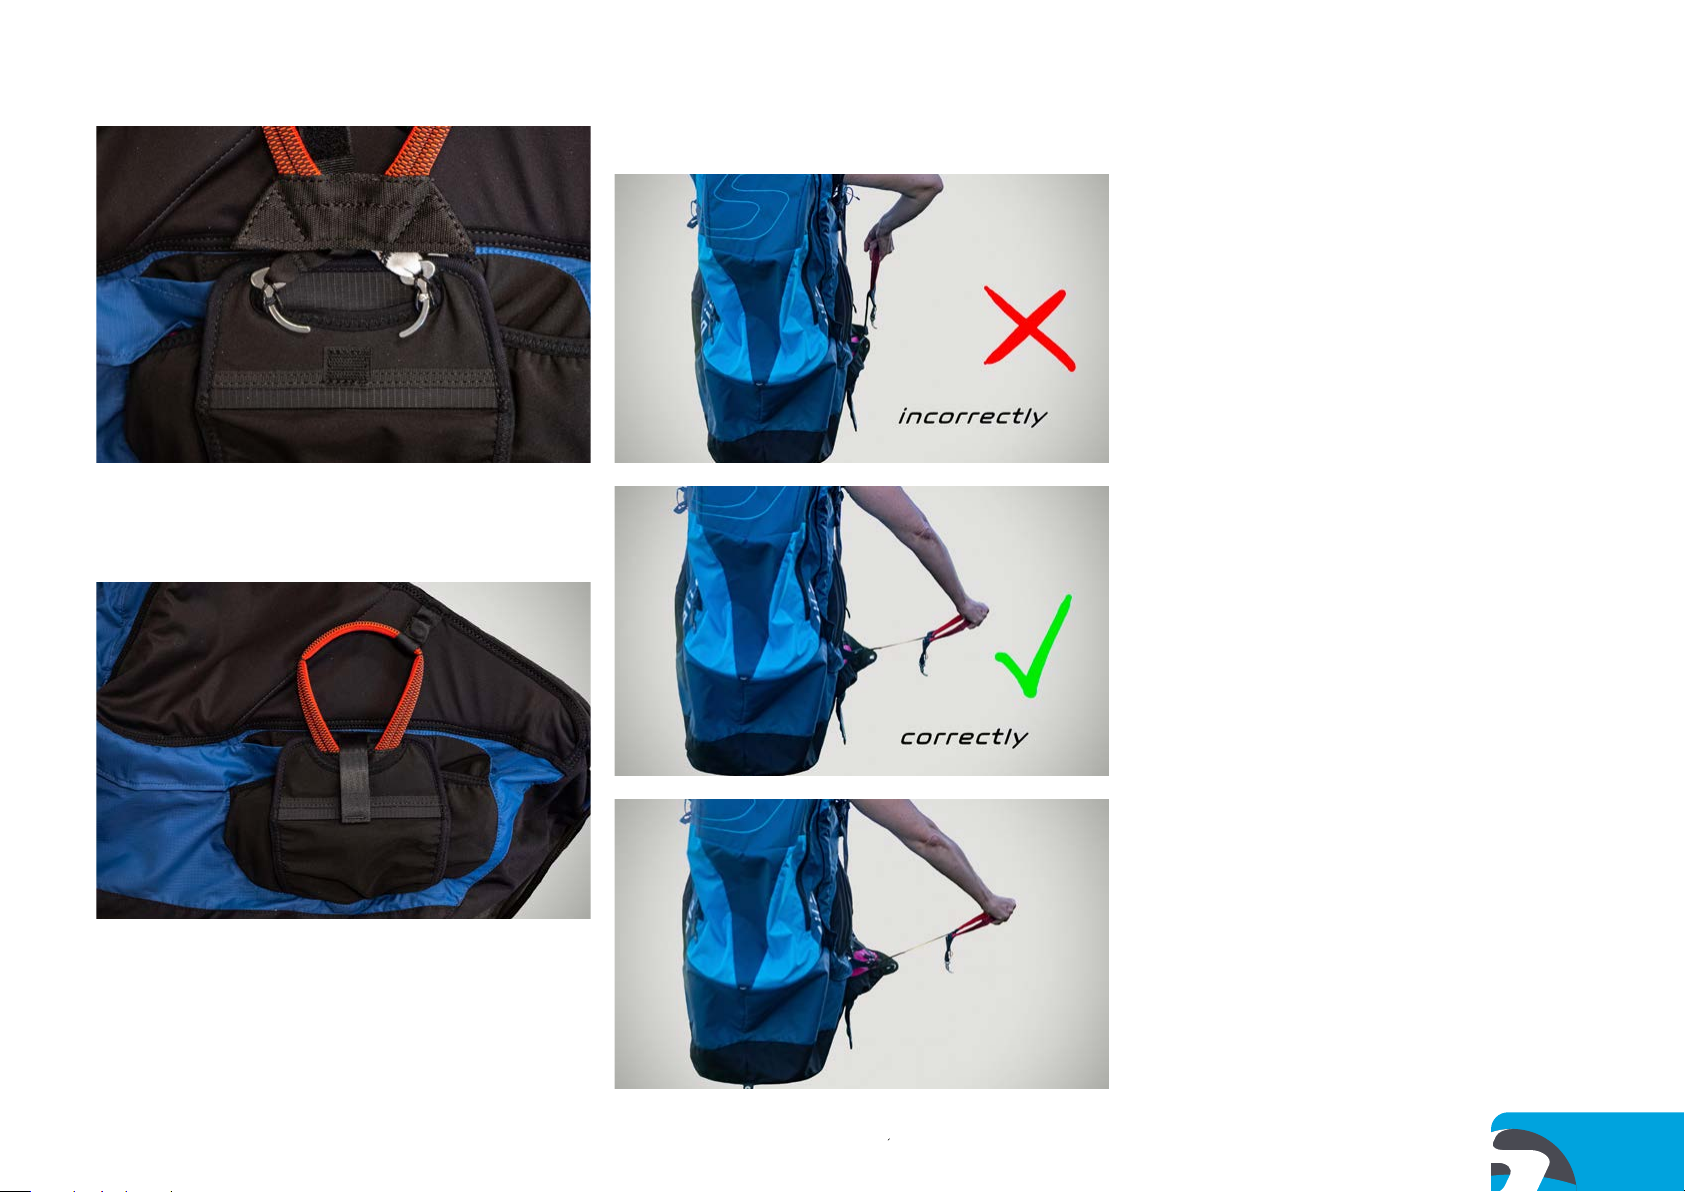
2.1 Fitting the reserve
It is highly recommended that the initial installation of the
reserve parachute be carried out by a qualified professional.
Ask your paragliding equipment supplier or instructor to do it
for you and familiarise yourself with the process. The size of the
reserve pocket on the Gii 5 is suitable for most current reserve
systems. If it is not possible to connect the harness reserve
handle to the loops on the parachute deployment bag inside
the pocket, please consult your supplier who may be able to
supply an alternative deployment bag. Loops can be sewn at
an appropriate place on any deployment bag, but this must be
carried out by a qualified person only.
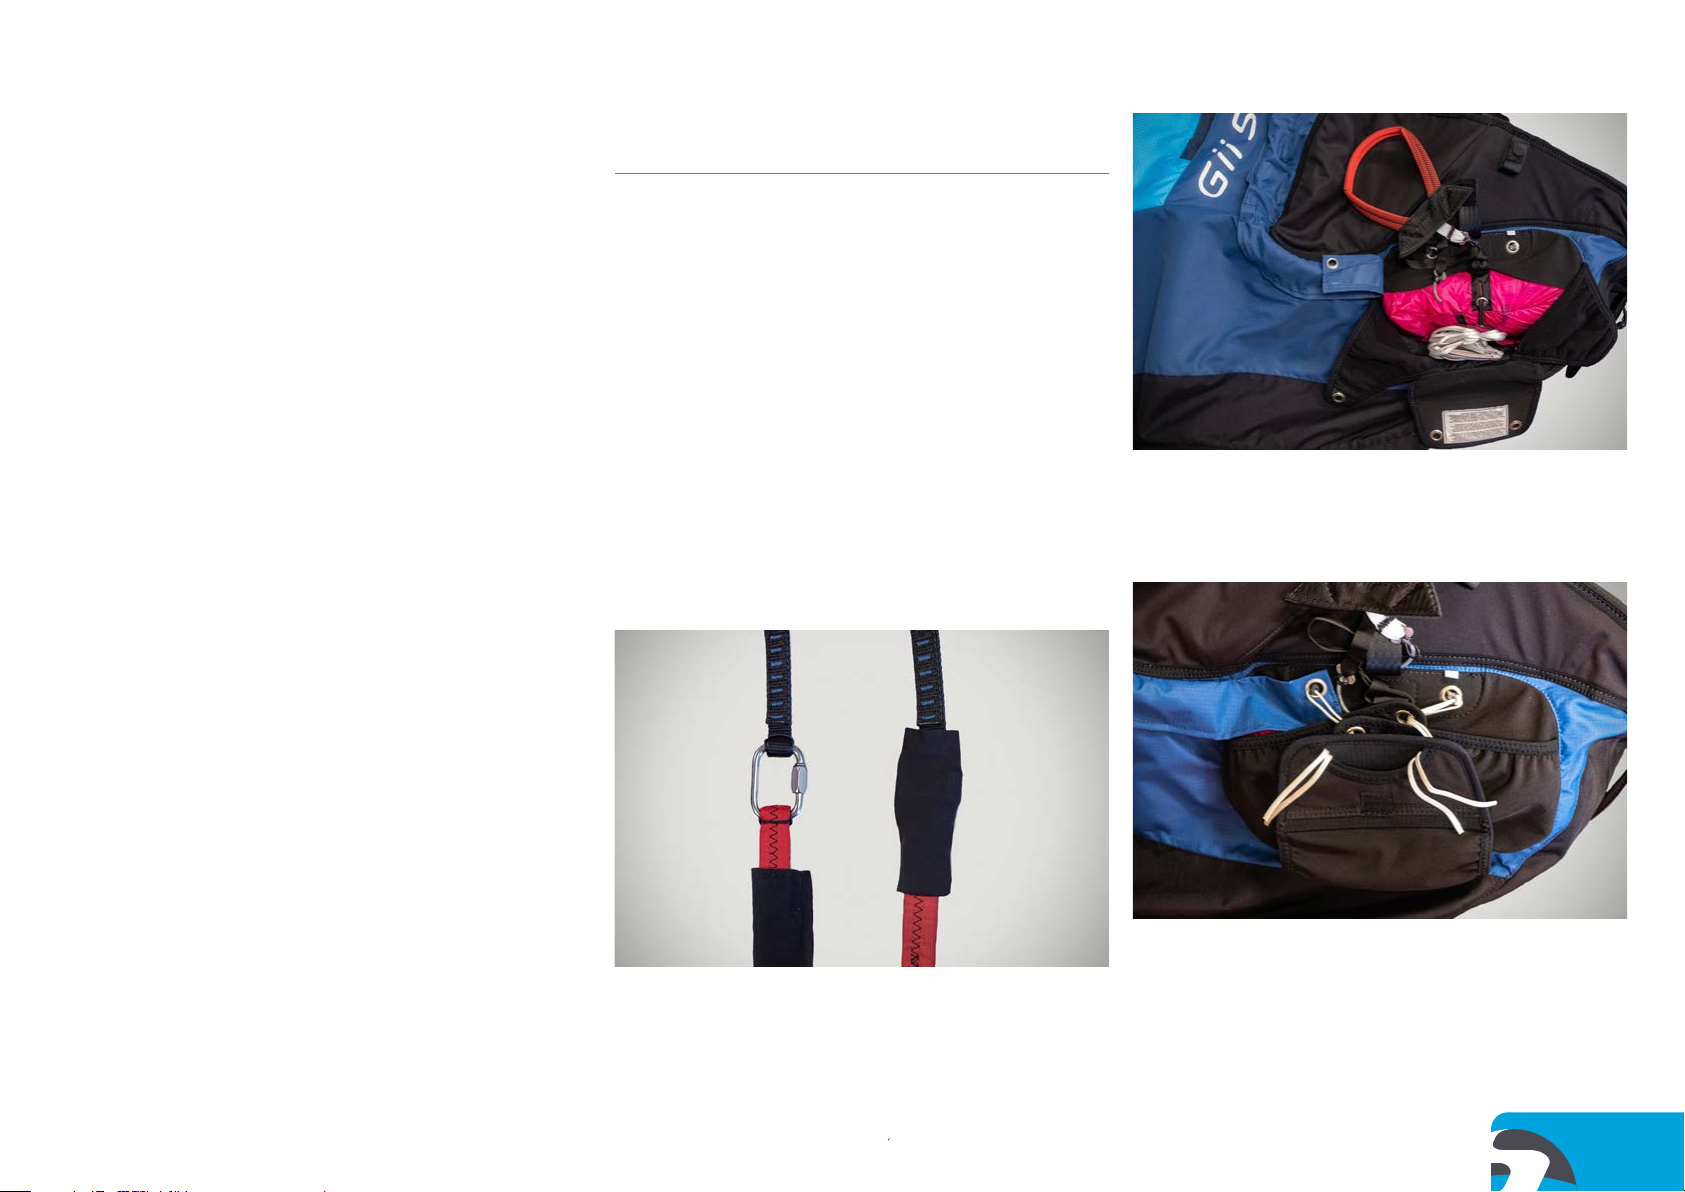
1) Connect the reserve bridle to the harness risers, secure with
the O rings.
2) Attach the handle to the center loop on the container. Slightly
crease the reserve in two and insert into the pocket.
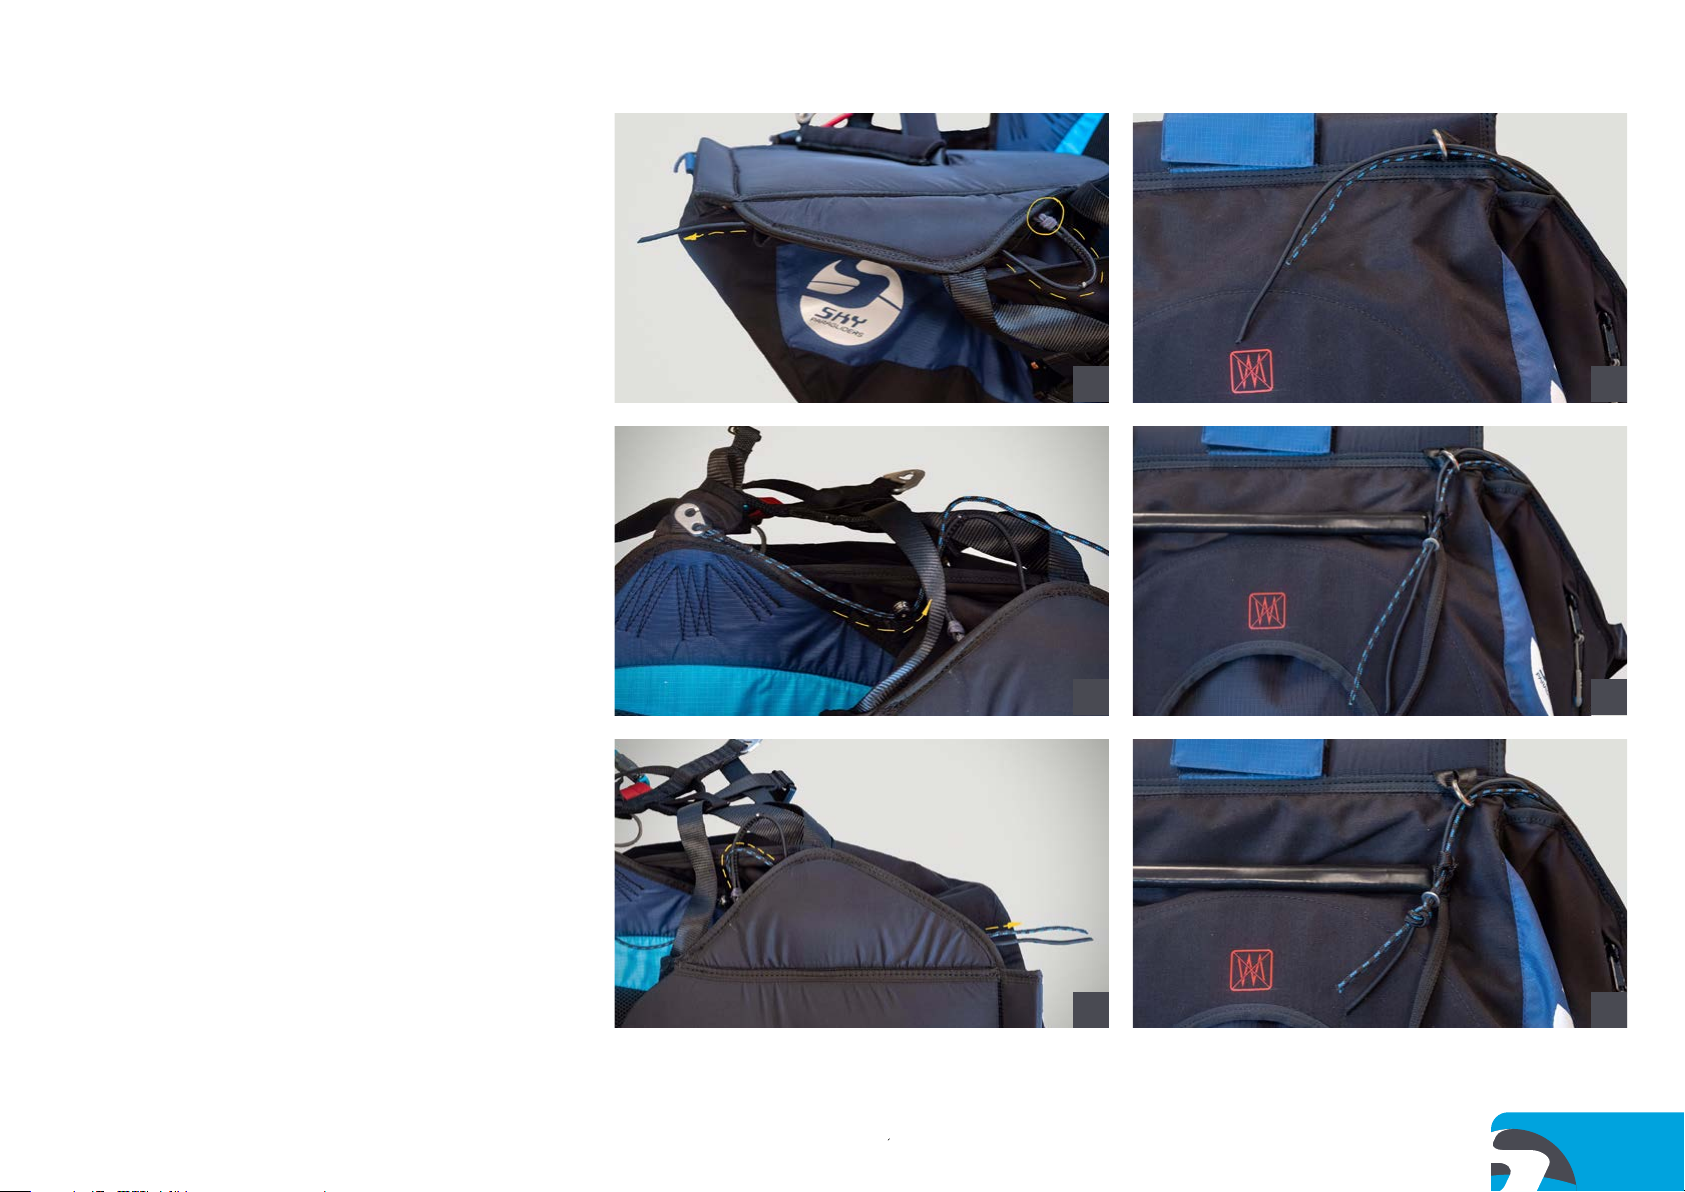
3) Thread the leafs in sequence using the line provided from the
reserve packing & maintenance kit (located in the rear harness
pocket).
8
User manual / Handbuch / Navod k obsluze
Gii 5
4) Locate the pins in their corresponding colour coded loops
and be sure to remove the packing line! Stretch the rubber
O-ring over the pin.
WARNING!
After installation of a reserve parachute in the harness, it is
absolutely essential to do a simulated deployment under
a static swing, ensuring that the parachute release system
operates correctly and the parachute comes out easily. The
elastic cords which close the reserve pocket must be checked
regularly. If the cord is worn, it must be replaced. Each time a
reserve parachute is installed, check that the cord is in good
order by applying a load of 10 kg. Before each flight, check that
the pins and handle are located correctly.
2.2 Adjusting the harness
1) Lumbar Adjustment
An excessively reclined position reduces stability and increases
the risk of risers twisting in the event of a spin.
2) Shoulder Strap Adjustment
For optimum comfort during take-off and ease of achieving
your preferred flying position the shoulder straps should not
be excessively tight. The straps may appear loose while in the
seated position but some play is required to avoid excessive
strap pressure in the standing position.
3) Main Chest Strap Adjustment
Tightening the chest strap increases the efficiency of the Auto
Balance System (ABS, i.e. stabilising system) but decreases
the roll response of the wing. With increased tightening, the
pilot may feel more stable in turbulent conditions and the wing
will be more stable in the event of an asymmetric collapse.
However, the wing may be less inclined to bank when turning.
The design of the integrated ABS allows for good stabalization
throughout the adjustment range.
RESERVE DEPLOYMENT
5) Complete the sequence by locating the pins and handle
under the neoprene flap and secure with the velcro flap.
9

User manual / Handbuch / Navod k obsluze
Gii 5
WARNING!
The chest strap adjustment can be quite sensitive and it is best
to first test this under a static swing, and then in still air flight,
before trying to adjust it during a turbulent flight. Before taking
off, do not forget to pre-adjust your chest strap. This will result
in a more comfortable flight.
2.3 Fitting the speed kit
Speed System Adjustment
• The speed system should be adjusted to the correct length
using a harness simulator.
• The speed system line must not run through the reserve
handle!
• The Gii 5 has a passage on both sides of the harness behind
the side pockets where the speed system cord must pass.
1 4
2 5
3 6
10

User manual / Handbuch / Navod k obsluze
Gii 5
Gii 5 S M L
Pilot`s Height (cm) 150-170 160-185 175-200
Board width (cm) 30.5 33 35
Board depth (cm) 34 37 39
Suspension points height (cm) 42 45 48
Chest strap range (cm) 38-43 40-46 43-49
Harness weight* (kg) 2.60 2.70 2.90
Protector Airbag (integrated)
Certification EN / LTF
* Weight including seatboard, rescue handle and integrated V-bridle for the rescue parachute.
3. TECHNICAL INFORMATION
Minimum and maximum volume of the rescue
parachute container:
Minimum: 2,3 liters / 0,99 kg (SKY LITE M)
Maximum: 7,6 liters / 2 kg (SKY SYSTEM 3 135)
Maximum clip-in weight (weight in flight): 120 kg
11

User manual / Handbuch / Navod k obsluze
Gii 5
4. CARING FOR YOUR
GII 5
4.1 Use
Gii 5 is made from high tech materials. However, care and
attention should be exercised when using to avoid abnormal
contact with abrasive surfaces. Carabiners require special
attention. If you have suspected any damage, replace them
immediately.
Pre-Flight Checks
PARAGLIDING IS AN EXTREMELY DEMANDING SPORT
REQUIRING THE HIGHEST LEVEL OF ATTENTION,
JUDGMENT, MATURITY, AND SELF-DISCIPLINE. EVEN
SMALL DETAILS SHOULD BE CAREFULLY CHECKED
BEFORE FLYING.
• Check the carabiners, and make sure that the twist lock
system closes them automatically.
• Check the harness buckles and their functionality.
• Adjust the harness using a harness hanger or simulator. When
adjusting under the simulator you should familiarise yourself
with the harness and its parts. Test all adjustments, study the
position and use of the reserve handle.
• Check that the reserve handle and the pins are in the correct
position
Take Off
Before flying it is extremely important to adjust the harness so
that you can easily assume a sitting position when airborne.
1. Put the harness onto the shoulders.
2. Fasten the leg/chest buckles.
3. If necessary, adjust the shoulder straps (the shoulder strap
adjustment depends on the size of the pilot; not too tight as
some free movement is required so that you can run easily).
4. Check that the lumbar straps are adjusted so as to enable
the preferred position in flight.
5. Check that the chest strap is pre-adjusted correctly.
6. Ensure that the leg/chest strap buckles are fastened
correctly (closing the buckles incorrectly is a common cause
of accidents)
Landing
During the final approach, move from the sitting position to
the upright position. This should be done early enough to
allow for sudden loss of height on approach. There is a high
risk of spinal injury in the event of a seated landing. Under no
circumstances become complacent about being equipped with
effective protection.
1. Flying over water (SIV)
Do not use any kind of air based protection (Bumpair, Cygnus
type Airbag…) under any circumstances if there is a risk of
landing in water. If you land in water using a bumpair, it‘s
buoyancy behind the pilot creates a high risk of the pilot‘s head
being pushed under the water. During SIV or flights over water,
we recommend the use of a life jacket equipped with a collar
which will keep the pilot’s head above water in the event of loss
of consciousness.
2. Landing
Never land in a seated position, it can result in a serious injury,
the protection is not intended to replace landing gear.
4.2 Towing
Gii 5 is suitable for towing. The tow bridles should be attached
to the main carabiners. If you have any doubts ask a qualified
towing instructor.
4.3 Maintenance
Maintenance Advice
• The harness should be checked regularly for signs of wear
and damage.
• The carabiners should be replaced every 5 years.
• These carabiners should never be used for anything other
than paragliding (not for climbing etc.).
• All repairs should be carried out by the manufacturer
or by qualified persons who have been authorized by the
manufacturer, and always using the original materials (thread,
webbing, buckles).
• The zip fasteners should be lubricated from time to time,
using a silicone spray.
The harness may be cleaned using mild soap and a soft brush.
If your harness gets wet, it is advisable to treat your automatic
buckles and carabineers with silicone grease. This may also be
done as a matter of course from time to time.
12

User manual / Handbuch / Navod k obsluze
Gii 5
5. GUARANTEE
Gii 5 is guaranteed for two years against any production fault
since the date of purchase.
The guarantee does not cover:
• Damage caused by misuse, neglect of regular maintenance,
or if the harness is overloaded or misused.
• Damage caused by inappropriate landings.
6. DISPOSAL
Even the best products have a limited service life, and once
your harness reaches this point, it must be disposed of properly.
Please make sure your harness is disposed of in the correct
environmental manner or send it back to Sky Paragliders
for correct disposal. In case of any doubts regarding the
information in the manual, contact your SKY dealer.
Sky Paragliders a.s.
Okružni 39 739 11 Frydlant nad Ostravici, Czech Republic
13

User manual / Handbuch / Navod k obsluze
Gii 5
Gii 5
DE
EINFÜHRUNG
Gratuliere zu Ihrer Entscheidung, ein Teil der Sky Family zu warden. Wir freuen uns, Sie zur
Welt von Sky begrüßen zu können und hoffen, dass Sie unter ihrem Sky Paragliders Schirm viele
schöne Stunden mit fantastischen Flügen genießen werden. Die Basis von Sky Paragliders liegt im
Herzen von Europa und wir sind stolz auf unsere auf dem neuesten Stand der Technik ausgestatte
Produktion in der Tschechischen Republik. Management und Entwicklungsteams sitzen nur 19
Stufen oberhalb des Produktionsbetriebes. Dieser enge Kontakt ist für uns unglaublich wichtig
und hilft uns dabei, Produkte höchster Qualität mit minimaler Umweltbelastung und minimiertem
Verbrauch von Material anbieten zu können.
HAFTUNGSAUSSCHLUSS
Bitte lesen Sie dieses Handbuch sorgfältig durch und beachten Sie die folgenden Details: Der
Zweck dieses Handbuchs besteht darin, dem Piloten Richtlinien anzubieten mit diesem Gurtzeug.
Wir empfehlen, dass Sie nur mit diesem Gurtzeug fliegen wenn qualifiziert, dies zu tun. Piloten
sind persönlich verantwortlich für ihre eigene Sicherheit und die Lufttüchtigkeit ihrer Ausrüstung.
Die Verwendung Der Gebrauch dieses Gurtzeugs erfolgt ausschließlich auf eigenes Risiko!
Weder die Hersteller oder Händler übernehmen hierfür keine Haftung Aktivität. Dieses Geschirr
erfüllt im Auslieferungszustand alle Anforderungen von den Regelungen EN und NfL und hat
eine Lufttüchtigkeit Zertifikat von Sky Paragliders. Änderungen an der Das Gurtzeug macht die
Zertifizierung ungültig.
14

User manual / Handbuch / Navod k obsluze
Gii 5
Inhalt
1. ALLGEMEINE INFORMATION 17
1.1. Produktübersicht
1.2. Musterprüfung
1.3. Pilot Profil
1.4. Lieferumfang
1.5. Eigenschaften
2. SET UP 18
2.1. Anpassung der Reserve
2.2. Das Gurtzeug anbringe
2.3. Anbau des speed kit
3. TECHNISCHE INFORMATION 21
4. GEBRAUCHS UND
WARTUNGSHINWEISE 22
4.1. Gebrauch
4.2. Windenstart
4.3. Instandhaltung
5. GARANTIE 23
6. ENTSORGUNG 23
15

User manual / Handbuch / Navod k obsluze
Gii 5
16

User manual / Handbuch / Navod k obsluze
Gii 5
1. ALLGEMEINE
INFORMATION
• Modellname: Gii 5 - S, M und L
• Maximal zulässige Startgewicht: siehe technische Daten.
• Diese Bedienungsanleitung datiert vom 20 Januar 2023
1.1 Produktübersicht
Das Gii 5 ist ein komfortables Universalgurtzeug mit integriertem
Airbag-Rückenprotektor.
17
User manual / Handbuch / Navod k obsluze
Gii 5
1.2 Musterprüfung
Das Gii 5 besitzt eine Musterprüfung nach bestandenem test
der Norm EN 1651:2018. Gurtzeug den Testkriterien der NfL
2-565-20. Jede Veränderung am Gurtzeug führt zum Erlöschen
der Musterprüfung.
BITTE BEACHTEN: Die Nutzung dieses urtzeugs erfolgt auf
eigene Gefahr. Eine Haftung des Herstellers oder Vertriebs
ist ausgeschlossen. Der Pilot ist verantwortlich für die
Lufttüchtigkeit seiner Flugausrüstung. Der Pilot muss den
gesetzlichen Vorschriften entsprechen.
1.3 Pilot Profil
• Piloten, die eine sitzende Flugposition bevorzugen.
• Schüler und Einsteiger.
• Piloten, die ein leichtes, unkompliziertes und komfortables
Gurtzeug bevorzugen.
1.4 Lieferumfang
• das Gurtzeug
• Rettungsgriff
• V Verbindungsleine
• Set für Rettereinbau mit Ersatzteilen
• entfernbare Funkgeräte-Tasche
1.5 Eigenschaften
• simples Gurtsystem mit einfacher Einstellung
• geringes Gewicht in seiner Kategorie
• Integrierter Airbag
• Integrierter Rettungsschirm-Container
2. SET UP
2.1 Anpassung der Reserve
Die Erstinstallation der Rettungsschirmes sollte von einem
qualifizierten Fachmann durchgeführt werden. Wir empfehlen,
den Einbau des Retters in das Gurtzeug von einem
qualifizierten Fachmann durchführen zu lassen. Bitten Sie
Ihren Ausrüstungsverkäufer oder Lehrer um die Erstinstallation
des Rettungsschirmes und machen Sie sich mit dem Prozess
vertraut. Die Größe des Rettungsschirmfachs des Gii 5 eignet
sich für die meisten aktuellen Systeme. Wenn es nicht möglich
ist, den Rettungsschirmgriff des Gurtzeugs mit Schlaufen am
Innencontainer des Retters zu verbinden, fragen Sie bitte Ihren
Anbieter nach einem geeigneten Innencontainer. Schlaufen
können an einem geeigneten Ort auf jeden Innencontainer
genäht werden, aber dies darf nur von einer qualifizierten
Person durchgeführt werden.
1) Verbinden Sie den Rettungsschirm mit den Tragegurten und
sichern Sie die Verbindung mit O-Ringen.
2) Verbinden Sie den Auslösegriff mit der zentralen
Anbringungsschlaufe mittels eines AnkerstichKnotens. Bauen
Sie den Rettungsschirm mit der Griffschlaufe nach oben und
den Leinen nach unten ein.
3) Fädeln Sie mit Hilfe der mitgelieferten Packleinen (diese
finden Sie Rückenfach) die beiden Gummischlaufen in korrekter
Reihenfolge durch die Ösen.
18

User manual / Handbuch / Navod k obsluze
Gii 5
4) Setzen Sie die Splinte in die jeweiligen farbmarkierten
Schlaufen ein und ziehen Sie den Gummiring über den Splint
in Position. Entfernen Sie die Packleinen!
WARNUNG!
Nach der Installation eines Rettungsschirm im Gurtzeug ist es
unbedingt erforderlich, eine Probeauslösung mit im Gurtzeug
sitzendem Piloten durchzuführen, um sicherzustellen, dass
sich der Fallschirm leicht ziehen und korrekt auslösen lässt.
Die elastische Schnur, welche das Retterfach schließt, muss
regelmäßig überprüft werden. Wenn die Schnur beschädigt
ist muss sie ersetzt werden. Prüfen Sie bei jedem Einbau des
Rettungsschirms diese Schnur durch Aufbringen einer Last von
10 kg auf ihren Zustand. Überprüfen Sie vor jedem Flug, ob
sich Aulösesplint und Griff in der korrekten Position befinden.
2.2 Das Gurtzeug anbringe
1) Lendenwirbeleinstellung Einstellung auf der Seite Eine zu
liegende Position reduziert die Stabilität und erhöht das Risiko
von eingedrehten Tragegurten im Fall des Trudelns.
2) Schultergurteinstellung Für optimalen Komfort während
des Starts und einfaches Erreichen Ihrer bevorzugten Position
sollten die Schultergurte nicht übermäßig fest sein. Die Gurte
können Ihnen im Sitzen locker erscheinen, aber etwas Spiel ist
erforderlich, um übermäßigen Druck des Gurtes im Stehen zu
vermeiden.
3) Brustgurteinstellung Das Anziehen des Brustgurtes erhöht
die Effizienz des AutoBalance-Systems (Stabilisierungssystem),
aber verringert das Ansprechen des Schirms auf
Gewichtssteuerung. Der Pilot wird sich in turbulenten
Bedingungen sicherer fühlen und der Schirm wird stabiler im
Falle eines einseitigen Einklappers. Allerdings ist der Schirm
weniger bereit, beim Drehen Schräglage aufzunehmen. Das
im Gii 5 eingesetzte ABS-System erlaubt daher nur einen
vernünftigen Einstellbereich des Brustgurtes. Das Gii 5 eignet
sich für Piloten, die ihre Schirm über die Gewichtsverlagerung
fliegen.
Reserve-Bereitstellung
5) Positionieren Sie die Splinte und den Auslosegriff unterhalb
der Neopren-Abdeckung. Sichern Sie den Griff am Klettband
und schieben Sie die verbleibende Klappe des Containers in
die vorgesehene Tasche.
19
User manual / Handbuch / Navod k obsluze
Gii 5
Achtung!
Die Brustgurteinstellung kann sehr empfindlich reagieren,
weshalb es am besten ist, sie zuerst unter einer Schaukel oder
in ruhiger Luft zu testen, bevor Sie versuchen, sie während
eines turbulenten Fluges anzupassen. Vergessen Sie vor
dem Start nicht auf die Voreinstellung Ihres Brustgurtes. Das
Ergebnis wird ein komfortablerer Flug sein.
2.3 Anbau des speed kit
Einstellung des Speedsystems Der Fußbeschleuniger sollte
in einem Gurtzeugsimulator auf die richtige Länge eingestellt
werden.
ACHTUNG! Die Beschleunigerleine darf nicht durch den Griffder
Reserve laufen. Um dies sicherzustellen ist das Gii 5 mit einer
speziellen Röhre ausgestattet.
1 4
2 5
3 6
20
Table of contents
Languages:
Other SKY PARAGLIDERS Accessories manuals


Popular Accessories manuals by other brands


Tekkeon
Tekkeon myPower ALL Plus MP3450i R2 Web and catalog content

Cardinal
Cardinal 204 Installation and technical manual

Dräger
Dräger Incubator 8000 IC operating instructions

Nouveau
Nouveau 229346 instruction manual

E+E Elektronik
E+E Elektronik EE680 user manual

Balluff
Balluff BOS R090K Series user guide