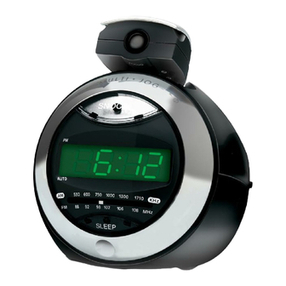
SkyScan 31402 User manual

31402/31403
THE SKYSCAN ATOMIC CLOCKAND RADIO
With the SkyScan Atomic Clock, you have the most accurate timepiece within the
continent. It can receive the time signal transmitted by the National Institute of
Standards and Technology (NIST), which is regulated by 3 atomic clocks and deviates
less than 1 second within 3,000 years. The NIST broadcasts the time signal (WWVB,
60kHz) continuously from Fort Collins, Colorado. This signal can be received
anywhere in the continental USA that long wave (AM) radio reception is possible
with a portable radio. It is expected that the signal can cover a distance of over 2,000
miles from the transmitter. Therefore, your clock will receive the signal within the
broadcast range anywhere anAM signal can be received; generally the signal cannot
be picked up in massive metal and concrete structures unless near a window. In
addition, some environmental effects (see next page) may affect the transmitting
distance.
For more information, please refer to the NIST WWVB website at:
http://www.tf.nist.gov
INSTALLATION
For best reception of atomic time signal and radio, keep your clock radio close to a
window and away from metal surfaces, electrical appliances and strong magnetic field.
Keep your clock radio at least 3 feet away from theAC outlet or AC/DC adaptor.
Plug the AC/DC adaptor to an U.S. household AC outlet, then plug the DC jack to the
back of the clock radio. Your clock radio is ready to work for you.
BATTERY BACK-UPINSTALLATION
In the event that the AC/DC adaptor power is disconnected or a power failure or other
interruptions occur, the back-up batteries will maintain the time and alarm settings.
Wake-by-Buzzer still functions by battery back-up. The radio, projection clock, LCD
backlite and the Wake-by-Radio will resume when AC power is restored.
1. Remove the battery cover at the bottom of the clock radio.
2. Insert 3 x AAA batteries (alkaline batteries preferred) by observing the + and -
polarity signs inside the battery compartment.
3. Replace the battery cover, making sure the cover locks into place.

Note: There is a FM antenna next to the battery compartment. Release and extend
the FM wire antenna fully through the small opening at the bottom case. Do not strip,
alter or attach to other antennas.
ENVIRONMENTALRECEPTION EFFECTS:
The SkyScanAtomic Clock obtains the accurate time with wireless technology. Same
as all wireless devices, the receiving ability may be affected by, but not limited to, to
the following circumstances:
Long transmitting distance
Nearby mountains and valleys
Among tall buildings
Near railway, high voltage cable, etc
Near freeway, airport, etc
Near construction site
Inside concrete buildings
Near electrical appliances
Near computers and televisions
Bad weather locally or electrical storms between you and Colorado
Inside moving vehicles
Nearby metallic structures
LOCATION PRECAUTIONS:
This clock receives a radio wave much like a TV or radio. Be sure to locate it near a
window or some other location where the reception is good. Avoid the following
location, which can interfere with proper reception.
1. Synchronization signal reception can be received in Continental USA only. In
other areas, you can still use this clock by setting the time manually.
2. Place your clock at a location with optimal signal, i.e.: close to a window and
away from metal surfaces or electrical appliances.
After the clock is powered up, the WWVB time code reception will automatically
start with the icon blinking. The clock will automatically update itself to the exact
time after receipt of the WWVB time code. This typically takes over night. Once a
successful code is received, the radio reception icon will appear on the front display.
The clock will automatically attempt to receive the WWVB signal every night at 1:00
am, 3:00am, and 5:00 am.

SETTINGTHE CLOCK
TO SET TIME
1. Press SET to enter time set mode, the time digits flash.
2. Press + / WAVE or - / DISPLAY on the top of your clock radio to set your
desired time. Remember to set the correctAM or PM time (PM icon will appear
on the clock display to indicate PM time).
SETTINGTIME ZONE
1. Then press SET again to enter time zone set mode, the clock display shows “P”
and flashes, the clock is preset at Pacific Standard Time (PST)
2. Press + / WAVE or - / DISPLAY to set your desired time zone
H = Hawaiian Standard Time
A = Alaskan Standard Time
P = Pacific Standard Time
M = Mountain Standard Time
C = Central Standard Time
E = Eastern Standard Time
SETTING DAYLIGHT-SAVINGTIME (DST)
1. Press SET again, clock display shows DST and ON (DST on) flashes.
2. Press + / WAVE or - / DISPLAY to select DST On or Off.
SETTING 12HR OR 24 HR TIME FORMAT
1. Press SET again, the clock display shows 12Hr and flashes.
2. Press + / WAVE or - / DISPLAY to select 12Hr or 24Hr.
SETTING SNOOZE DURATION
1. Press SET again, the clock display shows Zz and 05 flashes.
2. Press + / WAVE or - / DISPLAY to set your desired snooze duration from 5 to 60
minutes.
3. Press SET again (or if no key is pressed within 5 seconds) to return to normal
clock display mode.

USING THE ALARM
SETTING THE ALARMS
1. To set Alarm 1, press ALM 1 button once, the clock display shows 1 and 6:00
flashes.
2. Press + / WAVE or - / DISPLAY to set alarm time. Remember to set the correct
AM or PM time. Press and hold + / WAVE or - / DISPLAY will accelerate setting
in faster speed.
3. Press ALM 1 again to select Wake-by-Buzzer (icon appears) or Wake-By-Radio
(RADIO icon appears)
4. To set Alarm 2, just repeat Step 1 - 3 above but useALM 2 button.
VIEWING THE SET ALARM TIMES AND TURNINGALARM ON AND OFF
1. Press ALM 1 or ALM 2 button once to review the currently set alarm time(s).
2. Press the button again to turn on or turn off the alarm. When the alarm is turned
on, the related alarm icon appears in the display. When no alarm icon is showing,
the alarm is off and will not sound.
STOPPINGAND RESETTINGTHE ALARM TO COME ON THE NEXT DAY
When Alarm 1 sounds, press the ALM 1 / ALM STOP button to stop the alarm sound
and automatically reset it to come on the following day. Similarly, stop the alarm by
pressing ALM 2 / ALM STOP button when Alarm 2 sounds.
SNOOZE
When the alarm sounds press the SNOOZE/DIMMER once. The alarm will be
silenced and come on again according to the set snooze duration.
USINGTHE PROJECTION CLOCK
Press PROJECTION ON/OFF button to turn on or off the projection clock. Turn the
focus knob on the projector to adjust the image of the projected time onto the wall or
ceiling.

ADJUSTINGTHE DISPLAY BACKLIGHT
This clock radio features an adjustable display backlight with dim, medium and bright
settings. To select a backlight setting, press the SNOOZE/DIMMER button until the
brightness is reached. This setting can only be selected when the radio is not playing.
Note: Please note the always-on backlight will not work while the clock is operating
on battery power.
SETTING UPANTENNA
1. An AM antenna is built-in to the unit; rotate the unit as needed for best AM
reception.
2. Open the battery cover at the bottom case, extend the FM wire antenna fully and
vary the direction for best FM reception. Do not strip, alter or attach to other
antennas.
TUNINGAND PLAYING THE RADIO
1. Press SLEEP/RADIO once to turn on the radio, the clock display will show
“ON” and flashes.
2. Press AM/FM to select AM or FM band.
3. Repeatedly press either + or - at the front ring to tune into a desired radio station.
To scan the stations, press and hold the + or - for a few seconds and release. The
radio will search and stop on the next strong station.
Note: Keep your radio away from fluorescent lamps, which may cause
interference to the radio.
4. You may also use the MEMORY function to select a preset radio station. See the
USING THE MEMORY SET FUNCTION.
5. Rotate the VOLUME dial to adjust the volume level.
6. Press SNOOZE/DIMMER button to turn off the radio.

USINGTHE MEMORY SET (RADIO PRESET) FUNCTION
This clock radio features a total of 10 preset memory of radio setting: five AM
stations and five FM stations. These allow you to preset your favorite stations and
access them quickly.
1. Turn on the radio, set theAM/FM band and select the station you wish to preset.
2. Press and hold the MEMORY button until the clock display shows MEMORY
and “01” flashes.
3. Press MEMORY button again to store Memory 01.
4. To select another station you like to preset, press and hold MEMORY button
again until the clock display shows Memory and “01” flashes. Press +/WAVE
button on top to select “02” on the clock display, press MEMORY button to
store.
5. Repeat Step 4 to preset up to five AM stations and five FM stations.
6. To listen to a preset station at any time, simply press the MEMORY to select a
preset station while the radio is on.
7. To edit a preset station, select another station and repeat Step 2-4. This overrides
the original setting.
USINGTHE SLEEPTIMER
1. Press the RADIO/SLEEP button twice to enter the sleep mode. The clock display
shows the SLEEP icon and “5” (5 minutes) and flashes, keep pressing the
SLEEP/TIMER to select a 10-, 15-, 30-, 45-, 60-, 75-, 90-minute sleep timer. The
sleep timer display remains for few seconds and then returns to normal clock
display. The SLEEP icon will appear, showing the radio timer is activated.
2. The radio will play for the programmed sleep time and then shut off. To check
how many sleep time is remaining, press RADIO/SLEEP button once.
3. To turn off the radio before the sleep time has elapsed, press
SNOOZE/DIMMER once.
TROUBLE SHOOTING
If your clock displays irrelevant time or does not function properly, which maybe
caused by electro-static discharge or other interference, use a thin object to press the
RESET button at the bottom of the clock. The clock radio will be reset to default
settings and you need to set it again.

CARE OFYOUR PRODUCT
1. Place your clock radio on a stable surface, away from sources of direct sunlight
or excessive heat or moisture.
2. Protect your furniture when placing your units on a natural wood and lacquered
finish by using a cloth or protective material between it and the furniture.
3. Clean your unit with a soft cloth moistened only with mild soap and water.
Stronger agents such as Benzine, thinner or similar materials can damage the
surface of the unit. Make sure the unit is unplugged before cleaning.
4. Do not mix old and new batteries. Do not mix alkaline, standard (carbon-zinc),
or rechargeable (nickel-cadimium) batteries.
5. If the unit is not to be used for a prolonged period, such as a month or longer,
remove the batteries to prevent possible corrosion. Should the battery
compartment become corroded or dirty, clean the compartment thoroughly and
replace the batteries.
Warranty
This Product is warranted to be free of defects in manufacturing for a period of 2
years from the date of purchase at Target Stores. This model is discontinued and no
longer eligible for the manufacturer’s warranty. Defective clocks should be returned
to the place of retail purchase.
This manual suits for next models
1
Table of contents
Other SkyScan Clock Radio manuals
