SkyVac Interceptor User manual

SkyVac Interceptor Instrucon Manual

IMPORTANT PLEASE READ THESE INSTRUCTIONS AND HONDA OWNERS MANUAL
CAREFULLY BEFORE OPERATING THE MACHINE
SERIAL NUMBER……………………………………………………………. TO COMPLETED BY THE USER
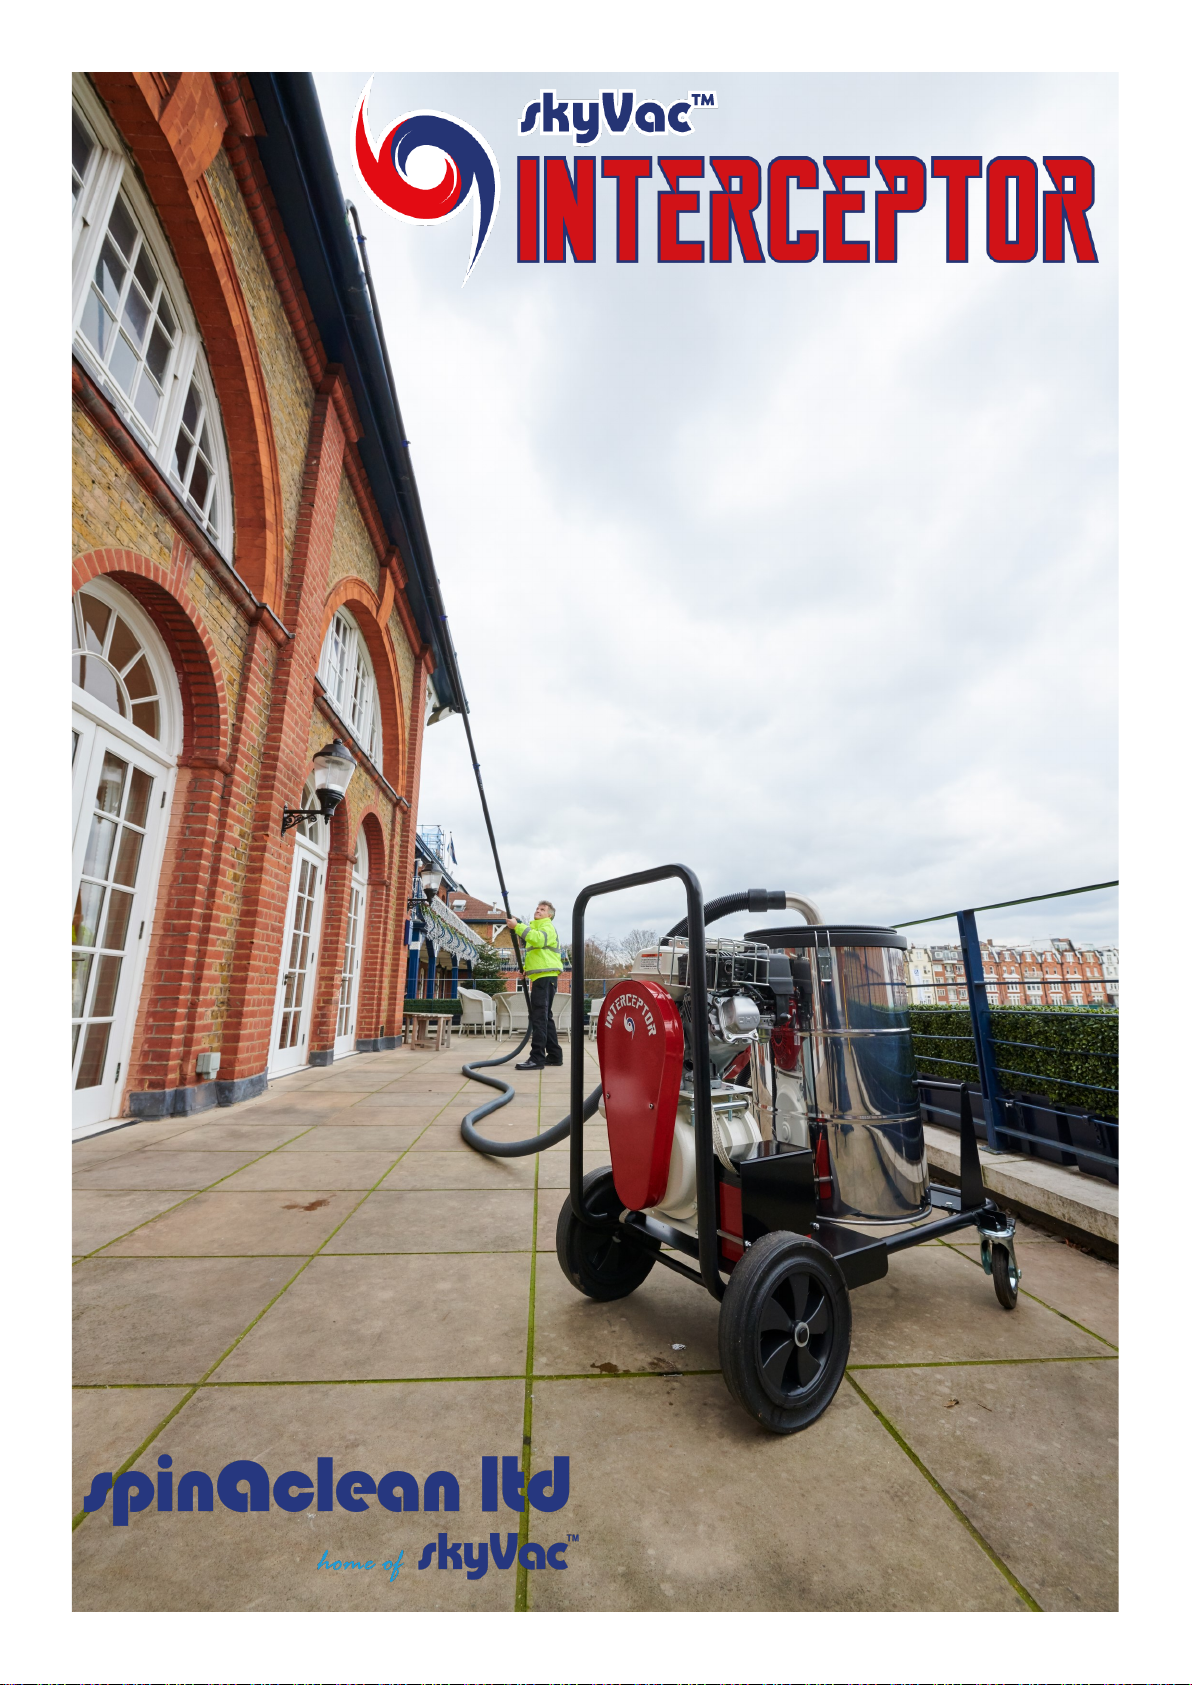
This Spinaclean Heavy Duty Vacuum Cleaner is designed to handle a wide range of
cleaning and debris collecon operaons in industrial areas
CAUTION
This vacuum cleaner must not be used for the collecon of health endangering
ammable or explosive material
ENGINE SAFETY
1) To prevent re hazards and to provide adequate venlaon, keep the engine at
least one metre away from buildings and other equipment during operaon.
DO NOT place ammable objects close to the engine
2) Children and pets must be kept away from the area of operaon due to a
possibility of burns from hot engine components or injury from any equipment.
3) Know how to stop the engine quickly , and understand the operaon of all
controls. Never permit anyone to operate the engine without proper
instrucons.
4) Petrol is extremely ammable and explosive under certain condions
5) Re-fuel in a well venlated area with engine stopped. DO NOT smoke or allow
ames or sparks in the refuelling area or where petrol is stored.
6) DO NOT over ll the tank. Aer refuelling make sure the tank cap is closed properly
and securely
7) Be careful not to spill fuel when re-fuelling. Fuel vapour or spilled fuel may
ignite. If any fuel is spilled, make sure the area is dry before restarng
8) Never run the engine in an enclosed or conned area. Exhaust contains
poisonous carbon monoxide gas, exposure may cause loss of consciousness and
may lead to death
9) The muer becomes very hot during operaon and remains hot for a while aer
stopping the engine. Be careful not to touch the muer while it is hot.
To avoid severe burns or re hazards, let the engine cool before transporng it or
storing it indoors

PREPARATION FOR EACH USE
1) Check for petrol leaks (clean up any spillages)
2) Check HT (spark plug) lead for damage
3) Check trailing grounding lead is intact and touching the ground
4) Check oil level is correct
5) Check that collecon drum is empty, or has sucient capacity .
6) Check the lter/oat valve for cleanliness/operaon
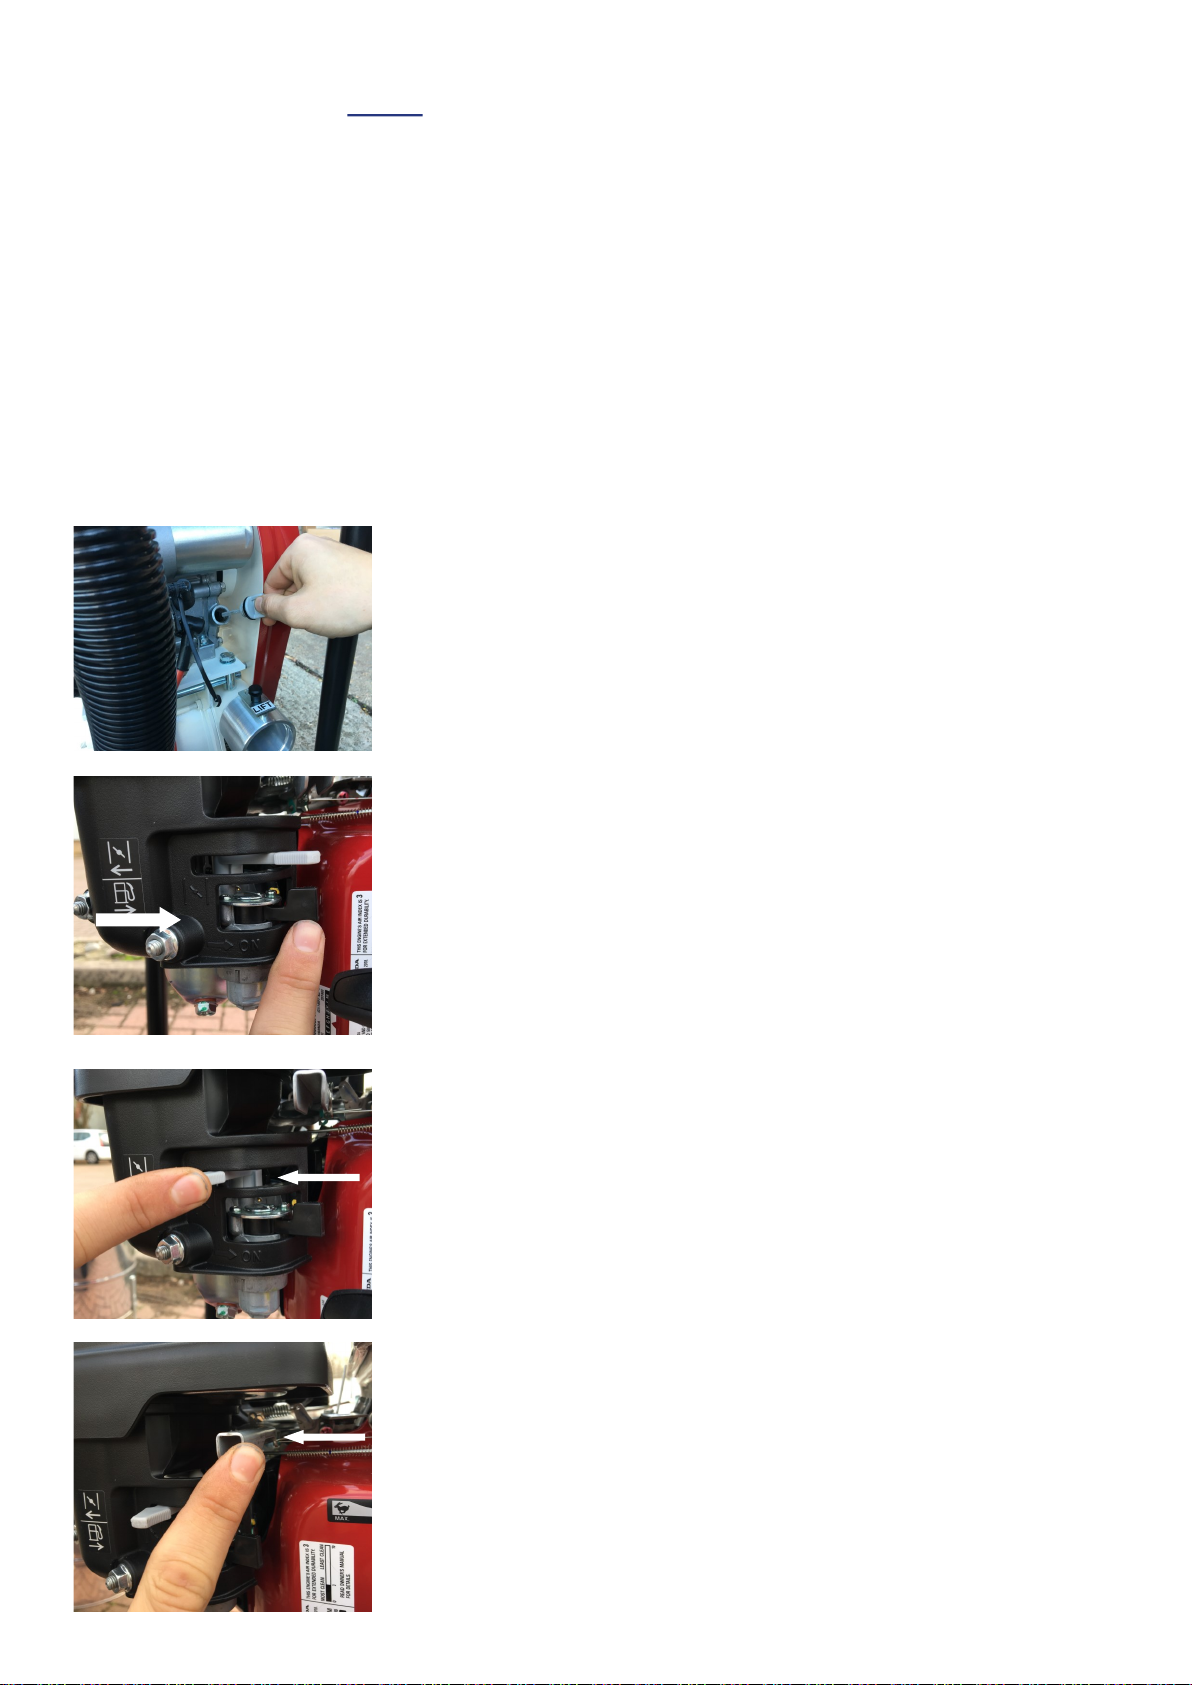
2) Move the choke lever to the CLOSED posion.
Note the choke may not be needed if the engine is
warm or the air temperature is high
3) Move the throle lever slightly to the le
Ensure the Interceptor is on level ground. Remove
the grey dipsck and ll with mulgrade 10w 40
engine oil. Pour up to the boom of the thread in
the dipsck chamber
STARTING THE ENGINE
1) Turn the black fuel valve to the ON posion
To Fill the Engine with Oil

4) Start the engine
A. Recoil start—Turn the engine switch to the ON posion. Pull the
starter grip lightly unl resistance is felt, then pull briskly. DO NOT
allow the starter grip to snap back against the casing, return it
gently to prevent damage to starter.
B. Electric Key Start—Turn the engine switch to the start posion and
hold unl engine starts (no more than 5 seconds) and return switch
to the ON posion. If the engine fails to start wait 10 seconds
before retrying.
5) Posion the throle lever to normal operang posion and begin
vacuuming
6) Vacuuming with higher rpm is permissible but should not be
undertaken for prolong periods of me
NOISE EMISSION Sound Power Level (LWA) 107 dB
91 dB(A) @ 1M at Normal Operang Level 3,000—3,300 rpm
96 dB(A) @ 1M at Maximum set 3,850 rpm
Ear Protecon MUST be worn at ALL mes when equipment is in use
HANDLING
The vacuum cleaner weight is 78Kg (Key Start 87Kg) empty and will be
considerably heavier when the collecon drum is full, be parcularly careful when
manoeuvring and liing for which a Risk Assessment should be undertaken and
consideraon given to Liing Aids and Shared Lis

WET PICK UP
The vacuum cleaner contains a oat valve that automacally closes when liquid
reaches its predetermined level in the tank. This is indicated by a change of sound
of the vacuum cleaner and suspension of pick—up. The cleaner should be turned
o when the oat valve closes and emped
Check the oat valve is clean and free to operate prior to wet pick up
CONNECTING THE HOSE SUCTION FEATURE
When vacuuming, the hose is connected directly
to the drum. PUSH the hose end directly into the
drum, and it will lock into place. To remove the
hose LIFT the “catch” under the drum inlet (hose
connecon) and withdraw the hose from the inlet.
CONNECTING THE HOSE BLOW FUNCTION
FEATURE
When using the BLOW funcon feature, the hose
is connected directly to the exhauster outlet
adapter. Li the knob and insert the hose end,
then release the knob when the hose is fully
inserted and it will lock it into posion. To release
the hose, li the knob and withdraw the hose
HOW TO EMPTY THE DRUM
Remove the head from the drum, lt the drum forward using the handles

The sieve basket will collect the debris and the water
will run through the basket and sit in the boom of
the drum. To dispose of the water switch the
machine o, disconnect the drain hose on the side of
the drum and release the ball valve. Set to one side
on the ground to allow the water to ow away. To
dispose of the debris collected in the sieve basket
remove from the drum and p away.
FITTING THE OPTIONAL SIEVE BASKET
Take the head of the drum and insert the basket feet rst unl it sits on the
boom of the drum. Insert the outer black plasc ring on top of the sieve
basket to lock it into posion
CLEANING THE FILTER
It’s important to keep the lter clean. To clean the
lter, remove the base plate and clean with a hand
broom making sure to remove all debris from the
open pleats. Aer every shi it would be worth
cleaning with a hose pipe, ensure the lter is dry
before re-using. Keep the lter in place for both dry
and wet pick up.
FILTER DEFLECTOR PLATE
To ensure the lter deector plate is ed in the
correct posion the inlet tube needs to be in line
with the sucon port

Insert the
carbon
bre tool
holder into
the pole
Adjust the
tension of
the clamp
by
twisng it
Select your end tool and insert it into the
tool holder, adjust the tension of the clamp accordingly
Open the clamp up and
insert the pole
Insert the pole up to the
posive stopper and no
further
Adjust tension of the
clamp and close o
CONNECTING YOUR SUCTION POLES AND END TOOLS TOGETHER

Push the
end cu
over your
base pole
Build your poles up against
the wall
Lean them against the wall
with the logo facing upwards.
Fit your selected end tool on
the top pole rst then feather
the poles upwards unl you
reach your desired height.
Always t the Vac Release
Pole as your base pole
Your carbon poles are extremely strong.
However, avoid over straining/bending
them when handling heavy grass
deposits. The Best way to remove heavy
tus of grass from guers is to chop them
down into manageable lengths.
Place sucon end tool on the grass tu
and li away from guer then open up
Vac Release door to cut the sucon. This
will release the grass from the end tool.
IMPORTANT ensure you can drop the grass
safely to the ground

Always clean your poles to ensure the joints are clean and free from
grit/dirt which may prematurely wear the joints
When cleaning, wet or damp guer dirt can
somemes sck and line the inside of your
poles. The poles will get cold to touch and
the weight of the poles will be increased
slightly. To remedy this, place the end tool in
water and suck up a small amount of water.
TIP Aer every shi, ush the inside of tubes and exi hose by sucking half a bucket of
water up into the vacuum and empty. This helps keep the pole joints clean from grit
FITTING AND OPERATING THE OPTION INSPECTION CAMERA
SkyCam Instrucons
Press the buon behind
the water proof boot to
switch the camera on
Aach the camera to the pole. You can survey the length of
guer to idenfy the depth of cleaning required then remove
camera and start cleaning. This allows you to be a lile more
vigorous with the sucon poles.
Once the clean has been completed use the camera for a quick
inspecon

TOP 10 TIPS FOR GUTTER CLEANING
1) When you arrive on site carry out an inspecon rst with your SkyCam
so you know what to expect
2) The cleaning acon is to agitate the debris in the guer to break it into
bite sized pieces. So no need to have your camera ed at this stage
3) Always nibble forward to grab a bite sized piece then pull back, this
will give the SkyVac a chance to work and will help to avoid blockages
in the end tool
4) If you do get any blockages in your end tool simply open up the vac
release valve to allow the blockage to fall free
5) As the SkyVac cleans the inside of the poles can get coated with dirt.
Periodically bring them down and suck up 2—3 litres of fresh tap
water to ush them through
6) When liing heavy clumps of grass/earth from the guer li up slowly
and turn airside make sure below is clear and safe, open up the vac
release valve to cut the vacuum to allow the collected waste to fall to
the oor
7) If you are unsure you have sucked up everything, you can open up the
vac release door slightly to see if there is any debris passing through or
not. If nothing is going by then move on.
8) For large leaves if your end tool keeps geng blocked, swap over to
the blow funcon feature to simply and quickly blow the guer clear
9) For maximum sucon power always keep your lter clean
10) Aer the clean has been completed put your SkyCam back up to check
you have removed everything

CAUTION
The vacuum cleaner should be switched o immediately if foam or liquid is
discharged
DO
1) Take care of the machine and be aware of “other” in the operaonal area
2) Service the machine regularly by an authorised representave, this will
extend the service life of the equipment
3) Only use spare parts provided by Spinaclean Ltd
4) Empty the cleaner before it becomes too full and pick up eecveness of
the cleaner is reduced
DO NOT
1) Do not leave the machine in operaon unaended
2) Do not smoke or use naked ames or spark producing equipment near the
vacuum cleaner
CARE AND MAINTENANCE
Always disconnect the baery (if ed) and spark plug lead if carrying out
maintenance
Bearings—The exhauster has pre-greased bearings which require lile maintenance.
The non drive end bearing is sealed and will need no maintenance. The drive end
bearing should be inspected every six months for excessive play
Belts—Slacken engine support, lightly tension the belt so any snag is removed,
ensuring the ribs are snug t in the grooves. Mark two lines on the back of the belt
200mm apart, tension the belt carefully rotang slowly unl distance between the
two lines has increased by 1.0mm (i.e 0.5% increase) Ensure the plaorm adjustment
is fully locked, check the belt frequently in the rst 24 hours of operaon and
re-adjust if necessary. If the belt will not turn true, the pulley shas are either
twisted in relaon to one another or not parallel to one another. Ensure that the
driving and the driven shas are parallel and that the pulleys are aligned by using a
straight edge and adjusng the motor posion accordingly. Always ensure that the
motor is secure in posion when adjustments are completed.

Assembly
Instrucons
www.spinaclean.com
01604 968700
Table of contents
Popular Industrial Equipment manuals by other brands

Meler
Meler PS20 instruction manual

Josoo Electric Appliance
Josoo Electric Appliance ZS-B200X instruction manual

Siemens
Siemens HiPath 3000 operating instructions

Pepperl+Fuchs
Pepperl+Fuchs IQT-F116-R4-V1 manual

VS
VS DATAGAUSS MAX-LG ZZ201240 operating manual

Mecc Alte spa
Mecc Alte spa ACO3 Series Operating and maintenance instructions