skyvoe OBX 32000 User manual

In-Ground Post
Assembly Manual
OBX 32000/4270/4770/5570
In-Ground Post


In-Ground Post Setup


3
InGround Post setuP |
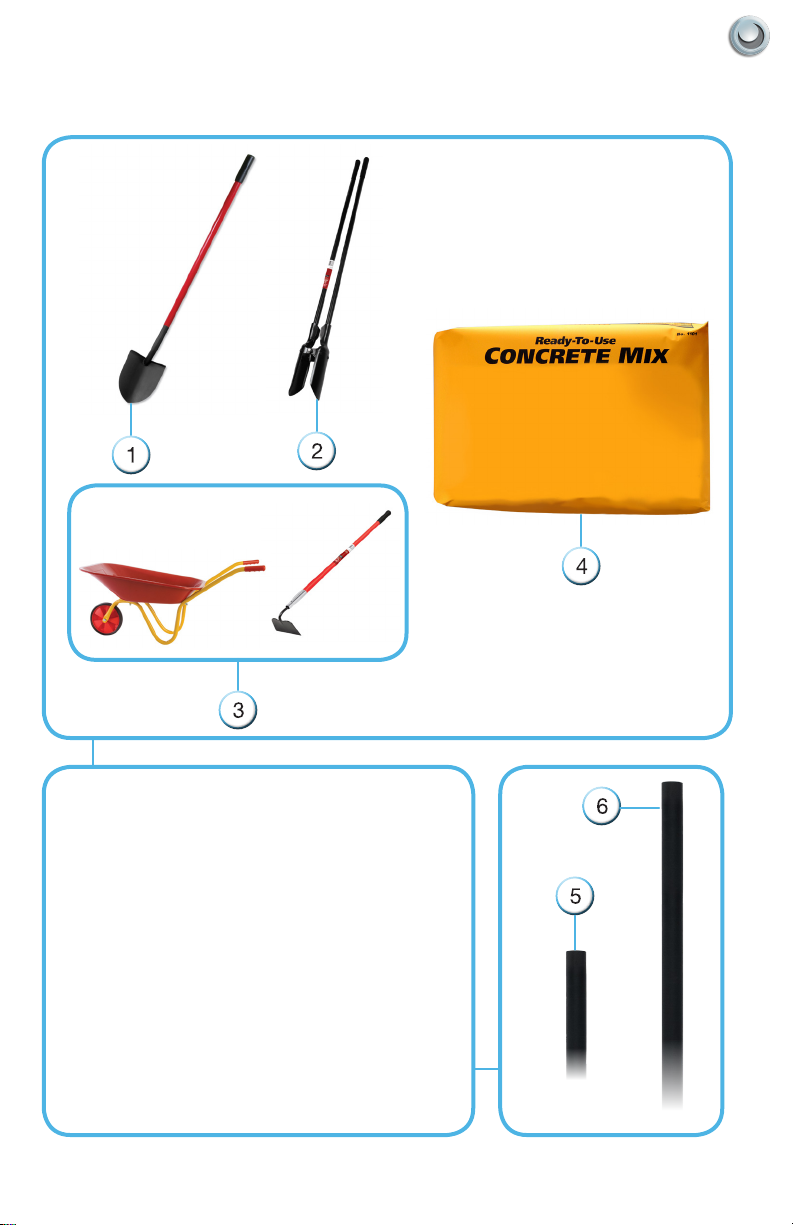
Tools Required for in-ground post Setup:
1. Shovel
2. Post Hole Digger
3. Wheelbarrow and Garden Hoe
(For mixing concrete.)
4. Bag of Concrete Mix
(Amount of concrete will vary,
additional bags may be needed to
complete this installation)
5. Short In-Ground Post Sleeve
6. Mounting Post
and

4All Rights Reserved. 2015 SkyVue®
Assembly Manual- In ground Post
Locate a spot for the post and television.
Dig a square 14”x14” hole like shown below. We recommend that the
hole should have a minimum depth of 24”, however depending on
your location of install depth can or may need to be determined by the
frost line of that area. Please check frost concentration in your location
before installing your in-ground post.
Once the hole is dug, gather your wheelbarrow for concrete mixing.
Be careful when mixing concrete. Wear gloves and eye protection if
possible. Do not handle concrete by hand without gloves as it may
damage or burn the skin.
Concrete Set up
24”
14”

5
InGround Post setuP |
Pour the concrete mix into your
wheelbarrow or mixing container.
Check the packaging for the amount
of water needed to create a mix of
concrete. After measuring, pour the
water into one side of the wheelbarrow
or container. Be sure to measure the
amount of water needed. Most 80
pound bags require no more than 2
quarts of water. Some may require 3.
Using the Garden Hoe, mix the
concrete by scooping and brushing
back and forth. Mix till the concrete
is nice and thick. A good mix should
hold its shape without dripping or
crumbling apart.
Concrete mixture should not be soupy or crumbling. A soupy mixture will
weaken the concrete too much for setting and a crumbling or dry concrete
mixture will not hold together. If your nal mixture is very watery or soupy
then add more concrete mix. For a dry or crumbling nal mixture add minor
amounts of water and then mix to a wet thick concrete.

6All Rights Reserved. 2015 SkyVue®
Assembly Manual- In ground Post
Once your concrete is mixed, have
a friend assist you with pouring.
Pour the concrete mixture to ll
the hole.
Pour slowly and evenly until
concrete mix has reached
ground level.
Once the mixture has been poured
into the hole gather the short post
sleeve to be inserted in the next
step.
Concrete Set up

7
InGround Post setuP |
With assistance insert the short
post sleeve into the center of the
concrete. It’s important that the
post sleeve is inserted straight
down and as level as possible.
Continue to press the sleeve down until the ange is against the concrete
mixture. Place the rubber spacer over top of the ange and proceed to
smooth the surface of the concrete mixture. Make sure to remove any
concrete above the ange as it will conict with the rest of the installation
process.
Once things are set in place, do not continue past this point until
concrete has strengthened and settled. Check the packaging of your mix
to determine the setting time for your concrete base.
Flange
Rubber spacer
NOTE: It’s important that you make sure the sleeve is level before leaving
the concrete to set.

8All Rights Reserved. 2015 SkyVue®
Assembly Manual- In ground Post
With the concrete base set and hardened your post can now be mounted
over the top of the sleeve. Do this by sliding the post down over the
sleeve as shown.
After you position the post insert the swivel locking handle at the hole
located at the lower end of the mounting post.
Congratulations you are now nished with the concrete and post set up
portion of this installation. If you have any questions feel free to contact
our technical support team at (877) 475-9883, option 2.

Notes:


Post Tilt Mount
Assembly Manual
OBX 42 / 47 / 55


13
Post tilt MountoBX 32000 / 4270 / 4770 / 5570 |
Parts for Tilt Mount Assembly:
1. Previously assembled post:
Deck Post, In-ground Post, or
Portable Cart
2. 2- U-Bolts - (4) Flat Washers,
(4) Lock Washers,
(4) Powder Coated Nuts
3. 2- U-Bolt Saddles
4. 4 - Rubber Bolt Caps
5. Appropriately sized tilt mount
(Located in the box labeled “PTM”)
these items are found in parts box

14 All Rights Reserved. 2015 SkyVue®
Assembly Manual- Post Tilt Mount
Tilt Mounts:
The tilt mount portion of a portable cart is provided in a separate box
labeled “PTM” and is size specic. See below for the appropriate sizes.
42”/ 47”/ 55” OBX-L
ClassTelevisions
Tools Required for Post Assembly:
Ratchet
with 1/2” Socket Crescent Wrench
or
1/2”
1/2”

15
Post tilt MountoBX 32000 / 4270 / 4770 / 5570 |
U-Bolts and
Mounting Plate Assembly:
U-Bolts should be hooked around the post and through the holes like
shown with the arrows above, on the U-Bolt Saddles. These should be
positioned near the upper cable entry hole.
With U-Bolts and saddles in place,
slide mounting plate over the U-bolt
ends.
U-Bolt
Post
Saddle
Top View

16 All Rights Reserved. 2015 SkyVue®
Assembly Manual- Post Tilt Mount

17
Post tilt MountoBX 32000 / 4270 / 4770 / 5570 |
1. With U-bolts threaded through the mounting plates, place
stainless steel at washers over the bolt ends.
2. Place stainless steel lock washers over bolt ends.
3. Thread black powder coated nuts over bolt ends and hand tighten.
See figure 3a for suggested mounting plate placement.
4. Once positioned, level and tighten all U-bolt nuts on mounting
plate.
5. Place rubber bolt caps over exposed bolt ends
U-Bolts and
Mounting Plate Assembly Cont.:

18 All Rights Reserved. 2015 SkyVue®
Assembly Manual- Post Tilt Mount
Lay blanket down on at
sturdy surface. Run hand
over surface to make sure
there are no sharp object or
protrusions, before laying the
television down.
Lay television down, viewing side down on blanket.
Other manuals for OBX 32000
1
This manual suits for next models
3
Other skyvoe TV Mount manuals