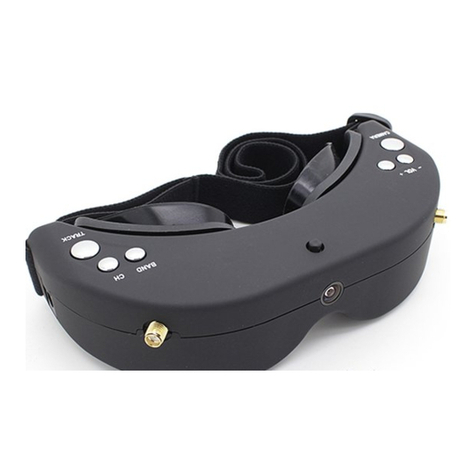
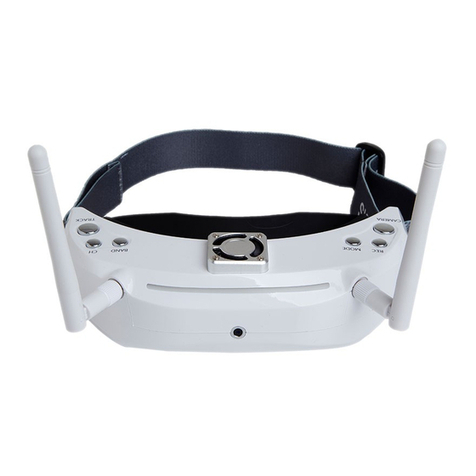
SkyZone SKY01S User manual

SKYZONE
SKY01S
FPVGOGGLE
USERMANUAL

SystemContent
FPVGOGGLECarrycase
Futabadatacable JRdatacable WFLYdatacable
AVcable Powercable 5.8G2dBiantennaX2Upgradecable

FunctionDiagram
OperationGuide
SKY01S FPV glasses are inbuilt with two 5.8GHz receiving modules, two antenna ports and Binocular Display
modules, 5.8GHz receiving work in diversity mode. supports 6 bands and 48 channels (see the Specifications
Description for details).
Quick Start
Preparation
· Install lens, eyeshade, antenna.
· Connect camera with transmitter properly, power on the transmitter, set proper working channel and then
power on SKY01S FPV glasses.
· Press short <BAND/CH> button to adjust channels and keep consistent with the transmitter to view the
images taken by the camera.
· Slide the IPD adjuster to adjust interpupillary distance (IPD).
Channel serach
· Button function.

· Long press the <Search> button to pop up the channel search menu.
· press the <Search> button to execute channel search (repeatable). Channel search is conducted from
low frequency to high frequency. After 40 channels are searched, the device will work at the strongest
channel. The histogram displays the signal intensity of every channel. You may press the <LEFT> button
and the <RIGHT> to choose the desired channel manually. The band, channel and signal intensity in the
place where the triangular indicator stays may be updated in real time.
· After exiting from the search menu, the device can work in the current search to the channel.
Functions of Buttons
TRACK Button:
· In normal mode, press short to reset the head tracker.
· Hold the button 3s to enter menu setup.
CHANNEL Button:
· In RF mode, press short to cycle adjust channels.
· In menu state, press such button to choose upward.
BAND Button:
· In RF mode, press short to cycle adjust bands.
· In menu state, press such button to choose downward.
VOL+ Button:
· In RF, AV IN mode, press short to turn up volume.
· In menu state, press such button to exit.
· In channel search state, press such button to choose rightward.
VOL- Button:
· In RF, AV IN mode, press short to turn down volume.
· In menu state, press such button to confirm.
· In channel search state, press such button to choose leftward.
CAMERA Button:
· In any mode, press short to switch to the front view.
· In RF mode, hold it 3s to enter or exit from the search menu.

RF Mode
· Press the <CHANNEL> button to adjust channels and <BAND> button to adjust bands in circular manner,
then the screen will display BAND, CH and frequency.
Front Camera
· The font camera of such FPV glasses has VGA resolution and good low illuminance, enabling to easily
observe surroundings very easily without taking off the glasses.
· In any mode, you may press the <CAMERA> button quickly to open the front camera.
· The front camera is designed only for temporary view to see surroundings; so it cannot AV output.
Image Adjustment
· Press Center button in the image setup menu, achieve personalized display effect.
· It's easy to setup the Brightness, Contrast, Saturation, Hue and Sharpness with the 5-direction switch.
· Press the <UP/DOWN> button to select menu, Press the <LEFT/RIGHT> button to adjust value.
· It is recommended to set such parameters in very clear image state.
· Press Center button 3 seconds to setup image to factory default
Head Tracking
· Head tracking needs initialization time. When powered on, be sure to keep the product horizontal and
stable. When you hear “Beep”, it means the initialization is completed and you may start to use head
tracking; or you may press the <TRACK> button shortly when this device keeps stable to use such
function normally.
· Press short <TRACK> button to reset the PPM signal to the central location with warning tone.
· In menu, you may set PPM channels as CH5-CH6, CH5-CH7, CH5-CH8, CH6-CH7, CH6-CH8 or CH7-CH8.
· Pan Tracking range: 180° (90° for left and right respectively), 120° (60° for left and right respectively),
90° (45° for left and right respectively), 90° as default.
· Tilt Tracking range: (60° for left and right respectively), 90°(45° for left and right respectively), 60°(30°
for left and right respectively), 90° as default.
· Pan Correction: Via such setup, you may separately compensate the central deviation of Pan. You may set
it at 0~10 levels, and the actual compensation angle is related to the turning angle of the cradle head.
· Tilt Correction: Via such setup, you may separately compensate the central deviation of Tilt. You may set
it at 0~10 levels, and the actual compensation angle is related to the turning angle of the cradle head.
· PPM Reverse: <Normal> as default setup, <Pan> as the reverse of such channel, <Tilt> as the reverse of
such channel,<Pan & Tilt> reverse in two directions.
AV IN
· This device supports AV IN. When the AV IN connection cable is inserted, it may automatically turn off the
radio reception module to save power.
AV OUT
· The AV OUT port outputs the audio and video signals of diversity reception.
· The earphone port may connect with a headset. When this device is powered on every time, be sure to
minimize the volume of the headset in order to prevent large noise from affecting your hearing.
Factory Settings
· Enter the system menu, choose the option of “Factory Settings”, press the <OK> button to enter the setup
state, press the <UP/DOWN> button to choose <YES>, and the <OK> button again to restore all the
functional settings in the menu to factory settings.

Firmware upgrade
· In off state, hold the VOL+ key and power on, then the system will enter the upgrade mode,
· Connect one end of the special upgrade cable to PC and the other end to the AV IN socket,
and wait for a moment, then PC will remind installing the driver (for initial use). After the
driver is installed, one “mobile disc” with capacity about 100KB~10MB will appear,
· Copy the upgrade document (generally in xxxxx.bin) to the root directory of such mobile disc
and then wait and copy。
Specifications
BinocularDisplay
FOV30degrees(Diagonal)
Resolution854X480(WVGA),1,229,760colorsub‐pixels
Brightness350cd/㎡
Interpupillary
distance(IPD)
60‐68mmAdjustable
WirelessReceiver
ISM5.8GHz48Channel,Diversityreceiver.
BandCH1CH2CH3CH4CH5CH6CH7CH8
A5865M5845M5825M5805M5785M5765M5745M5725M
B5733M5752M5771M5790M5809M5828M5847M5866M
E5705M5685M5665M5645M5885M5905M5925M5945M
F5740M5760M5780M5800M5820M5840M5860M5880M
R5658M5695M5732M5769M5806M5843M5880M5917M
L5362M5399M5436M5473M5510M5547M5584M5621M
Sensitivity‐90dBm±1dBm
Antennaport2XSMA,50ohm
VideoStandardNTSC/PAL
Videooutputlevel1.0Vp‐pTyp/75ohm
Audiooutputlevel1.0Vp‐pTyp/10Kohm
FrontCamera
FOV120degrees(Diagonal)
Resolution640X480(VGA)
FOCALLENGTHf=0.95mm
F/NOF/NO=2.0
HeadTrackerSensorMagnetic,Inertialandgyro
OutputPPM8channel,Optional5‐6CH,5‐7CH,5‐8CH,6‐7CH,6‐8CH,7‐8CH
AVPort
Div.AVOUT(3.5mm4P)DiversityVideo、Audiooutput
EAROUT(3.5mm3P)32Ω/75mWor16Ω/105mW,Withvolumecontrol
AVIN(3.5mm4P)Video、Audioinput
PowerSupply
DCINDC7~28V/1A
PowerConsumption12Vinput:4.3W
Dimensions168(L)X92.5(W)X41(H)mm(Notincludeprominentpart)
Weightg
OperatingTemperature0℃~+60℃
Table of contents
Other SkyZone Accessories manuals
Popular Accessories manuals by other brands

POLTI
POLTI SANI SYSTEM Express manual
Allstar Innovations
Allstar Innovations Sharper Image UV-ZONE operating instructions

Clint
Clint RTA Series INSTALLATION, USE AND MANTEINANCE MANUAL
Optical Structures
Optical Structures Astrodon MonsterMOAG MMOAG-1 manual
Leviton
Leviton Decora ODS0D-TDx installation instructions

SICK
SICK WTL16 operating instructions
PCB Piezotronics
PCB Piezotronics IMI SENSORS 640B12 Installation and operating manual

IDEAL
IDEAL EXRKIT58 Replacement

Amana
Amana IO-646 installation instructions

PCB Piezotronics
PCB Piezotronics ICP RH201A76 Installation and operating manual
BLH NOBEL
BLH NOBEL G5-PM-S-DC-W Technical manual

Byron
Byron SX-35 Installation and operation instruction

