SkyZone sky02 User manual

SKYZONE
www.tecnic.co.uk
SKY02
3D FPV GOGGLE
USER MANUAL
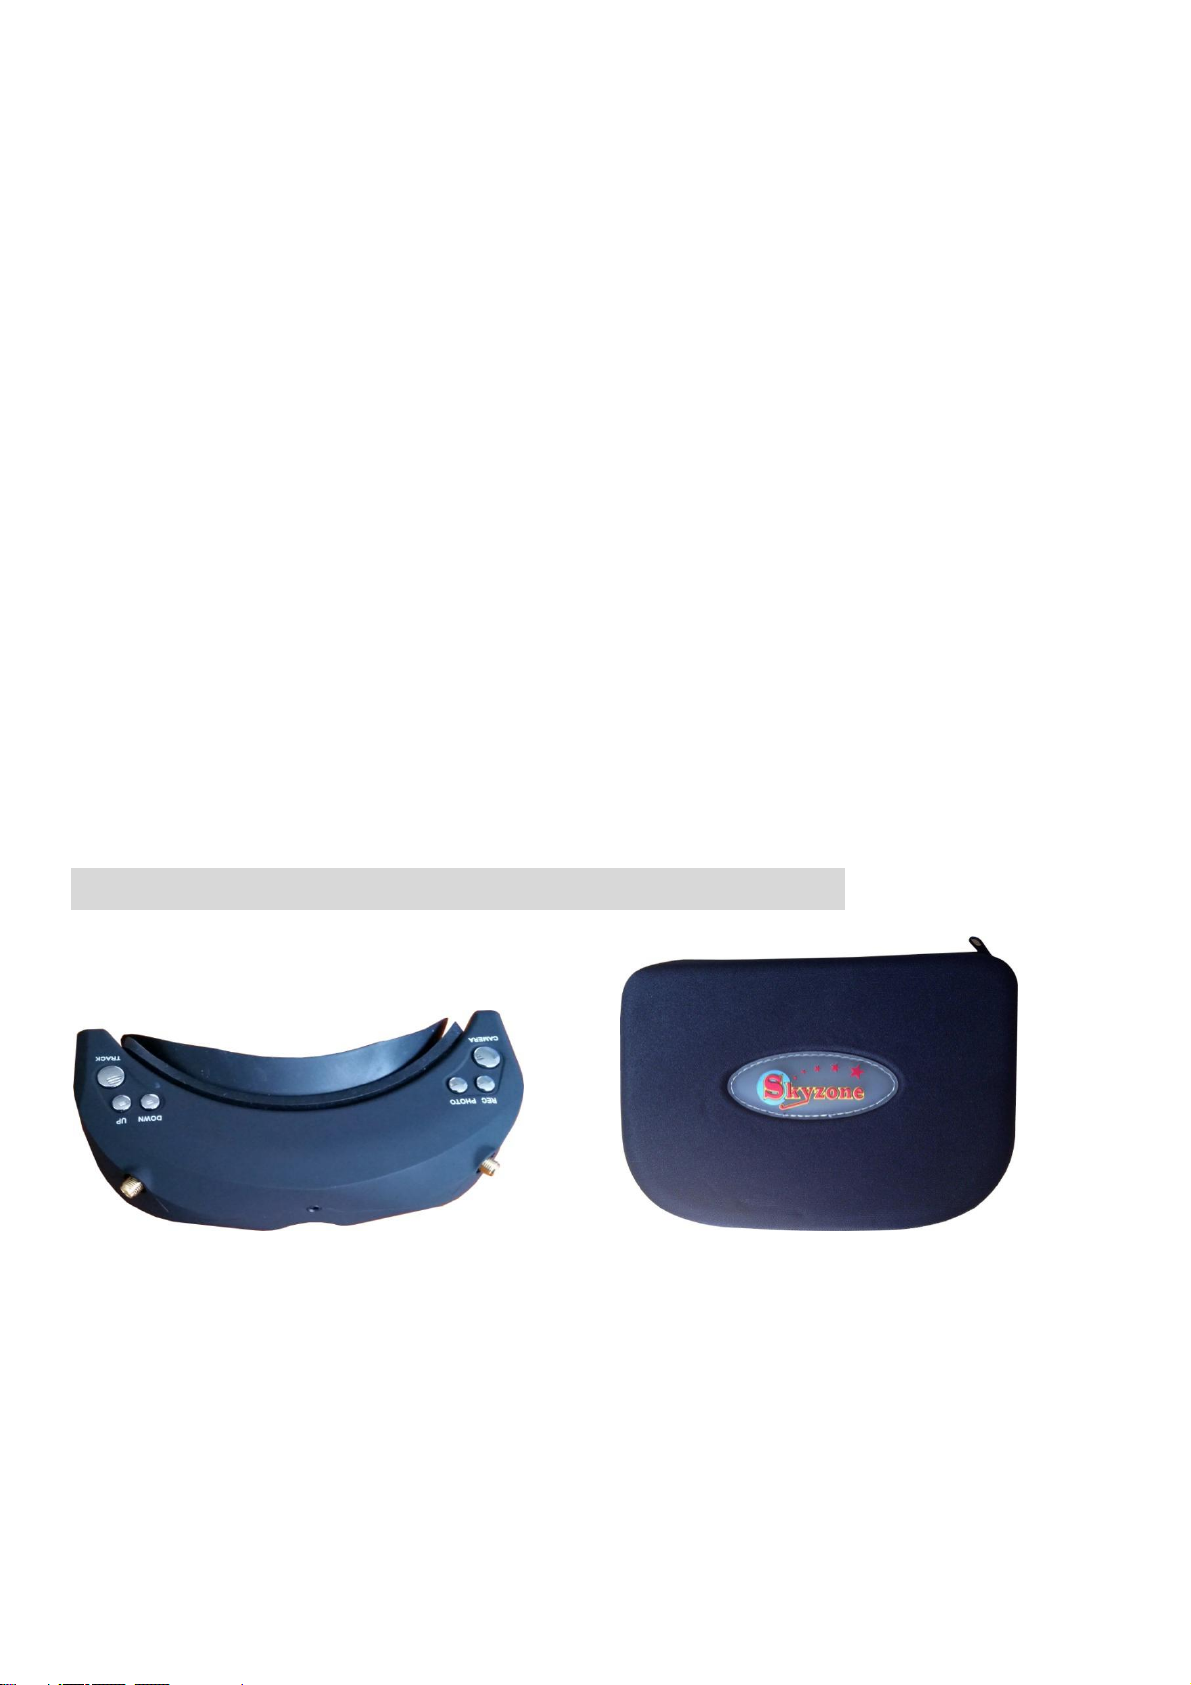
System Content
FPV GOGGLE Carry case
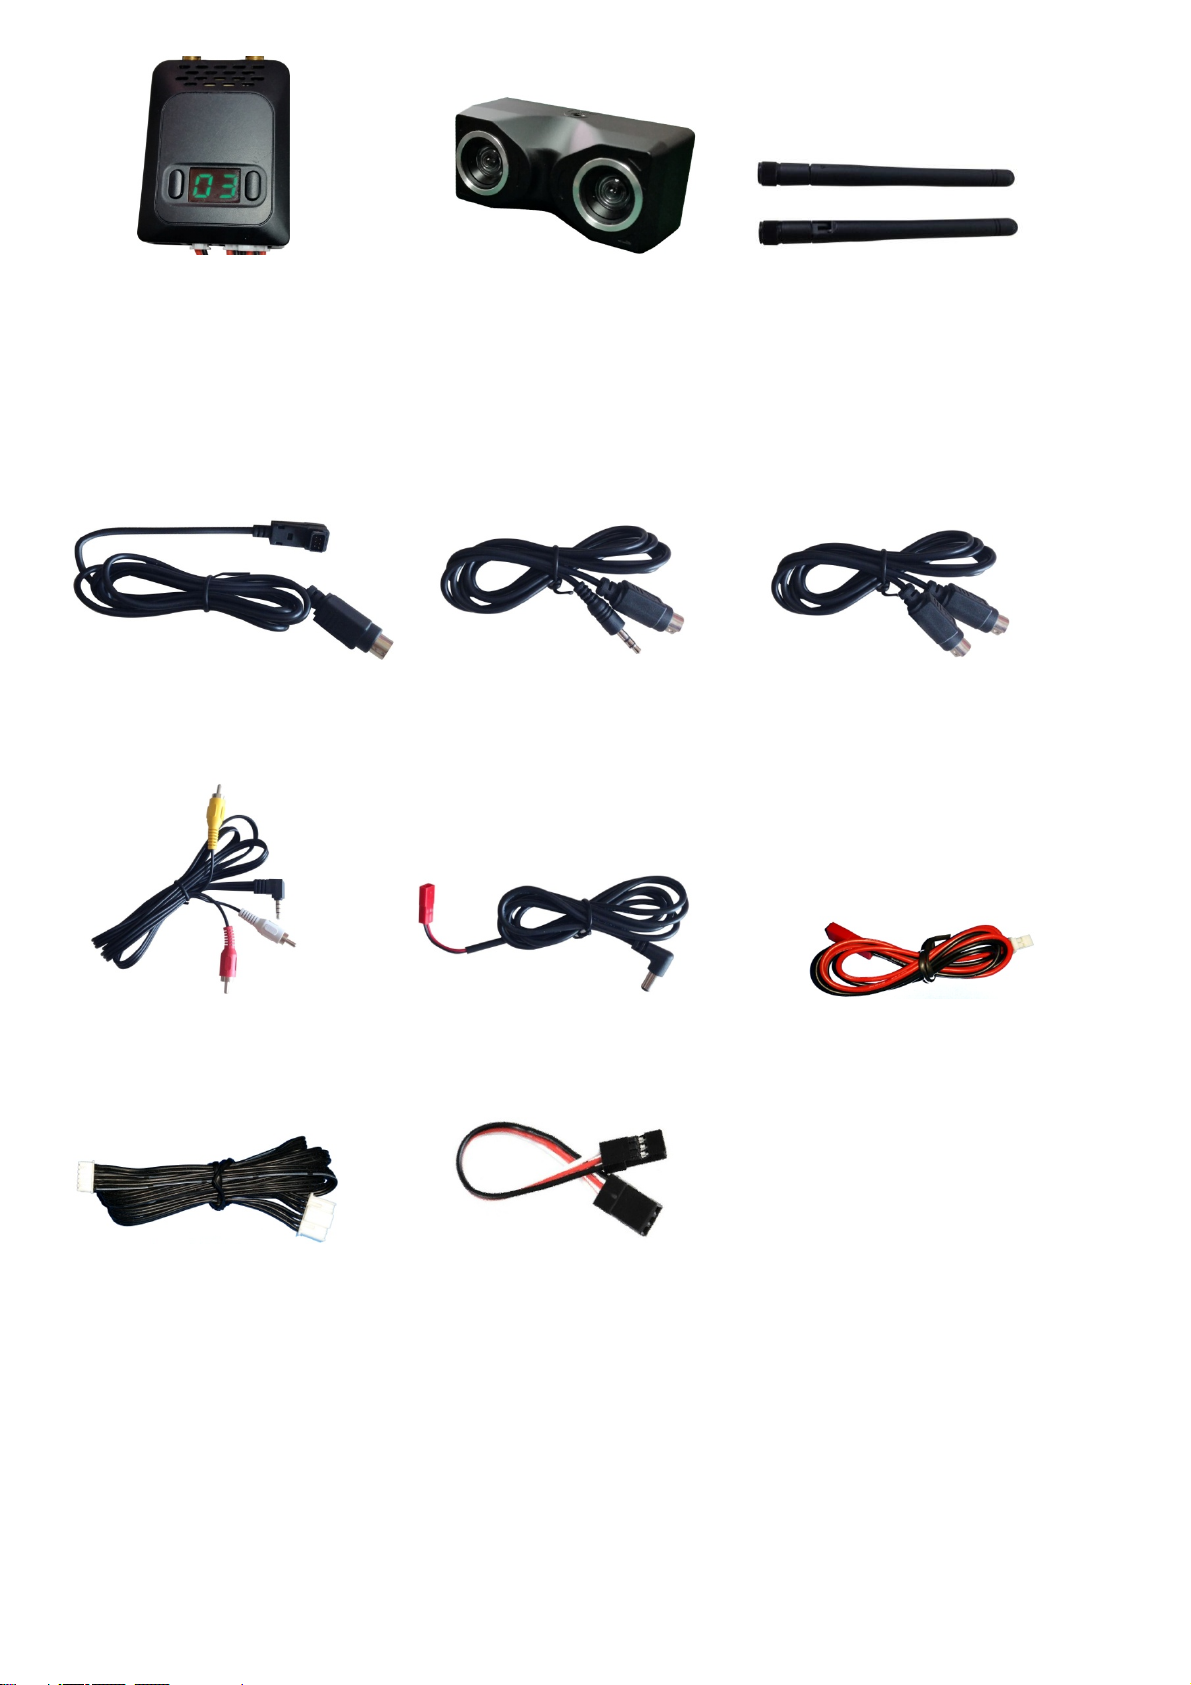
SKY201 Transmitter SKY301 Camera 5.8G 2dBi antenna X 4
Futaba data cable JR data cable WFLY data cable
AV cable Power cable 2P TX Power cable
6P Camera cable 3P TX Remote control cable x2
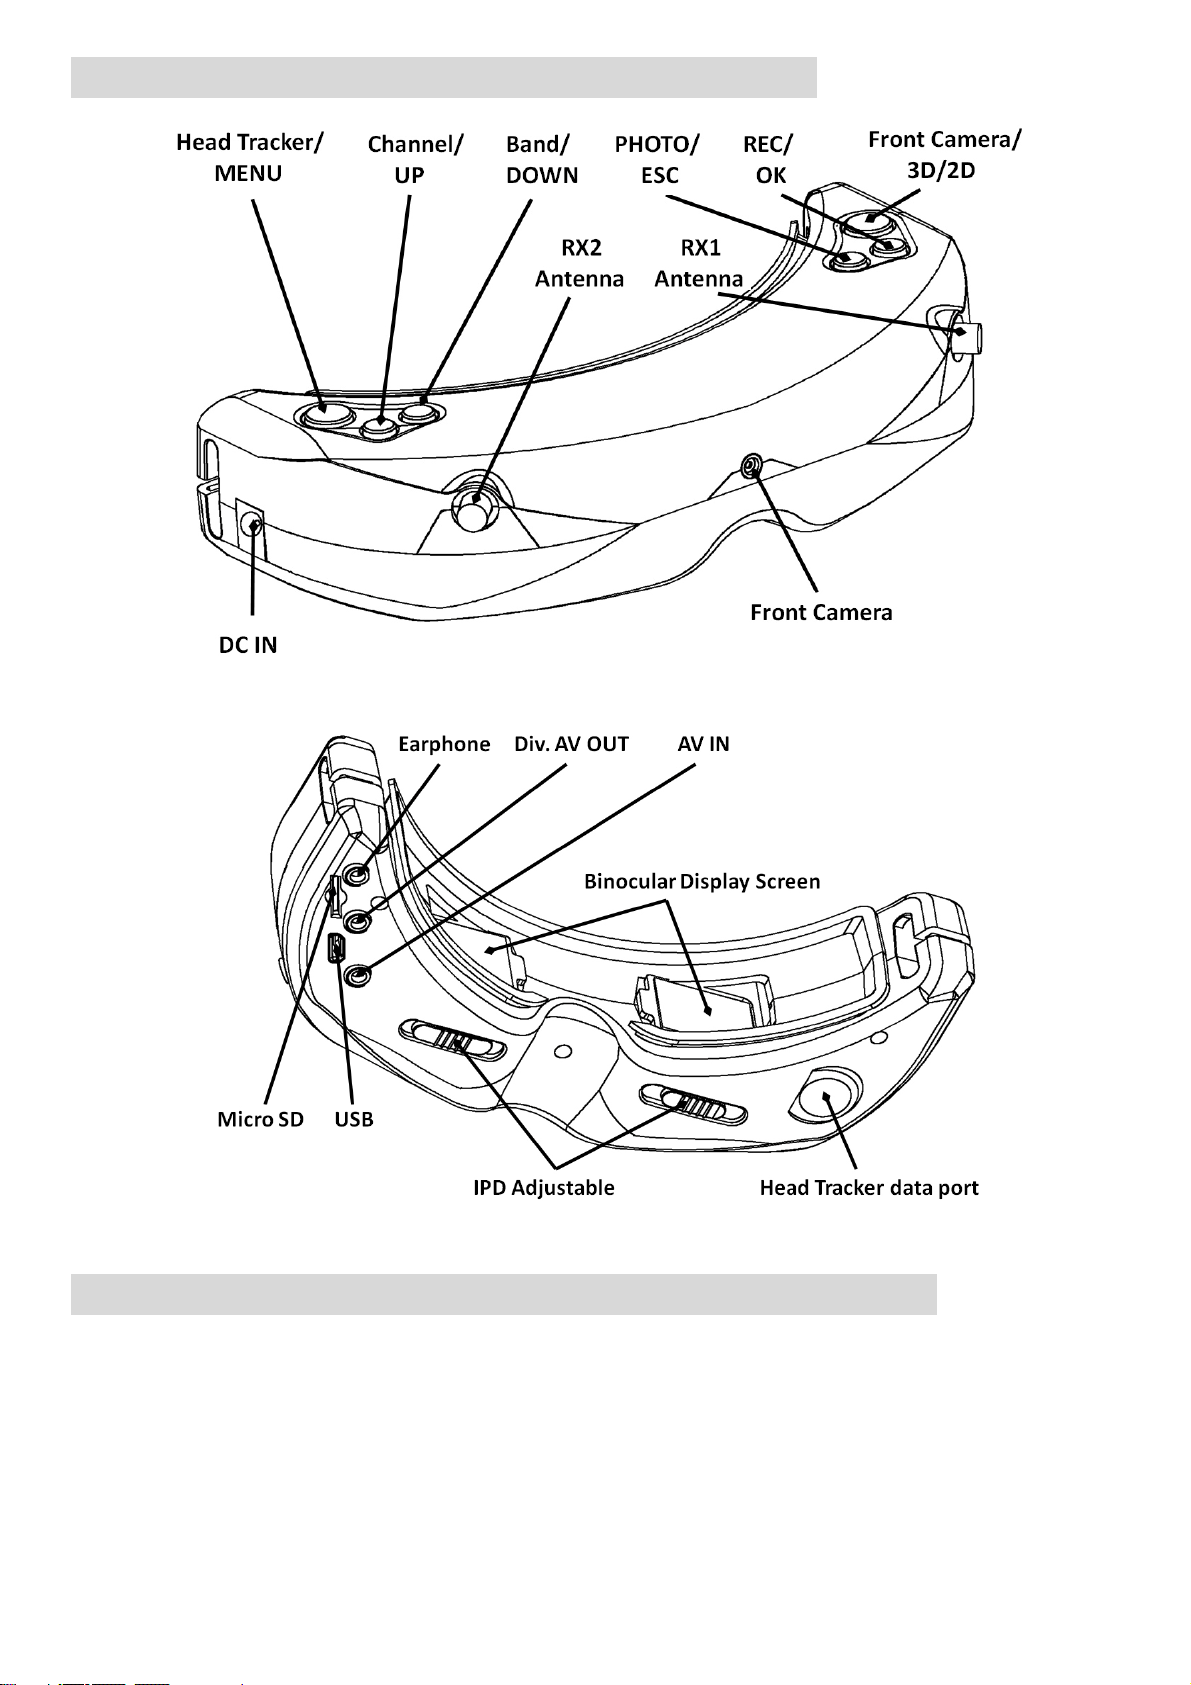
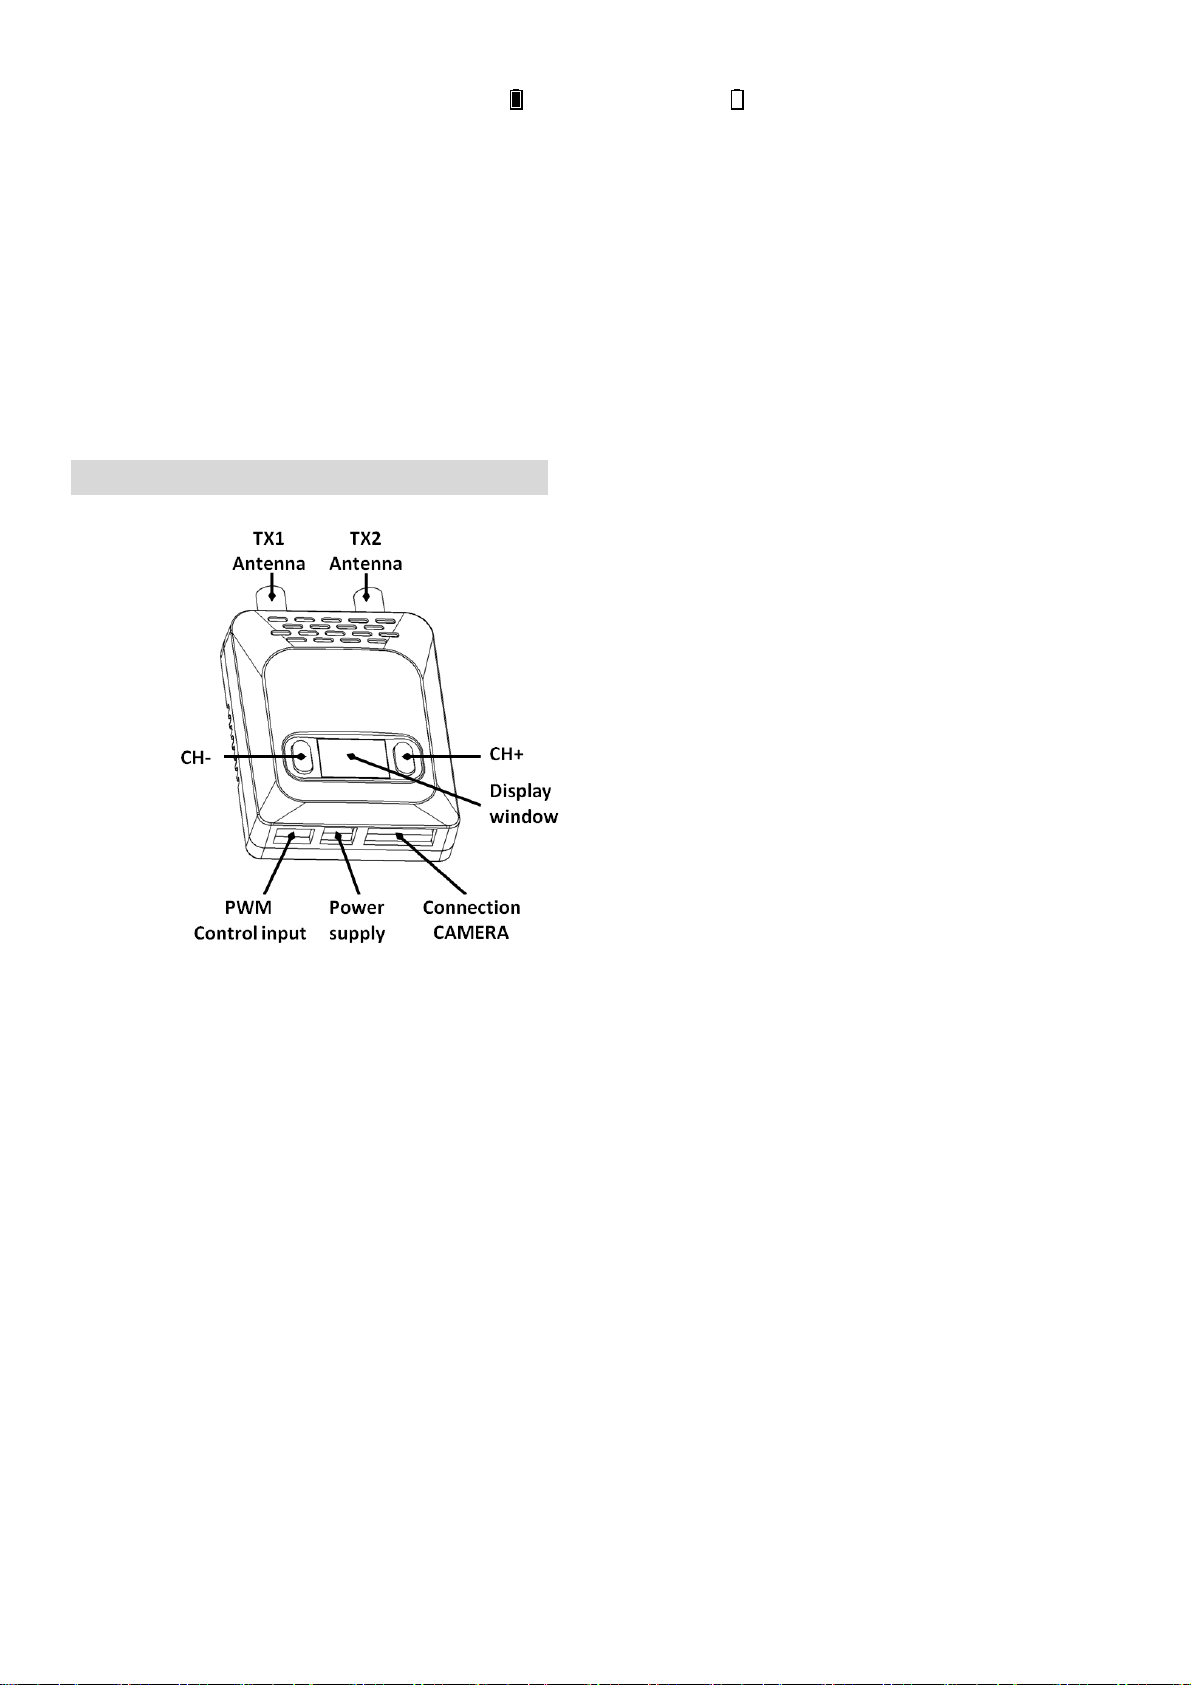
Function Diagram
Operation Instruction
The FPV Goggles SKY02 with Built-in 5.8Ghz Diversity Receiver and diversity Antenna inputs and two
independent video display modules can bring you the 3D Vision FPV experience of flying. It requests the
3D camera SKY301 and the dual transmitter SKY201. The two lens 3D camera that using the parallel
shooting method will bring you strong 3D vision for close-range shooting and weaker for long-distance
shooting. But there will be more vivid visual experience as a whole.
The FPV goggles can also work in normal diversity mode which is in 2D vision. And they are well

compatible to SKY201 and most of other transmitters. It supports 4 Bands and total 32channels (Bands
selection and Resulting Frequencies see details in Specifications)
Quick Start Guide
Preparation:
·Install the lens, lens hood, antennas and the TF card
·Connect the camera and transmitter and then power the transmitter and FPV goggles
·Short press <UP/DOWN> button to setup the same channel to the transmitter to view the image
·Pull the IPD Adjuster to adjust the inter-pupillary distance
Buttons:
TRACK Button:
·Short press the Track button to reset the Head Tracker in the normal mode
·Long press MENU button 3 seconds to enter MENU setup
·Switch between the 4 main menu with this button in MENU setup
CHANNEL Button:
·Short press to add channel in 3D RF mode
·Short press to in 2D RF mode,multiple press for loop adjustment
·Long press 3 seconds to turn up the volume in 3D RF、2D RF、AV IN、PLAYBACK mode
·It's up button in MENU setup
BAND Button:
·Short press to reduce channel in 3D RF mode
·Short press to adjust the band in 2D RF Mode, multiple press for loop adjustment
·Long press 3 seconds to turn down the volume in 3D RF、2D RF、AV IN、PLAYBACK mode
·It's down button in MENU setup
REC Button:
·Short press to start recording and press again to stop in 3D RF、2D RF、AV IN mode
·It's OK button in MENU setup
PHOTO Button:
·Short press to capture in 3D RF、2D RF and AV IN playback Mode
·It's ESC button in Menu setup
CAMERA Button:

·Short press to switch to Front Camera mode in any mode
·Long press 3 seconds to fast switch to 2D from 3D RF Mode
RF mode
3D mode
·3D mode in RF mode, and will be in 2D in all other modes.
·Press up/down button to adjust the 4 default channels.And it is also ok to custom the RF Band to select
the proper band and channels.(Caution:there will be interference if select frequency too close. The
recommended frequency interval is 40MHz
·Long press<CAMERA>button to fast switch to 2D mode.
2D mode
·They will work in diversity mode if close the 3D mode in the menu.And the setup in 3D mode will not
work.
·Press <CHANNEL>button to select channels, and <BAND> for band, multiple press to cycle.
·
Front Camera
·The Front Camera is Wide-Angle Camera with 680X480(VGA) Resolution and good low Illumination. It's
very convenient to view around without taking off the Goggles.
·Press "Camera" button to open the Front Camera.
·The Front Camera can neither be recorded nor display via AV OUT but for viewing around only. It's ok to
open the Front Camera while recording.
·It's ok to setup the goggles with the Front camera turning on
Image adjustment
·It's ok to adjust the Brightness、Contrast、Saturation、Hue、Sharpness Parameters in Image setup
Menu
·Press REC/OK button to enter setup and press UP/DOWN to adjust, press ESC to exit
·It's recommended to adjust while the image is good.
Head Tracker
·Please keep the goggles in horizontal position and steady, initialization is ok when there is 1 beep. Or
short press the <TRACK> button.
·short press the TRACK button with beep to setup the PPM to center.
·Setup PPM CHANNEL in the Menu :CH5-CH6、CH5-CH7、CH5-CH8、CH6-CH7、CH6-CH8、CH7-
CH8。
·Pan Tracking range :180degree(L90/R90)、120degree(L60/R60)、90degree(L45/R45),
Default90degree
·Tilt Tracking range :120degree(UP60/DOWN60)、90degree(UP45/DOWN45)、60degree
(UP30/DOWN),Default 90degree
·Pan Correction :setup for compensating Pan center offset,0~10 levels,actual angles refers to
rotation angle of the cradle head
·Tilt Correction :setup for compensating Tilt center offset,0~10 levels,actual angles refers to
rotation angle of the cradle head
Recording
·Please format the TF card firstly before record
· Recording is either ok in RF Mode or AV in Mode. Screen displays < >和<memory card info.>,Press
<REC>按button to start record,and < >in red with recording time displayed
·Press <PHOTO>to capture in preview mode with click (not ok while recording)
·There is both video and audio in default. It is ok to turn off audio in the system menu to record video
only.
·It is also ok to turn off the video record to save power.
Playback
Button functions in playback:
·Long press <REC> to enter playback in RF or AVIN mode. (Please don't connect the AV cable in
playback mode)
·REC <PLAY/PAUSE/OK>
·PHOTO <STOP/BACK>
·BAND <PREVIOUS /BACKWARD >
·CHANNEL <NEXT/FORWARD >
·TRACK <DELETE>
·Videos and photos are previewed directly in playback mode, the last 4 number of the file displayed in top
right corner and duration time for video clips。
·PRESS CHANNEL BUTTON for 2X,4X,8X quick play,and press REC back to normal speed.Press
PHOTO button back to preview or play again or other actions.
·Press TRACK button to delete the file and press REC to confirm.
·The files captured from other devices may not be played properly.
AV input
·The goggles support AV IN. The wireless model will close when the AV IN is connected to save power.
·Please plug off theAV IN cable if playback,and don't plug in while playing otherwise it will exit
automatically.
AV output
·AV Out is the diversity Video and Audio output
·Earphone port is audio output for connecting earphones,Each boot is automatically set to the lowest
volume to avoid sudden loud boot
Format SD card
·Format SD card and press<OK>to enter setup,press <UP/DOWN>and select < YES>,
press<OK>again to format
·Caution: all files will be deleted, please operate sincerely.
Factory settings
·Enter system menu and select Factory settings,press <OK> to setup,press <UP/DOWN> and select
< YES>, and the press <OK> to setup to factory default setting.
Screen OSD Overview
·Recording :Red while recording, Red while record module is closed, SD card is full or SD
CARD error.
·拍照:Press <PHOTO> button once in video preview, red once indicates one photo is captured.
·Memory card: normal with,capacity with GMB(1000MB)and red when memory is full.
·Mode:RF mode,AV IN mode, PLAYBACK mode
·Mode:Enabled only in RF MODE
·Mode:Displayed when enable Fast 2D in 3D mode and also indicated the signal source from RX1
or RX2.
·Mode:Displayed when close 3D mode or in AV IN, PLAYBACK, FRONT CAMER Mode.
·Mode:Displayed when connected to PC. It is ok to manage the memory card
·/ PLAY/PAUSE
·/ BACKWARD /FORWARD
· POWER:DC IN power, screen displays <DC IN>,Power by battery,it is ok to select from 2S, 3S, 4S,
5S, 6S, and displayed on the screen,indicates full power,indicates low power
·CHANNEL :Displayed in 3D Mode. When enable Custom mode in 3D mode ,Band and Channeled of
RX1/RX2 will also displayed ,Displayed BAND and CH in 2D Mode
Transmitter Operation Instruction
·Please make sure the antenna and transmitter are compatible otherwise the transmitter maybe damaged.
·Please place the transmitter in well-ventilated place and avoid to place in confined place or wrap the
transmitter tightly.
· Please don't touch the antenna or the mental parts to avoid burning by the parts
·SKY201 has two digit LED display. It showed channels in default channel mode and LEFT for TX1 band and
channel, RIGHT for TX2 band and channel in Custom channel mode.
· Press <CH->,<CH+> to adjust the channels, total 4 channels
· Long press <CH->or<CH+> to enter Custom setup. The display will flash quickly and then Press <CH-,CH+>
to setup band of TX1,TX2 separately. Long press <CH-,CH+> separately to ext Band setup. Short press
<CH->or<CH+> to setup channels . Please press <CH->or<CH+> at the same time to switch from custom to
default mode.
·It is also ok to control the channels of the transmitter through the PPM signal. To assign a Thirds switch in the
remote control ,C-H, to CH+,C-L to CH-. Connect 1PPM channel of the receiver to the S1 port of the
SKY201 to control mother channels.
·Connect another PPM channel of receiver to S2 of SKY201 in custom mode. S1 for TX1 and S2 to TX2.

Specifications (SKY301)
FOV 85 degrees (Diagonal)
F/NO F/NO=3.0
Resolution 720X576
Video Standard PAL
Video output level 1.0Vp-p Typ. / 75ohm
Audio output level 2.0Vp-p Typ. / 10Kohm
Power supply DC 5.0V/ 0.5A
Power Consumption 1.6W
Dimensions 65(L)X30(W)X28(H)mm
Weight g
Operating Temperature 0~+60
Specifications (SKY201)
Modulate Wideband FM Modulate
Video Standard NTSC/PAL
RF Output Impedance 50 ohm
RF Output Power
Min. Typ. Max. Units
26.0 27 28 dBm
ISM 5.8GHz 32 Channel, Dual Transmitter.

Wireless
Transmitt
er
Preset
Frequen
cy
CH 1 CH2 CH3 CH4
5733M / 5771M 5752M / 5790M 5809M / 5847M 5828M / 5866M
Custom
Frequen
cy
Band CH 1 CH2 CH3 CH4 CH5 CH6 CH7 CH8
A 5865M 5845M 5825M 5805M 5785M 5765
M 5745
M 5725
M
B 5733M 5752M 5771M 5790M 5809M 5828
M 5847
M 5866
M
E 5705M 5685M 5665M 5645M 5885M 5905
M 5925
M 5945
M
F 5740M 5760M 5780M 5800M 5820M 5840
M 5860
M 5880
M
Video input level 1.0Vp-p Typ. / 75ohm
Video Band Width 8.0MHz
Audio input level 2.0Vp-p Typ. / 10Kohm
Audio carrier Frequency 6.5MHz
Power supply DC 7.0V~26V/ 1.5A
Power Consumption 12V input: 7.5W
Dimensions 59(L)X46(W)X16(H)mm (Not include prominent part)
Weight g
Operating Temperature 0~+70
Specifications (SKY02)
Binocular
Display
FOV 30 degrees (Diagonal)
Resolution 854X480(WVGA), 1,229,760 color sub-pixels
Brightness 350cd/㎡
Interpupillary
distance(IPD)
57.5-69mm Adjustable

Wireless
Receiver
ISM 5.8GHz 32 Channel, Diversity receiver.
Preset
Frequen
cy
CH 1 CH2 CH3 CH4
5733M / 5771M 5752M / 5790M 5809M / 5847M 5828M / 5866M
Custom
Frequen
cy
Band CH 1 CH2 CH3 CH4 CH5 CH6 CH7 CH8
A 5865M 5845M 5825
M 5805
M 5785
M 5765
M 5745
M 5725
M
B 5733M 5752M 5771
M 5790
M 5809
M 5828
M 5847
M 5866
M
E 5705M 5685M 5665
M 5645
M 5885
M 5905
M 5925
M 5945
M
F 5740M 5760M 5780
M 5800
M 5820
M 5840
M 5860
M 5880
M
Sensitivity -90dBm±1dBm
Antenna port 2 X SMA,50ohm
Front Camera
FOV 60 degrees (Diagonal)
Resolution 640X480(VGA)
FOCAL LENGTH f=4.0mm
F/NO F/NO=2.8
Head Tracker Sensor Magnetic, Inertial and gyro
Output PPM 8 channel, Optional 5-6CH,5-7CH,5-8CH,6-7CH,6-8CH,7-
8CH
Record
Micro SD Support to 32GB
Compression MJPEG, 30fps, AVI
Picture JPEG
Record rate 6Mbps
AV Signal
Video Standard NTSC/PAL
Video output level 1.0Vp-p Typ. / 75ohm
Audio output level 1.0Vp-p Typ. / 10Kohm
AV Port
Div. AV Diversity Video, Audio output
EAR OUT(3.5mm3P) Stereo 16Ω/150mW
AV IN(3.5mm4P) Video、Audio input
Power Supply
DC IN DC 7~26V/ 1A
Power 12V input: 5.4W
Dimensions 168(L)X92.5(W)X41(H)mm (Not include prominent part)
Weight g
Operating Temperature 0~+60
Other manuals for sky02
1
Table of contents
Other SkyZone Accessories manuals


Popular Accessories manuals by other brands


Minebea Intec
Minebea Intec Pendeo PR 6204 Series installation manual

HB Products
HB Products HBX Vapor Quality sensor Installation and configuration guide

Cyndar Electronic Technology
Cyndar Electronic Technology XD-TOF-25 operating instructions

Jabra
Jabra ROX WORELESS Getting started guide

Dometic
Dometic CFF SERIES operating manual

Perel
Perel E305DM-1 user manual


