Smaak JAB User manual

JAB
OWNER’S MANUAL


2
Owner’s manual
Contents
1. GENERAL............................................................................................................................... 4
1.1. Revisions........................................................................................................................ 4
1.2. Warnings ........................................................................................................................ 4
1.3. Waste management ....................................................................................................... 5
1.4. Authorized technician..................................................................................................... 5
2. SPECIFICATIONS AND INSTALLATION................................................................................ 6
2.1. Dimensions..................................................................................................................... 6
2.2. Certifications................................................................................................................... 6
2.3. Electrical specifications .................................................................................................. 6
2.4. Specifications ................................................................................................................. 7
2.5. Components identification .............................................................................................. 7
2.6. Options........................................................................................................................... 8
3. OPERATING INSTRUCTIONS ............................................................................................... 9
3.1. Optimal use .................................................................................................................... 9
3.2. Working principles.......................................................................................................... 9
3.3. Product layout in the vacuum chamber .......................................................................... 9
3.3.1. Solids of minimal thickness.................................................................................... 10
3.3.2. Solids of medium thickness (from 1 to 2 in / 25 to 50 mm) .................................... 10
3.3.3. Solids of higher thickness (from 2 to 4 in / 50 to 100 mm) ..................................... 10
3.3.4. Liquids or solids with liquids................................................................................... 11
3.4. Product particularities................................................................................................... 11
3.4.1. Suggestions........................................................................................................... 11
3.4.2. Packaging liquids................................................................................................... 12
3.4.1. Products to avoid and products that require special treatment .............................. 13
3.5. Vacuum packing........................................................................................................... 14
3.5.1. Packing sequence.................................................................................................. 14
3.5.2. Basics .................................................................................................................... 15
3.5.3. Function mode....................................................................................................... 16
3.5.3.1. Program creation............................................................................................. 16
3.5.3.2. Program deletion............................................................................................. 16
3.5.4. Programming mode ............................................................................................... 16

3
Owner’s manual
3.5.4.1. Program identification...................................................................................... 16
3.5.4.2. Vacuum level by sensor .................................................................................. 17
3.5.4.3. Vacuum plus.................................................................................................... 17
3.5.4.4. Sealing time..................................................................................................... 18
3.5.5. Running a vacuum cycle........................................................................................ 18
3.5.6. Diagnostic menu.................................................................................................... 19
3.5.7. Menus structure..................................................................................................... 19
3.5.7.1. Function mode................................................................................................. 19
3.5.7.2. Programming mode......................................................................................... 19
3.5.7.3. Diagnostic menu.............................................................................................. 19
3.6. Return to atmospheric pressure speed adjustment (soft air)........................................ 20
4. DAILY MAINTENANCE......................................................................................................... 21
4.1. Cleaning....................................................................................................................... 21
4.2. Verifications.................................................................................................................. 21
5. TROUBLESHOOTING .......................................................................................................... 22
6. MAINTENANCE.................................................................................................................... 24
6.1. Maintenance schedule.................................................................................................. 24
6.2. Vacuum pump .............................................................................................................. 25
6.2.1. Parts identification.................................................................................................. 25
6.2.2. Oil change.............................................................................................................. 25
6.2.2.1. Draining the oil ................................................................................................ 25
6.2.2.2. Filling up the vacuum pump............................................................................. 26
6.2.3. Replacing the exhaust air filter............................................................................... 26
6.3. Seal bars ...................................................................................................................... 27
6.3.1. Parts identification.................................................................................................. 27
6.3.2. Replacing the Teflon™ tape................................................................................... 27
6.3.3. Replacing the elements ......................................................................................... 28
7. SALES CONDITIONS AND WARRANTY ............................................................................. 30
8. APPENDIX................................................................................................................................i
8.1. Electrical schematics........................................................................................................i
8.2. Pneumatical schematics..................................................................................................v
8.3. Mechanical schematics ..................................................................................................vi

4
Owner’s manual
1.GENERAL
1.1. Revisions
Revision
Date
Modifications
0
14-05-2020
Original manual
1.2. Warnings
This symbol points out important safety
instructions which, if not followed, could
endanger the personal safety and/or
property of yourself and others. Read and
follow all instructions in this manual before
attempting to operate your appliance.
Failure to comply with these instructions
may result in personal injury.
• Read, understand, and follow all
instructions in the manual and on the oven
before starting. Keep this manual in a safe
place for further and regular reference and
for ordering replacement parts.
•Only allow responsible individuals familiar
with the instructions to operate the
appliance. Be sure to know the controls
and how to stop the appliance quickly.
• Never put your hands near moving parts.
• Only allow qualified individuals to perform
maintenance of your appliance.
• Remove all obstacles, which may interfere
with the appliance functions.
• Clear the work area of any potential
source of danger such as electrical wires,
buckets, knives, etc.
• Make sure that everyone else is clear of
your work area before operating the
appliance.
• Do not sit or stand on the appliance.
• Always turn off the appliance after your
work is done. Never leave a running your
appliance unattended.
• Always disconnect the appliance before
attempting any maintenance.
• Do not wear loose-fitting clothes or jewelry
as they may get caught in moving parts of
the appliance.
• Always wear appropriate shoes, to prevent
injury.
• Work only in daylight or good artificial
light.
• Do not operate this appliance while under
the influence of alcohol or drugs.

5
Owner’s manual
1.3. Waste management
• Use proper containers when draining the
oil. Do not use food or beverage
containers that may mislead someone into
drinking from them. Properly dispose of
the containers, or store them in a safe
place immediately after draining the oil.
• Prior to disposal, determine the proper
method to dispose of waste from your
local office of Environmental Protection
Agency. Recycling centers are established
to properly dispose of materials in an
environmentally safe fashion.
1.4. Authorized technician
WARNING
All installation and/or service on this appliance must be performed by qualified, certified,
licensed and/or authorized installations or technical service personnel. All electrical, gas and
plumbing connections must be made by authorized technicians and in compliance with all
electrical, gas, plumbing and safety requirements.
It is possible to obtain these services by contacting customer service, a sales representative or
a local service agency.
DEFINITIONS
QUALIFIED INSTALLATION PERSONNEL
Qualified installation personnel can be represented by an individual, a firm, a corporation or a
company which, either in person or through a representative, is involved and is responsible for:
1. The installation of electrical wiring from the electric meter, main control box or service outlet
to the electric appliance. The qualified installation technician must be experienced in such
work, be familiar with all required precautions, and have complied with all requirements of
state or local authorities having jurisdiction.
2. The appliance, when installed, must be electrically grounded in accordance with local
codes, or in the absence of local codes, with the National Electrical code ANSI/NFPA 70, or
the Canadian Electrical code, CSA 22.1 No 109 or conform to UL STD 197.
6
Owner’s manual
2.SPECIFICATIONS AND INSTALLATION
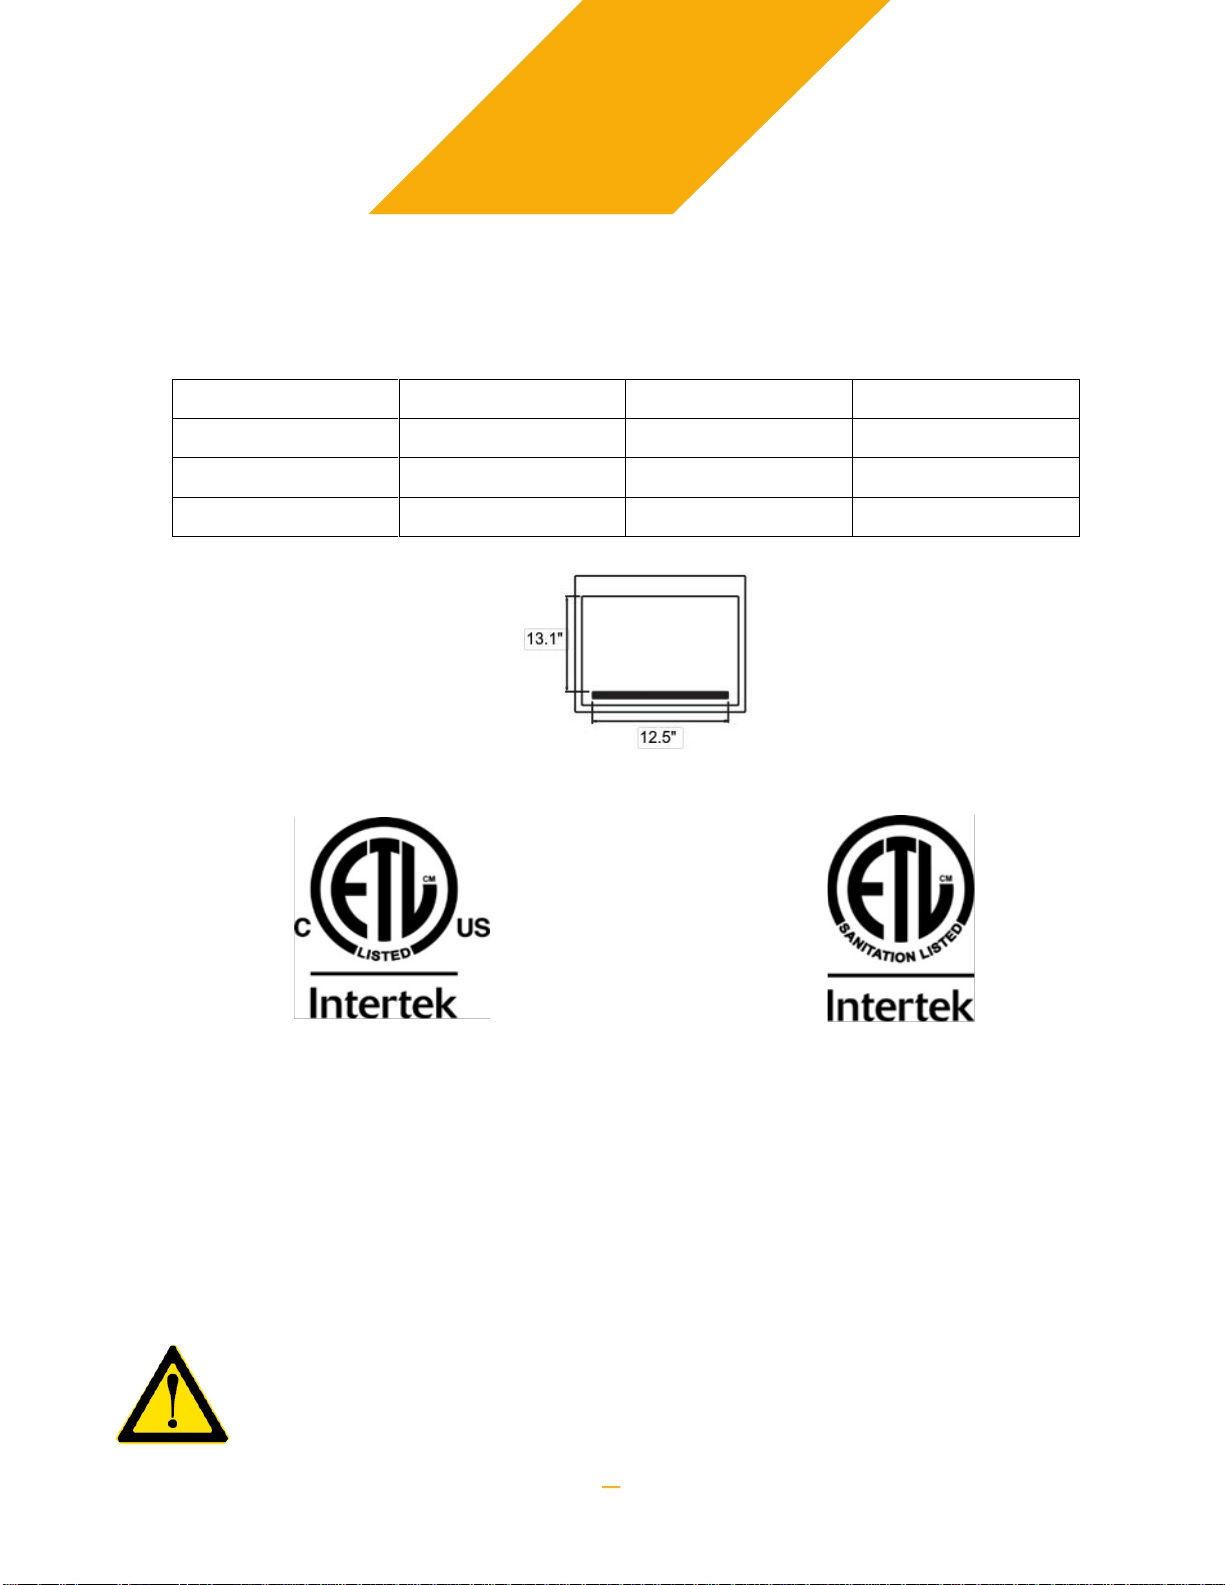
2.1. Dimensions
Hauteur
Depth
Width
Package (wood)
25" (635 mm)
32" (815 mm)
29" (740 mm)
Appliance
17" (430 mm)
20.7" (525 mm)
17.2" (435 mm)
Chamber area
4" (100 mm)
13.1" (335 mm)
12.5" (315 mm)
2.2. Certifications
ETL listed C & US
Conforms to UL STD 73
Certified to CAN/CSA C22.2 No. 68
ETL Sanitation Listed
Conforms to NSF/ANSI STD 169
2.3. Electrical specifications
Voltage: 120 V / 1Φ / 60 Hz
Current: 15 A
Pump: 8 m³ / 0.35 kW
This appliance requires a dedicated power outlet and circuit. Usage of extension
cords are strongly not recommended and should be of gauge 12 AWG or larger
(Heavy Duty). Usage of an undersized extension cord can cause serious damage
to the vacuum pump of the appliance.

7
Owner’s manual
2.4. Specifications
- Built in stainless steel with clear lid
- Pouch cut-off
- Soft-air that allow a slow return to atmospheric pressure
- 8m³ pump
- Microprocessor
- Precision vacuum sensor
- Shims to adjust product height
- Silencer that reduce noise when returning at atmospheric pressure
2.5. Components identification
1- Clear lid
2- Stainless steel frame
3- Lid retention clip (Only used to keep the lid down when in storage, DO NOT USE
while the appliance is operating)
4- Seal bars (Lower seal bar not visible on the picture)
5- Lid seal
6- Removable shims for the product packaging
7- Microprocessor
8- Legs
4
1
5
3
6
2
4
7
8

8
Owner’s manual
2.6. Options
1- Inclined shim JAB FILLER: Allow to place the product in the optimal angle every
time, ideal for liquids.
Product code: SMAAK_JAB_FILLER
2- JAB CART: Allow you to easily carry your appliance around while offering a work
area at the ideal height.
Product code: SMAAK_JAB_CART
3- JAB MAINTENANCE KIT: Everything you need to perform preventive maintenance
on your appliance.
Product code: SMAAK_JAB_MK

9
Owner’s manual
3.OPERATING INSTRUCTIONS
3.1. Optimal use
In order to optimize the efficiency of your appliance, please read the following advices
carefully.
- Choosing the proper location to install your appliance is really important to maximize
the output you can get from it. Take care of anticipating the area required to place the
product to be packaged, the packaged product and the supplies (pouch) required
beside the area required for the appliance itself.
- Take note that the appliance is required to be installed on a flat surface otherwise the
lid might not close properly.
- To obtain packages of superior visual appearance, the pouch needs to be of the
proper size for the product. Pouch excess should never be more than 50 mm (2 in) of
the other side of the seal bars.
- To get a good seal, never leave a liquid or fat deposit on the pouch where the seal will
be.
- Before turning on the appliance, always check oil level using the glass sight installed
on the pump and always make sure to check the oil level at least once a week. Never
use oil that was not recommended by the manufacturer when changing the oil. To
prevent leaks the appliance is delivered without any oil in the pump, you must add
new oil once the appliance is in place. Please refer to section 6.2.2.2 for the required
instructions.
3.2. Working principles
Vacuum packaging is done in 3 steps. First the vacuum is done in the chamber including
the interior of the package holding the product. Then the seal bars close themselves and
apply heat and pressure to seal the pouch, once this step is completed air is let inside the
vacuum chamber, pressing against the pouch and the product inside it.
3.3. Product layout in the vacuum chamber
Product layout is crucial to get a nice quality package.
10
Owner’s manual
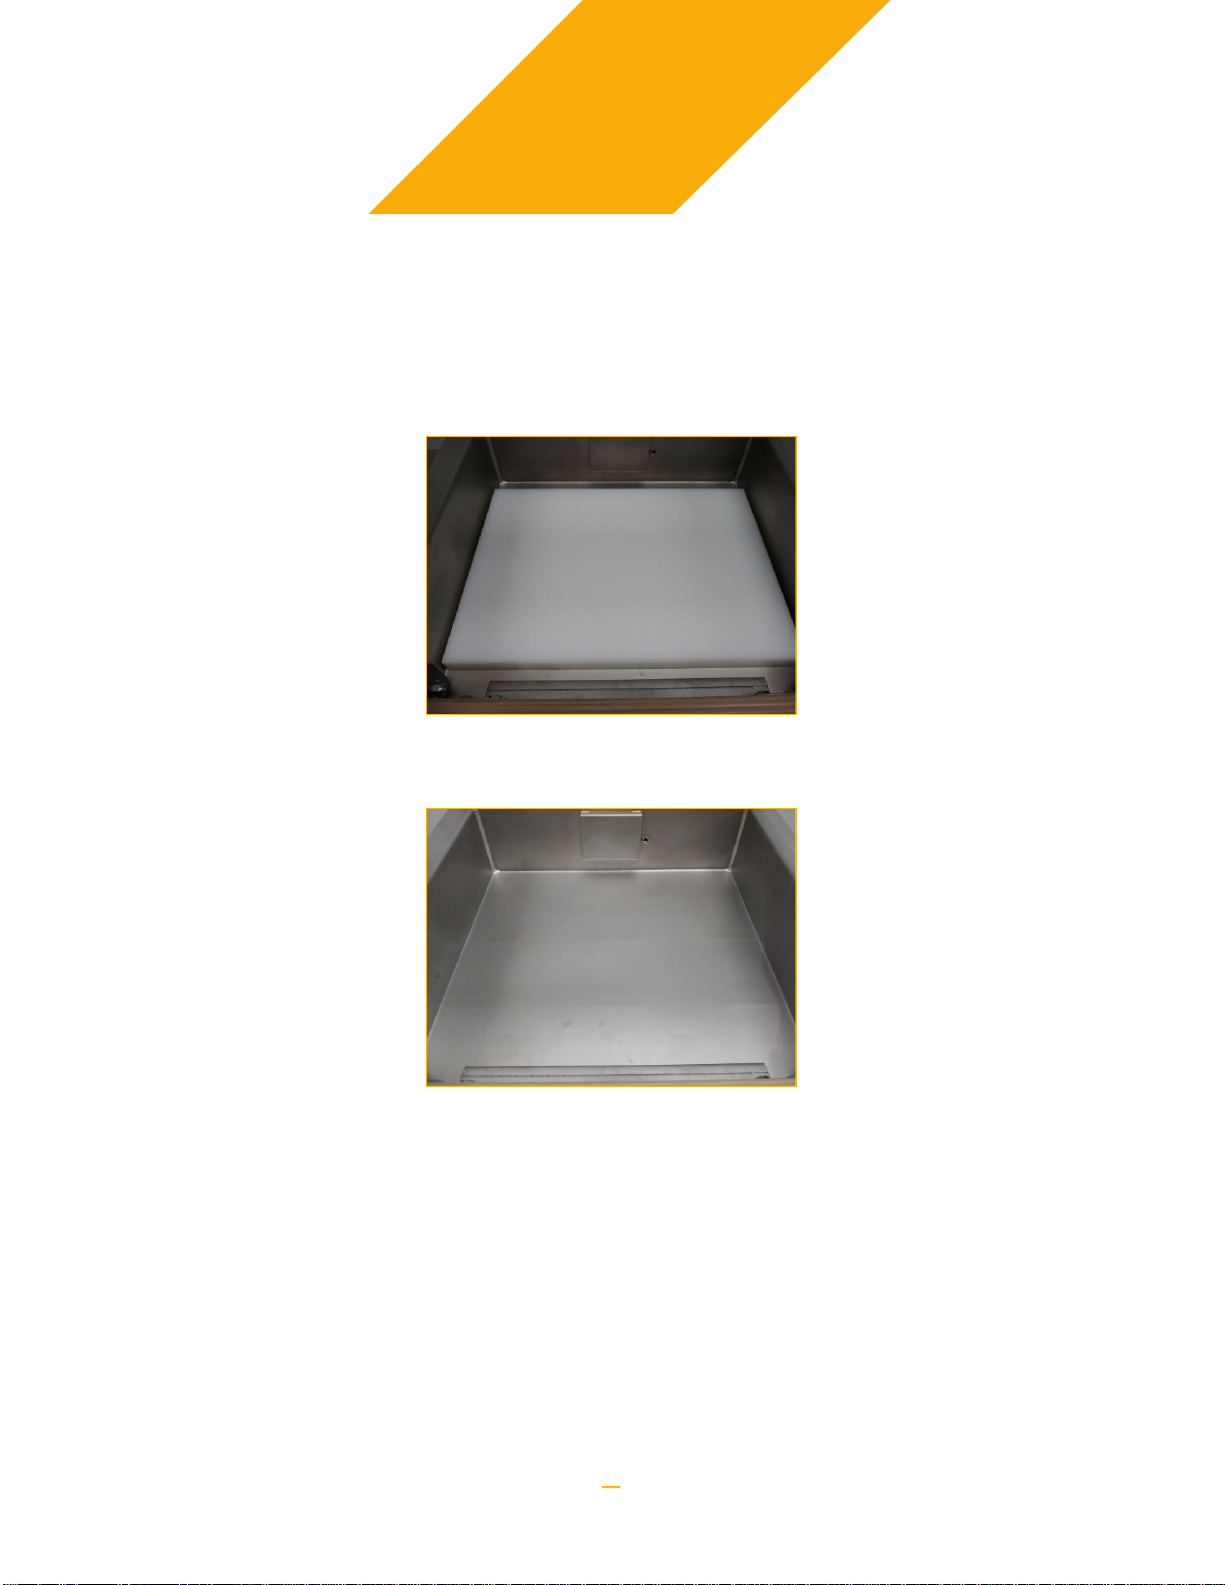
3.3.1. Solids of minimal thickness
Using two superposed shims is strongly recommended when dealing with thin
products. This facilitate the pouch manipulation while filling the extra space in the
vacuum chamber, reducing the required amount of time to get a proper vacuum level.
3.3.2. Solids of medium thickness (from 1 to 2 in / 25 to 50 mm)
Packaging using a single shim is strongly recommended
3.3.3. Solids of higher thickness (from 2 to 4 in / 50 to 100 mm)
Packaging without any shim is strongly recommended
11
Owner’s manual
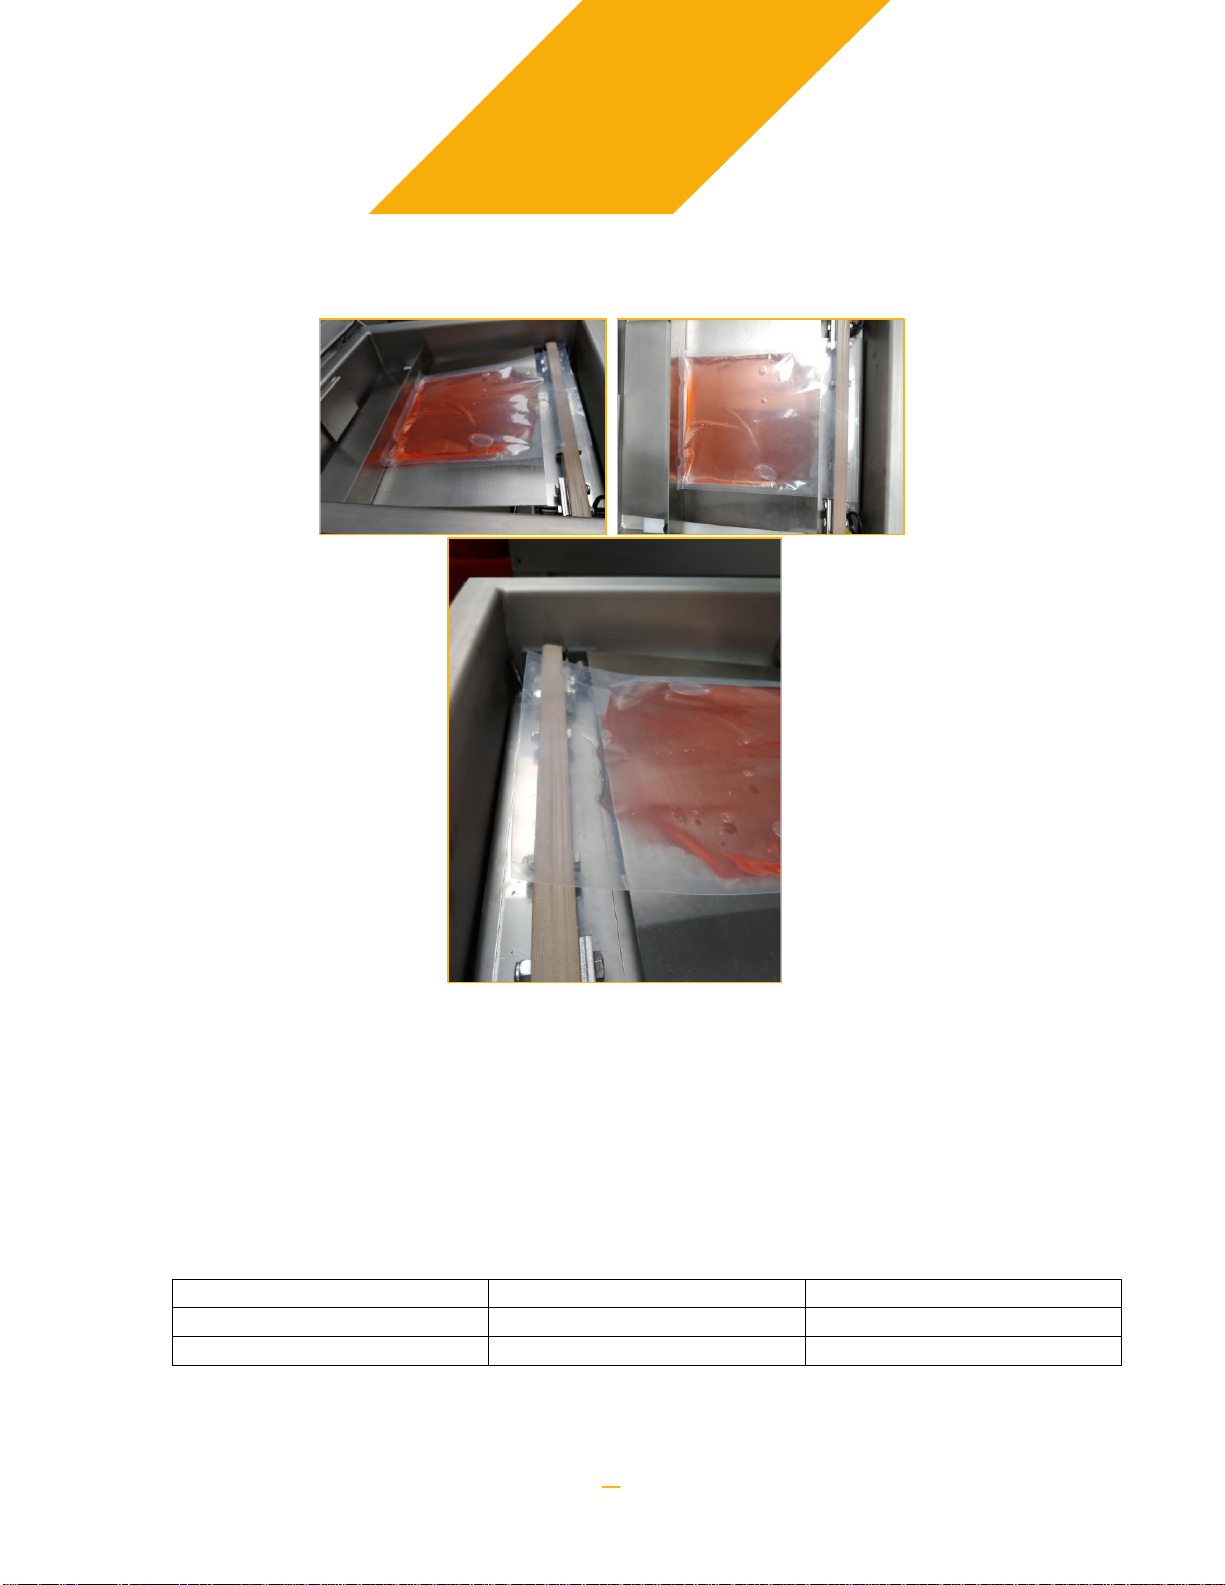
3.3.4. Liquids or solids with liquids
Packaging using the inclined shim SMAAK JAB FILLER with or without an extra shim
is strongly recommended.
3.4. Product particularities
Depending on the product to be packaged, being meat, soup, sauce or anything else,
some particularities will influence the method used to get a proper vacuum.
3.4.1. Suggestions
Product
Vacuum level
Vacuum extra time
Meats
98.5 %
4 s
Liquids
90.0 %
4 s

12
Owner’s manual
3.4.2. Packaging liquids
This appliance can be used to package liquids like soups and sauces, but in order
to preserve your product quality, you must take care of not boiling it inside the
vacuum chamber. It is really important to know that the boiling point of a liquid
varies depending on the pressure around it. When a vacuum is applied to a
product in a vacuum chamber, the boiling point (temperature) of the liquids inside
your product gets lower.
Please look at the following table for an example with water. You will notice that to
boil water at 99% of vacuum you only need to have a product at 7°C or more. This
means that if you are trying to seal a product at room temperature with a high
concentration of water in it, like soup, and trying to reach a vacuum level of 99%,
you won’t be able to make it because the steam from the water boiling in your
package will prevent the machine reaching a level that low, and you won’t be able
to go higher than 98% vacuum. So, it is really important to take note of the
temperature, composition and liquid content of your product since those factors
will have a large influence on the vacuum level you will be able to reach. It’s
preferable to have a lower vacuum level target and add some extra vacuuming
time in order to confirm getting a proper vacuum for the package.
Water boiling point from vacuum pressure table
Pressure (mbar)
Equivalent vacuum %
Boiling point (°C)
1013
0
100
912
10
97
810
20
94
709
30
90
608
40
86
507
50
81
405
60
76
304
70
69
203
80
60
101
90
46
51
95
33
41
96
29
30
97
24
20
98
18
10
99
7
5
99.5
-2

13
Owner’s manual
3.4.1.Products to avoid and products that require special treatment
Some products should not be vacuum packed at all to prevent botulism and other
similar sicknesses. Those sicknesses are caused by anaerobic bacteria, which
means that the thrive in an environment without air.
These products should never be vacuum packed.
- Raw mushrooms
- Garlic
- Fresh onions
- Soft cheese (Blue cheese, brie, camembert, ricotta, unpasteurized
cheese and similar cheese)
These products require special attention
- Fresh vegetables that where just cooked or steamed (Safe to package
once they reach room temperature)
- Fresh fish (Safe if frozen)
- Fresh cheeses like cottage cheese or cream cheese (Safe if pasteurized)
These products should not be packaged fresh and require to be blanched,
dried and then packaged.
- Arugula
- Bok choy
- Broccoli
- Brussel sprouts
- Cabbage
- Cauliflower
- Kale
- Radishes
- Turnips

14
Owner’s manual
3.5. Vacuum packing
3.5.1. Packing sequence
Choosing the proper pouch is of the upmost importance to get a nice-looking quality
package.
1. Select the proper pouch
It is imperative to choose a pouch of the proper dimension for your
appliance. The width of the pouch’s opening must be shorter than the
length of the seal bars. If you’re packaging multiple pouches at the same
time, make sure to allow enough gap between bags as they are not to be
superposed. Allow enough of a gap so the pouch will not touch the lid once
the lid is closed, keep a 2-3 cm (≈1 in) gap between the pouch and the lid.
2. Fill the pouch with product and place it in the chamber
Fill the pouch with the product making sure that the area where the seal will
be remains clean and dry at all time, if contaminated, wipe the interior of the
pouch using a dry and clean rag, or use a toll that will allow the pouch to
remain clean (ex: a funnel). For a liquid, use the inclined SMAAK JAB
FILLER accessory to keep the liquid level below the seal bar. The pouch
must be laid flat without wrinkles. The pouch and the product must be
placed inside the chamber for packaging.
3. Close the lid
Close the lid firmly for about 2-3 seconds.
4. Inspect package
Once the lid open by itself, remove the pouch and inspect the end result.
- Make sure there is no air bubbles or leaks: If the package is not
entirely void of air bubbles, raise the vacuum level, or the vacuum plus
time if dealing with liquids, and try again.
- Make sure the seal is strong enough and airtight: The seal must be
clear and even. If the seal is incomplete, look like some parts that are
thinner or don’t’ look like has fused properly, or if it’s easy to pull apart,
add 0.2s to the sealing time and try again. If the seal is whiteish, have
a milky texture, or look cloudy, reduce the seal time by 0.2s and try
again
15
Owner’s manual
3.5.2. Basics
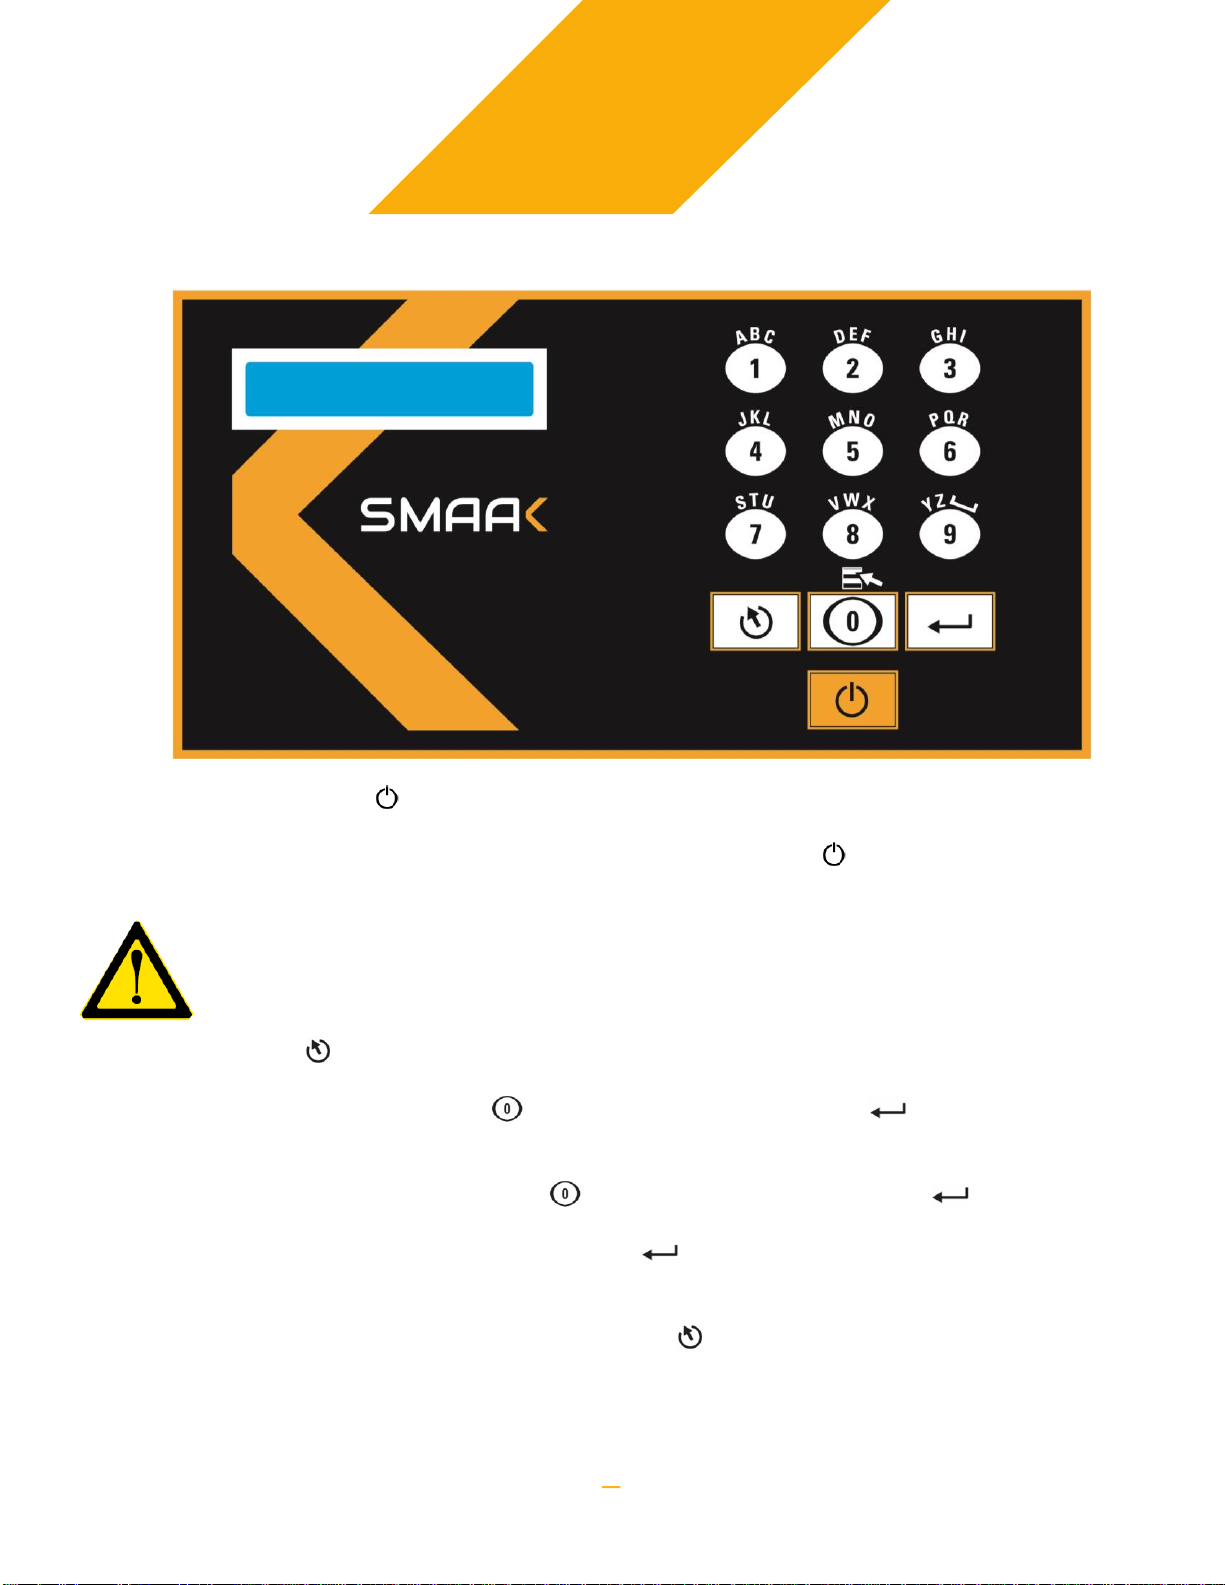
Tactile membrane
Use the power key to turn the appliance ON and OFF. Once the appliance is
turned on, the ident of the last program used is displayed on the display. To turn off
the appliance, first turn off the appliance using the power key, and then remove
the power cord from the wall outlet.
WARNING! Do not pull the plug from the outlet using the cable. Firmly hold the plug
with your hand and pull it out from the outlet. It is imperative to unplug the appliance
for the wall outlet before cleaning or performing any maintenance.
Use the key to switch between programming mode and function mode.
In function mode, use the key to select a function and the key to gain access
to the function.
In programming mode, use the key to select a program and the key to edit it.
In edition mode of the program, use the key to switch between parameters.
Take note that the selected parameter will blink to indicate being in edition mode.
Once the last parameter is shown, the display will switch back to programming mode
automatically. It is also possible to use the key to switch back to programming
mode manually.
Press any key to remove any error displayed.
16
Owner’s manual
3.5.3. Function mode
3.5.3.1. Program creation
When creating a program, the edition mode of the program is automatically
accessed, starting by the program name selection. The initial identification “Pxx
NO NAME” is given to the program and all parameters are set to 0. Program
number is set automatically.
3.5.3.2. Program deletion
When deleting a program, the edition mode of the program is automatically
accessed, and the identification of the first program is displayed and blinking to
confirm being in program deletion function. Use the key to select which
program to delete and then the key to confirm program deletion. If you
want to cancel program deletion, press the key. Once the program deletion
function is not active anymore, the program identification will stop blinking.
3.5.4. Programming mode
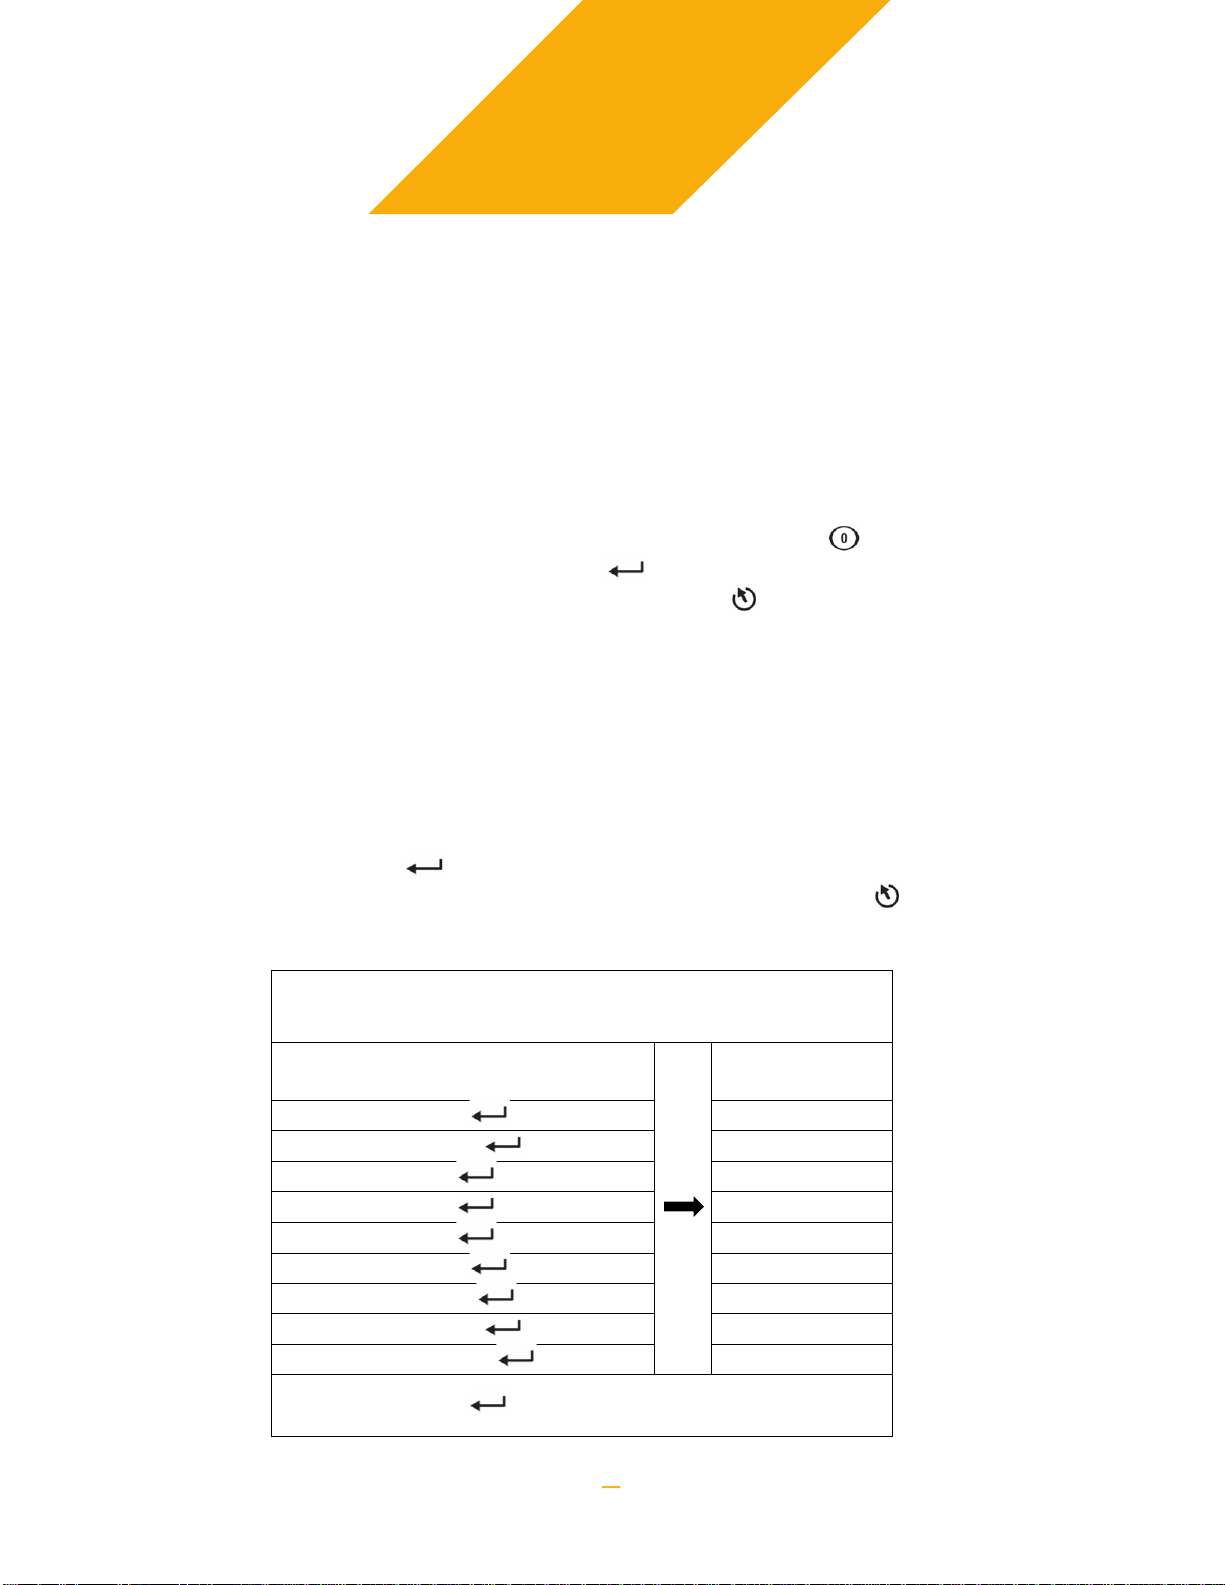
3.5.4.1. Program identification
For a selected program, set the program identification using the numeric
keypad. Repetitively press the numeric key until the desired character is
displayed. Take note that to input a number, the key must be pressed 4 times.
The use the key to confirm the selected character, and to confirm the
modification once the last character is edited. Using the key allow to go
back and erase one or multiple characters.
Ex: Set the identification « EXAMPLE 1 »
KEYS
RESULTS
2, 2,
E
8, 8, 8,
X
1,
A
5,
M
6,
P
2, 2,
L
4,4,4,
E
9, 9, 9,
1, 1, 1, 1,
1
Press the key to confirm identification
17
Owner’s manual
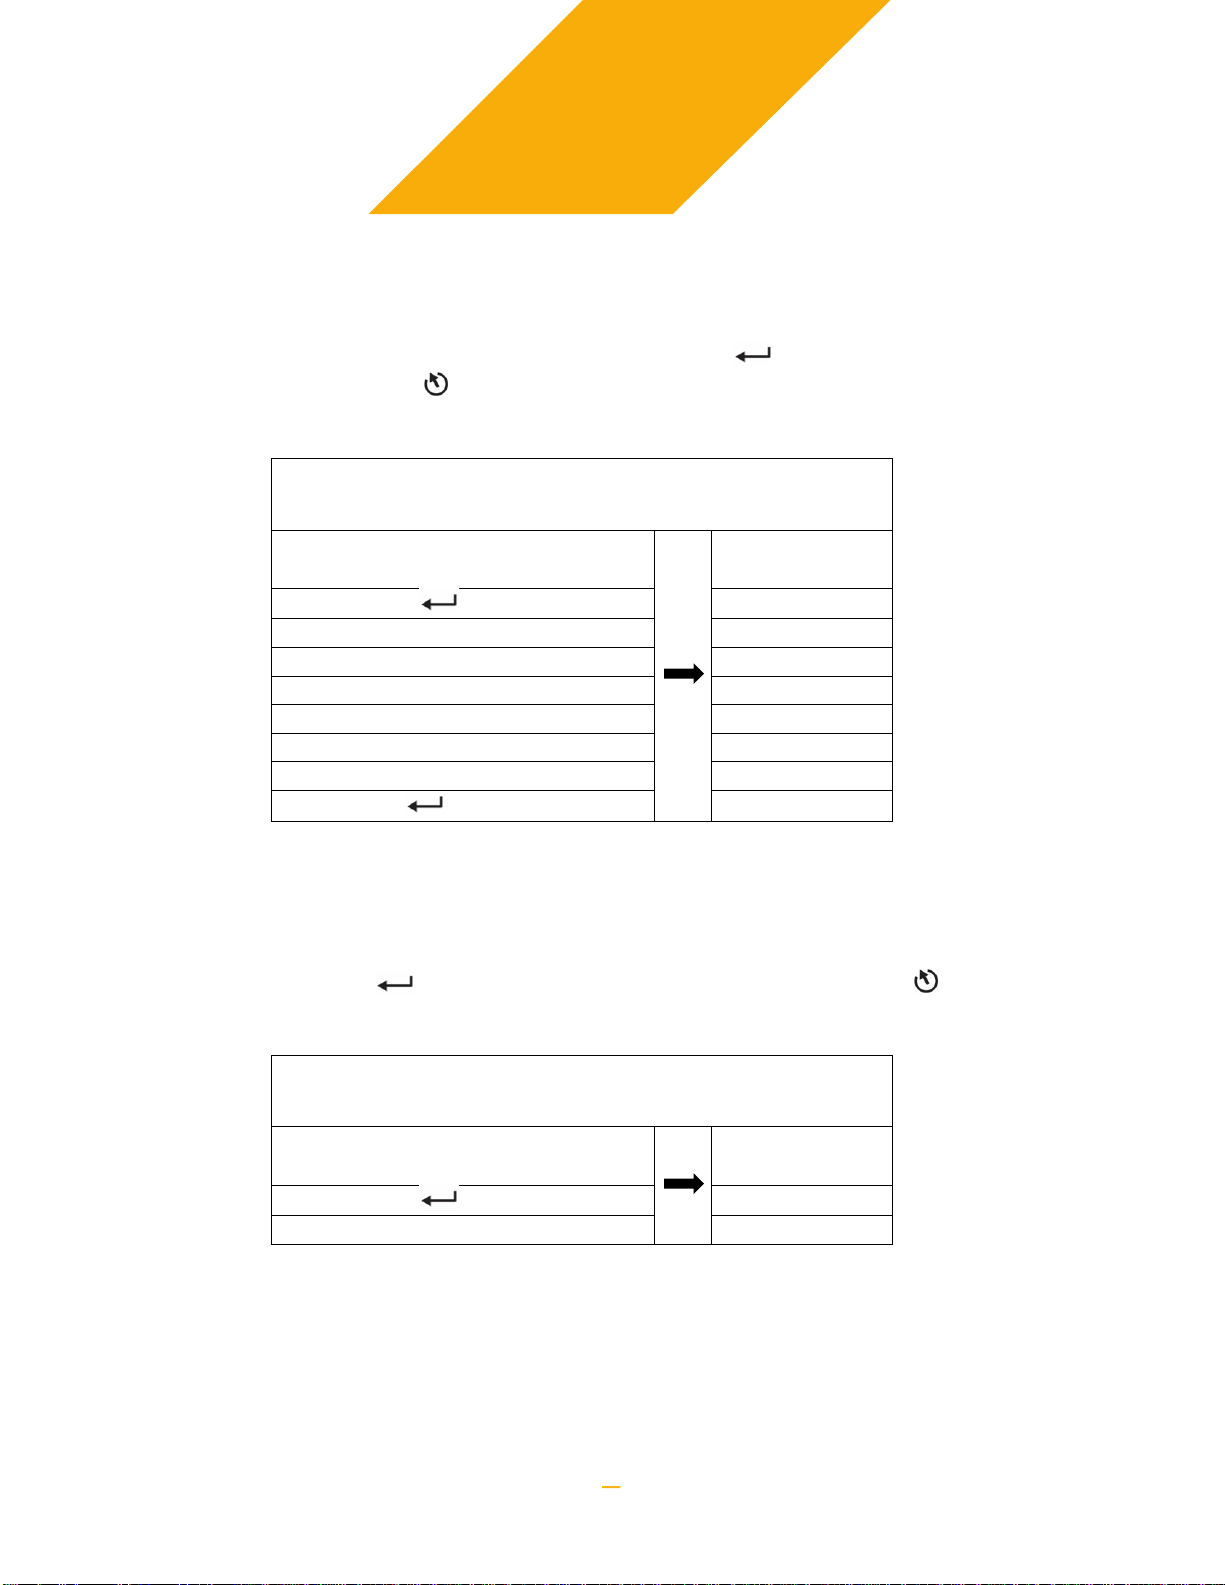
3.5.4.2. Vacuum level by sensor
For a selected program, set the desired vacuum level, in percent. The decimal
point is set between the second and third characters. The entry validation is
done once the third character is set and the value is rounded down to the
closest 0.5% value. While editing using the key allow to confirm the current
value and the key allow to cancel edition of the parameter, the old value will
blink. Set this value to 0 to use only the vacuum plus parameter.
Examples
KEYS
RESULTS
9, 0, or 9, 0, 0
90.0%
9, 0, 1
90.0%
…
90.0%
9, 0, 4
90.0%
9, 7, 5
97.5%
…
97.5%
9, 7, 9
97.5%
0, or 0, 0, 0
0.0%
3.5.4.3. Vacuum plus
For a selected program, set the vacuum plus parameter to add extra vacuum
time, in seconds, once the vacuum level setpoint is reached. While editing
using the key allow to confirm the current value and the key allow to
cancel edition of the parameter, the old value will blink.
Examples
KEYS
RESULTS
1, or 0, 1
1s
1, 5
15s
18
Owner’s manual
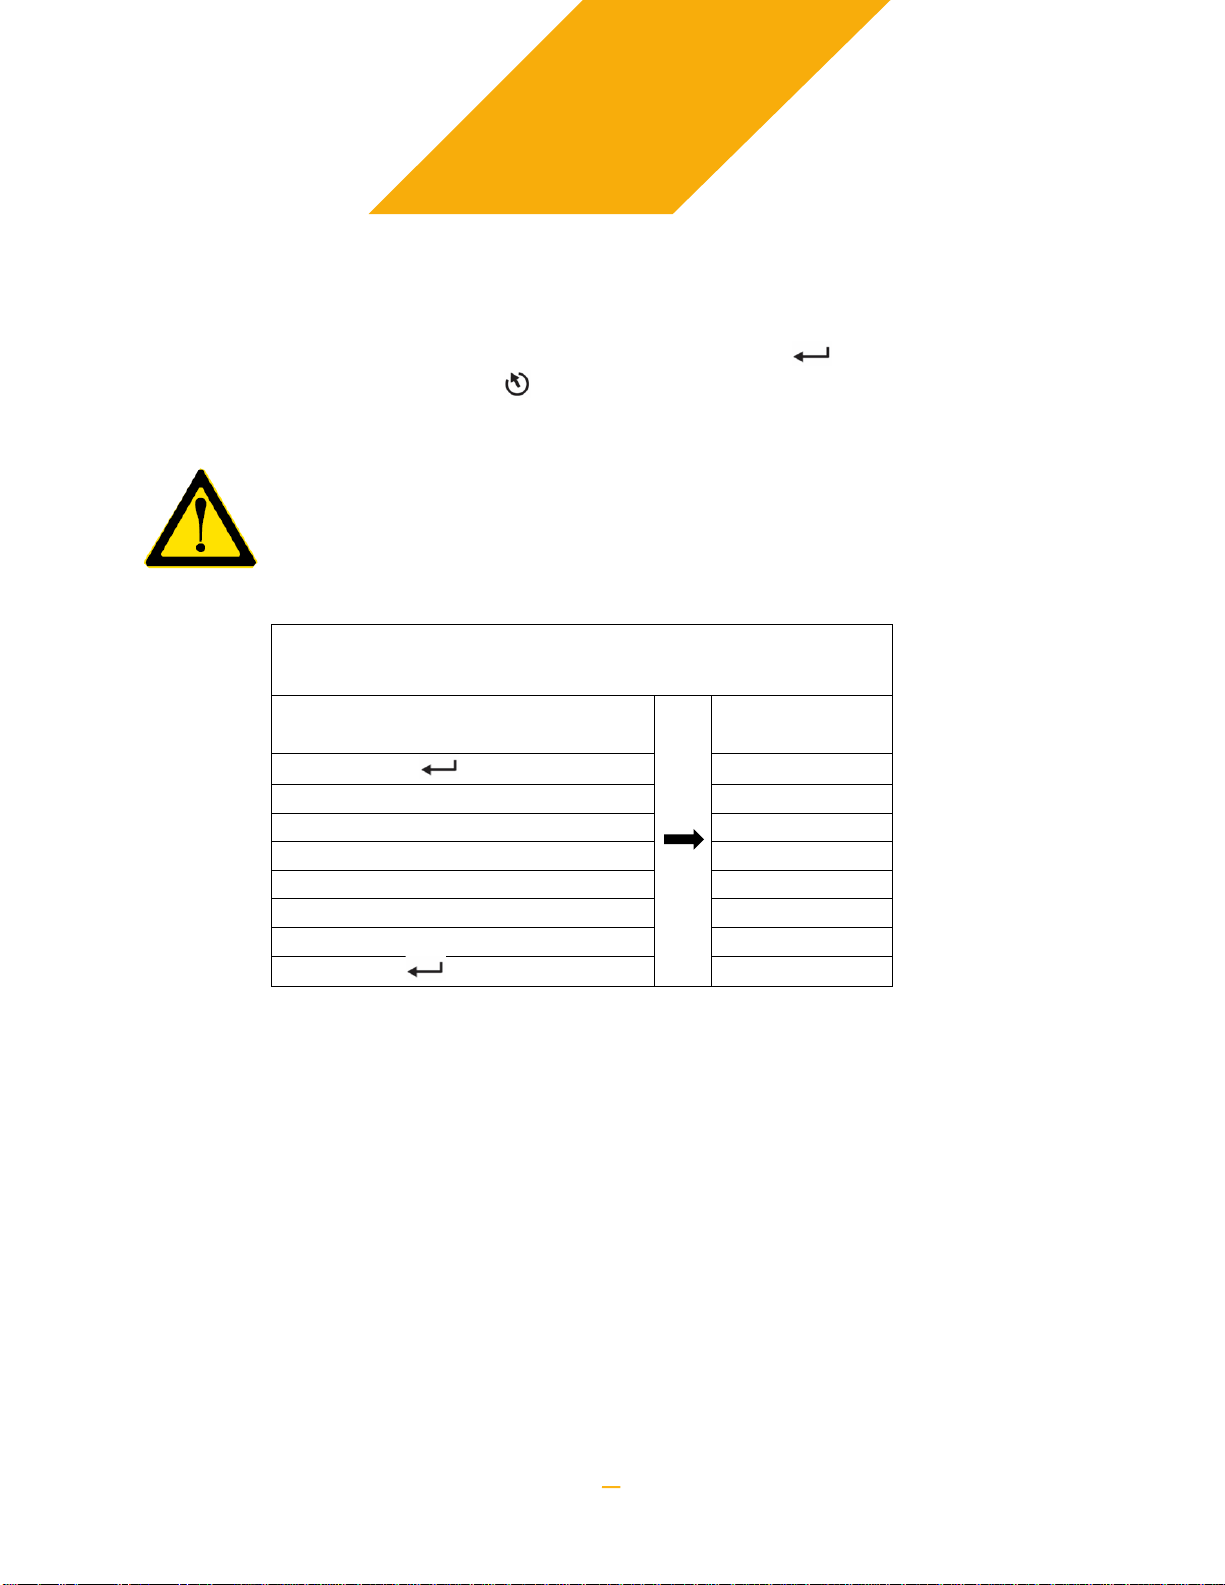
3.5.4.4. Sealing time
For a selected program, set the sealing time to the desired value in seconds.
The decimal point is set between the first and second characters. The entry
validation is done once the third character is set and the value is rounded down
to the closest 0.05 value. While editing using the key allow to confirm the
current value and the key allow to cancel edition of the parameter, the old
value will blink.
Warning: a sealing time set longer than necessary will reduce the operating life
of the Teflon™ tape and the silicone strip. It is recommended to start with a 2
seconds value and to test the seal quality. If it’s easily pulled apart, raise the
value by 0.2s and try again. Repeat until a satisfying seal is obtained.
Examples
KEYS
RESULTS
4, 5, or 4, 5, 0
4.50s
4, 5, 1
4.50s
…
4.50s
4, 5, 4
4.50s
2, 3, 5
2.35s
…
2.35s
2, 3, 9
2.35s
0, or 0, 0, 0
0.00s
3.5.5. Running a vacuum cycle
To start a cycle, all that need to be done is to close the lid. If a step of the cycle need
to be skipped, press the 1 key, and the cycle will go to the next step of the program.
It is only possible to start the cycle when in programming mode and are not in
program edition function. While running a cycle, the state of the current step is
displayed, except for parameters that have a 0 set.
Displayed parameters:
- Vacuum time of current vacuum level in %
- Sealing time left
- « ATM » when returning to atmospheric pressure

19
Owner’s manual
While running a cycle, it is possible to edit a program. First press the 1 key to skip
the vacuum process and go to the sealing process, then press the key to access
the program edition to modify it. The new program will not be active until the next
cycle.
3.5.6. Diagnostic menu
To access diagnostic menu, power on the appliance while holding the key. Use
the key to select the desired diagnostic function then press key to access
and display the desired parameter. Use the key to browse between:
- Software version
- Running hours counter
- Amount of cycles counter since the beginning
3.5.7. Menus structure
3.5.7.1. Function mode
- F1 CREATE A PRGM: Program creation
- F2 DELETE A PRGM: Program deletion
3.5.7.2. Programming mode
- Pxx NAME: Program identification
Program sub menu
- VACUUM LV: xx.x% (0.0-99.5%)
- VACUUM PLUS: xxs (0-99s)
- SEAL TIME: x.xxs (0.00s –3.50s)
- Pxx NAME (12 characters)
3.5.7.3. Diagnostic menu
- DIAGNOSTIC MENU: Diagnostic menu, a code is required
- D1 INPUTS TEST: Inputs status
- D2 OUTPUTS TEST: Outputs verification
- D3 MODEL SELECTION: Appliance model selection
- D4 GAS OPTION: Gas injection option (N/A on this appliance)
- D5 SEALING TIME: Sealing time maximum allowed
- D6 COOLING TIME: Cooling time
- D7 OFFSET CALIB: Vacuum sensor calibration
- D8 VACUUM SENSOR: Vacuum sensor activation
- D9 ACCESS CODE: Activate / Deactivate program edition password
- D10 CODE CHANGE: Change/set the program edition password
- D11 PUB: Activate/Deactivate the screen saver
- D12 SELECT PUB: Factory setting (reserved)
- D13 VACUUM CALIB: Automated vacuum sensor calibration
Table of contents
Other Smaak Kitchen Appliance manuals


