Small HD AC7 User manual

0
AC7
AC7-SDI
User Manual

1 | P a g e
Table of Contents
Product Introduction …………………………………………………………………… .... …2
Caring for your AC7 Monitor.....................................................................4
What should be in the box:.......................................................................5
Powering the AC7......................................................................................6
Locking Connectors for AC7-OLED Models only. ......................................9
Additional Power Options.........................................................................9
Using the AC7..........................................................................................10
Operating the Menus..........................................................................10
The Preset Menu:............................................................................11
DSLR Scale Presets .......................................................................12
Assigning Function Buttons.............................................................14
Image Menu ........................................................................................15
Tools Menu .........................................................................................16
False Color.......................................................................................18
FALSE COLOR HL.........................................................................19
FALSE COLOR HML......................................................................20
FOCUS ASSIST PLUS.....................................................................21
FOCUS IN COLOR..........................................................................22
FOCUS ASSIST MAX......................................................................23
2X ZOOM..........................................................................................24
ANAMORPHIC DESQUEEZE.......................................................25
IMAGE FLIP ....................................... Error! Bookmark not defined.
MONOCHROME.............................................................................27
1:1 PIXEL MAPPING......................................................................29
Input Menu .........................................................................................30

2 | P a g e
Changing inputs: .............................................................................30
System Menu ......................................................................................31
PIP Menu.............................................................................................32
Updating Firmware .................................................................................33
Specifications ..........................................................................................34
Specifications ..........................................................................................35
Warranty .................................................................................................36
Thank You! ..............................................................................................37

3 | P a g e
No matter how good a monitor is, if your camera doesn’t
work with it then it probably won’t be very helpful to you.
That’s why all the standard HD inputs – HDMI, Component,
and HD/SDI –are available on the AC7.
The AC7
Wide range of inputs
Product Introduction
Resolution
First and foremost, the ultimate purpose of a field monitor is
to be able to see what you are shooting. Shooting in HD and
monitoring in SD is, we feel, a step in the wrong direction.
That’s why even with a 7 inch screen, the AC7 delivers HD a
1280x800 resolution. Simply put –this means that you truly
see what you get, so there are no surprises in the editing
room.
Production-friendly accessories
Every production comes with a unique set of needs, and
we’ve made sure to accommodate for as many of those as
possibly with a range of innovative and useful accessories
such as the click-in neoprene Sunhood, and HDMI splitter.

4 | P a g e
Caring for your AC7 Monitor
* The AC7’s max input voltage is 18vDC. Over powering can result
in damage to your AC7. SmallHD is not liable for any damage due
to overpowering the unit.
* Not all power sources are created equal. Using off-brand
batteries can result in undesired performance and longevity
issues.
* Do not attempt to disassemble the AC7. Doing so voids
warranty.
* Water damage is not covered by warranty, but taking the right
precautions when a water event occurs can sometimes preserve
unit functionality.
* Clean the screen with a high quality microfiber cloth only.
Never spray the screen directly with any sort of cleaning fluid.
* Always ask us if you have any questions about general
operation. Contact SmallHD at www.smallhd.com/support
*Much more information about the AC7 and other SmallHD
products can be found online on our website and in video form
at www.smallhd.com

5 | P a g e
What should be in the box:
1. AC7 Field Monitor
2. Mini to standard USB cable
3. US Power Supply
4. SmallHD Cleaning Cloth
5. Quick-Start Guide

6 | P a g e
Powering the AC7
With an amazing DC input voltage range of 7 to 18v, the AC7 can
be used with nearly any battery on the production market.
Battery Plates
The portable powering solution.
We offer several portable powering options to help our customers
reduce the amount of charging equipment that is plugged in
around the set. For example, if you’re using a Canon 7D, then you
only need to worry about keeping your LP-E6 batteries charged –
just one charging station.
Canon 5D/7D Battery Bracket
Use your Canon’s 5D/7D batteries rather than buy other
(Canon Model Number: LP-E6)
Holds 2 Batteries –Hot-Swap for Endless Power
Runs a AC7 for 4 hours straight when using 2 LP-E6
batteries at once
Fits snugly against the back of your AC7 monitor to
maintain an incredibly low profile
Lightest weight battery option so far for the AC7
Output Voltage: 7.4v
Sony NP-FV Battery Bracket
Uses Sony NP-FV series batteries
Holds 2 batteries at a time for maximum power
Mounts sleekly on the back of the AC7
Capacity is dependent on batteries
Output Voltage: 7.2v

7 | P a g e
Panasonic Battery Bracket
Supports CGA-D54 style batteries
Holds 2 batteries but will run on just one –Hot-Swap for
endless power
Will run a AC7 for over 12 hours straight when using high-
capacity Panasonic batteries
Also maintains a low profile when mounted snugly against
the back of the AC7
Output Voltage: 7.4v
SmallHD AC7 Universal Battery Plate
Enables lightning-fast one-handed battery changes
Incredibly low profile and light weight
Snaps in and only uses one screw to attach to the monitor
Makes your monitor compatible with all current AC7
SmallHD battery brackets as well as some Anton Bauer
and Marshall plates. (Marshall plate requires extra wire
available on our website)
SmallHD Battery sleeve
Ships free with your AC7 (Upon request only)
Attaches to your Universal Battery Plate
Holds your legacy SmallHD battery pack.
Attaching the Battery Plate
Your battery plate attaches by screws directly to the back of the
Universal battery adapter plate –The Sony, Canon 5D/7D and
Panasonic plates are attached at two points which are on the left
and right side of the adapter plate.
If you lose a thumbscrew –go to this webpage and you can
order more: http://www.smallhd.com/store/thumb-screw

8 | P a g e
AC7 Power Supply
Take it with you where ever you go.
This 12V/1.5A powering option is included with each AC7 and
includes a detachable US-style cable, but can be replaced with
additional Australian, European or UK style plugs that are
available on the Store page on the website.
Output: 12v DC/1.5 Amps
Output Plug Style: Male Barrel –2.1mm ID/5.5mm OD
Input: 110-240c AC
Wall Plug Style: 2-Pin (no ground)
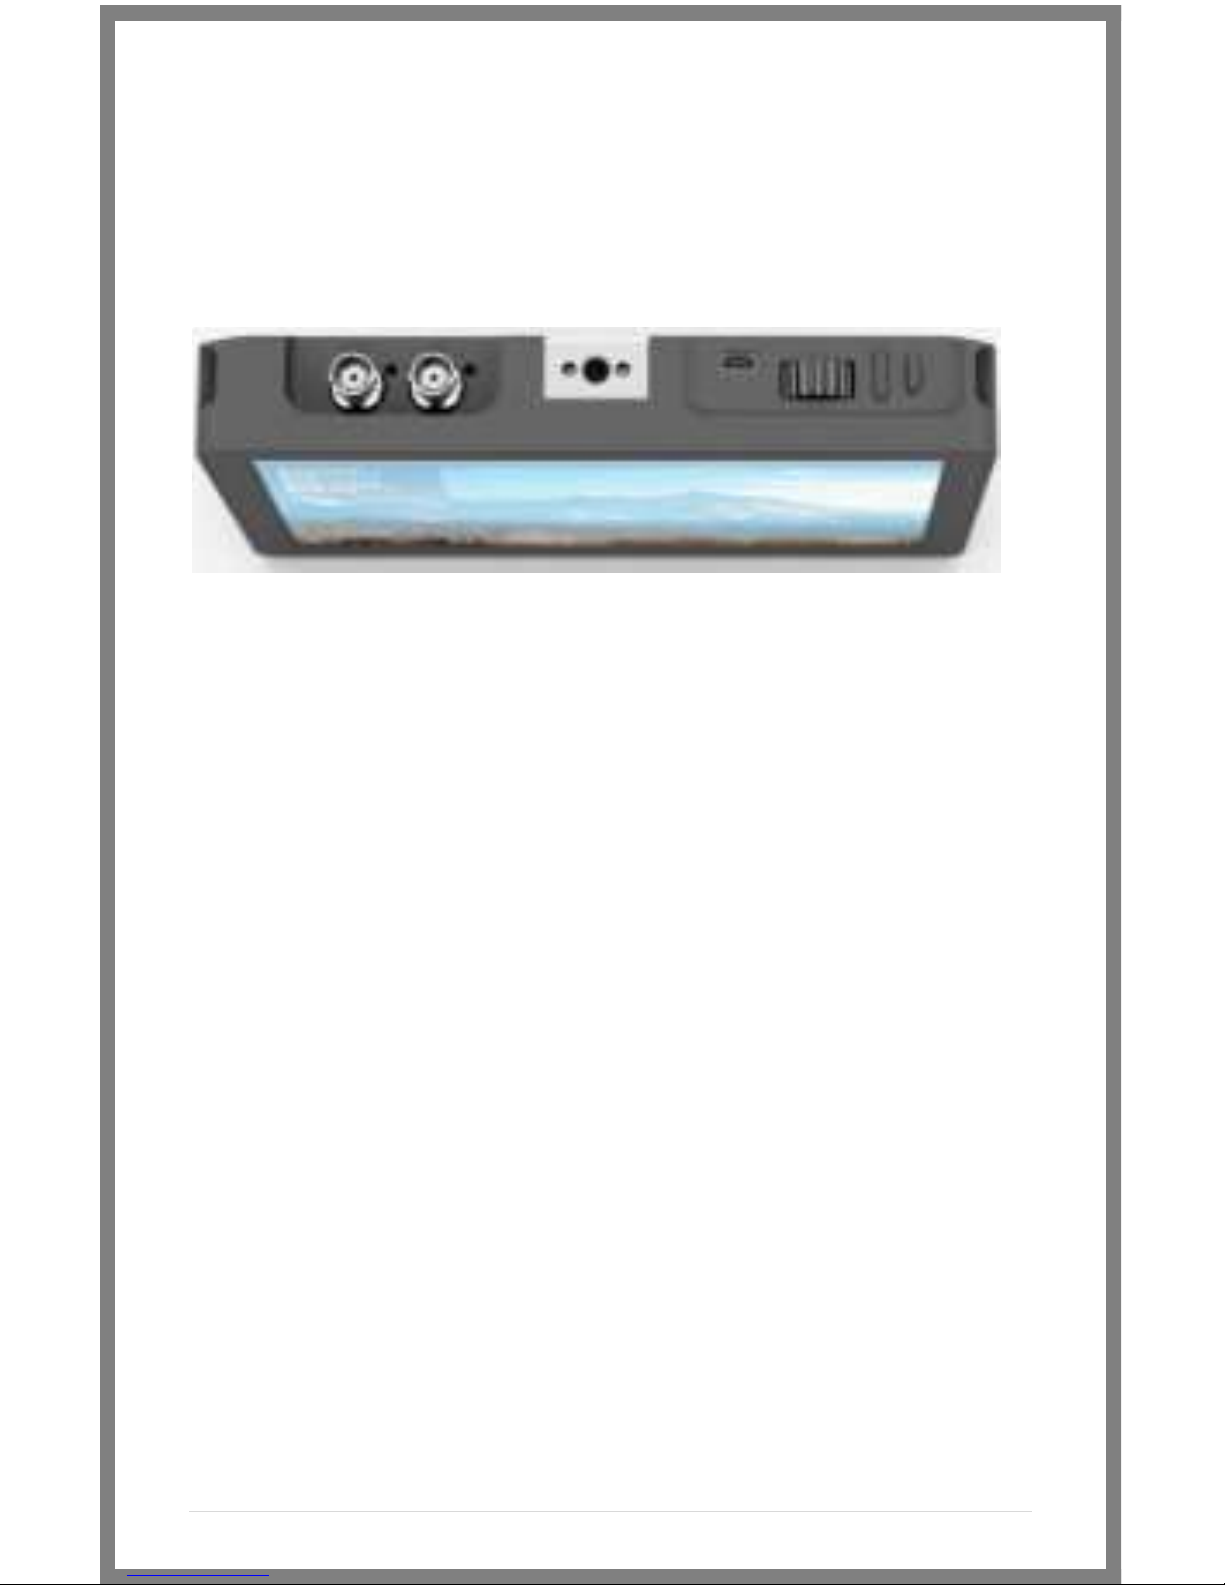
The AC7 has a barrel power input for powering from a wall plug
using the included power supply, or from other sources such as
Anton Bauer batteries.
The specifications of this plug are below:

9 | P a g e
Locking Connectors for AC7-OLED Models
only.
The AC7-OLED has a locking 4 pin Hirose connector on it, we sell
multiple different power cable’s including a Hirose to XLR 4 pin, Hirose
to D-tap, and Hirose to Flying leads (which you can use to make your
own custom cable.)
Additional Power Options
Adaptable power for maximum performance.
SmallHD does not make custom power cables. However, if you
need to fabricate a special connection to use your preferred
battery, we recommend using the SmallHD D-Tap cable, and then
adapting the D-Tap end to the connection of your choice. Or if you
have the OLED just use the Hirose to Flying leads cable we offer.
As always, if you have any questions, call Support at
919.439.2166, or go to www.smallhd.com/Support and submit
your questions.
10 | P a g e
Using the AC7
Operating the Menus
1 2 3
1 –Navigation Scroll Wheel
* Click to activate Main Menu
* Click to select items in menu
* Scroll right and left to adjust values
*(From no menu) Scroll any direction to access the
Preset menu
2 –Back button/Custom Function A
* Press to reverse out of the menu
* Activate/deactivate Preset
3 –Custom Function B Button
* Activate/deactivate Preset

11 | P a g e
Activating the menu and adjusting a function:
1 –Click the scroll wheel one time
2 –Roll the scroll wheel left or right to the proper sub menu
3 –Click the wheel to select the sub menu
4 –Roll the wheel to select the desired menu item
5 –Click the wheel to select the desired menu item
6 –Roll the wheel left or right to adjust the value
7 –Press the back button to exit out of the menu system.
*NOTE: SmallHD monitor software is constantly under
development, which means there is a chance this manual might
not always be accurate. Always refer to online documentation
and videos for the most up-to-date information on AC7
software.
The Preset Menu:
The Preset menu is a list of selectable presets that can perform a
variety of advanced functions. Named presets are pre-
programmed to perform specific functions; therefore the user
cannot modify some of their parameters. Generic presets (with
the name "Preset" followed by a number) will store menu
adjustments made to the AC7 in real time. The selected preset
can be seen in the bottom right corner of the Main menu.
Accessing the Preset Menu:
While not in any menus:
1 –Roll the scroll wheel to the right to display the menu
2 –Roll the wheel to the desired preset
3 –Click the wheel to select the preset
4 –Press the back button to exit the preset menu

12 | P a g e
DSLR Scale Presets
The DSLR Scale presets are factory defined presets that enable
the input signal from a variety of DSLR cameras to fill the screen
of the AC7. Most monitors are unable to achieve this function.
Special logic is in play when these presets are activated that keeps
the image in full-screen mode even though the video signal may
be changing aspect ratios behind the scenes (as in the case of the
Canon 5D Mark 2, 60D, T2i, and T3i). As a result, the "Scale" and
"CustomScale" menu functions are locked while using these
presets.
Use preset "Canon DSLR" for Canon DSLR (480p output)
cameras during LiveView/Record mode. Use preset
"Nikon DSLR" for Nikon DSLR (720p output) cameras
during LiveView/Record mode.
Use preset "C PLAYBACK" when reviewing footage already
recorded onto the Canon DSLR.
*Many of the menu functions are described in video format on
the video section of the SmallHD website
www.smallhd.com/videos/ View videos such as “Nikon Preset”
and “Preset Menu Demo” are great resources for learning how
to navigate your presets.
This Preset Menu shows the
Nikon DSLR Record preset is
selected.
PRESET 1
PRESET 2
PRESET 3
PRESET 4
PRESET 5
PRESET 6
PRESET 7
PRESET 8
PRESET 9
NIKON DSLR
CANON DSLR
C PLAYBACK
13 | P a g e
DSLR SCALE
INACTIVE
ACTIVE
Most Canon and Nikon DSLR’s output signals do not fill a monitor’s screen
completely. The AC7’s“DSLR Scale” function enables the operator to
quickly and easily fill the full screen with the incoming signal, removing
those useless black bars, giving you a larger, more detailed look at the scene.

14 | P a g e
Assigning Function Buttons
The AC7 has two buttons that can be assigned to custom
functions for a convenient one-press ON/OFF of your favorite
features.
While not in any menus:
1 –Press and hold either of the two buttons (1 or 2) for 3 seconds
and release
2 –Scroll with the scroll wheel to the desired function and click
the scroll wheel to select it
3 –Press the Back button to exit the menu
Focus Plus
Focus Max
Focus in Color
Peaking
1:1 Mapping
Freeze
Image Flip
FalseColor HML
FalseColor HL
2x Zoom
2x Anamorphic
This Menu shows
that a function
button is set to the
1 : 1 Mapping tool.
(Menu may appear
different on your
monitor.)
15 | P a g e
Image Menu
The image menu controls Brightness, Contrast, Hue, Saturation,
Sharpness and Gamma. Below is a description of each.
Function
Range
Description
Contrast (LCD ONLY)
0-100
Controls the maximum
white point of the signal.
Brightness (LCD
ONLY)
0-100
Controls the maximum
black point of the signal.
Hue
0-100
Also known as Tint or
Phase.
Saturation
0-100
Also known as Chroma.
Sharpness (LCD ONLY)
0-100
Amount of edge
enhancement is applied.
RGB Control
0-100
Adjusts RGB Gain and Offset
for all three color channels.
Gamma (LCD ONLY)
2.2
Standard Gamma (not
adjustable)

16 | P a g e
Tools Menu
The Tools menu provides access to the many software tools of the
AC7 to, among other things, aid in focus and exposure.
Some of the functions are explained in greater detail in later
pages, marked by the asterisk (*).
Function
Range
Description
Focus Assist
Color, Plus,
Max, Off
Color highlights your in focus
edges in the edge color of
your choice. Plus and max
Darken image and outlines
area in focus in white.
Edge Color
R,B,Y,C,M,G
Select the color of your focus
assist edge in this menu.
Peaking
On, Off
Over-sharpens the image to
give a frosted look to areas
in focus.
Exposure Assist
HML, HL
Overlays varying IRE levels in
specific colors.
1:1 Mapping*
On, Off
Maps the native signal data
to the screen of the AC7 –
one native pixel to one AC7
screen pixel, no scaling.
2X Zoom
On, Off
A 2x digital zoom feature
that allows you to get a
closer view of your image.
Aspect Scale
16:9, 4:3,
2.35:1,
1.85:1, 15:9,
16:10,
AUTO
Defines the initial scaling
parameters for the AC7.
16:9, 4:3, etc.

17 | P a g e
CustomScale
0-1000(x4)
Stretch, shrink and move the
image on screen pixel-by-
pixel.
DSLR Scale
Canon,
Nikon, Off
Use this setting to help get a
full screen image on your
monitor. Even if your camera
output’s image in strange
format or aspect ratio like
the 5DmkII (Cont pg12)
2x Anamorphic
On, Off
Desqueeze the image when
using a 2x anamorphic lens.
So that your image looks
normal even when using
anamorphic.
Freeze
On, Off
When activated will freeze
the image on-screen. Turn
off to resume normal video.
Image Flip
H
Flip the image horizontally
Blue Only
On, Off
Turns the Red and Green
color channels off. Used for
calibrating to color bars.
Monochrome
On, Off
Removes all color and leaves
only the Luminance data of
the signal.
Negative
On, Off
Invert’s the colors of your
monitor.
18 | P a g e
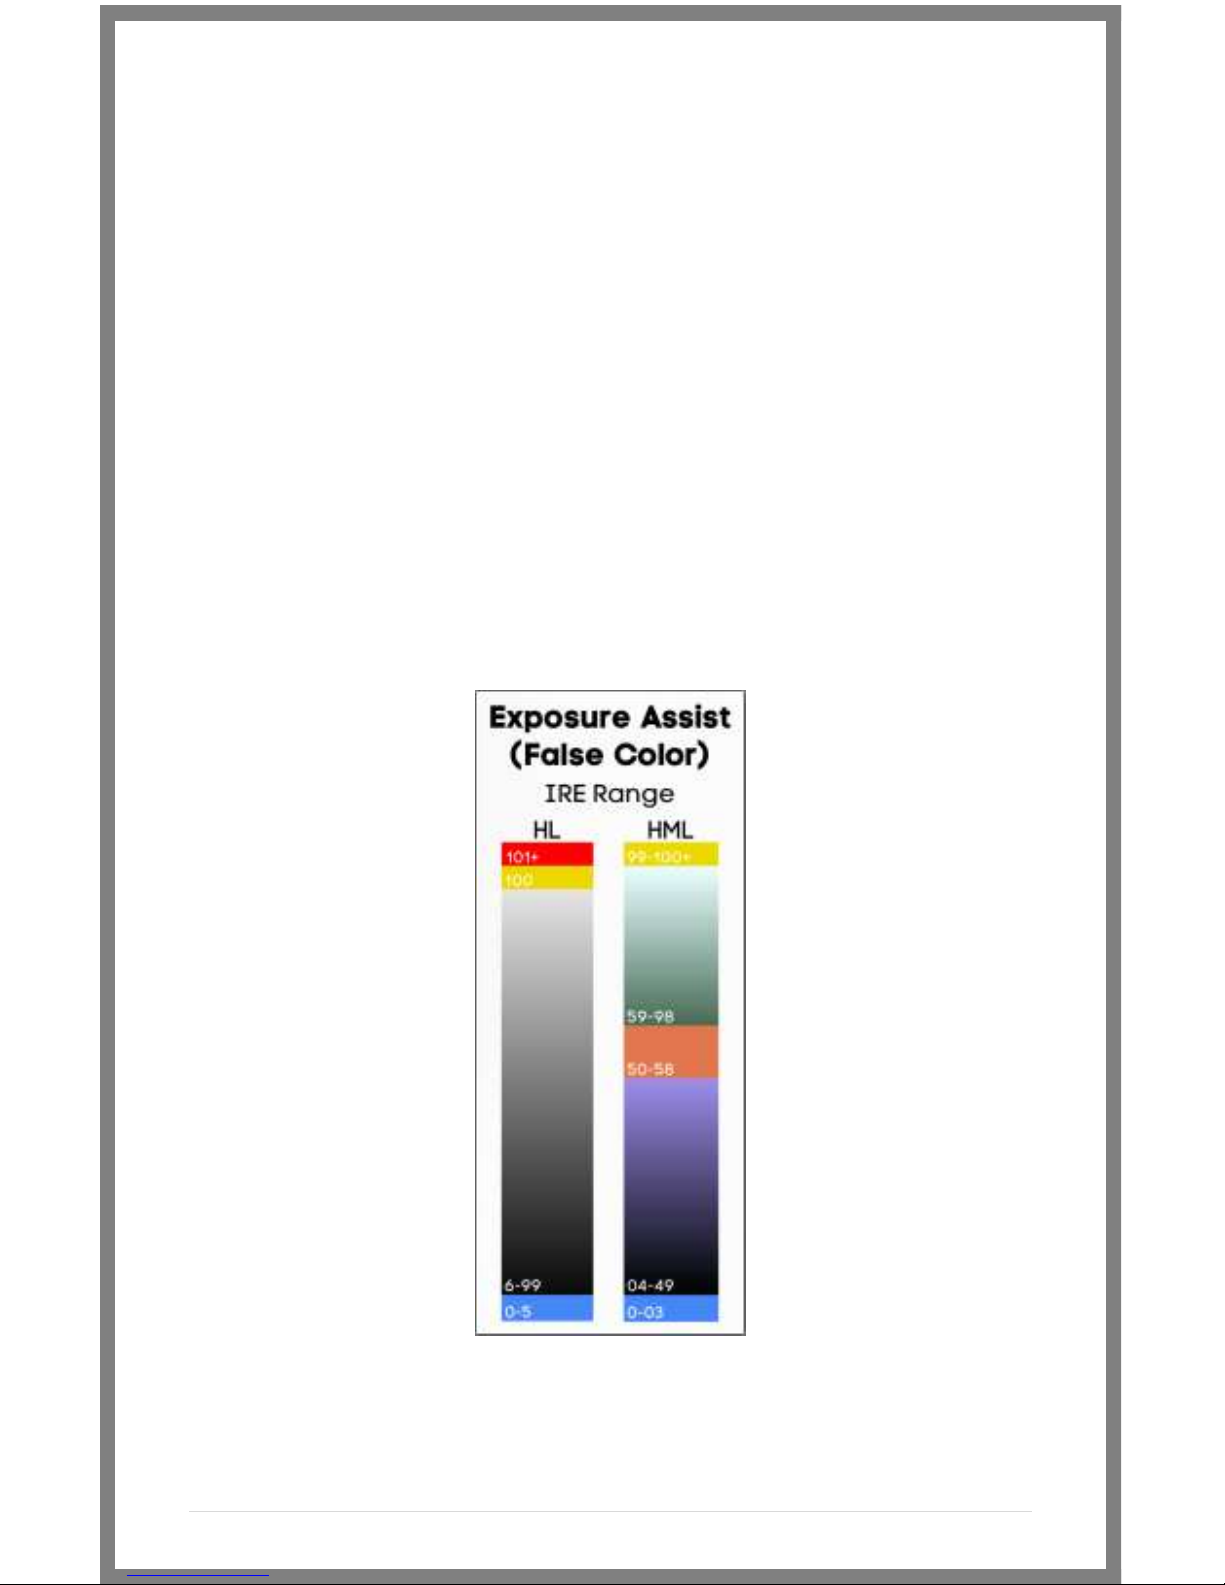
False Color
False color evaluates the incoming IRE levels (exposure) of the
signal and then changes the colors of the pixels to represent what
those IRE levels are. This is a quick way to gauge the exposure
levels within an image in a very clear way.
The AC7 currently has two different types of False Color.
False Color HML (High / Mid / Low)
Meaning High, Medium, Low, has colors for over-exposed, under-
exposed and mid-range. The scale is below
False Color HL (High / Low)
Meaning High, Low, has colors for over and underexposed. The
remaining middle will be monochrome.

19 | P a g e
FALSE COLOR HL
INACTIVE
ACTIVE
This manual suits for next models
1
Table of contents
Other Small HD Monitor manuals

Small HD
Small HD DP1 User manual

Small HD
Small HD Smart 5 Series User manual

Small HD
Small HD Action 5 User manual

Small HD
Small HD 4K Monitor Dual Battery Plate User manual

Small HD
Small HD DP6-SLR User manual

Small HD
Small HD RED DSMC3 User manual

Small HD
Small HD CINE 24 User manual

Small HD
Small HD 703 Bolt User manual

Small HD
Small HD 500 Series User manual

Small HD
Small HD CINE 7 User manual


