Smart Comfort A300 User manual

SAVE THESE INSTRUCTIONS
Operation Instructions
A300 MASSAGE CHAIR

01
02
04
06
07
08
16
Thanks for purchasing this product. Please read this instruction manual carefully
in order to know how to use this product correctly before operation. Please pay
attention to the important safety warnings and keep this manual for future use.
Note: Our Company reserves the right to revise the design and description of this
product without any further notice.
CONTENTS
Safety and maintenance
Safety warning
Name and function of components
Function
Method of usage
Product specification

03
02
1.Important Safety Warning.
·Don’t allow children to touch moveable parts of this product.
·Please use a well-grounding power supply suited to this product.
·Please pull out the plug after use or before cleaning to avoid injury or damage to
the product.
·Please operate this product according to this instruction manual.
·Don’t use accessories which are not recommended.
·Don’t use this product outdoors.
·Please read this instruction manual carefully before operation.
·Any other usage that is not listed in this instruction manual is not recommended.
·Recommended session time is 20 minutes.
·Please don’t use if any part of the device is damaged.
·Please don’t use if the radiator hole is covered or blocked.
·Please don’t drop anything into this product.
·Please don’t fall asleep while using this product.
·Please don’t use if intoxicated or feeling unwell.
·Please don’t use within one hour after having a meal.
·Switch massage off before exiting the chair.
·Avoid using the massage function on a strength that may cause you injury.
2. Environment for usage.
·Don't use this product outdoors.
·Don't leave in direct sunlight.
·Don't use near an open fire or heater.
·Don't use in high temperature or moist environments such as a bathroom.
·Don't use in a dusty environment.
·Don't use where there is not adequate ventilation.
3. Individuals who should not use this product
·Don't use the massage function if you are pregnant.
·Don't use if you have a pre-existing medical condition, osteoporosis, heart
disease or a pacemaker; unless consulted and advised by a doctor.
·Don't use if advised not to by your doctor.
·Don't use if your body is wet e.g. following a bath or shower.
·This appliance has a heated surface. Individuals insensitive to heat must take
care when using the appliance.
·Stop using if you feel unwell. If in serious discomfort consult your doctor.
·Children under 14 should be supervised when using this appliance.
·This appliance is not intended for use by persons (including children) with
reduced physical, sensory or mental capabilities, or lack of experience and
knowledge, unless they have been given supervision or instruction concerning
use of the appliance by a person responsible for their safety.
4. Safety.
·Check the voltage is suitable to the specification of this product.
·Don’t use wet hands when operating.
·Don't operate this product if liquid spillage occurs on or around it.
·Don’t damage the wires or change the circuit of this product.
·Don’t use wet cloth to clean the electric parts such as switch and plug.
·Stay away from this product during a power cut to avoid injury if the power returns
suddenly.
·Stop using this product if it works abnormally, and please consult local agent
immediately.
·Children should be supervised to ensure that they do not play with the appliance.
·If cord is damaged, it must be replaced by the manufacturer, its service agent or
similarly qualified persons in order to avoid a hazard.
5. Maintenance.
·This product should be maintained by appointed agents, users are prohibited to
disassemble or maintain by themselves.
·Please cut the power after usage.
·Don’t use this product if the socket loosens.
·If this product will be left unused for long, please curl up the wires and keep this
product in dry and dustless environment.
·If the detachable cord / supply cord is damaged, it must be replaced by the
manufacturer, its service agent or similarly qualified persons in order to avoid a
hazard.
·Please clean this product by dry cloth. Don’t use thinner, benzene or alcohol.
·The mechanical components of this product are specially designed and made, it is
not necessary to be specially maintained.
·Don’t roll or pull this product above uneven ground, it should be lifted before
moving.
·Please use it intermittently; don’t make this product work continuously.
6. Solution of ordinary malfunctions.
·It is natural movement noise if the motor sounds while in usage.
·If the controller won't work normally, please check if the plug and socket are
connected correctly and make sure the switch is turned on.
·After each massage cycle, the product will automatically activate the power-off
button; if this product works continuously for long, the temperature protector will
make the product automatically power-off. It should be used again after half an
hour's rest.
Safety and maintenance Safety and maintenance

0504
Safety warning Safety warning
Warning
Warning
Warning
Warning
Do not apply weight to the leg rest while machine is in use. Doing so may result in
damage or injury.
DO NOT apply weight
Ensure the mechanism returns to the starting position before use, otherwise this
may result in damage or discomfort.
DO NOT pull out the power cord during standby or power-on mode. Doing so may
result in damage or injury. It is recommended that the power cords are put away
after use to reduce risk.
Ensure there is no person, animal or item obstructing the area under the leg rest
and recliner before operating this product.

06 07
1
2
4
5
6
9
7
14
13
18 19 20 21
12
8
15
17
10
3
FUSE:
T5AL 250V POWER INPUT
CONTROLLER JACK ON/ OFF
11
16
Name and function of components Function
1.Head cushion
2.Upper arm air
pressure component
3.Arm air pressure
component
4.Remote controller and
mobile phone holder
5.seat cushion
6.Leg rest frame
7.Foot rest frame
8.Calf retaining plate
9.Back cushion
10.Armrest decoration
11.Armrest
12.Side cover
13.Back cover
14.Controller
15.PCB box cover
16.Caster
17.Power cord and plug
18.Fuse box
19.Hand controller
cable socket
20.Power switch
21.Power cord socket
·Intelligent 3D mechanical massage balls simulate hands that can move up and
down, and back and forth, to mimic a range of human-like movements.
·Massage methods of this chair emulate shiatsu, kneading, tapping, knocking, and
simultaneous kneading and tapping.
·6 auto-programmed functions: Comfort, Ease, Full Body, Neck & Shoulder, Back
& Waist, and Stretch.
·Manual massage for the upper body with 3 adjustable speeds in the options of:
fixed, partial, full back, neck and shoulders, and back and waist.
·During upper body massage in the state of flapping, shiatsu and knocking, the
width between the two kneading balls is adjustable with 3 options: wide, medium,
and narrow.
·During upper body massage on a partial and fixed point, the massage hands can
move up and down to adjust the massage point accurately.
·Air pressure massage with 3 levels of intensity in 3 options: full body, arms, and
legs.
·Foot roller massage.
·Extend footrest by pushing it out to suit different heights.
·Zero Gravity function that reclines 118° to put user in a neutral position with feet
above heart.
·Footrest and the backrest operate in synchronisation.
·Automatic lay down mode with 3 options.
·Massage chair will reset once switched off. The massage balls will also return to
their original positions.
·Natural magnet is placed at the heel of the heel.
·Space-saving zero wall recliner.

0908
Method of usage Method of usage
Note: Image may differ to actual product.
1
2
3
4
5
6
7
8
9
10
11
12
13
14
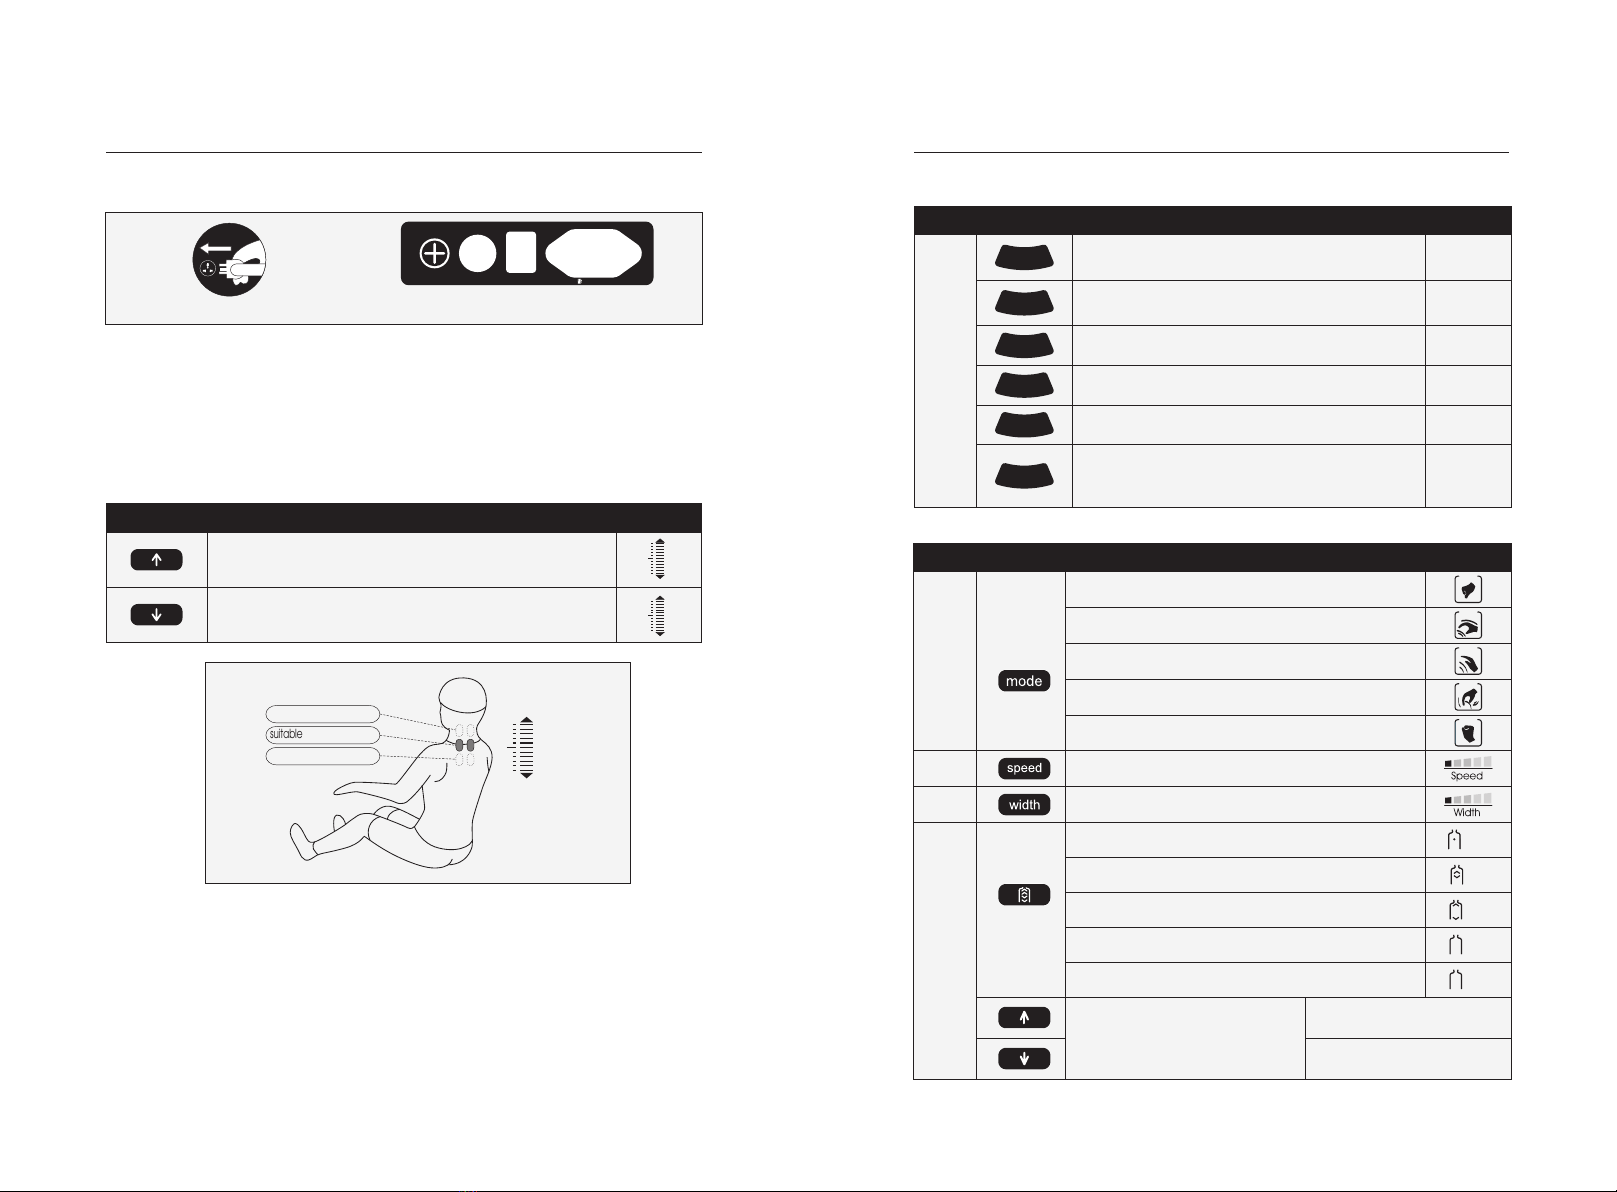
1.LCD display:
·Displays all massage functions.
2.Power switch:
·Turn on/off massage chair.
3.Pause:
·Pause or start all massage functions.
4.Timer:
·Time setting.
5.Auto lay down:
·There are three automatic lying positions, choose your favourite one.
6.Auto massage:
·Please refer to page 10 of this manual for details.
7.Air pressure mode:
·Turn on/off the air pressure massage function (refer to page 11 of this manual for
details).
8.Manual massage:
·Please refer to page 10 of this manual for details.
9.Sole roller:
·Turn on/off sole roller massage function.
10.Shoulder adjust:
·Adjust shoulder acupressure points.
11.Raise seat:
·Raises the backrest and lowers the footrest.
12.Recline:
·Lowers the backrest and raises the footrest.
13.Air pressure intensity:
·Adjust air pressure intensity.
14.Roller intensity:
·Adjust sole roller intensity.
1110
Method of usage Method of usage
·Automatic massage functions:
·Upper body manual massage
H0
H1
H2
H3
H4
F1 Auto
F2 Auto
F3 Auto
F4 Auto
F5 Auto
F6 Auto
Function
Button Description Display
Automatic massage
Comfort
Relax
Full body
Neck & shoulder
Back&waist
Stretch
Loosens the muscles.
Deep-tissue massage throughout key
acupressure points to promote relaxation.
Full body massage
Focus on the neck and shoulder area
Focus on the back and waist area.
The footrest and backrest lift together,
combined with air pressure massage to stretch
the legs, promote recovery and combat fatigue.
Function
Button DisplayMassage ball adjustment
Massage
Speed
Width
Back
stretch
Shiatsu: adjustable speed and width
Kneading: adjustable speed
Tapping: adjustable speed and width
Kneading and tapping: adjustable speed
Knocking: adjustable speed and width
3 adjustable levels
3 adjustable levels
The massage hand stays in a fixed position
The massage hand will move up and down in a
partial position
The massage hand will move up and down
over the full back
The massage hand will move up and down on
back and shoulder area
The massage hand will move up and down on
back and waist area
Massage position adjustment (in
fixed point and partial mode, the
massage position can be
adjusted).
Massage hand moves up
Massage hands moves down
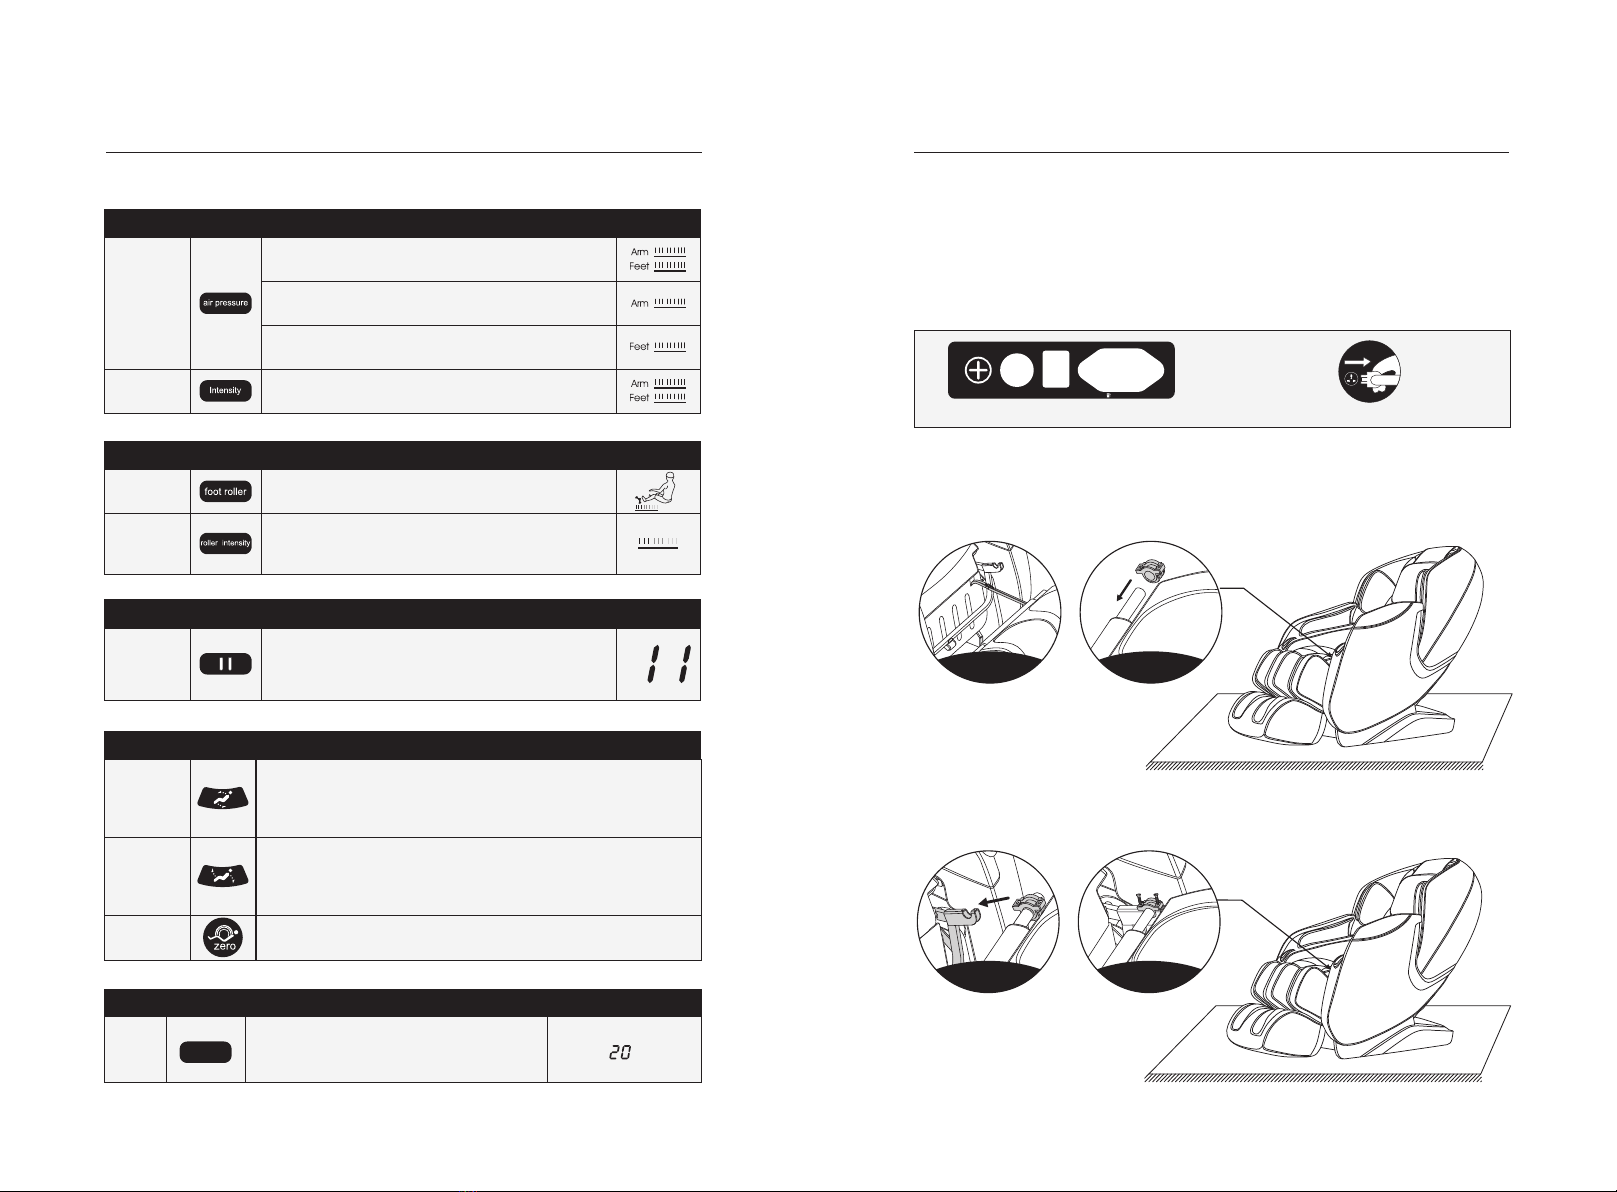
1.Switch power supply on
Diagram of plug in Diagram of the switch position of power supply
FUSE:
T5AL 250V POWER INPUT
CONTROLLER JACK ON/OF F
2.Start massage
①.Press the power button to start massage.
②.Automatic shoulder position and massage acupressure point detection will
commence. Wait for the completion of the scan.
③.If the body scan deviates from the actual shoulder position, adjust the position
by using the up and down buttons to find an appropriate position. There are 10
adjustment levels and you have 10 seconds to make the adjustment before the
massage begins automatically.
Button Description Display
Move the massage balls upward to a suitable position
Move the massage balls downward to a suitable position
Shoulder
adjust
High shoulder position
suitable shoulder position
Low shoulder position
During the body scan process, the shoulder position adjustment icon will be
displayed on the screen of the controller and will make a beep sound. Press the
shoulder position up and down keys to adjust the shoulder position. You can also
press any of the six automatic massage function keys (comfort, ease, full body,
neck & shoulder, back & waist, and stretch) and start massage.
④、Choose massage function and start massage.
12
1 2
3 4
FUSE:
T5AL 250V POWER INPUT
CONTROLLER JACK ON/ OFF
13
1.
2. Place the calf fixing block on the two sides of the round tubes of the leg rest (Figure 2).
3. Hang the leg rest off the fixed block on the massage chair frame hook (Figure 3).
4. Then use 4 (2 pieces each side) M4 screws to fasten the leg rest to the massage
chair. Check whether there is any abnormality and finish the installation (Figure 4).
Method of usage Method of usage
3.Turn off the power and stop massage.
·Once the power button is pressed, all massage function will stop immediately,
and the backrest and footrest will return to their original positions automatically.
After each massage cycle, the massage hand will go back to the default
position and all massage functions will stop, however the backrest and footrest
will not go back to the default position.
·Cut off the power of the whole machine. Figure (switch power off)
Diagram of the power switch position Unplug the power cord
4. Leg rest installation.
After connecting the air hose and the wire harness on the leg rest and the
massage chair, untie the fixed line belt and insert the connecting part into the
frame. (Figure 1).
·Air pressure massage
·Foot roller manual massage function
·Pause/start massage button
·Backrest and leg rest adjustment
·Other manual functions
min
Function
Button Description Display
Air
pressure
mode
Intensity
Full air pressure: air pressure massage on arm,
leg and foot.
Arm: Air pressure massage focus on arm.
Legs: Air pressure massage focus on leg and foot.
3 levels adjustable
Function
Button Description Display
Foot roller
Roller
intensity
Foot roller massage function on/off.
After the foot roller massage is turned on, the
massage intensity can be adjusted: mild, medium
and strong.
Function
Button Description Display
Pause/
Start
Press this button to pause the massage (the timer
will continue to count down). Press again to
resume massage.
Function
Button Description
Raise
chair
Recline
Chair
Automatic
lying mode
Press and hold this button, it will raise the backrest and lower
the footrest simultaneously, a beep sound will indicate that it
has reached the maximum position and stop. Press this
button again while lifting, then immediately stop.
Press and hold this button, it will lower the backrest and raise
the footrest simultaneously, a beep sound will indicate that it
has reached the maximum position and stop. Press this
button again while lifting, then immediately stop.
When pressing this button, it will automatically place you into
one position, total three position switch.
Function
Button Description Display
Timing Timing
Timing adjustment, press one time, add 5
minutes, not more than 30 minutes. If it
exceeds 30 minutes, it will return to 5 minutes.

14 15
·When you place the massage chair, the backrest should always be kept at least
275mm away from the wall. If the backrest is too close to the wall, it will be collide
with the wall and cause damage to the product when it reclines.
275mm
Method of usage
8.The distance from the wall
7.Method of movement
·Make sure that all wires are far above the ground, tilt the backrest backward to
a certain degree (with the gravity center resting on the wheels), push the chair
forward or backward with your hands and finally resume the chair to the normal
position in a slow and gentle manner.
Note: During movement you must turn off the power first and then unplug the
power cord and the controller cord.
Method of usage
12
5.Dismounting headrest cushions and backrest pads
·The head cushion allows you to control the intensity of the neck and shoulder
massage. You can decide whether to use the head cushion (recommended). The
backrest cushion and the backrest is connected by zipper (1), head cushion and
the backrest cushion connected by the Velcro as show in the illustration (2).
Zipper Velcro
·This product is heavy and may cause damage to the floor. Place on carpet or
a protective surface to reduce risk of damage.
Caution: Do not move the chairs with its wheels on wood floor, rough ground or in
a narrow space. Two people are required to lift the chair. During the lifting period,
take the calf rest end sealing plate and backrest cover grooves as the force-bearing
point. (Please do not lift armrest directly.)
6.Floor Protection

16
Product specification
Model: A300
Name: Massage Chair
Rated voltage: 110-120V~ 60Hz
220-240V~ 50Hz/60Hz
Rated power input:110W
Rated time: 20Min
Safety structure: Class I
Material introduction: PVC, PA, steel parts and electric & electron parts
MATERIAL PU LEATHER CLOTH WOOD
Table of contents
Other Smart Comfort Massager manuals


Popular Massager manuals by other brands

DS Produkte
DS Produkte 03967 instruction manual

Panasonic
Panasonic REAL PRO Elite EP3513 operating instructions

FujiFilm
FujiFilm EC-3000 manual

HoMedics
HoMedics NOV-41-9CTM-AU instructions

truMedic
truMedic MC-1000 instruction manual

HoMedics
HoMedics QUAD Extreme Rechargeable Massager RC-QUAD Instruction manual and warranty


