manuals.online logo
Brands
  1. Home
  2. •
  3. Brands
  4. •
  5. SMART
  6. •
  7. Accessories
  8. •
  9. SMART AirLiner User manual

SMART AirLiner User manual

Quick Reference
Connecting and Customizing Multiple AirLiner Slates
The AirLiner™ wireless slate supports multiple connectivity. More than one user can write at the same time on
separate slates. You cab also customize the various function buttons and tool strips for a different feel or to limit
options for certain users.
Connecting multiple AirLiner wireless slates
You can connect more than one AirLiner wireless slate through a single Bluetooth®adapter. This can be useful during
a brainstorming session or when you want to get input from more than one person. Both users can write and erase
simultaneously, but only one user at a time can perform mouse clicks or other functions. To add a second AirLiner
wireless slate complete the following steps:
1 Press the Power button, and then the Connect button on the underside of the second AirLiner slate
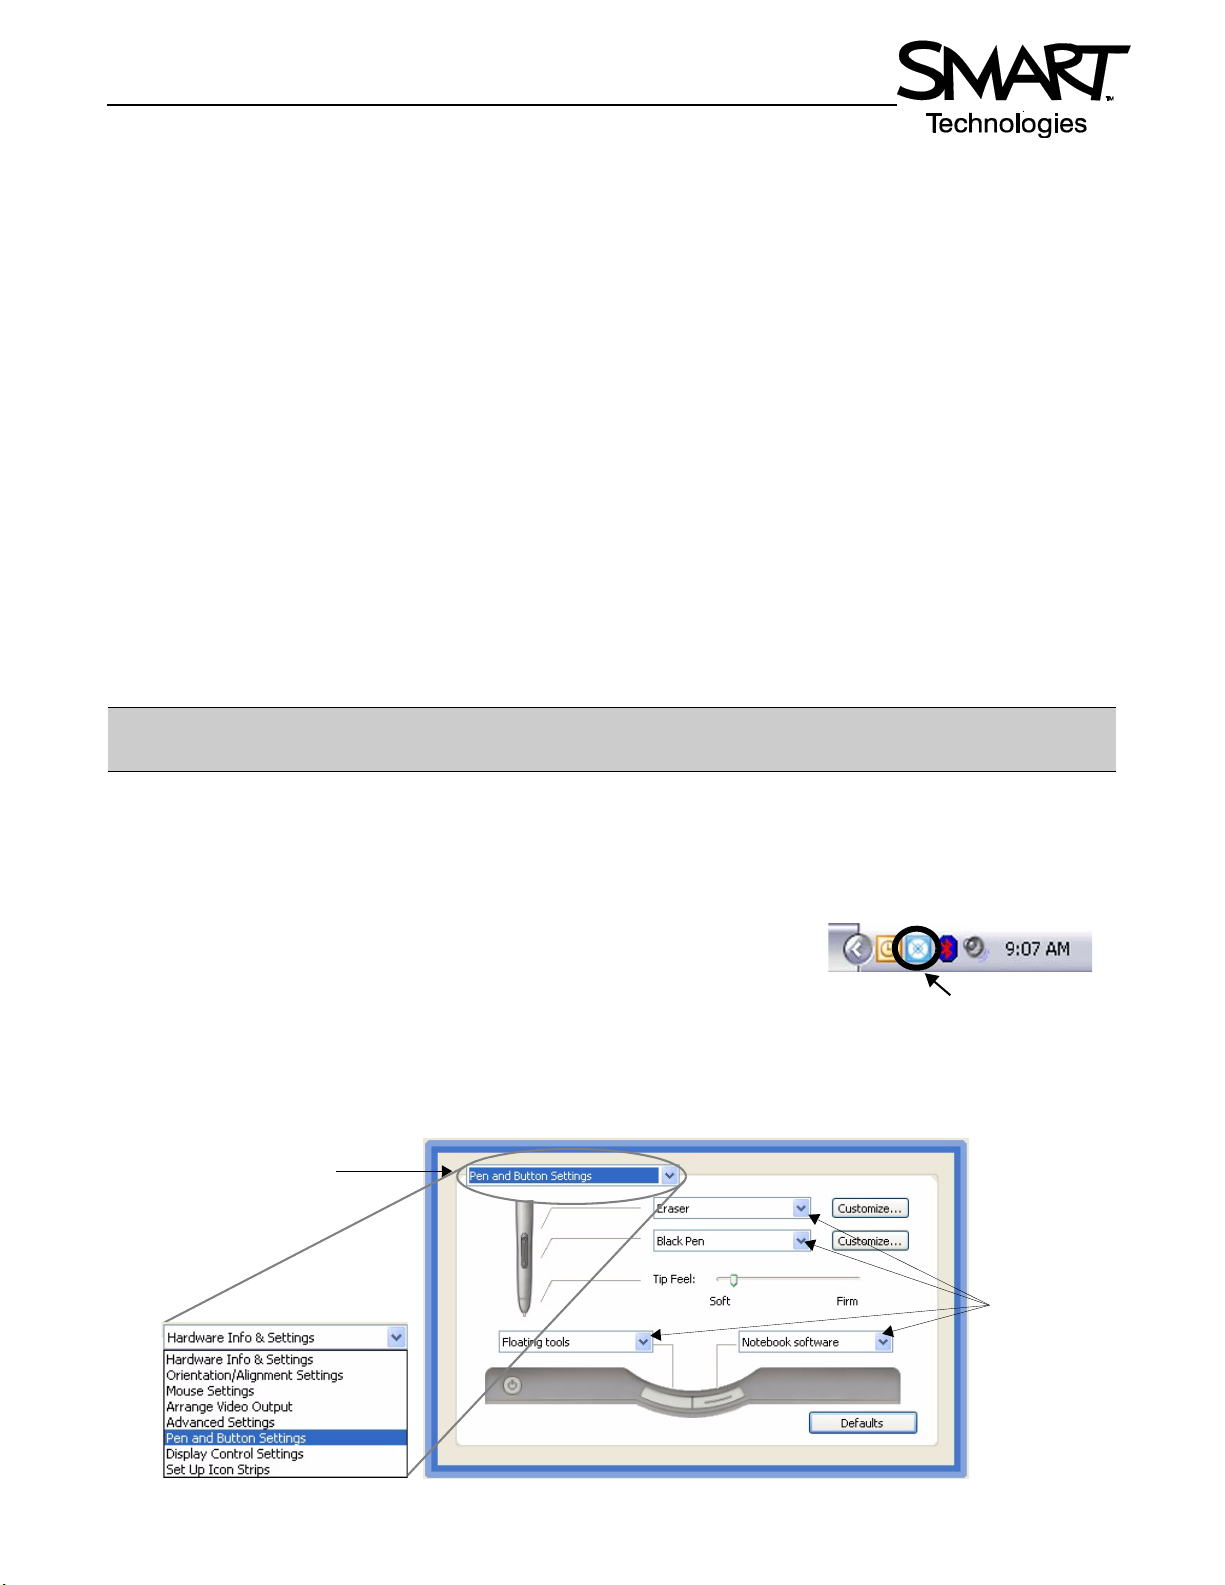
2 Double-click the Bluetooth icon in the Windows notification area
3 Select the Devices tab in the Bluetooth Devices dialog box, and click the Add button
4 The Add Bluetooth Device Wizard appears. Check the box indicating that your device is set up and ready to be
found, and then click Next.
5 The second wireless slate will appear in the list. Double-click its icon, and follow the on-screen instructions.
Customizing the AirLiner slate
Once you have connected more than one wireless slate, you can customize its buttons and toolbars. For example, in
a classroom setting or meeting, you may want to limit access on the slates to the pen and eraser tools only. To disable
all but the pen and eraser tools do the following.
1 Right-click on the SMART Board™ icon in the Windows notification area,
and select Control Panel
2 Select SMART Board Settings. In the settings screen, you may see a
number of devices listed.
3 Click on the icon of the AirLiner slate you wish to customize.
4 From the drop-down menu in the upper left corner, select the option for Pen and Button Settings.
TIP: If you have problems connecting through a single Bluetooth adapter, turn the AirLiner slate off, then press
the Power and Connect button again.
SMART Board icon
Select which settings
you wish to customize
from the drop-down list.
Use the four drop-
downliststodisable
or change settings
for the side switch
and function
buttons.
© 2008 SMART Technologies ULC. All rights reserved. AirLiner, SMART Board, Notebook and the SMART logo are trademarks of SMART
Technologies ULC. The Bluetooth word mark is owned by the Bluetooth SIG, Inc. and any use of such marks by SMART Technologies ULC is
under license. All other third-party products and company names may be trademarks of their respective owners. Printed in Canada 06/2008.
5 Use the drop-down lists to disable the pen side switch, and to disable the two function buttons. This prevents
a user from opening Notebook™ software or the Floating Tools toolbar, and render the side switch inactive.
6 Click OK, and then return to the drop-
down menu in the upper left corner.
Select the option to Set Up Icon Strips.
7 Select the Tool Strip and click Edit
8 Select the icon for the SMART Board
Control Panel, and click Remove. This
removes the ability for a user to access
the Control Panel directly from the
AirLiner wireless slate.
9 If you wish, repeat the process to
remove the Capture, On-Screen
Keyboard and the right-mouse buttons
10 You cannot leave toolbar spaces empty, so choose a tool from the Available Tools list to the left, and click
Add. You can add the same tool (for example, Black Pen) four times to fill the spaces.
11 Click OK when you are finished
TIP: If you plan to remove the left-click function, be sure that you have another input device to control your
applications (i.e., the wireless mouse, a SMART Board interactive whiteboard, or another AirLiner wireless slate).
Select the
Tool Strip
Click to
change or
disable the
Tool Strip
settings
Click to add tools
to the Current
Toolbar
Click to remove
tools from the
Current Toolbar
Current Toolbar
Lists of
Available Tools

Other SMART Accessories manuals

SMART Camfire User manual

SMART

SMART Camfire User manual

SMART CAS-300-IRSENS User manual

SMART

SMART CAS-300-IRSENS User manual

SMART INSTEON User manual

SMART

SMART INSTEON User manual

SMART J4 User manual

SMART

SMART J4 User manual

Popular Accessories manuals by other brands

Quincy lab 140AE-1 operating manual

Quincy lab

Quincy lab 140AE-1 operating manual

HomePro ZIR000 user manual

HomePro

HomePro ZIR000 user manual

DOL 20SCR Technical user guide

DOL

DOL 20SCR Technical user guide

RAB Smart Task installation manual

RAB

RAB Smart Task installation manual

Kemppi KMS 300 quick guide

Kemppi

Kemppi KMS 300 quick guide

Stearns 57,500 Series Installation and service instructions

Stearns

Stearns 57,500 Series Installation and service instructions

iGuzzini TWILIGHT COPENAGHEN manual

iGuzzini

iGuzzini TWILIGHT COPENAGHEN manual

Adelaide Annexe & Canvas Avan Deluxe installation guide

Adelaide Annexe & Canvas

Adelaide Annexe & Canvas Avan Deluxe installation guide

OHAUS 5000 instruction manual

OHAUS

OHAUS 5000 instruction manual

HOME8 WLS1300 quick start guide

HOME8

HOME8 WLS1300 quick start guide

MAXBOTIX MaxSonar quick start guide

MAXBOTIX

MAXBOTIX MaxSonar quick start guide

ioSmart iSmart56 Installation and user guide

ioSmart

ioSmart iSmart56 Installation and user guide

Focusrite Scarlett 18i8 user guide

Focusrite

Focusrite Scarlett 18i8 user guide

Velleman ED38105 user manual

Velleman

Velleman ED38105 user manual

JumpSport SkyBounce user manual

JumpSport

JumpSport SkyBounce user manual

Prima-Temp PRIYA Instructions for use

Prima-Temp

Prima-Temp PRIYA Instructions for use

Tefcold BC85I-BC85I W user manual

Tefcold

Tefcold BC85I-BC85I W user manual

Vaisala WMS302 user guide

Vaisala

Vaisala WMS302 user guide

manuals.online logo
manuals.online logoBrands
  • About & Mission
  • Contact us
  • Privacy Policy
  • Terms and Conditions

Copyright 2025 Manuals.Online. All Rights Reserved.