SMART J4 User manual

Please consult below checklist for all the components.
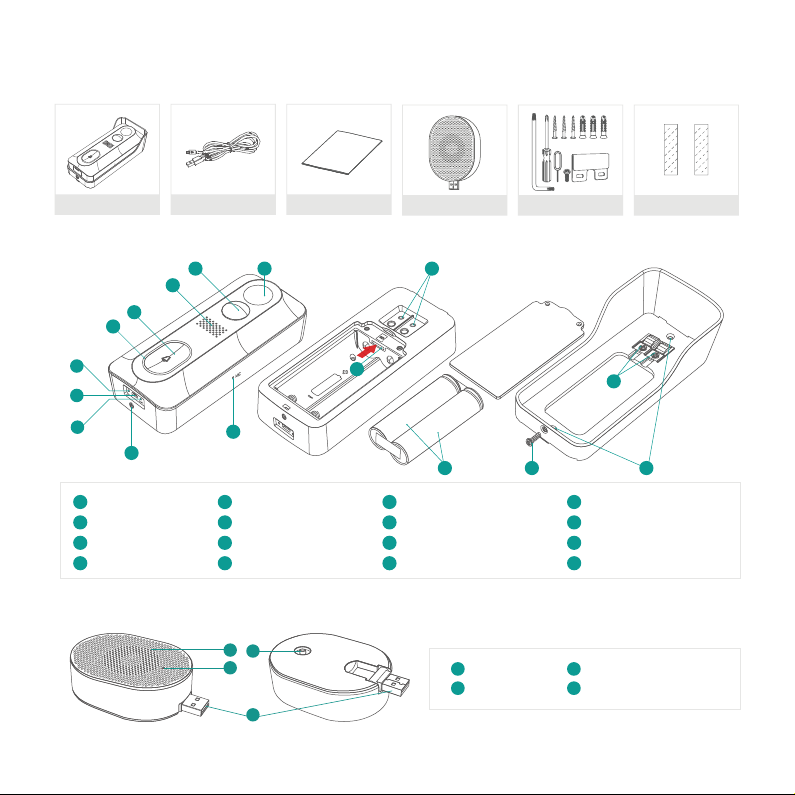
1. what’s in the box
2. meet the doorbell
User GuideUSB Cable
Video Doorbell Adhesive Tape
3. Meet the chime
Speakers
Reset
2
1LED Indicator
USB Port (Type-A/M)
3
4
Indoor Chime Screw & Tools
- 1 -
2MP camera
Motion sensor
Speakers
Doorbell button
LED indicator
Charging indicator
Micro-USB port
Reset hole
Security screw hole
Microphone
Power contacts
Hardwire terminals
Micro-SD card slot
18650 Battery pack
Security screw
Mounting screw holes
3
2
1
4
6
5
8
7
10
9
12
11
13
15
16
14
12
11
14
2
1
4
5
10
6
7
8
9
3
1615
13
1
3
2
4
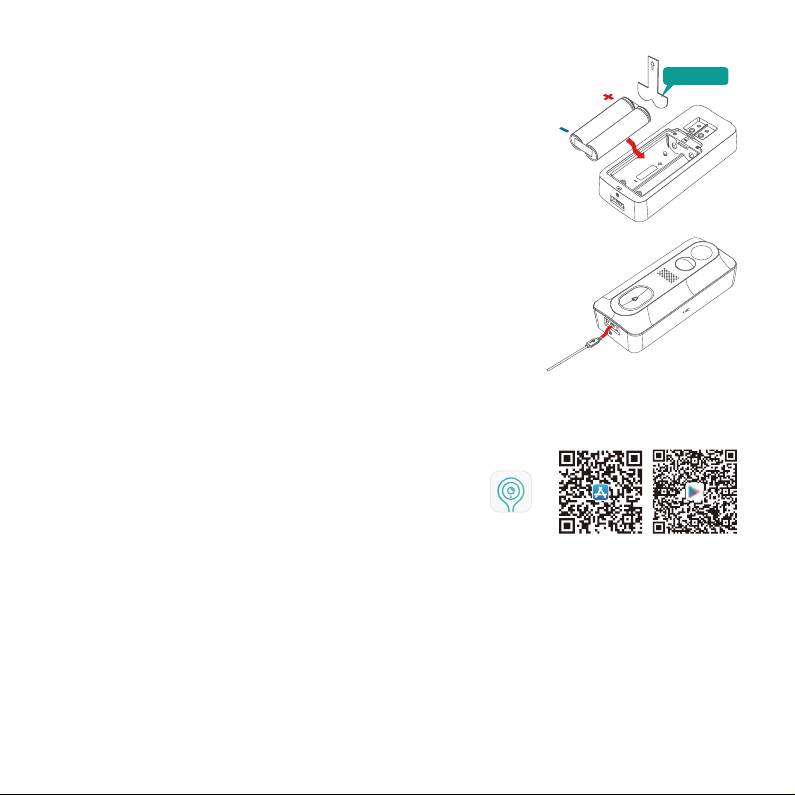
4. Battery installation
The batteries are pre-installed in the doorbell, with an isolating lm inserted
in the positive poles. Please remove the lm and insert the battery pack
back to compartment, with positive poles upwards!
NOTE:
Improper battery installation will cause damage to the internal components
and may result in serious injury.
The batteries inside the doorbell are not fully charged in accordance with
transportation safety regulations.
Please charge the batteries with a USB compatible wall charger (not included)
and the provided USB cable for about 8~10 hours prior to installation.
5. Battery charging
- 2 -
7. wi- set up
Before you start the Wi-Fi conguration, please note below:
1). The doorbell works with 2.4 GHz Wi-Fi, but not with 5 GHz Wi-Fi.
2). Avoid using special characters or symbols like )(@~!#$%^&*..., either in your Wi-Fi name or password.
3). Perform the conguration near your Wi-Fi router.
6. Download the app
Download and install the 'CloudEdge' App from Google Play
TM
or the
App Store
TM
. The App is also available by scanning the QR codes on
the right, using your QR code scanner on your smart phone.
NOTE:
Google Play
TM
is a trademark of Google Inc.
App Store
TM
is a service mark of Apple Inc.
Launch the ‘CloudEdge’ App and register an account with your mobile phone numer or email ID. Start the
Wi-Fi conguration, following the in-App instructions or refering to the following guiding steps.
Android
iOS
CloudEdge
isolating lm

9:55
Devices Messages Me
Tap + to add a new device
Devices
· Using the supplied reset pin, reset the
device(please consult the user manual for more on
this)
· Wait for the LED indicator to ash RED
· Tap Next
Please reset the device
Install Doorbell
Next
9:55
Install Doorbell
Press the [Bell] button, and tap Next
Help
Next
9:55
Please follow the instruction manual to
power the device
Please stay near your router for the best signal
Install Doorbell
Next
9:55
Camera
Battery Camera Floodlight Camera
Network Video
Recorder
Doorbell
1. Tap “+” to add device 2. Select Doorbell 3. check power status 4. Activate the doorbell 5. Reset device
9:55
Devices Messages Me
Devices
056853326
Select your Wi-Fi network
Change WiFi
Hide Password
Home
Password123
(Please select a 2.4G network, this device will not
work with 5G Wi-Fi networks)
Wi-Fi Setup
Next
9:55
Scan QR Code
Scan the QR code below with the
device at a distance of 5-8 inches.
A tone will be heard when
successfully scanned.
Help Next
9:55
Please stay near your router for the
best signal
Device Found!
Connecting device to network...
Registering device...
12%
connecting...
Connect Network
Operation
Next
9:55
Please remove all lm from the lens. Tap
Next to show a QR code, and let your
device scan the code. Keep your phone 5-8
inches from the lens.
15~25cm
5~8 in
6. Input Wi-Fi password 7. Prepare Code Scanning 8.Generate QR Code 9. Wait for connection
10. Adding device complete
Guiding steps:
- 3 -
8. run a test
After setup, tap on the live view window in the App for a test. Then take your doorbell outside to the installation
spot and run a test there. Make sure the installation spot is covered by strong 2.4 GHz Wi-Fi signal.
Note:
If the video quality from the doorbell outside is not as good as it was indoors, you may need to move your
router closer to your installation spot, or invest in an Wi-Fi extender.
- 4 -
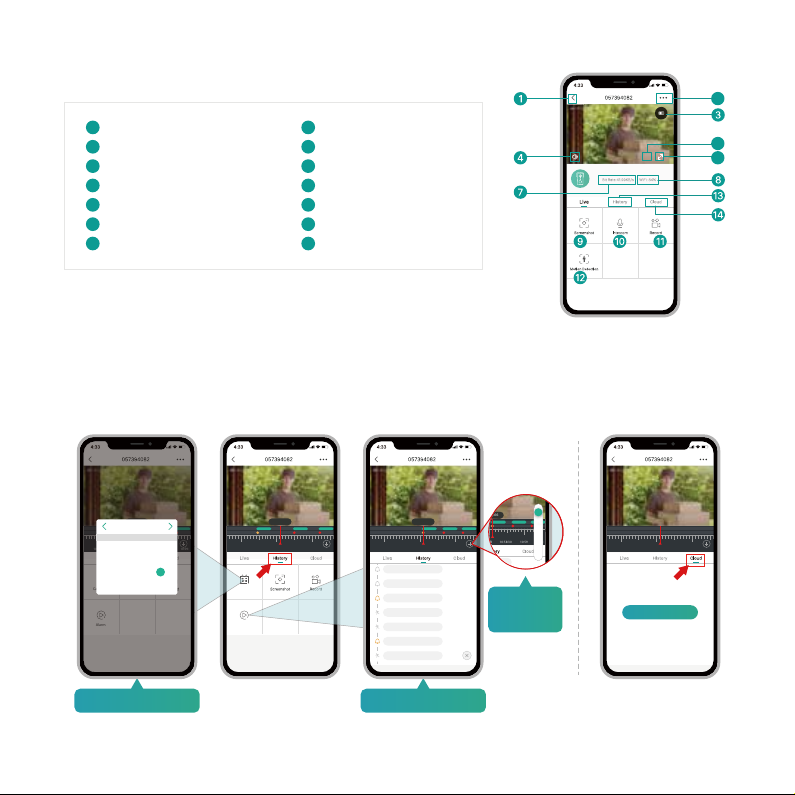
9. Live viewing
3
6
4
1
7
2
5
Quit live viewing
Setting menu
Battery status
Volume on/o
HD/SD switch
Full screen display
Stream bit rate
9
10
13
8
11
14
12
Wi-Fi signal status
Screenshot button
Speak to the scene
Record on the phone
Body detection on/o
Notication history
Cloud storage service
Note:
Live viewing will not trigger device recording.
10. Playback
If the Micro-SD card is properly installed, you can playback the video clips taken after detected motions or
visitor calls. (Live viewing will not trigger device recording). You can also back up video clips to the cloud,
only if you have activated the cloud storage service (Charge after a 7-Days-Free trial).
HD
Live view interface
Playback interface Cloud storage interface
10:58:06
10:57 10:57:30 10:58 10:58:30 10:59 10:59:
Calendar
Alarm
10:58:06
10:57 10:57:30 10:58 10:58:30 10:59 10:59:
Calendar
Alarm
Nov 2019
SUN MON TUE WED THU FRI SAT
27 28 29 30 31 1 2
10 11 12 13 14 15 16
17 18 19 23 21 23
24 25 26 27 28 29 30
3 4 5 6 7 8 9
3 4 5 6 71 2
22
10:58:06
10:57 10:57:30 10:58 10:58:30 10:59 10:59:
Visitor Message 09:29:30
Visitor Message 10:10:02
Visitor Message 10:56:56
Moton Detection 10:58:45
Motion Detection10:59:21
Visitor Message 13:09:30
Motion Detection 14:39:51
10:57 10:57:30 10:58 10:58:30 10:59 10:59:
Cloud storage is not active
Activate
Search video clips by date
Search video clips by events
10:58:06
10:57 10:57:30 10:58 10:58:30 10:59 10:59:
Visitor Message 09:29:30
Visitor Message 10:10:02
Visitor Message 10:56:56
Moton Detection 10:58:45
Motion Detection10:59:21
Visitor Message 13:09:30
Motion Detection 14:39:51
Timeline
zoom in/
zoom out
- 5 -
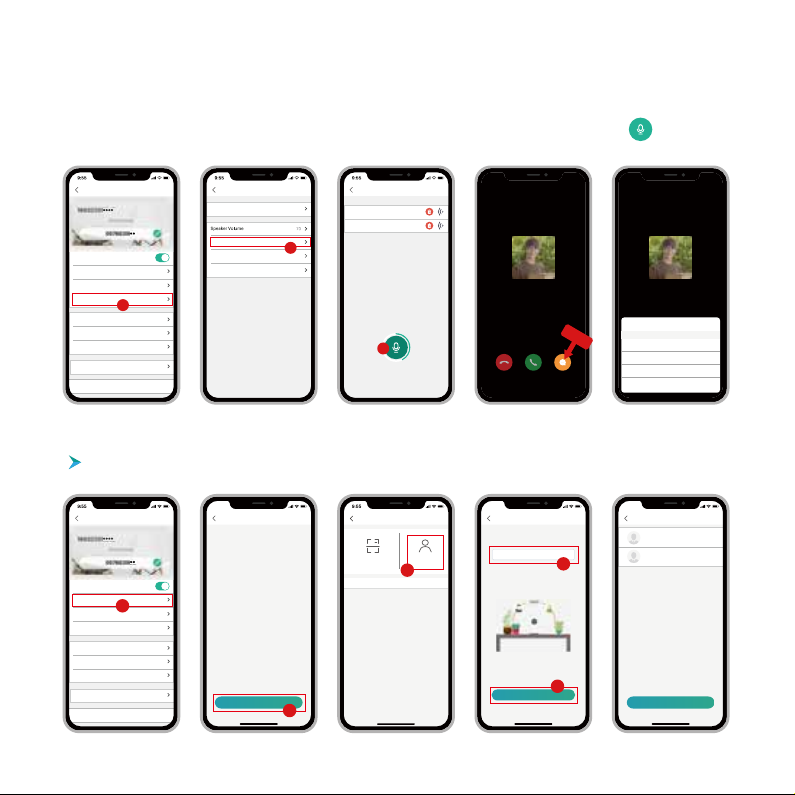
11. leave Voice messages
Maximum 3 voice messages (Max. 10 seconds each) can be pre-recorded into the doorbell, which enables
you to quickly respond to your visitors when you are not convenient to answer the doorbell call.
Steps: Setting --> Basic function --> Host Leaves Message --> Press and hold this icon to record
voice messages --> Push doorbell button--> Play the selected voice message in reply to doorbell call
Steps: Settings>>Device Share>>Tap on “Add ”>>Tap on “Account”>>Type in account ID>>Conrm Sharing.
12. share Your device
Device Share
9:55
1372896****
Lil
Shared
Requesting
mophie2019**@gmail.com
Mophie
Add
Delete Device
Device Share
Receive Notications
Device Information
Basic Function
Alarm Setting
Device Version
SD Card
Cloud Server
Settings
1
Device Share
9:55
Add
2
Device Share
Recent contacts
Scan QR Code
Account
3
Device Share
9:55
Search
Please enter your family’s account
mophie2019**@gmail.com|
4
5
sharing by account searching
057394082
You have a visitor
Delete Device
Device Share
Receive Notications
Device Information
Basic Function
Alarm Setting
Device Version
SD Card
Cloud Server
Settings
1
Night Vision
Wireless Chime
Power Management
Automatic
BasicFunction
Host Leaves Message
2
Voice Mail
My voice mail
voice msg 1
voice msg 2
Hold the button to record voice mail
0:04
3
Tap Here
057394082
You have a visitor
Send voice mail
Voice Msg 1
Voice Msg 2
Voice Msg 3
Cancel
My voice mail
How to share devices?
- 6 -
(not included)
(not included)
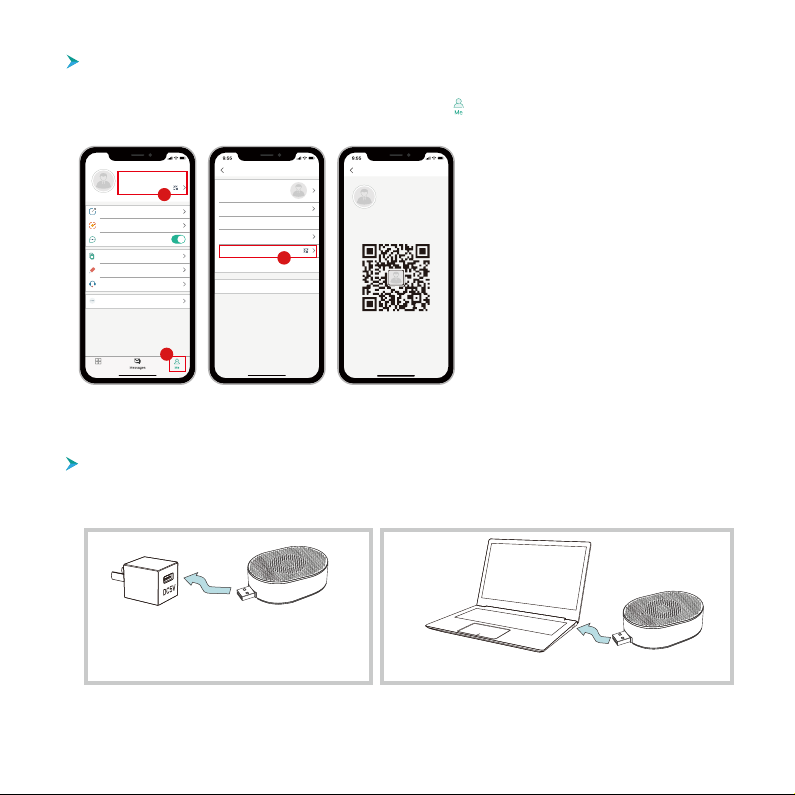
1. Powered by DC5V phone charger. 2. Powered by PC USB Port.
13. connect the chime
The chime can be powered by an USB compatible phone charger (DC5V 1A). You can also plug the chime
to the USB port on your PC/notebook to supply power.
Sharing by QR code scanning
The new users can show their QR codes to the administrator, and share device by QR Code scanning.
Find your QR code: Run CloudEdge App >> Tap on “ ” >> “User Name” >> “My QR Code”
>> Let the administrator scan your QR Code
NOTE:
1. Guide your family members to download and
install the CloudEdge App, and register an account
prior to device-sharing.
2. There is no limitation on the number of users
sharing one device.
3. Only the adminstrator got access to the setting
menu. Other users can only live view & playback.
4. All users will receive doorbell calls and alarm
notications.
5. Many users can access to the doorbell simul
-tanously, to live view or playback.
My QR Code
User Name
1882020****
Scan the QRCode to share camera with me
9:55
Devices
User Name
1882020****
In-App Alert Sound
Pictures & Videos
Device Share
FAQ
Feedback
Online Help
More
1
2
My information
Account
Edit Nickname
Prole Photo
Reset Password
My QR Code
Your Region
Log Out
User Name
1882020* * * *
Region
3
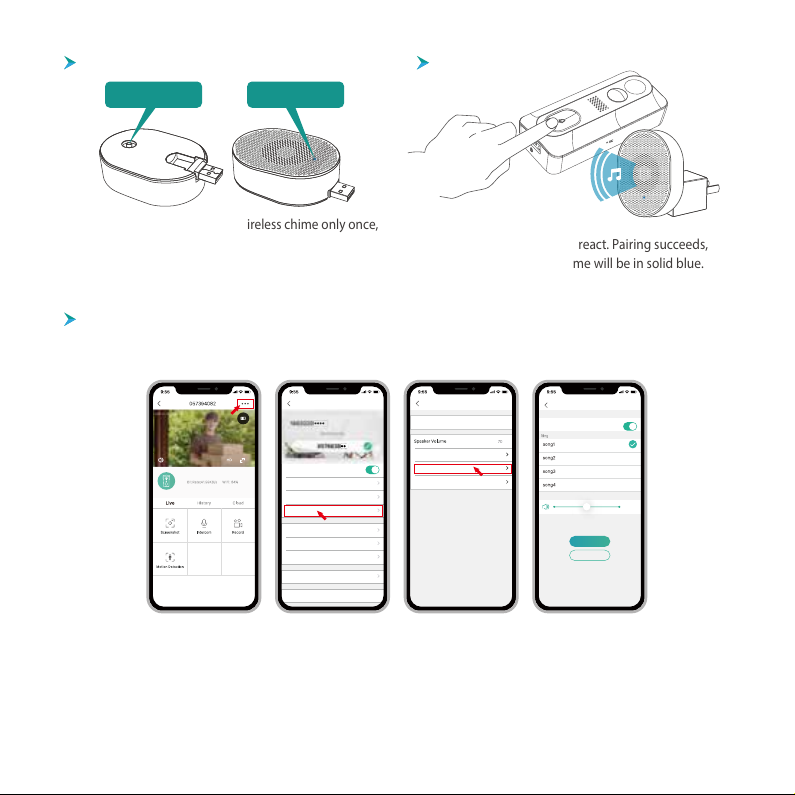
1 ).
supply power to the chime
- 7 -
4). chime settings
2). Click reset button
3). Press the doorbell button
Click the RESET button on the wireless chime only once,
and you will see the LED indicator ashing blue,
indicating the chime is in pairing mode.
You can enter into the chime setting page following below setting steps, so as to mute the Chime Reminder,
select ringtones, adjust chime volume or unbind the connection with doorbell.
Press the doorbell button,
and the Chime will sound to react. Pairing succeeds,
and the indicator on the chime will be in solid blue.
Night Vision
Wireless Chime
Power Management
Automatic
BasicFunction
Host Leaves Message
Step.2 Step.3Step.1 Step.4
Wireless Chime
Middle
Chime Pairing
One-button untie
Chime Reminder
Delete Device
Device Share
Device Information
Basic Function
Alarm Setting
Device Version
SD Card
Cloud Storage Service
Settings
Receive Notications
NOTE:
1. Your doorbell communicates with the chime via Radio Frequency, but not WiFi. You can even do the
pairing prior to doorbell conguration.
2. You can add many chimes to one doorbell, and vice versa.
3. Press and hold RESET button on the chime for 5 seconds till the indicator ashes blue 3 times, and
you can also release the connection between the chime and its connected doorbell.
View operation video?
Ring Volume
LED Indicator
Reset Button
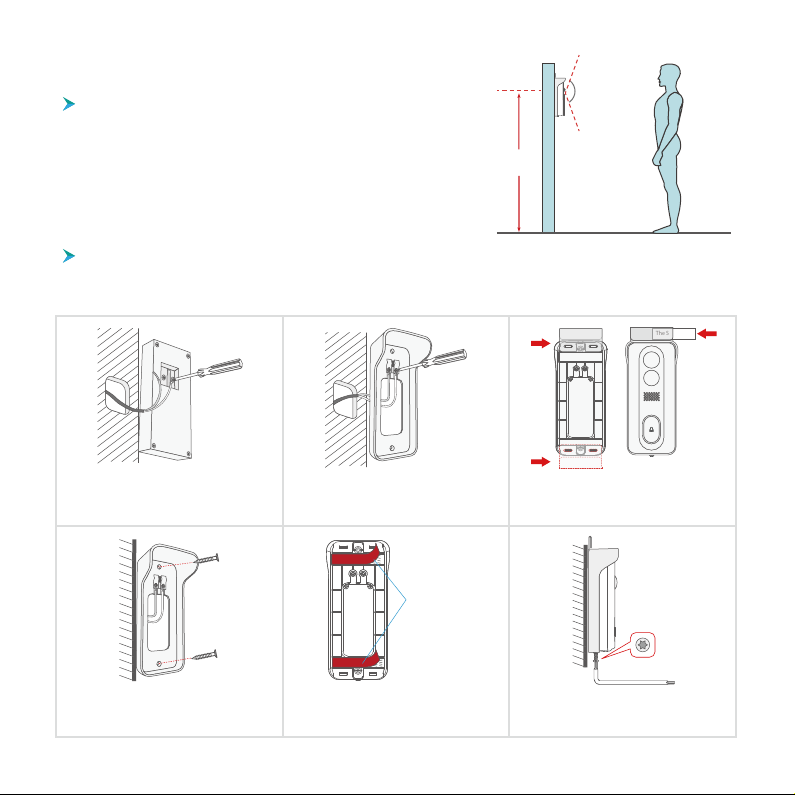
Your doorbell has 166-degree view angle and 120-degree
human detection range.
It is suggested to mount your doorbell at least 5 feet (160 cm)
above the ground for the best angle of view and motion
detection performance.
The doorbell works with both 12V ~ 24V AC and 12V DC hardwire power source. Either wire can be connected
to either terminal. The cable order doesn't matter.
14. Installation
Select location
Hardwire your doorbell (Optional)
- 8 -
5 feet
160cm
166°
1. (Optional) Shut o power at the breaker,
remove the old doorbell from the wall and
disconnect the wires.
2. Connect the wires to the screw terminals
on your mounting bracket. Either wire can be
connected to either terminal.
6. Mount the doorbell to the bracket, and
secure it with the provided star-shape
security screw and screw driver. All set!
3. (Optional) The nameplate holder can be
mounted on the top rear/ bottom rear of the
bracket, prior to bracket installation.
4. Drive the screws into the anchors, or
directly into your wall untill the bracket
is tightly fastened on your wall.
5. (Optional) You can also use the provided
double-sided tape instead of screws to x
the wall mount on at surface.
Double-sided
adhesive tape
(Example)
The Smiths

The Smiths
Go wireless installation
- 9 -
Note:
1. When hardwire your doorbell, please operate under the guide of the professionals.
2. The doorbell works with 12V - 24V AC and 12V DC power source. And either cable can connect to either
terminal. The connecting order doesn’t matter.
3. If your doorbell is powered solely on batteries, you may need to charge your doorbell once in a while.
Lab-tested battery life: 12 month standby, 6 month regular using(activate 20 time per day. (The actual
battery life may be dierent due to dierent activation freqency).
3. (Optional) The nameplate holder can be
mounted on the top rear/ bottom rear of the
bracket, prior to bracket installation.
1. Dismount the bracket by pushing from
the back of your doorbell. Please remove
the insulation lm in the battery cell.
4. Mount your doorbell to the xed bracket.
Make sure it reaches the bottom where you
can hear a click.
5. Secure your doorbell with the provided
star-shape security screw and screw driver.
6. All set, congratulations!
Now you can press the doorbell button
to try it out.
2. Bracket installation: mount the bracket on
the wall with screws & anchors or the double
-sided adhesive tape.
(Example)
The Smiths
Table of contents
Other SMART Accessories manuals


