Smartech JS-15000N User manual

User Guide
Guía del usuario
Jump Starter / Power Bank
Model/Modelo: JS-15000N
CRANKING CURRENT: 400 Amps
PEAK CURRENT: 800 Amps
OUTPUT: 2x5V/2.4A, 12V/10A, 19V/3.5A
BATTERY CAPACITY: 15000mAh/55.5Wh
FULLY CHARGE IMMEDIATELY AFTER PURCHASE.
Fully recharge after each jumpstarting, or every 3 months to ensure
long battery life.
Jump • Charge • Power

USER GUIDE PAGE 2JS-15000N USER GUIDE PAGE 3JS-15000N
DANGER
Please read and understand all important
safety and operating instructions before
using this charger. In addition, please
read and follow all battery and vehicle
manufacturer’s instructions and
cautionary markings. Failure to follow the
instructions may result in ELECTRICAL
SHOCK, EXPLOSION, or FIRE, which
may result in SERIOUS INJURY, DEATH,
DAMAGE TO DEVICE or PROPERTY. Do
not discard this information.
Operating Manual has been designed to instruct you on the correct use and
operation of your product. Your satisfaction with this product and its safe
operation is our ultimate concern. Therefore please take the time to read the
entire manual, especially the Safety Precautions. They will help you to avoid
potential hazards that may exist when working with this product.
Published by:
Smartech Products, Inc.
8700 Larkin Rd.
Savage, MD 20763
(888) 288.5148
www.smartechproduct.com
Copyright © 2018 by Smartech Products, Inc.
Reproductions of this work, in whole or in part, without written permission of
the publisher are strictly prohibited.
The publisher does not assume and herby disclaims any liability to any party
for any loss or damage caused by any error or omission in this manual,
whether such error results from negligence, accident, or any other cause.
RISK OF EXPLOSIVE GASES
WORKING IN THE VICINITY OF A LEAD-ACID BATTERY
IS DANGEROUS. BATTERIES GENERATE EXPLOSIVE GASES
DURING NORMAL BATTERY OPERATION. FOR THIS REASON,
IT IS OF UTMOST IMPORTANCE THAT YOU FOLLOW THE
INSTRUCTIONS EACH TIME YOU USE THE CHARGER.
To reduce risk of battery explosion, follow these instructions and those published by
battery manufacturer and manufacturer of any equipment intended to be used in vicinity
of battery. Review cautionary marking on these products and on engine.
SAFETY PRECAUTIONS FOR WORKING IN THE VICINITY OF
LEAD ACID BATTERIES
1) Use this product for jumpstarting 12V LEAD-ACID batteries only.
Do not attempt to jump-start a vehicle with a non-rechargeable or
defective battery.
2) Working in vicinity of a lead-acid battery is dangerous. Batteries
generate explosive gases during normal operation. Use in a well
LAPTOP CHARGER TIPS
CONSEJOS PARA EL CARGADOR PORTÁTIL
SMART BATTERY CLAMPS
PINZAS SMART BATTERY
INCLUDED ACCESSORIES
ACCESORIOS INCLUIDOS
2 IN 1 USB CABLE
CABLE USB 2 EN 1
CARRYING CASE
ESTUCHE DE TRANSPORTE
CAR CHARGER
CARGADOR DE COCHE
CARGADOR DE PARED
WALL CHARGER
12V ADAPTER
ADAPTADOR 12V

USER GUIDE PAGE 4JS-15000N USER GUIDE PAGE 5JS-15000N
ventilated area. Battery acid can cause permanent blindness. Avoid
touching eyes while working near battery.
3) Do not smoke, strike a match, or cause a spark in vicinity of battery
or engine. Avoid explosive gas, ames and sparks.
4) Remove all personal jewelry, such as rings, bracelets, necklaces, and
watches before jumpstarting operations. These items may produce a
short-circuit that can cause severe burns.
5) To avoid damage to the vehicle’s electrical system, do not use this
product on a vehicle that does not have a battery installed.
6) Use of an accessory not recommended or sold by the manufacturer
may result in a risk of re, electric shock or injury to persons. Do not
operate with damaged accessory(s).
7) Locate the product as far away from battery as jumper cables permit.
8) Do not expose to rain or wet conditions.
9) To reduce the risk of damage to electric plug and cord, pull by the
plug rather than the cord when disconnecting.
10) Operate with caution if the jump starter has received direct hit of
force or been dropped. Have it checked and repaired if damaged.
11) Any repair must be carried out by the manufacturer or an authorized
repair agent in order to avoid danger.
12) Pursuant to California Proposition 65, this item contains chemicals
known to the State of California to cause cancer and birth defects or
other reproductive harm. Wash hands after handling.
FEATURES
ABOUT THIS PRODUCT
Features Built-In Protection: Spark Proof Protection, Reverse Polarity
Protection, Short Circut Protection, Over Current Protection, Over Discharge
Protection, Over Charge Protection, Self Discharging Protection and Over
Heat Protection. This product can instantly jump start most single battery
vehicles, up to 70+ (over 70) times on a full charge. This product is also
equipped with USB power output, LED ashlight, 12VDC power output and
a 19V output for laptops.
About the JS-15000N:
About the Smart Jumpter Clamps:
Green LED
Red LED
EC5 Plug
Positive Clamp
Negative Clamp
Boost Button
%
5VUSB
2.4A
15V
5V
IN
OUT 19V 3.5A
1) Flashlight
2) Battery Capacity
3) 5V/2.4A Output
4 & 7) 5V/2A Input
5 & 7) 15V/1A Input
6) 19V/3.5A Output
Power Button
Built-In 8000mAh
Lithium Ion Battery
3 Mode
LED Flashlight
Battery Status /
Output Display
EC5 Engine Start Socket
15V/1A INPUT PORT
5V/2A INPUT PORT
19V/3.5A OUTPUT PORT (2) 5V/2.4A USB Outputs
12
3
4
5
6
7

USER GUIDE PAGE 6JS-15000N USER GUIDE PAGE 7JS-15000N
LED and Buzzer Communication:
Red LED Green LED Buzzer
Sound Condition
1 On Off One sound Jumper cables and jump
starter are connected.
2Off On One sound
Jumper cable and
vehicle battery are
connected. Ready to
start the engine.
3Slow ash Off No buzzer Lithium battery voltage in
jump starter is low.
4Slow ash Off No buzzer
Have not turned on the
ignition switch within
the regulated time. To
resolve this, you need
remove clamps from
vehicle battery, and
connect again when
No.1 condition occurs.
5Fast ash Off Fast buzzer
Red and black clamps
are connected with each
other.
6Fast ash Off Fast buzzer Reverse connection of
clamps.
7Off Fast ash No buzzer Engine is started.
8Off Fast ash No buzzer
Vehicle’s battery voltage
is higher than Jump
Starter’s.
Technical Specication:
Battery Type Lithium-ion Polymer
Battery Capacity 15000mAh
Starting Current 400A
Peak Current 800A
Jump Start Up to 6.0L Gas Engine, 5.0L Diesel
Engine
USB Output 5V/2.4A, 5V/2.4A
LED Flashlight 2W
12V Output 10A Max
19V Output 19V/3.5A for Laptops
Operating Temperature -22°F - +122°F
Charging Temperature 32°F - +104°F
Storage Temperature -4°F - +95°F (For 3 months)

USER GUIDE PAGE 8JS-15000N USER GUIDE PAGE 9JS-15000N
of engine cranking. The jumpstart feature is designed for short term
operation only, and more than 5 seconds may cause damage to the
unit. Allow the jump starter to cool down for at least 3 minutes after
each jumpstarting.
6) Disconnect the cable from the jump starter immediately after engine
starts, and then remove from battery terminals.
“BOOST” Mandatory Operations:
1) If with correct connection between Jump Starter and vehicle battery
(Red LED keeps on and green LED is off), press and hold BOOST
button for three (3) seconds (after a buzzer sound, the green LED
is on and red LED is off). Usually this is because the vehicle battery
capacity is rather low.
2) Start the engine (same method as the normal operations in Page 7).
Cautions:
1) Under normal circumstances, do not use the mandatory operations.
2) The spark proof, reverse polarity protection and short circuit
protection features are disabled after Boost button is pressed. Pay
very close attention to the polarity of the battery before using this
mode. Do not allow the positive and negative battery clamps to touch
or connect to each other as the item will generate sparks and high
heat if not used properly.
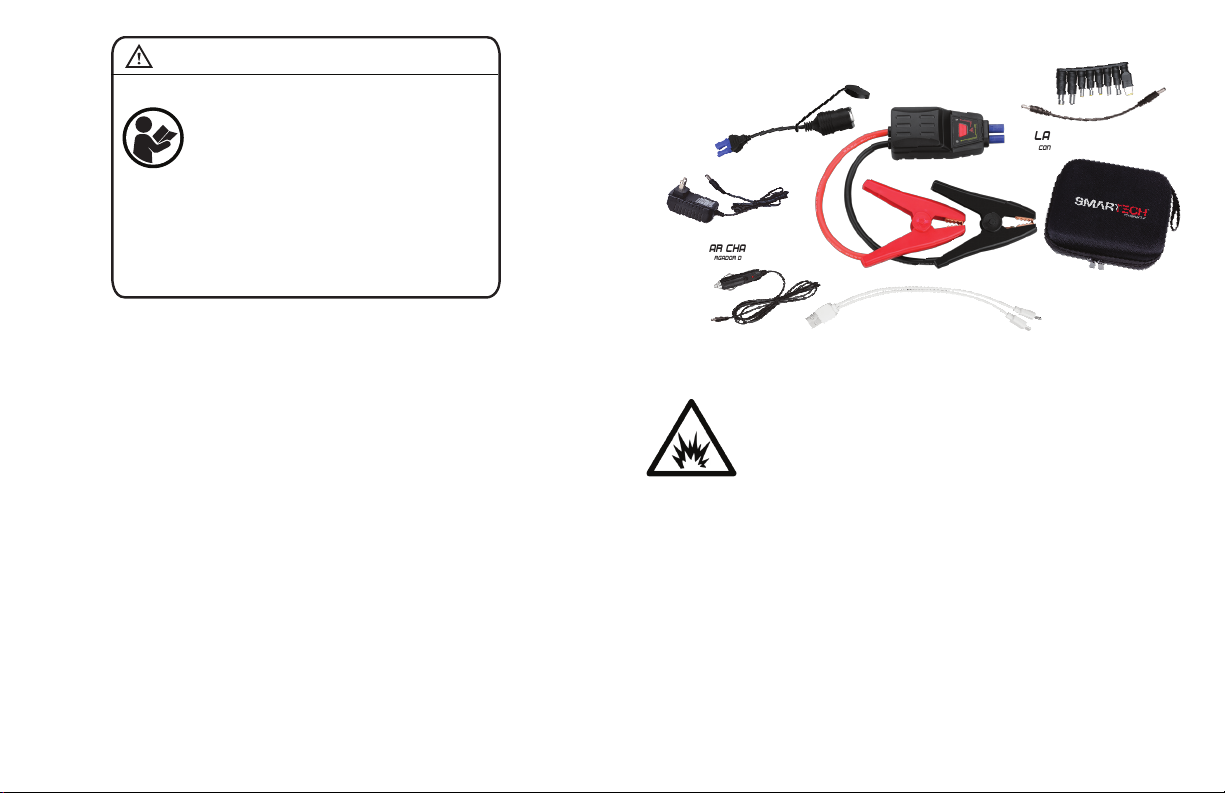
CHARGING
This product is partially charged from the manufacturer. Fully charge the unit
immediately after purchase. In order to prolong the product life, be sure to
fully recharge the unit after each jumpstaring, or every 3 months even if this
unit has not been used. If battery voltage in the jump starter is too low, this
item will shut off to prevent damage to itself. Recharge the unit as soon as
possible to be activated and fully charge it to ensure long battery life. In addi-
tion, we recommend not to charge and discharge the unit at the same time.
AC Charging:
1) Insert AC charging adapter into charging jack of the unit.
2) Plug the other end of AC charging adapter into a wall socket.
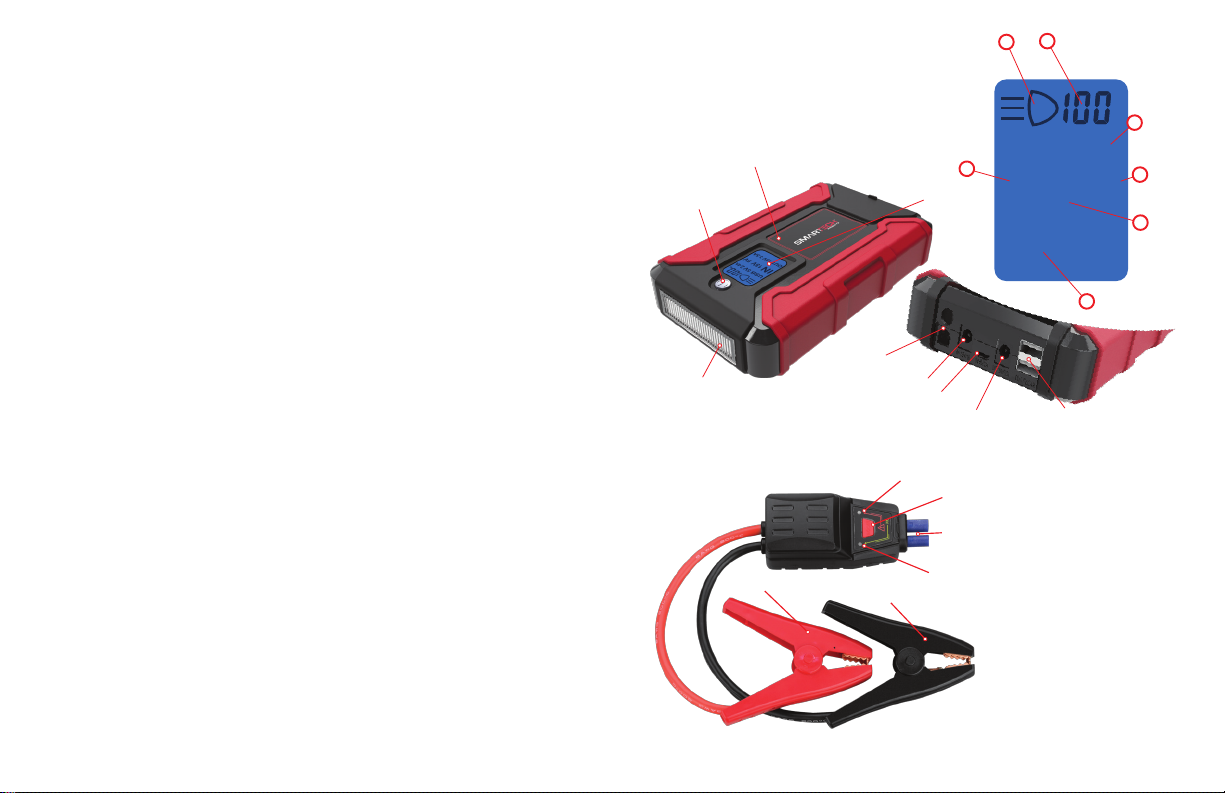
CONNECTING TO THE BATTERY
1) Identify polarity of battery posts. The positive battery terminal is
typically marked by these letters or symbol (POS,P,+). The negative
battery terminal is typically marked by these letters or symbol
(NEG,N,-).
2) Do not make any connections to the carburetor, fuel lines, or thin
metal parts.
3) Identify if you have a negative or positive grounded vehicle. This can
be done by identifying which battery post (NEG or POS) is connected
to the chassis.
4) For a negative grounded vehicle (most common): connect the RED
POSITIVE jumper clamp rst to the positive battery terminal, then
connect the BLACK NEGATIVE jumper clamp to the negative battery
terminal or vehicle chassis
5) For a positive grounded vehicle (very uncommon): connect the
BLACK NEGATIVE jumper clamp rst to the negative battery
terminal, then connect the RED POSITIVE jumper clamp to the
positive battery terminal or vehicle chassis
6) When disconnecting, disconnect in the reverse sequence, removing
the negative rst (or positive rst for positive ground systems).
JUMP STARTING
1) This unit is only for emergency use, not for frequent commercial
use! ENGINE START socket is ALWAYS activated! Do not attempt
to jumpstart your vehicle when the jump starter battery capacity is
below 30% (observe battery status indicator on the unit).
2) Turn off the vehicle ignition and all accessories (radios, lights, air
conditioners, etc.), and disconnect electronic devices.
3) Connect the jumper clamps to the correct polarity battery terminals.
4) Connect the EC5 plug of jumper cables to the ENGINE START
socket of jump starter.
5) Try starting the vehicle (turn on the ignition switch). Most vehicles will
immediately start. Stop if the vehicle does not start after 5 seconds

USER GUIDE PAGE 10JS-15000N USER GUIDE PAGE 11JS-15000N
LIMITED WARRANTY
Effective April 15, 2017. Replaces all undated warranties and all warranties
dated before April 15, 2017
w
Repair/Replacement Warranty
Smartech Products warrants to the original purchaser that the mechanical
and electrical components will be free of defects in material and workmanship
for a period of one (1) year from the original date of purchase. This product is
intended for household use only. Transportation charges on product submitted
for repair or replacement under this warranty are the sole responsibility of
the purchaser. This workmanship for a period of warranty only applies to the
original purchaser and is not transferable.
Do not return the unit to the place of purchase.
Contact Smartech Products’ Customer Service and Smartech Products will
troubleshoot any issue via phone or e-mail. If the problem is not corrected
by this method, Smartech Products will, at its option, authorize evaluation,
3) Fully charge the unit.
4) When charging is complete, unplug the AC charging adapter from the
wall socket rst, then from the charging jack on the jump starter.
DC Charging in Your Vehicle:
1) Turn the vehicle engine on.
2) Insert the DC charging adapter into the charging jack of the unit.
3) Plug the other end of DC charging adapter into vehicle’s cigarette
lighter socket.
4) Fully charge the unit. Engine must keep running during entire charge.
5) When charging is completed, unplug the DC charging adapter from
the vehicle rst, then from the charging jack on the jump starter.
USB Charging:
This product has a USB cable that can also be used to recharge the
jump starter.
Charging Time:
LCD will show “100%” as fully charged. Charging time will differ based on the
discharge level and the power source used. If charging begins from 5% to
full charge, it approximately takes approxiamately 7 hours for AC charging
USB POWER
Connect the USB device to the jump starter with either the original cable or
the included multi-tip cable (better use original cable of Apple® for Apple®
products). Press Power button to start USB power. When disconnected,
the jump starter will automatically shut off. The number of times you can
recharge a USB device will vary between devices.
FLASHLIGHT
Press and hold Power button for 3 seconds to start ashlight. Press once to
switch lighting modes: Steady On – Strobe – SOS – Off.
SUPPLY TO 19V DEVICES
Select the appropriate input tip and connect the jump starter with your lap-
top. Press the Power button to start 19V/3.5A power. When disconnected,
the jump starter will automatically shut off. The number of times you can
rechaerge a laptop will vary between decives.
SUPPLY TO 12V DEVICES
The jump starter can run/charge 12VDC appliances that draw 10 amps or
less.
Two options as follows:
1) Connect the jump starter to 12V devices with the optional accessory
(This item does not include the accessory). Press Power button to start 12V
power. When disconnected, the jump starter will automatically shut off.
2) Connect the jump starter to 12V devices by the incuded accessory.
You do not need to press the Power button as the EC5 12VDC output is
ALWAYS activated. When the battery voltage of the jump starter is too low,
12V devices will stop running/charging.

USER GUIDE PAGE 12JS-15000N USER GUIDE PAGE 13JS-15000N
Limits of Implied Warranty and Consequential Damage
Smartech Products disclaims any obligation to cover any loss of time, use
of this product, freight, or any incidental or consequential claim by anyone
from using this product. THIS WARRANTY IS IN LIEU OF ALL OTHER
WARRANTIES, EXPRESS OR IMPLIED, INCLUDING WARRANTIES OF
MERCHANTABILITY OR FITNESS FOR A PARTICULAR PURPOSE.
A unit provided as an exchange will be subject to the warranty of the original
unit. The length of the warranty governing the exchanged unit will remain
calculated by reference to the purchase date of the original unit.
This warranty gives you certain legal rights which may change from state to
state. Your state may also have other rights you may be entitled to that are
not listed within this warranty.
Some states do not allow the exclusion, so it may not apply to you.
Contact us at:
Smartech Products Inc.
8700 Larkin Rd.
Savage, MD 20763
(888) 288-5148
www.smartechproduct.com
This warranty will not apply to parts and/or labor if this product is deemed to
have been misused, neglected, involved in an accident, abused, modied,
installed improperly or connected incorrectly to any electrical component.
Other Exclusions
This warranty excludes:
• Merchandise sold as reconditioned, used as rental equipment, or
oor/display models sold without packaging and/or missing parts
or components.
• Repair and transportation costs of merchandise determined not to
be defective.
• Cosmetic defects such as paint, decals, etc.
• Failures due to acts of God and other forces of nature beyond the
manufacturer’s control.
• Problems caused by parts that are not original parts.
Warranty Exclusions
This warranty does not cover the following repairs and equipment:
Normal Wear
This warranty does not cover repair when normal use has exhausted the life
of a part or the equipment as a whole
Installation and Use
repair or replacement of the defective part or component at a Smartech
Products’ Service Center. Smartech Prodcuts will provide you with a case
number for warranty service. Please keep it for future reference. Repairs or
replacements without prior authorization, or at an unauthorized repair facility,
will not be covered.

USER GUIDE PAGE 14JS-15000N
Other manuals for JS-15000N
1
Table of contents
Popular Accessories manuals by other brands

B.E.G. LUXOMAT
B.E.G. LUXOMAT PD1-M-2C Installation and operating instruction manual

MRC
MRC LOM-200 instruction manual

M-Audio
M-Audio PCI Audio & MIDI Interface Audiophile 2496 Bedienungsanleitung

Rice Lake
Rice Lake 1280 Enterprise Series Technical manual

Sanique
Sanique S-3 user manual

R9 Technology
R9 Technology SN400 user guide