Smarter Reefs Protein Skimmer 150 User manual

Smarter Reefs Automatic Self-Cleaning
Protein Skimmer
Welcome
Congratulations on the purchase of your Smarter Reefs automatic self-cleaning protein
skimmer!
Please follow the instructions carefully in this manual. We have made several videos and QA
sections to help you get started. If you have any difficulties installing or operating this product
please contact us at smarterreefs.com
DANGER: To avoid possible electric shock, special precautions should be taken when near a
wet aquarium. For problems with wiring or other electrical issues, do not attempt repairs
yourself; contact us at smarterreefs.com
This product is for use by adult aquarists only. It contains plastic bags that can be choking
hazards and small parts that can also be choking hazards for children. This product contains
electronic devices that are used near water, it is critical to follow instructions to maintain a large
margin of safety. It is essential to keep power supplies and digital controllers mounted in a dry
location and never allow them to get wet. Never use a pump, electrical cord or electronic device
that appears to have physical damage. Never plug in a power supply or digital controller if they
are wet.

Product Safety
● Prior to plugging anything in, ensure the power supply is compatible with your home
voltage (110V).
● A three prong outlet with proper grounding is required to operate the protein skimmer
pump and cleaning motor.
● Only use electrical outlets with GFCI protection
● Do not operate any appliance if it has a damaged cord or plug or if the product is
damaged in any way
● This device is only appropriate for indoor use and only in aquatic environments/marine
aquariums
● Do not forcefully bend the power cords and do not carry/hold devices by their
power cords
● To avoid injury, do NOT contact or touch moving parts
● Unplug devices when not in use
● Never allow pump to run dry, it will permanently damage the pump and void the warranty
● Do NOT operate pump outside temperatures +4 C to +35C or 39F to 95F
● The power supplies AND controllers are NOT waterproof
○ Secure DC power supply to dry location
○ Secure both digital controllers to dry locations
● Do not touch plugs or controllers with wet hands
● If the plug or receptacle does get wet, DO NOT unplug the cord. Make sure power is off
to the circuit breaker. Once you have confirmed there is no power going to the outlet or
device, then it is safe to unplug the device and examine for presence of water in the
receptacle.
● The device is NOT intended for use by children or persons with limited physical or
sensory or mental capacities unless properly supervised.
● Do NOT clean protein skimmer with chemicals such as alcohol or ammonia, it will
damage the materials
● Do NOT clean the pump with vinegar. Use citric acid bath every 6 months to 1 year to
remove calcium deposits as needed
● Do NOT use devices for anything other than their intended uses
● When the self-cleaning motor is turning, keep hands and fingers away from the device.
It turns very slowly but can potentially cause injury.
Drip Loop
● In order to avoid the sensitive electrical equipment and electrical outlet from getting wet,
it is important to install equipment using a drip loop.
●In a manner similar to the diagram, create a U-shape with the electrical cables that is
lower in position than the lowest part of the controller box, outlet or power supply. In this
manner, gravity will cause any condensation or water to fall away from the sensitive
electronics. Use an extension cord if needed to complete the drip loop.
WATCH INSTALLATION VIDEO
smarterreefs.com/skimmerInstructions
Make sure you have all required parts:
● Skimmer Body
● Skimmer Pump
○ Electrical cord
○ Power supply
○ DC Controller
○ Pump Body
● Clean Material (Free spinning) Spindle
● Dirty Material (Motor) Spindle
● Set of screws (X x M6)
● Clean Filter Material Roll
● Venturi Connector
● Airline Tubing
● Air intake silencer / muffler
● Air silencer mounting bracket
Instructions
1. Remove and unwrap all parts from the package
2. Remove and unwrap all items that were shipped inside the skimmer body
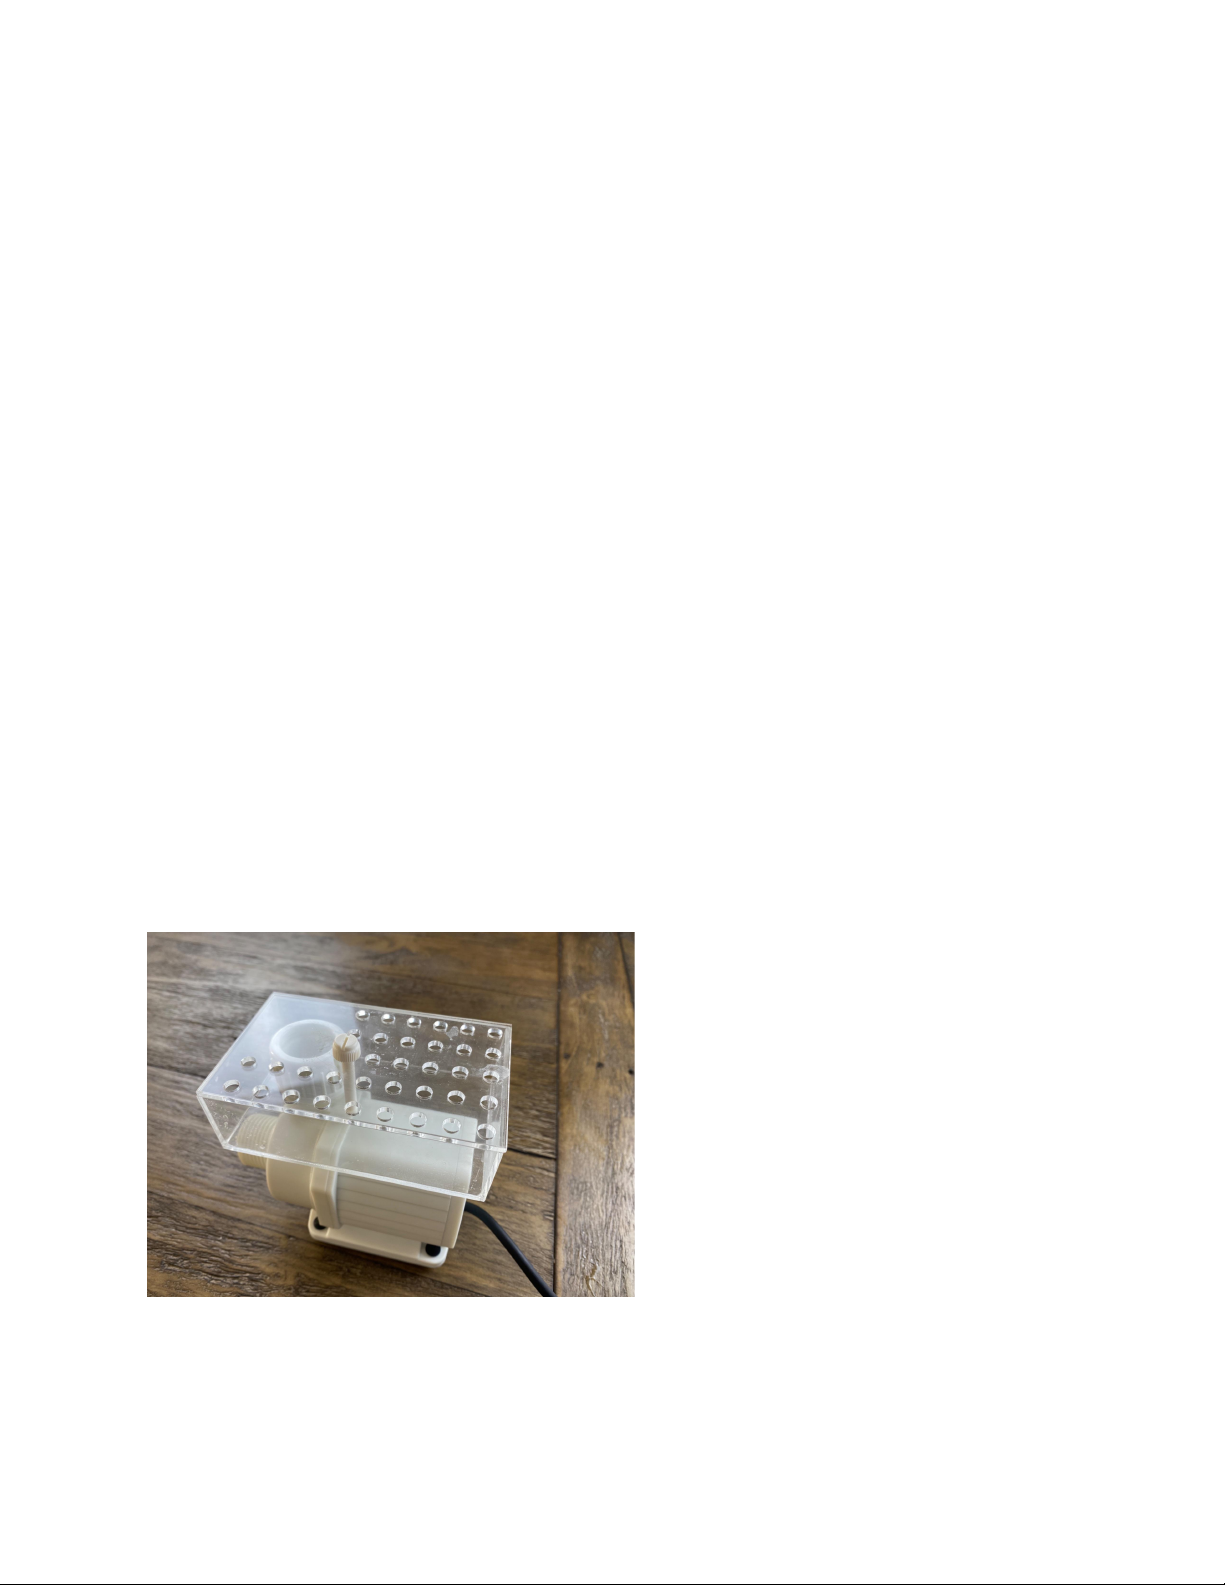
3. Setup the skimmer pump
a. Insert the bubble diffuser over the skimmer pump outlet
b. Screw on the skimmer pump outlet cap to secure the bubble diffuser
c. Using long nylon screw, secure the bubble diffuser top to the bubble diffuser base
d. Grasp the end of the skimmer pump electrical cord and feed it down to the
bottom of the skimmer body, and feed it through the large hole at the base of the
skimmer body.

e. Take the cord and insert it into the small cord notch. The cord needs to be in the
notch to allow the venturi to be passed through the larger hole.
f. Place skimmer pump inside skimmer body with pump intake facing the intake
hole in the skimmer
g. Insert venturi into the hole in base of skimmer, and use other hand to hold the
skimmer pump steady while inserting the venturi onto the skimmer pump intake.
It should be snug but does not need to be tightened very much
h. Connect air tubing to venturi air connection port
i. Connect other side of air tubing to included silencer/muffler
j. Install air silencer bracket onto the skimmer body with supplied nylon thumb
screws, do not over tighten
k. Slide/snap the air silencer onto bracket
4. Setup Controllers and Cables
a. Using 3M tape or small screws, secure both controllers to a dry location safe
from water drips or flooding. The controllers are NOT waterproof.
b. Using 3M tape or zip ties (not included), secure the power supply to a dry
location safe from water drips or flooding. The power supply is NOT waterproof.
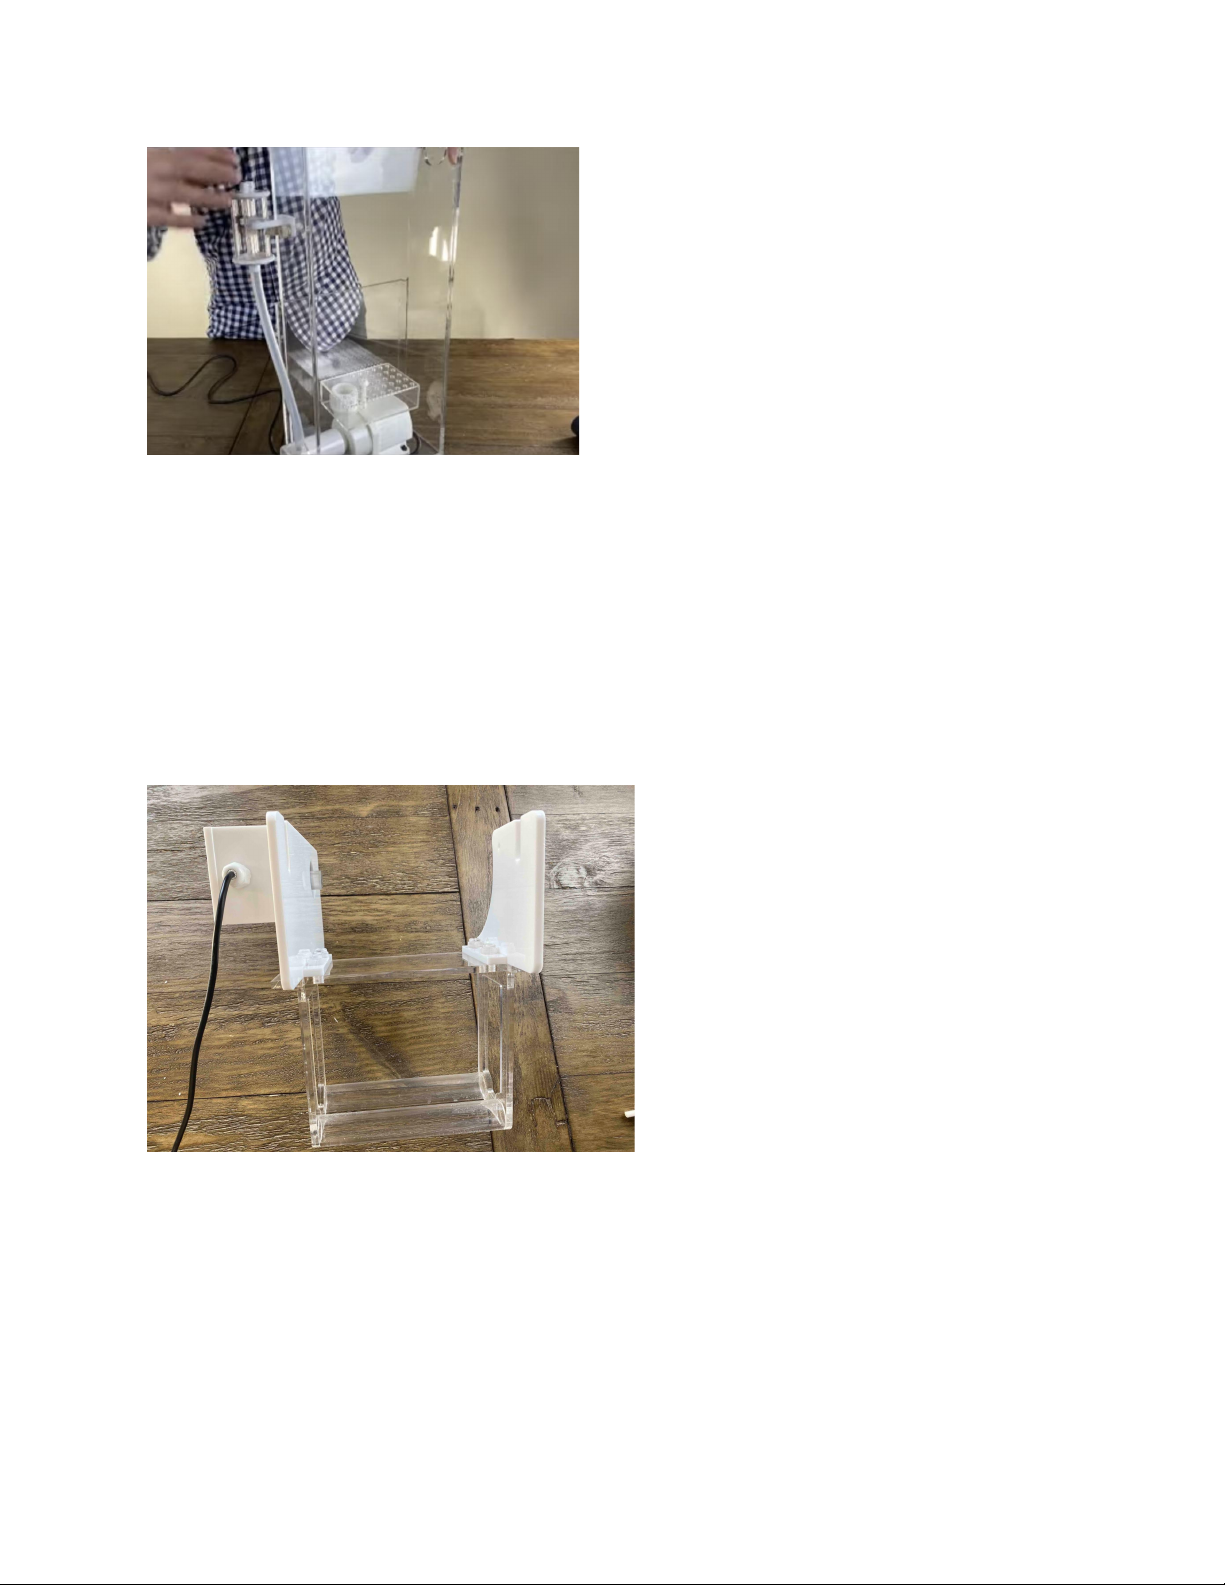
5. Setup Self-Cleaning Assembly
a. Using supplied nylon thumb screws, working on one side at a time, align the
holes and hand-tighten. It should be secure but not overly tight.
b. Repeat for the other side
c. Assembly should look like this
d. Slide the motor spool onto the motor hex gear and hold with one hand. With the
other hand, insert the open end of the spool into the hole on the removable motor
spool and secure the piece with 2 thumb screws. Do not overtighten.
e. Remove filter material roll from packaging. Slide the filter roll over the roll holder
piece and slide the piece onto the bracket.
f. Feed the paper around the paper guiding rods back up to the other side and tape
with a small piece of tape (either the tape included with QR Code or shipping
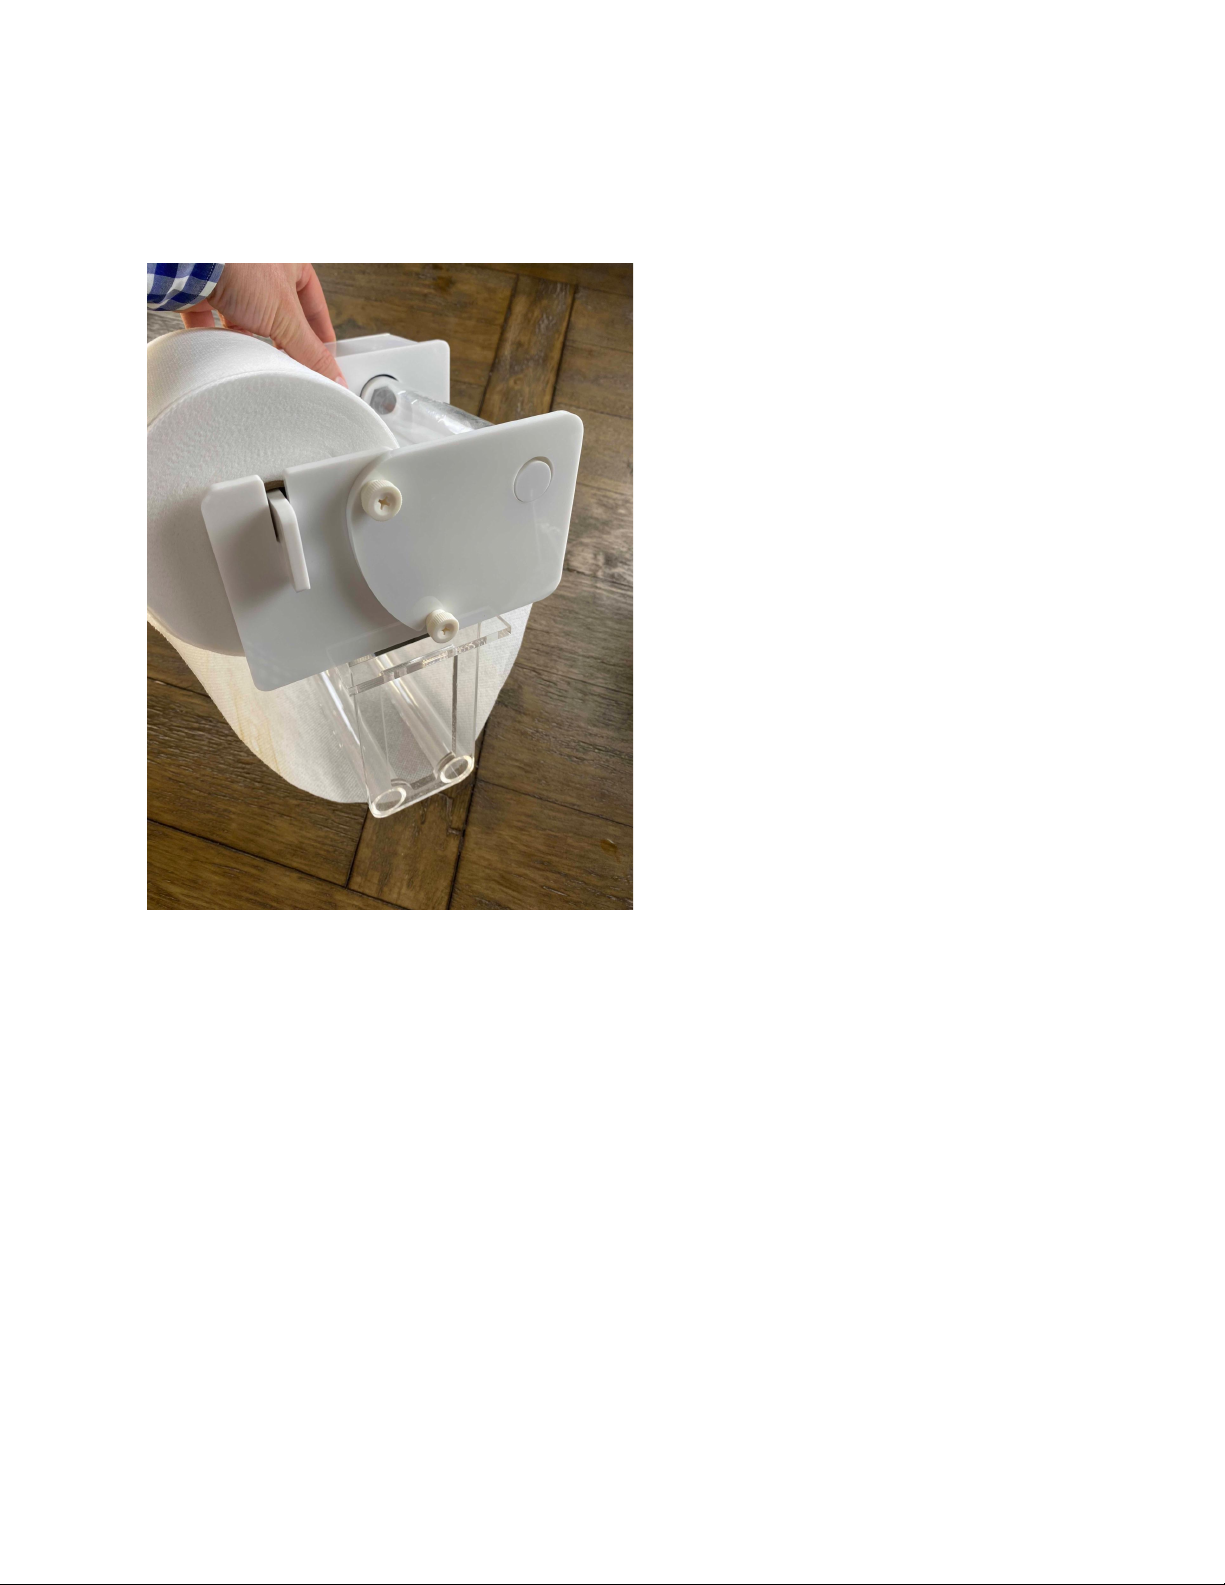
tape) to the motor spool. Make sure you wrap the filter material around the
outside-to-inside orientation.
g. With all parts installed and paper secured, the assembly is ready
h. Its ok at this point if paper is loose
6. Install PVC bulkhead drain
a. With elbow on the outside of the skimmer body, insert into drain hole on the top
of the skimmer and screw the bulkhead together, it does not need to be tight, just
gently secured

7. Completing Assembly
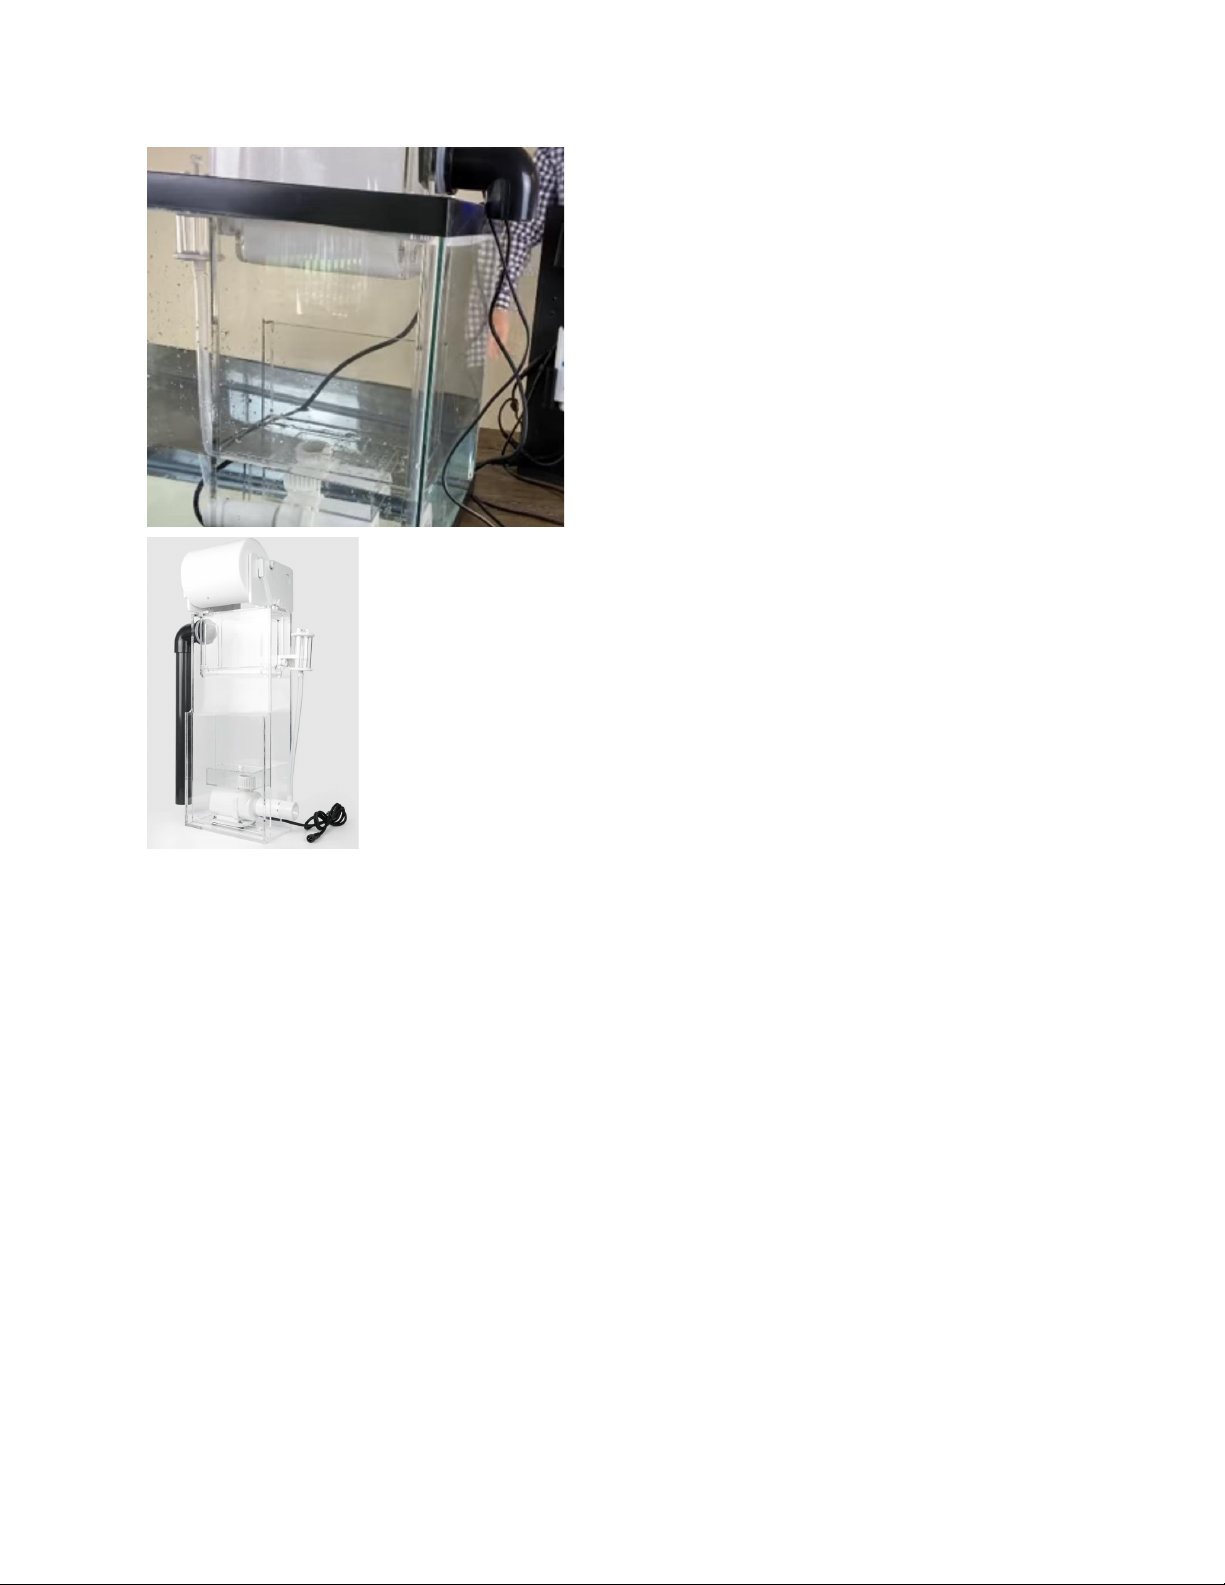
a. Insert the skimmer body into your sump in 4-9 inches of water. The exact depth
is not critical because of the fixed-height waterfall overflow. There is not level
control like you would find on traditional skimmers and is one less thing to worry
about.
b. Ideally, place the waterfall overflow adjacent to the sump walls so that the sump
wall will help baffle any microbubbles. Do not place the skimmer overflow directly
next to the return pump intake or you will get unwanted microbubbles.
i. Make sure the venturi intake is unobstructed, provide 1-2 inches of space
for skimmer water intake
c. Insert self-cleaning assembly onto the top of the skimmer body, it is held in place
with gravity.
d. Connect skimmer pump cable to skimmer pump controller
e. Connect self-cleaning motor cable to motor controller
f. Plug the power cord into wall outlet
i. Note that nothing will happen. The skimmer pump has a 3-minute delay
on timer and the motor controller also will not immediately turn on
8. Install PVC pipe / drain reservoir
a. You can cut the PVC pipe as needed (take appropriate safety measures) to suit
your specific setup. It is standard PVC pipe material
b. It is recommended to use our available drain reservoir (sold separately) with the
system. It is over 1 gallon in size and collects many weeks or months of
skimmate liquid
i. If you use your own reservoir, find a suitable sized container and align
with PVC drain
ii. The PVC drain is not intended to be glued, it should be easy to slide on
and off the elbow and its useful to remove periodically for cleaning
9. Turn on skimmer pump
a. Make sure everything is assembled, electronics are secured in a dry location,
drip loop is in place and you are ready to turn on the skimmer.
b. Press the power button on the skimmer pump controller once, and the skimmer
pump should power up!
c. If the display is flashing this indicates standby mode. Try pressing the power
button again
10. Setup self-cleaning motor
a. Make sure the paper is taped onto the motor spool outside to inside.

b. Press the “Feed” button once and the filter material will advance 10cm (about 4
inches) and this should be enough for the roll to secure itself onto the spool.
c. Setup the digital controller
i. Make sure the controller is plugged in and display is on
ii. Everyday, once a day, the motor will turn on and advance the filter roll the
set length. Units are in cm. To convert to inches, divide the displayed
number by 2.5. Most of the time, the motor will be off. It only turns on
for a few seconds each day.
iii. It is important to know that as the paper gets collected onto the dirty
uptake spool, the diameter increases. The digital controller accounts for
this using a formula and dispenses the same amount of paper each day.
With power loss, the length is recalled with memory but the time is not.
So, the motor will turn on once a day at the same time, 24 hours after it
was plugged in. If you wish the motor to turn on at a certain time each
day, simply unplug and plug the controller back in at the desired time.
iv. Because each system has unique properties such as water volume and
dissolved organic matter, the system will require tuning. The tuning is
very easy thanks to the digital controller. A nice dark brown, saturated
filter material is the goal. If you turn down the dispensing rate using the
controller, less material is dispensed and therefore more organics will
adhere to the filter material, resulting in darker color and more filter
material saturation. Increasing the feed rate will have the opposite effect.
Every few days, you can check the coloration of the filter material and
make appropriate adjustments. Even if the system is not tuned perfectly,
the skimmer is still working and its not a major issue. It is not critical to
tune the system perfectly the very first day.
v. For the first few days, especially if the skimmer is still breaking in and you
are not seeing a lot of dirty foam produced, you can set the controller to
dispense 0 cm daily if necessary.
vi. If you set the controller to 40cm/day, this will result in a daily complete
refresh of the filter material inside the skimmer body. This is useful if you
are getting really dark coloration on the dirty spool.
vii. At 40 cm/day the filter material should last about 3 months. The rolls are
about 36M in length. 3600cm / 40 cm/day = 90 days
Troubleshooting
Q. The skimmer pump controller is flashing and pump is not on
A. Make sure the pump is submerged and the pump cable is connected to the pump controller.
You CANNOT connect the pump to the self-cleaning motor controller and expect it to work.
Make sure the pump is connected to the pump controller and the power supply is plugged into
the wall. Flashing indicates standby mode. With power loss the pump will stay off for about 3
minutes. The purpose of the delay is to allow the sump level to equilibrate before turning on the
skimmer. If you want to turn the pump on immediately, press the power / feed button.

Q. The self-cleaning motor is not turning
A. This is normal, the motor turns on for just a few seconds each day. The normal state of the
motor is off. If you want to test the system, press the “Feed” button once and the motor should
turn on for a few seconds and dispense about 10 cm (4 in) of paper. The motor will turn on 24
hours after it was plugged in, so if you wish, you can unplug the controller, plug it back in, set a
23:58 timer and return the next day, watch and wait for the motor to turn on.
Q. The bubbles in the skimmer are too large.
A. Protein skimmers only work in saltwater/sea water, they do not work in freshwater. Make
sure the air tubing is connected to the venturi and make sure the other end of the tubing is not
submerged. If a silencer/muffler is being used, make sure it is not obstructed with foreign body
or material. Make sure the venturi connector is securely interfaced with the pump intake.
Q. My skimmer is new and doesn't seem to be skimming.
A. Sometimes it takes 2-3 days for the skimmer to “break-in” and create a good skimmate. Also,
if you have a lighter biological load, you can turn the skimmer pump to lower or lowest setting
and if necessary try tightening slightly the screw on the air silencer. This will decrease the water
flow inside the skimmer and also decrease the air flow, making less bubbles and increasing
contact time. If you have a smaller tank with lighter bio-load then these steps may be required.
Q. My aquarium is full of micro bubbles or air mist.
A. All skimmers release some air bubbles to the sump and therefore it is best practice to have a
bubble trap between the skimmer chamber and the return pump. Your skimmer includes a
custom-built bubble diffuser and waterfall overflow to help minimize the microbubbles. If your
skimmer is new, allow a few days for the skimmer to settle in and the bubbles should decrease.
Put the skimmer overflow away from any return pumps to allow any escaped bubbles to rise
inside the sump.
Q. My skimmer is producing a lot of weak, watery foam.
A. If there are not sufficient dissolved organics for the protein skimmer to remove from the water,
then you may not see good foam results. Try lowering the power to the lowest setting (1) on the
skimmer pump.
Q. There is a reduction in the quantity of air bubbles in my skimmer.
A. Check airline, venturi connector and skimmer pump for continuity. Make sure the airline is
clear of debris and connected to venturi. Visually check the venturi for debris. Inspect needle
wheel impeller for damage or debris. If required, you can open the pump head to check thee
interior of the pump. Rotate pump head GENTLY counterclockwise to disengage the pump
head tabs from the pump body. After you feel the rotation stop, GENTLY pull/wiggle apart the
pump head from the pump body and inspect. The impeller is removable and you can clean with
water. If calcium deposits are present, use citric acid solution and soak for 30 minutes. NEVER
USE VINEGAR as it can permanently damage the pump.

Q. I cannot regulate my skimmer.
A. Check that the water level in the skimmer chamber of your sump is as recommended. The
water level needs to be BELOW the waterfall overflow level. Try raising or lowering the water
level by approximately 12mm (1/2”). Check that the water outlet on the bottom of the skimmer
has not become blocked. Clean the skimmer pump.
Q. The pump is making a rattling noise.
A. All protein skimmers make noise. The pump draws in air and chops it up into thousands of
bubbles every second. The air mixing and air flow inside the device are not inherently silent.
However, the noise should not be bothersome. We have designed the device with an oversize
pump so that it should still work very well even at half power. Also, always check to make sure
there is no debris or blockages in airline, venturi and skimmer pump. Any obstruction will
increase the noise. Make sure you properly maintain and clean the skimmer pump every 6
months.
Q. The skimmer is making a gurgling noise.
A. There may be water trapped in the silencer. It is safe to completely unscrew the nylon screw
in the air silencer, remove it and drain water from the silencer. Remember to return the screw to
about the same position it was in.
Maintenance
A well-maintained skimmer will outperform and last longer than a poorly maintained device. We
have designed the product to require minimal maintenance. However, in harsh marine
conditions, periodic maintenance is highly recommended at least twice a year.
We recommend disconnecting all cords and completely removing the skimmer from the sump.
If you are unable to remove the skimmer, you can accomplish most of the maintenance with the
skimmer inside the sump.
Clean the accumulated scum from skimmer walls with a moist paper towel or other reef-safe
clean absorbent material. Remove PVC drain pipe and clean with warm water and pipe cleaner
tool (not included) or paper towel.
Disconnect the airline from venturi. GENTLY disconnect the venturi from the pump head by
rotating small movements back and forth while providing gentle traction. Remove the skimmer
pump and inspect for calcium deposits or other fouling materials and clean it with clean sponge
or paper towel.
It is possible to damage the pump if you disassemble it incorrectly. Watch VIDEO for
demonstration. Firmly grasp and slowly and steadily rotate the pump head
COUNTERCLOCKWISE until it cannot be rotated further. DO NOT FORCE. You can break the
pump head tabs if you apply too much force. After rotation, GENTLY separate the pump head
from the pump by pulling the parts away from each other. This will expose the impeller for

inspection and cleaning. It is recommended to use citrus acid bath to soak pump 1-2 hours to
loosen calcium deposits.
Once the skimmer is cleaned, re-assemble, return to sump, connect venturi, airline, power cord
and re-start the skimmer pump.
Warranty
The pump and DC pump controller are warrantied for a period of X years from date of purchase.
Damage from improper care or use is not covered under warranty. We provide to you thorough
maintenance and cleaning instructions including videos. It is your responsibility to adhere to
these instructions.
This is a novel product, and we reserve the right to modify the specifications and/or design of
this product without notification.
Warranty does NOT cover:
● Lime or scale deposits
● Damage from dry-running the pump
● Damage to consumable parts (rotors, seals)
● Damage from improper handling and use
○ Broken parts from crush or mishandling
● Damage to electrical wires (needs to be replaced)
● Any user modifications will void warranty
● Consequential damages from improper use, lack of maintenance or non-compliance with
safety regulations
Smarter Reefs LLC Limited Warranty
The product limited warranty sets forth all Smarter Reefs LLC responsibilities regarding this
product. There are no other express or implied warranties from Smarter Reefs LLC. Smarter
Reefs LLC warrants your product against defects in materials and workmanship for a period of
12 months, valid from the date of original purchase and will repair this product free of charge
(not including shipping costs) with new or rebuilt parts. The precondition for the warranty is that
the stipulated set- up routine is observed. In the event that a problem develops with this product
during or after the warranty period, contact Smarter Reefs LLC at http://smarterreefs.com and
follow “Contact Us” links.
The warranty is extended only to the original purchaser. Proof of date of purchase will be
required before warranty performance is rendered. This warranty only covers failures due to
defects in materials or workmanship which occur during normal use. It does not cover damage
which occurs in shipment or failures which result from misuse, abuse, neglect, improper
installation, operation, mishandling, misapplication, alteration, modification or service by anyone
other than Smarter Reefs LLC. Smarter Reefs shall not be liable for incidental or consequential

damages resulting from the use of this product, or arising out of any breach of this warranty. All
express and implied warranties, including the warranties of salability and fitness for particular
purpose, are limited to the applicable warranty period set forth above. These statements do not
affect the statutory rights of the consumer. Some states do not allow the exclusion or limitation
of incidental or consequential damages, or limitations on how long an implied warranty lasts, so
the above exclusion or limitations may not apply.
Table of contents


