Smartplanet Nestle Nesquik NCF-1 User manual
NCF-1
PLEASE READ THESE INSTRUCTIONS CAREFULLY
AND RETAIN FOR FUTURE REFERENCE.

1
2
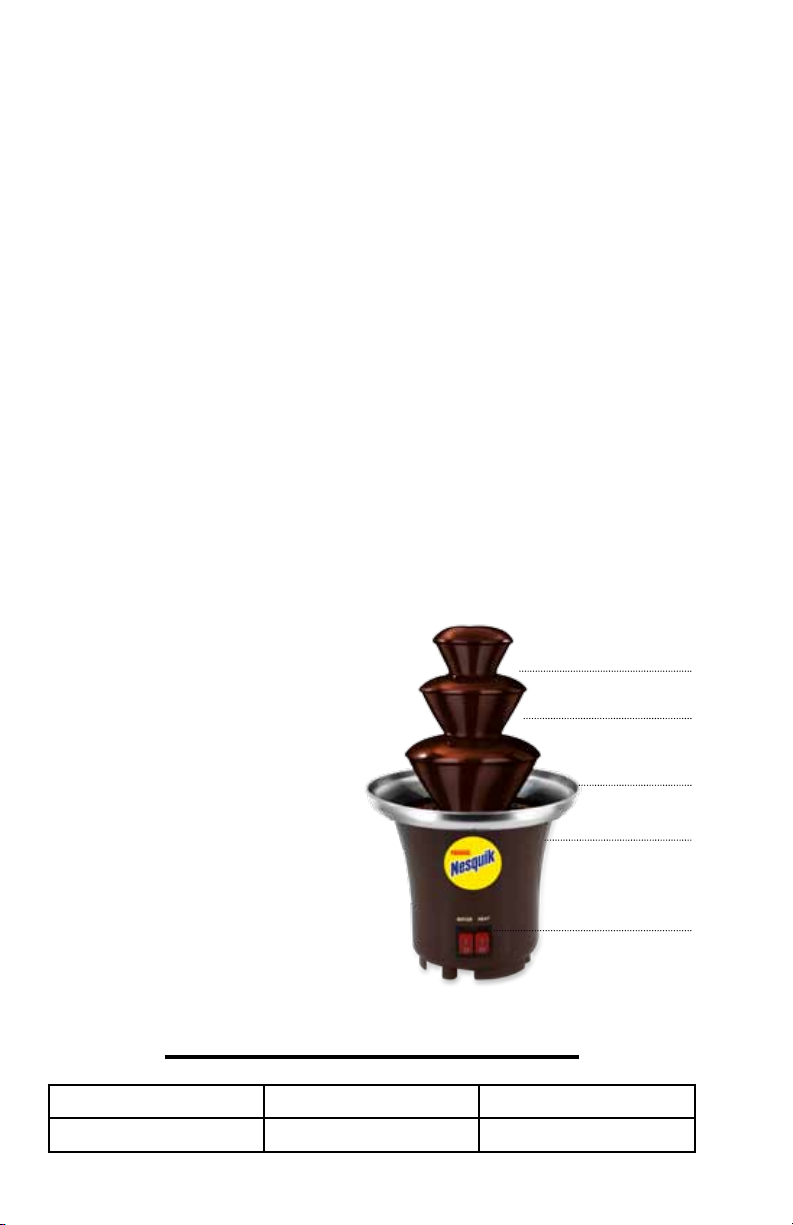
A. Three Tier Fountain
B. Stainless Steel Bowl
C. Fountain Base
D. Control On/Off
CONGRATULATIONS
You are now the proud new owner of a
SMART PLANET NESTLÉ®NESQUIK®
Chocolate Fondue Fountain
model no. NCF-1
Before using your NESTLÉ®NESQUIK®Chocolate Fondue
Fountain for the rst time, kindly take time to carefully read
the instruction manual. Please observe all safety precautions
and follow the operating procedures. Please store your
instruction manual in a safe place for future reference. If
you pass this appliance to a third party, please include the
operating instruction manual.
PARTS DESCRIPTION
Electrical Specications
VOLTAGE FREQUENCY WATTAGE
120 V 60Hz 40 W
A
A
D
C
B

3
IMPORTANT SAFEGUARDS
• Never touch hot surfaces with bare hands.
• To protect against re, electric shock and injury, do not
immerse the cord, the plug or the appliance in water or
other liquid.
• Close supervision is necessary when this appliance is
used by or near children.
• Before use, unwind the power cord completely and keep
the cord away from the hot parts of the appliance.
• Do not let the power cord hang over the edge of a table,
counter or touch hot surfaces.
• Do not place the appliance on or near hot gas or electric
burner, or in a heated oven.
• Do not operate the appliance if it has a damaged cord
and/or plug, if the appliance has malfunctioned, or has
been damaged in any manner. Contact the Service
Center for examination, repair or replacement. Do not
attempt to repair this appliance yourself.
• The use of accessories and/or attachments is not
recommended and may result in re, electric shock or
injury.
• Always unplug the appliance from the electrical outlet
when not in use and before cleaning to avoid accidental
electrical shock. Allow it to cool before cleaning.
• While the appliance is hot, even if unplugged, there is a
danger of getting burned. Do not touch the appliance or
place it into storage while hot.
• Do not use this appliance other than for its intended use.

4
• For use only with 120V. 60HZ power. Use an electrical
socket with a good ground connection.
• For interior household use only. Do not use this appliance
outdoors.
• SAVE THESE INSTRUCTIONS
This appliance has a polarized plug (one blade is
wider than the other). To reduce the risk of electric
shock, this plug is intended to fit into a polarized
outlet only one way. If the plug does not fit fully into
the outlet, reverse the plug. If it still does not fit,
contact a qualified electrician. Do not attempt to
modify the plug in any way.
PRECAUTIONS
FOR USE AROUND CHILDREN
• Close supervision is necessary when this appliance
is used near children.
• Do not allow cord to hang over any edge where a child
can reach it. Arrange cord to avoid pulling, tripping or
entanglement.
CAUTION
To prevent burns or other personal injuries
to children, read and follow all
instructions and warnings.

5
CLEANING & CARE
• Always clean your appliance after each use to prevent
build up.
• Always disconnect the power plug from the wall outlet
before cleaning.
• Clean the unit only when it has completely cooled down.
• Clean the inner surface and the outer surfaces of the
unit with a soft, damp cloth. Do not use abrasives or
metal scourers as they will scratch the fountain tiers.
• CAUTION: To avoid electric shock DO NOT immerse the
appliance in water or other liquids.
• Do not place the fondue fountain in the dishwasher.
DO NOT put the NESTLÉ®NESQUIK®
Chocolate Fondue Fountain
into the dishwasher.
This will permanently damage the product
and will void the warranty.
BEFORE INITIAL USE
1. When using for the rst time, remove all packaging
materials and unwind the power cord from the appliance.
2. Clean the appliance with warm soapy water using a
damp cloth, then dry it. DO NOT immerse the whole unit
in water at anytime.
3. Set the Fondue Maker on a at surface. Make sure it is
at least 4-6’’ away from any obstacles.

6
OPERATING YOUR
NESTLÉ®NESQUIK®
Chocolate Fondue Fountain
To melt the chocolate in the microwave, put the chocolate
in a microwave safe bowl, add the oil and other ingredients
and put the microwave on a medium setting. Time will
vary depending on the type of oven. Stir frequently (every
15-30 seconds) to avoid overheating and burning. The
approximate melting time is 2 minutes for 12 ounces of
chocolate (1 bag).
NOTE: chocolate should be melted completely, and of a
smooth consistency with no lumps before adding to the
NESTLÉ®NESQUIK® Chocolate Fondue Fountain.
• NESTLÉ®NESQUIK® Chocolate Fondue Fountain must
be on a level surface to ow properly.
• Prepare the chocolate following the instructions listed
within the recipes.
• Microwave the bowl with the chocolate mixture for
approximately 2 minutes on medium setting.
• Turn on the HEATER setting and let the appliance warm
for 6 minutes.
• Turn on the MOTOR setting and pour the melted
chocolate in to the base of the NESTLÉ®NESQUIK®
Chocolate Fondue Fountain. The chocolate will start
owing up through the TOWER and over the CANOPIES.
• Enjoy the decadent chocolate waterfall

7
TROUBLESHOOTING
Chocolate is not flowing:
• Mixture is too thick; add additional oil.
Chocolate is not flowing evenly:
• Chocolate Fondue Fountain is not on a at surface
• Chocolate mixture is not thin enough, add a small
amount of oil.
Chocolate changes to a lighter color:
• This is normal.
Full waterfall effect is not achieved:
• Chocolate to oil ratio may be incorrect. Try adding
more oil or more chocolate.
Chocolate Fondue Fountain suddenly stops:
• Turn all the switches to OFF, unplug the unit, check
for/remove obstructions, let cool (5 minutes), plug
back in, and turn the HEATER and MOTOR
switches back on.

8
Recipes
The Classic Nesquik
Chocolate Fondue
FONDUE:
12 oz semisweet chocolate chips
1/2 cup vegetable oil
1 tbsp NESTLÉ®NESQUIK® chocolate powder
DIPPABLE OPTIONS:
Whole fresh strawberries
Thick slices of banana
Dried apricot halves
6 banana cut into 1-inch chunks
Pound Cake 1”x1” cubes
Cherries
Grapes
Wedge sliced apples
• In a microwave safe bowl, pour in the semisweet chocolate chips,
vegetable oil and NESTLÉ®NESQUIK® chocolate powder. Place the
bowl in the microwave for approximately 2 minutes on medium setting.
• Plug in the NESTLÉ®NESQUIK® Chocolate Fondue Fountain and press
the preheat button. Allow the appliance to preheat for approximately
6 minutes.
• Remove the bowl from the microwave and stir the chocolate until it
is of a smooth consistency with no lumps.
• Turn on the MOTOR switch and pour the chocolate onto the stainless
steel base of the NESTLÉ®NESQUIK® Chocolate Fondue Fountain.
• Arrange the dippables on a platter or plates around the chocolate pot.
Use a fondue fork, bamboo skewer, seafood fork, or salad fork to dip,
swirl and enjoy!
• If the chocolate begins to feel a little stiff, add a tablespoon of oil and
stir. It will help it go a little longer. Eventually, it will cook down though
and you may need to start over.

9
The Nesquik
Creamy Chocolate Fondue
FONDUE:
12 oz. semisweet chocolate chips
2/3 cup heavy cream
1 tbsp NESTLÉ®NESQUIK® chocolate powder
1/4 cup vegetable oil
DIPPABLE OPTIONS:
Whole fresh strawberries
Thick slices of banana
Dried apricot halves
6 banana cut into 1-inch chunks
Pound Cake 1”x1” cubes
Cherries
Grapes
Wedge sliced apples
• In a cup combine the heavy cream and NESTLÉ®NESQUIK®
chocolate powder.
• In a microwave safe bowl, pour in the semisweet chocolate chips, and
the NESTLÉ®NESQUIK® chocolate powder and heavy cream mix.
Place the bowl in the microwave for approximately 2 minutes on
medium setting.
• Plug in the NESTLÉ®NESQUIK® Chocolate Fondue Fountain and press
the preheat button. Allow the appliance to preheat for approximately
6 minutes.
• Remove the bowl from the microwave and stir the chocolate until it
is of a smooth consistency with no lumps. While stirring, gradually add
the vegetable oil.
• Turn on the MOTOR switch and pour the chocolate onto the stainless
steel base of the NESTLÉ®NESQUIK® Chocolate Fondue Fountain.
• Arrange the dippables on a platter or plates around the chocolate pot.
Use a fondue fork, bamboo skewer, seafood fork, or salad fork to dip,
swirl and enjoy!
• If the chocolate begins to feel a little stiff, add a tablespoon of oil and
stir. It will help it go a little longer. Eventually, it will cook down though
and you may need to start over.

10
90 DAY LIMITED WARRANTY
Smart Planet warrants this appliance from failures in
its materials and workmanship for 90 days from the date of
original purchase provided the appliance is operated and
maintained in conformity with the instruction manual. Any
defective part of the appliance will be repaired or replaced
at Smart Planet’s discretion. Customers must provide proof
of purchase when submitting a warranty claim.
This warranty does not cover discoloration or any damage
to the non-stick surfaces of the appliance. This warranty is
null and void, as determined solely by Smart Planet, if the
appliance is damaged through accident, misuse, abuse,
negligence, scratching, shipping or if the appliance is al-
tered in anyway.
If you think the appliance has failed or requires service with-
in its warranty period, please email the Service Department
at [email protected] for further instructions. Please
include a description of the defect along with the date you
purchased the product and the original receipt with the
original purchase date. A receipt proving the original pur-
chase date will be required for all warranty claims, hand
written receipts are not accepted. You may be instructed to
return the appliance for inspection and evaluation. Return
shipping costs are not refundable. Smart Planet is not re-
sponsible for returns lost in transit.
Valid only in USA and Canada
www.smartplanethome.com
Copyright 2011 Smart Planet Canoga Park CA 91304
Service Center: [email protected]
copyright v.20120615
NESTLÉ® and NESQUIK® are registered trademarks of
Société des Produits Nestlé S.A., Vevey, Switzerland, and
are used with permission.

11
www.smartplanethome.com
Check out some of our other great products.
Table of contents
Other Smartplanet Kitchen Appliance manuals

Smartplanet
Smartplanet PQM-1 Quick guide

Smartplanet
Smartplanet OPP-1 User manual

Smartplanet
Smartplanet BG-1 User manual

Smartplanet
Smartplanet MTP-1 User manual

Smartplanet
Smartplanet SGCM-2 User manual

Smartplanet
Smartplanet CDM-2 Technical specifications

Smartplanet
Smartplanet MBM-1 User manual

Smartplanet
Smartplanet MCM-1NQ User manual

Smartplanet
Smartplanet MPM-1K User manual

Smartplanet
Smartplanet Keebler PPM-1K User manual


