Smeg DF13TF3X User manual

Contents
1
1. Safety and operating instructions __________________________2
1. Installation and hook-up _________________________________7
2. Description of the controls ______________________________10
3. Operating instructions__________________________________22
4. Cleaning and maintenance______________________________39
5. Troubleshooting ______________________________________46
Thank you for choosing one of our products.
You are advised to read this manual carefully; it contains all the
information you need about the right conditions for the proper, safe use of
your dishwasher.
The individual sections are laid out to provide you with a step-by-step
guide to all your appliance's functions; the texts are easy to understand
and are complete with detailed illustrations.
Recommendations are given for the correct use of the baskets, spray
arms,containers,filters, washing programs, and for operating thecontrols.
Following the cleaning instructions provided here will keep your
dishwasher's performance at peak levels in the long term.
This user-friendly manual will provide answers to all your questions about
use of the dishwasher.
INSTALLATION INSTRUCTIONS: these are intended for the qualified
technician who must carry out the installation, hook-up and testing of the
appliance.
USER INSTRUCTIONS: these consist of recommendations for using the
appliance, a description of its controls and of the correct cleaning and
maintenance procedures.

Installation instructions
2
1. Safety and operating instructions
THIS MANUAL FORMS AN INTEGRAL PART OF THE APPLIANCE; IT MUST
ALWAYS BE KEPT INTACT TOGETHER WITH THE DISHWASHER FOR FUTIRE
REFERENCE. BEFORE USING THE APPLIANCE, CAREFULLY READ ALL THE
INSTRUCTIONS CONTAINED IN THIS MANUAL. THEY CONTAIN IMPORTANT
INFORMATION FOR THE INSTALLATION, USE AND MAINTENANCE OF THE
APPLIANCE. IN THE EVENT OF SALE OR TRANSFER, ENSURE THAT THE
MANUAL ALWAYS ACCOMPANIES THE APPLIANCE.
THIS APPLIANCE IS INTENDED TO BE USED IN HOUSEHOLD AND SIMILAR
APPLICATIONS SUCH AS:
- STAFF KITCHEN AREAS IN SHOPS, OFFICES AND OTHER WORKING
ENVIRONMENTS;
- FARM HOUSES;
- BY CLIENTS IN HOTELS, MOTELS AND OTHER RESIDENTIAL TYPE
ENVIRONMENTS;
- BED AND BREAKFAST TYPE ENVIRONMENTS
THIS APPLIANCE IS DESIGNED TO BE USED ONLY IN STATIONARY
LOCATIONS.
THIS APPLIANCE COMPLIES WITH DIRECTIVES 2006/95/EC AND
2004/108/EC CURRENTLY IN FORCE, INCLUDING THE PREVENTION AND
ELIMINATION OF RADIO FREQUENCY INTERFERENCE AND IS DESIGNED
FOR THE FOLLOWING PURPOSE: WASHING AND DRYING OF DISHES; ANY
OTHER USE SHALL BE CONSIDERED IMPROPER. THE MANUFACTURER
DECLINES ALL RESPONSIBILITY FOR USES OTHER THAN THOSE
DESCRIBED ABOVE.
DO NOT USE APPLIANCES WHICH HAVE BEEN DAMAGED DURING TRANSIT!
IF IN DOUBT, CONSULT YOUR DEALER.
THE APPLIANCE MUST BE INSTALLED AND CONNECTED IN ACCORDANCE
WITH THE INSTRUCTIONS PROVIDED BY THE MANUFACTURER.
INSTALLATION MUST BE PERFORMED BY A QUALIFIED TECHNICIAN, IN
COMPLIANCE WITH THE REGULATIONS IN FORCE.
DO NOT LEAVE THE DISCARDED PACKAGING MATERIALS UNSUPERVISED
WITHIN THE HOME. DO NOT ALLOW CHILDREN TO PLAY WITH PACKAGING
MATERIALS. SEPARATE THE VARIOUS MATERIALS WHICH MAKE UP THE
PACKAGING AND TAKE THEM TO THE NEAREST SORTED WASTE
COLLECTION CENTRE.
THE NAME PLATE FEATURING THE TECHNICAL DATA, SERIAL NUMBER AND
MARKINGS IS VISIBLY POSITIONED ON THE INNER EDGE OF THE DOOR.
THE NAME PLATE MUST NEVER BE REMOVED.

Installation instructions
3
THE APPLIANCE MUST BE PROVIDED WITH AN EARTH CONNECTION IN
ACCORDANCE WITH THE ELECTRICAL SAFETY REGULATIONS IN FORCE.
THE MANUFACTURER DECLINES ALL RESPONSIBILITY FOR DAMAGE TO
PERSONS OR PROPERTY RESULTING FROM THE FAILURE TO EARTH THE
APPLIANCE OR FROM A DEFECTIVE EARTH CONNECTION.
DURING THE INSTALLATION THE APPLIANCE MUST BE DISCONNECTED
FROM THE NETWORK..
DO NOT INSTALL THE APPLIANCE IN A PLACE SUBJECT TO FREEZING.
IF THE APPLIANCE IS INSTALLED ON A CARPET FLOOR, TAKE CARE THAT
THE OPENINGS IN ITS BASE ARE NOT OBSTRUCTED.
DO NOT INSTALL THE APPLIANCE NEAR EQUIPMENT WITH HIGH
IRRADIATION TEMPERATURES (EG. GAS BURNERS, FIREPLACES, ETC.) AS
THEY MAY CAUSE DAMAGE.
IF THE APPLIANCE IS INSTALLED IN A COMPARTMENT ABOVE OR BELOW
ANOTHER EQUIPMENT (EG. GAS BURNERS, OVENS, ETC.), READ
CAREFULLY THE INSTRUCTIONS PROVIDED BY THE MANUFACTURER OF
THE EQUIPMENT. IF THE INSTRUCTIONS OF THE EQUIPMENT DO NOT
CONTAIN INFORMATION, CONTACT THE MANUFACTURER OF THE
EQUIPMENT TO ENSURE THAT THE APPLIANCE CAN BE INSTALLED ABOVE
OR BELOW IT.
BUILDING-IN THE APPLIANCE UNDERNEATH A HOB IS ABSOLUTELY
FORBIDDEN.
INSTALL A HOB ON TOP OF A FREE-STANDING APPLIANCE IS ABSOLUTELY
FORBIDDEN.
TO ENSURE STABILITY, INSTALL THE APPLIANCE ONLY UNDER
CONTINUOUS WORKTOP, SECURELY FIXED TO ADJACENT CABINETS. IF
THE APPLIANCE IS INSTALLED IN A HIGH CABINET BOTH, THE APPLIANCE
AND THE CABINET, MUST BE ADEQUATELY FIXED.
IF THE APPLIANCE IS NOT BUILT-IN AND IS THEREFORE ACCESSIBLE ON
ONE SIDE, THE DOOR HINGE AREA MUST BE COVERED FOR SAFETY
REASON (INJURY HAZARD). THE COVERING FIXTURES ARE AVAILABLE AS
AN ACCESSORY FROM SPECIALIST DEALERS OR THE AFTER-SALES.
CHECK THAT THE VOLTAGE AND THE FREQUENCY OF THE MAINS MATCH
THE RATINGS ON THE NAME PLATE OF THE APPLIANCE.
THE PLUG ON THE SUPPLY CORD AND THE CORRESPONDING SOCKET
OUTLET MUST BE OF THE SAME TYPE AND MEET THE REGULATION IN
FORCE.
DO NOT USE ADAPTORS OR SHUNT CONNECTIONS IN ORDER TO AVOID
THE POSSIBILITY OF OVERHEATING OR BURNING.
THE PLUG OF THE APPLIANCE MUST BE ACCESSIBLE AFTER
INSTALLATION.
NEVER DISCONNECT THE PLUG BY PULLING ON THE POWER CORD.

Installation instructions
4
IF THE APPLIANCE IS PROVIDED WITH A PLUGLESS SUPPLY CORD, A
CIRCUIT BREAKER PROVIDING A FULL DISCONNECTION IN OVERVOLTAGE
PROTECTION CLASS III MUST BE INSTALLED IN AN EASILY ACCESSIBLE
POSITION ON THE SUPPLY LINE.
THE DISHWASHER MUST ALWAYS BE CONNECTED TO THE WATER
SYSTEM USING NEW HOSE SETS.
IMMEDIATELY AFTER INSTALLING THE DISHWASHER, PERFORM A QUICK
TEST OF THE APPLIANCE. IF THE DISHWASHER FAILS TO OPERATE
CORRECTLY, DISCONNECT IT FROM THE ELECTRICAL POWER SUPPLY
AND CALL THE NEAREST TECHNICAL SERVICE CENTRE. DO NOT ATTEMPT
TO REPAIR THE APPLIANCE.
THE APPLIANCE IS NOT INTENDED FOR USE BY PERSONS (INCLUDING
CHILDREN) WITH REDUCED PHYSICAL, SENSORY OR MENTAL
CAPABILITIES, OR LACK OF EXPERIENCE AND KNOWLEDGE, UNLESS THEY
HAVE BEEN GIVEN SUPERVISED OR INSTRUCTION CONCERNING USE OF
THE APPLIANCE BY A RESPONSIBLE PERSON FOR THEIR SAFETY.
YOUNG CHILDREN SHOULD BE SUPERVISED TO ENSURE THAT THEY DO
NOT PLAY WITH THE APPLIANCE.
WARNING: SOME DISHWASHER DETERGENTS ARE STRONGLY ALKALINE.
THEY CAN BE EXTREMELY DANGEROUS IF SWALLOWED. AVOID CONTACT
WITH SKIN AND EYES AND KEEP CHILDREN AWAYFROM THE DISHWASHER
WHEN THE DOOR IS OPEN.
KEEP CHILDREN AWAY FROM THE DISHWASHER WHEN THE DOOR IS
OPEN. ALWAYS CHECK THAT THE DETERGENT RECEPTACLE IS EMPTY
AFTER COMPLETION OF THE WASH CYCLE.
DO NOT DRINK THE WATER RESIDUES WHICH MAY BE PRESENT INSIDE
THE DISHES OR APPLIANCE AT THE END OF THE WASHING PROGRAM.
DO NOT INTRODUCE SOLVENTS SUCH AS ALCOHOL OR TURPENTINE IN
THE APPLIANCE, AS THIS MAY CAUSE AN EXPLOSION.
DO NOT LOAD DISHES THAT ARE SOILED WITH ASH, WAX OR PAINT.
PLEASE DO NOT LEAVE THE DOOR OPEN AS THIS WILL CAUSE A TRIPPING
HAZARD.
WARNING: KNIVES AND OTHER UTENSILS WITH SHARPS POINTS MUST BE
LOADED IN THE BASKET WITH THE POINTS DOWN OR PLACED IN A
HORIZONTAL POSITION.
THE DISHWASHER MEETS ALL THE REQUIREMENTS SET OUT BY THE
REGULATIONS IN FORCE CONCERNING SAFETY AND ELECTRICAL
EQUIPMENT. ANY TECHNICAL CHECKS SHOULD BE CONDUCTED
EXCLUSIVELY BY TRAINED AND AUTHORISED TECHNICIANS: REPAIRS

Installation instructions
5
CARRIED OUT BY UNAUTHORISED PERSONS WILL INVALIDATE THE
WARRANTY, AS WELL AS POSING A POTENTIAL HAZARD TO THE USER.
IN THE EVENT OF A FAULT, DISCONNECT THE DISHWASHER FROM THE
ELECTRICAL POWER SUPPLY AND SHUT OFF THE WATER TAP.
IF THE SUPPLY CORD IS DAMAGED, IT MUST BE REPLACED BY THE
MANUFACTURER OR ITS SERVICE AGENT OR A SIMILARLY QUALIFIED
PERSON IN ORDER TO AVOID HAZARD.
SOME COMPONENTS ARE LIVE EVEN WITH THE ON/OFF BUTTON IN THE
OFF POSITION. BEFORE MAINTENANCE WORK ON THE APPLIANCE,
DISCONNECT THE PLUG OR TURN OFF THE MAINS SWITCH IN THE FIXED
WIRING
CLEANING AND REGULAR MAINTENANCE OF THE APPLIANCE BY
CHILDREN IS ONLY PERMITTED UNDER THE SUPERVISION OF A PERSON
RESPONSIBLE FOR THEIR SAFETY.
DO NOT USE STEAM CLEANERS TO CLEAN THE DISHWASHER.
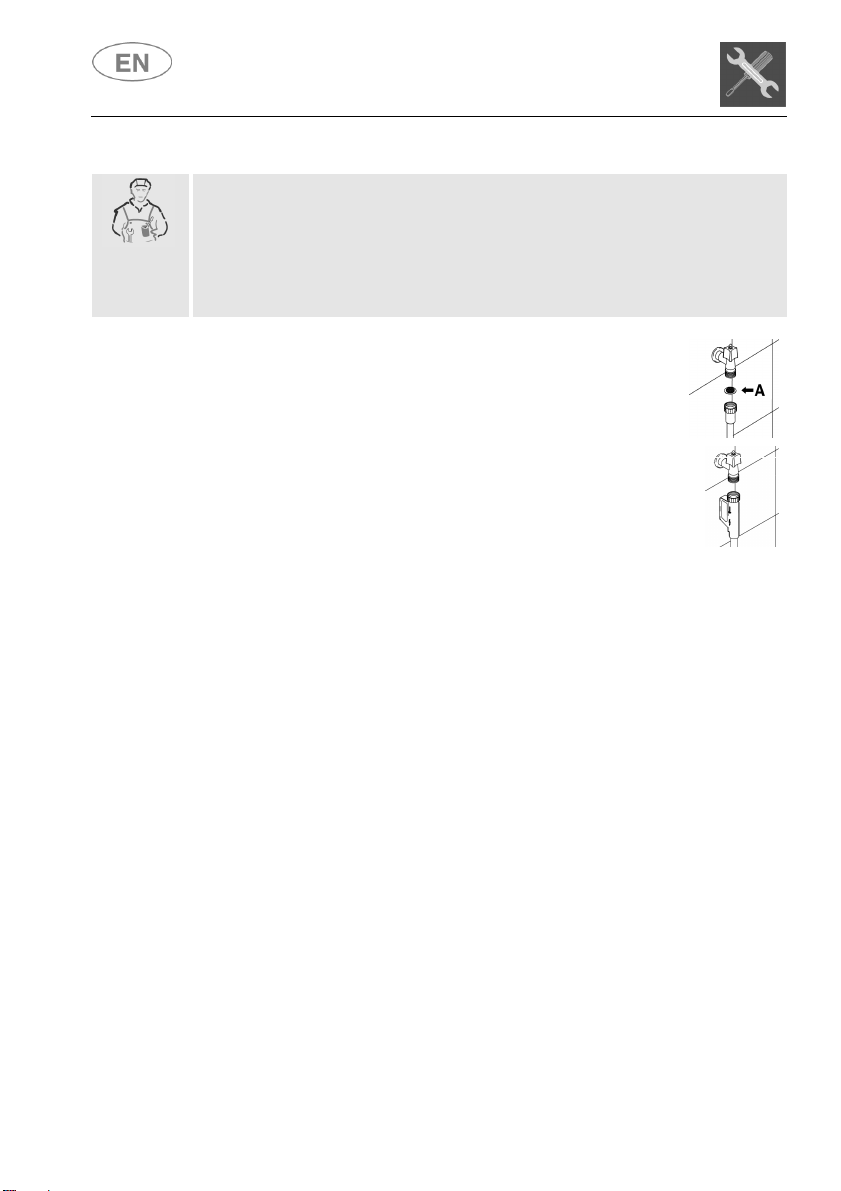
MODELS WITH “AQUASTOP” DEVICE
THE “AQUASTOP” DEVICE PREVENTS FLOODING IN THE EVENT OF A
WATER LEAK. WHEN THE “AQUASTOP” DEVICE IS TRIPPED, CALL IN A
QUALIFIED TECHNICIAN TO IDENTIFY AND REPAIR THE FAULT.
INSIDE THE “AQUASTOP” WATER INTAKE HOSE, THERE ARE ELECTRICAL
PARTS. DO NOT CUT THE HOSE AND DO NOT ALLOW THE “AQUASTOP”
DEVICE TO DROP INTO WATER. IN THE EVENT OF DAMAGE TO THE
“AQUASTOP” WATER INTAKE HOSE, DISCONNECT THE APPLIANCE FROM
THE ELECTRICAL SUPPLY AND FROM THE WATER SUPPLY.
MODELS WITH INTERNAL LIGHTING
THE LIGHTING SYSTEM OF THE APPLIANCE BELONGS TO RISK GROUP 1
UNDER THE IEC/EN 62471 STANDARD. THIS MEANS THAT THERE IS NO
PHOTOBIOLOGICAL RISK IN NORMAL CONDITIONS OF USE.
IN ACCORDANCE TO ART. 26 OF THE LEGISLATIVE DECREE 14 MARCH
2014, NR. 49 “IMPLEMENTATION OF THE DIRECTIVE 2012/19/EU ON WASTE
OF ELECTRICAL AND ELECTRONIC EQUIPMENT (WEEE)”.
THE SYMBOL OF A CROSSED OUT WHEELIE BIN ON THE DEVICE OR
PACKAGE SHOWS THAT THE PRODUCT MUST BE COLLECTED SEPARATE
FROM OTHER WASTE, AT THE END OF ITS SERVICE LIFE. THEREFORE, THE
USER HAS TO TAKE ANY EQUIPMENT THAT HAS REACHED THE END OF ITS
SERVICE LIFE TO LOCAL WASTE DISPOSAL CENTRES FOR ELECTRICAL
AND ELECTRONIC EQUIPMENT WASTE.
AS AN ALTERNATIVE TO THE IDEPENDENT MANAGEMENT, IT IS POSSIBLE
TO DELIVER THE EQUIPMENT WHICH HAS TO BE DISPOSED OF TO THE
DEALER, AT THE MOMENT OF PURCHASING A NEW EQUIVALENT DEVICE
AT THE ELECTRONIC EQUIPMENT DEALERS WITH A SALES AREA OF AT

Installation instructions
6
LEAST OF 400 M
2
. ALSO, FOR DISUSED DEVICES WITH DIMENSIONS
INFERIOR TO 25 CM, FREE DELIVERY TO THE DEALERS IS POSSIBLE, WITH
NO PURCHASE OBLIGATION
A PROPER SEPARATE WASTE COLLECTION AND THE CONSEQUENT
HEADING OFTHE DISUSED DEVICETOWARDS ITS RECYCLING,TREATMENT
AND ENVIRONMENTALLY COMPATIBLE DISPOSAL, CONTRIBUTES IN
PREVENTING ANY POSSIBLE NEGATIVE EFFECTS ON ENVIRONMENT AND
HEALTH; ALSO, IT SUPPORTS THE REUSE AND/OR RECYCLE OF THE
MATERIALSWHICH COMPOSED THE DEVICE.
OBSOLETE APPLIANCES MUST BE RENDERED UNUSABLE. CUT OFF THE
MAINS POWER CORD AFTER UNPLUGGING IT FROM THE WALL OUTLET,
AND MAKE SAFE ANY COMPONENTS WHICH MIGHT BE DANGEROUS FOR
CHILDREN (LOCKS, DOORS, CABLES, HOSES, ETC.).
The manufacturer declines all responsibility for damage to persons or property
resulting from failure to observe the above precautions, from tampering with
even a single component of the appliance, or from the use of non original spare
parts.
TECHNICAL DATA
TECHNICAL DATA
Width 597 599 mm
Depth measured flush with the
outer edge of the control panel
Free standing: 600 mm
Semi-integrated: 570 mm
Height (depending on models)
Free standing: from 850 mm to 890 mm
from 890 mm to 930 mm
Semi-integrated: from 820 mm to 890 mm
from 860 mm to 930 mm
Capacity
13 Standard place settings
Water supply pressure
min. 0,05 - max. 0,9 MPa (min. 0.5 – max. 9 bar)
Electrical characteristics
See rating plate

Installation instructions
7
2. Installation and hook-up
Remove the polystyrene basket retainers.
Position the appliance in the desired place of installation. The back or
sides of the dishwasher may be placed up against walls or other furniture
units. If the dishwasher is installed near a heat source, fit the special
insulating panel to prevent overheating and malfunction of the appliance.
To ensurestability, install integrated or built-under dishwashers only under
continuous worktops, and screw them to the adjacent units. To facilitate
the installation procedure, the intake and drain hoses can be positioned in
any direction; make sure that the hoses are not kinked, crushed or pulled
too tightly. Make sure to tighten the locking ring-nut once the pipes have
been placed in the direction required. A hole at least 8 cm in diameter is
required to allow the power supply cable and pipes to pass. Before putting
the dishwasher into its definitive position, turn on the water tap and check
that there are no leaks from the tap connection, the dishwasher
connection or the hose.
Level the appliance on the floor using its adjustable feet. This operation is
essential for ensuring correct operation of the dishwasher.
Some models areequipped with onlyoneadjustablefootattherear,which
can be adjusted by turning the screw on the lower front part of the
appliance.
Building-in adishwasher underneath a hob isabsolutely forbidden.
Moreover, dishwashersmay not beinstalleddirectlytouching appliances
which are not conventional built-in kitchen appliances (e.g. fireplaces,
stoves, etc.).
When installing the dishwasher in a compartment next to one or more other
appliances, it is essential to comply with all the recommendations provided
by the appliance’s manufacturer (minimum distances, installation
procedures, etc.).

Installation instructions
8
2.1 Water supply connection
Preventing the risk of clogging or damage: if the water pipe is new or
has not been used for a long time, before connecting to the water supply
check that the water is clear and free of impurities, to prevent damage to
the appliance.
The dishwasher must always be connected to the water system with
new hoses; old or used hoses must never be reused.
CONNECTING TO THE WATER SUPPLY
Connect the intake hose to a cold water supply with ¾” gas
thread, inserting the filter Asupplied with the dishwasher.
Take care to screw the hose firmly into place with your
hands and then complete by tightening about ¼ of a
turn with pliers.
In dishwashers equipped with the ACQUASTOP device,
the filters is already fitted inside the threaded ring.
Thedishwashercanalsobeconnectedtoahotwatersupply
not exceeding
60°C. Supplying the appliance with hot water cuts down the washing time
by approximately 20 minutes, but slightly reduces its effectiveness. Make
the connection to the domestic hot water supply using the same procedure
described for connecting to the cold water supply.

Installation instructions
9
DRAIN CONNECTION
Insert the dishwasher’s drain hose
into a drain pipe having a diameter
of at least 4 cm, or alternatively,
place it inside the kitchen sink
using the plastic support provided,
taking care not to crush or
excessively bend the hose. It is
important to prevent the hose from
coming loose and falling. For this
purpose, the plastic support is
equipped with a hole for tying it to
the wall or water tap.
The free end should be positioned at a height of between
30 and 100 cm
,
and should never be submerged in water. If a horizontal drain extension
hose is used (for a maximum of 3 m) the drain hose can be placed at a
maximum height of
85 cm
from the ground.
Class of protection against moisture
: IPX0

User instructions
10
3. Description of the controls
3.1 Front panel
All the dishwasher controls are grouped on the front panel. Programming
and option selection are only possible with the door closed.
1 ON/OFF BUTTON AND WARNING LIGHT
2 OPTION SELECTION BUTTONS AND WARNING LIGHTS
3 “CHILD LOCK” ACTIVATION BUTTONS
4 START/PAUSE BUTTON
5 PROGRAM SELECTION BUTTONS
6 INFORMATION DISPLAY
7 HANDLE TO OPEN THE DOOR
N.B.: symbols and styling are guideline and may vary depending on
the model or version of the dishwasher purchased.

User instructions
11
3.2 Information display
The dishwasher is equipped with a practical DISPLAY which provides
information on the programmed dishwasher functions.
Rinse aid lack warning indicator
Salt lack warning indicator
End of cycle signal
“Child lock” option warning light
000
Delayed start indicator, wash cycle duration and alarms
H
0….H5
Water softener setting indicator
b0….b5
Rinse aid setting indicator
Program phases warning lights
With program in progress, it
indicates the status of the program
Prewash
Wash
Rinse
Drying

User instructions
12
PROGRAMS TABLE
PROGRAMME
NUMBER
& SYMBOL
LOAD CROCKERY AND
CUTLERY PROGRAM
PROGRESS
DURATION
CONSUMPTION
MINUTES
(1)
WATER
LITRES POWER
KWh (1)
1 GLASSES
Glass, china and mixed
dishes with light dirt.
Wash at 45°C
Cold rinse
Rinse at 55°C
Dry
140/70
(3)
9,5 1,10
2 SILENT
Program particularly
suited for night-time use.
Automatically reducesthe
noise level to a minimum.
For normally dirty dishes
without dry residues.
Wash at 55°C
Cold rinse
Rinse at 55°C
Dry
290/
245 (3)
9,5 1,25
3 ECO (*)
EN 50242
Dishes with normal dirt,
even with dried-on
residues
Wash at 45°C
Cold rinse
Rinse at 55°C
Dry
**/
185 (3)
** **
4 AUTOMATIC
IEC/DIN***
Pans and dishes with
normal dirt, even with
dried-on residues.
When the "AUTO" program is selected, the dishwasher
recognises the type of dirt and automatically adjusts the
washing parameters as appropriate.
5 ULTRA
CLEAN
****
Very dirty pans and
dishes, even with dried-on
residues.
Hot prewash
Wash at 70°C
Cold rinse (2)
Rinse at 70°C
Dry
155
15,5 1,70
IMPORTANT: see “NOTES AND REFERENCES” table on the following pages.
The
ULTRA CLEAN
program terminate with an extra anti-bacteria rinse that ensures
a further reduction in the bacteria level. If the temperature falls during this stage of the
program (e.g. because the door is opened or due to a power blackout), the program
lights
flash to warn that the ant
i
-
bacteria effect is not guaranteed.
If the dishwasher door is open or not properly closed, the washing cycle
will not start.

User instructions
13
QUICK TIME PROGRAMS
(see relevant section for explanation of functioning modes)
PROGRAMME
NUMBER E
SYMBOL
LOAD CROCKERY AND
CUTLERY PROGRAM
PROGRESS
DURATION
CONSUMPTION
MINUTI
(1)
WATER
LITRES
POWER
KWh (1)
6SOAK
+
Pans and dishes awaiting
completion of the load Cold prewash 15 3,5 0,02
7 RAPID 27’
+
Dishes with light dirt,
washed immediately after
use
Wash at 38°C
Rinse at 50°C
27
6,5 0,70
8 ECO
QUICK
+
Dishes with normal dirt,
washed immediately after
use.
Cold prewash
Wash at 60°C
Cold rinse
Rinse at 70°C
80
12,5 1,25
9 NORMAL
QUICK
+
Dishes with normal dirt,
washed immediately after
use.
Cold prewash
Wash at 70°C
Cold rinse
Rinse at 70°C
75 13 1,40
10 STRONG
and FAST
+
Mixed dishes with normal
dirt without dried-on
residues.
Wash at 65°C
Cold rinse
Rinse at 70°C
50
10 1,20
IMPORTANT: see “NOTES AND REFERENCES” table on the following pages.
If the dishwasher door is open or not properly closed, the washing cycle
will not start.

User instructions
14
NOTES AND REFERENCES
Only
run the soak program with half loads.
Options cannot be used with thesoak program.
The ENERSAVE option cannot be used with soak, ultra clean, or any programs
which do not include the final drying stage.
* Standard programme under
EN 50242
. The
ENERSAVE
option must
be
enabled
.
**
See
information sheet provided
***
IEC/DIN
reference programme. The
ENERSAVE
option must
be enabled
.
**** Reference program for laboratories: Detergent:
20g
in the
dispenser
+
10g
in
the
door
or tablet.
Configuration
: see photo in “Using the baskets”.
(1) Programconsumption and durationfigures have been measured in accordance
with the EN 50242 standard. Values may vary depending on intake water and
room temperatures and the type and quantity of dishes loaded.
(2)
1 or 2 cold rinses depending on the model.
(3)
ENERSAVE option selected (default)/not selected
.
REFERENCES for the ENERGY LABEL supplied with the dishwasher:
- Annualenergy consumptionis based on 280 standard wash cycles withcold
water and consumption of low-energy operating modes. Actual consumption
depends on the way in which the appliance is used.
- Water consumption is based on 280 standard wash cycles. Actual
consumption depends on the way in which the appliance is used.
- Information refers to the EN 50242 STANDARD programme (identified in the
programmes table), which is the most effective in terms of combined energy
and water consumption. The programme is recommended for dishes with a
normal level of dirt.
- Drying efficiency class on a scale from “G” (minimum efficiency) to “A”
(maximum efficiency).

User instructions
15
3.3 Washing programs
The dishwasher is equipped with a control panel and an
INFORMATION
DISPLAY from which it is possible to carry out all the power switch-on,
switch
-
off and programming operations.
Before starting a washing program make sure that:
The water supply tap is open.
The correct amount of detergent has been added to the
dispenser.
The baskets have been correctly loaded.
The spray arms are able to rotate freely and without
obstruction.
The dishwasher door is securely closed.
Warning:
during the initial phase of the washing program, the operation of sprayers
is not perceived because they start rotating about 5minutes after the start.
This is the normal operation of the washing cycle.
LIGHTING
Pressing the ON/OFF button will start the dishwasher and will lit up the
dishwasher pilot light. After approximately 3 second from this operation
the DISPLAY will be turned on with a visualization that will depend upon
the state of the dishwasher.
PROGRAMMING
All the programming operations are possible only with closed door. With
open door, on the DISPLAY will appear - - : - -.

User instructions
16
SELECTION PROGRAM
The program selection is possible
through the relative buttons.
By pressing the relative button of the desired program (see table) it will
light up the relative pilot light to confirm that the operation occurred and
on the
DISPLAY
a program duration forecast will appear
(“
h.mm
”).
START PROGRAM
At this point, in order to start the machine, it is only enough to press the
START/PAUSE for some seconds until the symbol START/PAUSE
start toflashand confirmation“beep” is heard. From thismoment the cycle
duration on the DISPLAY starts to decrease.
This phase, that updates itself during the cycle, is “indicative” since it is
influenced by the washing conditions such as dishwasher type and
quantity, entry temperature etc. For this reason it is normal to see the
updating during a program (increment and decrease of minutes) specially
in the passage from one phase to the other (for example, from washing to
rinse).
Program progress isindicatedby the program phases that show the status
of the current cycle.
The current phase flashes, while the next washing phases lights stay on.
At the end of each phase, the signal will turn off.
N.B.: when a program which does not need the prewash phase is
selected, the prewash signal stays off.
Prewash
Wash
Rinse
Drying
END PROGRAM
At the end of the program the DISPLAY shows “end”. By pressing one of
the program buttons the
dishwasher
is ready to start a new cycle.

User instructions
17
INTERRUPTING
A
PROGRAM
In order to interrupt a running program it is necessary:
to press the START/PAUSE for some seconds until when the
led START/PAUSE remains lit on (confirmation beep). At this point,
it is possible to start the cycle again, otherwise:
TO CHANGE A PROGRAM
To change the running program it is necessary:
to interrupt the running program (see “INTERRUPTING A PROGRAM”);
select the new program;
to press againthe START/PAUSE button to make start the new
program.
STOPPING A PROGRAM
To cancel a program which is running:
Interrupt the program (see "INTERRUPTING A PROGRAM")
Press the START/PAUSE button and hold it down; the
display will show "P0" and the dishwasher will immediately
switch to the end of the cycle and drain the tank (during this
process, the "START/PAUSE led will flash). When the drain
procedure ends, the end of cycle "End" message appears on
the display
.
In case that the door is opened during the operation, to the next door
closing it is going to be necessary to start the program as shown in
paragraph “STARTING THE PROGRAM”. The program will resume from the
point in which it was interrupted.
In case that the tub temperature is higher than 50°C the program will
start about 60 seconds later.

User instructions
18
OPTIONS
The selection of options is controlled by the
relative buttons and indicated by the warning
light below the symbol. Please read the
paragraphs relating to each option for their
usage details.
QUICK TIME PROGRAMS
Select this option together with any washing program (except the soak
program) to SHORTEN the cycle by from a minimum of 10% to a
maximum of 55%, depending on the cycle selected. To activate this
option, press the QUICK OPTION button (light comes on) after
selecting the program required. The option is automatically deactivated at
the end of the program.
ENERSAVE
This option further reduces energy consumption by opening the door at
the end of the cycle for more effective drying. At the end of the wash an
automatic device releases the door, which slowly opens by a few
centimetres. This allows optimal drying even with low rinsing
temperatures, for significant energy saving.
The dishwasher remains in an idle state between the rinse stage and the
end of the cycle to allow proper drying (the display shows thetimeleft until
the end of the cycle). Opening the door at this stage causes the cycle to
stop and ends the program.
The program end is signalled by a short beep and the flashing of the
indicator lights for programs 4 and 5.
When the function is activated, opening of the door
must not be
impeded in any way; do not leave anything in the necessary space in
front of the door to allow it to open. Do not force the door lock before
the end of the cycle is signalled, as this would damage the mechanism.
When the function is activated, opening of the door must not be
impeded in any way; do not leave anything in the space in front of the
door necessary to allow it to open.
Do not re-close the door during automatic opening as this would
damage the mechanism. Wait for the pushers to retract before re-closing
the door.

User instructions
19
DELAYING THE PROGRAM
The PROGRAM DELAY button can be pressed to delay the start of
the washing program by 1upto24 hours. Thismeansthatthedishwasher
can be operated at the time of day of your choice.
Press the PROGRAM DELAY button again; the INFORMATION
DISPLAY (6) will show the number of hours of delay with which the appliance
will start.
After settingthe delay, start the program: press theSTART/PAUSE button
(4) for a few seconds, until the PROGRAM STARTEDlight starts flashing.
Theappliancewill prewashthe dishes, after which the“program delay” set
previously will come into effect.
To cancel the program delay once the wash has started, proceed as
follows:
Press the START/PAUSE button (4) for a few seconds, until the
PROGRAM STARTED light stops flashing;
Press the PROGRAM DELAY button several times until the
program delay returns to zero;
Press the
START/PAUSE
button
(4)
to start the program.
ULTRA CLEAN
The "ULTRA CLEAN" program prolongs the final hot rinse to ensure a
further reduction in the bacteria level. If the temperature in the tank falls
during this stageof theprogram (e.g. becausethe door is opened or due to
a power blackout), the light of the option and the program lights (2) flash to
warn that the additional washing phase has not been completed
successfully. This does not mean that the wash program has been less
effective than usual.

User instructions
20
Flexi Tabs
Ideal for multi-function detergents, this option allows washing to be
optimised, with full benefits from the combined-action tablets. When this
option is activated, any salt and rinse aid in the relative containers will not
be used.
If the option is not provided, we recommend the use of conventional
products (separate detergent, salt and rinse aid), because with
conventional washing cycles, combined products might create problems
such as a white deposit, poor drying results and residues left on dishes.
N.B.:
When the salt and rinse aid containers are empty, the relative lights will
remain on even if the “Flexi Tabs” option is selected.
IMPORTANT:
when no longer required, the option must be deactivated by pressing the
relative
button
(the light goes out).
These products
are not suitable
for use with
excessively “hard”
water.
If the hardness level set is higher than H3, when the option is activated
the relative light flashes to indicate that the product is being used
incorrectly; the dishwasher will still work, but washing results may be
poor
.
“CHILD LOCK” OPTION
By pressing the indicated buttons (3) at the same time, the controls are
locked, whichis confirmed when the warninglight on display turns on.This
option stays active until the buttons
(3)
are pressed again.
Table of contents
Other Smeg Dishwasher manuals