Smeg UD515D User manual

1
TRANSLATION OF THE ORIGINAL INSTRUCTIONS
SUMMARY
1PRODUCT IDENTIFICATION................................................................................................................... 3
1.1 APPLICATION, GENERAL FUNCTIONS ANDINTENDED USE.............................................................. 3
1.2 NAME AND ADDRESSOFMANUFACTURER ORDISTRIBUTOR......................................................... 3
SMEG S.P.A.............................................................................................................................................. 3
1.3 DECLARATION OF CONFORMITYTO PRODUCTSTANDARDS........................................................... 3
1.4 DESCRIPTION OF THE APPLIANCE................................................................................................... 4
2SYMBOLS USED IN THE MANUAL ......................................................................................................... 5
3SAFETY PRECAUTIONS AND INSTRUCTIONS......................................................................................... 6
3.1 CORRECTINSTALLATION................................................................................................................ 6
3.2 SAFE USE ....................................................................................................................................... 7
3.3 CORRECTMAINTENANCE............................................................................................................... 8
4PRODUCT CHARACTERISTICS................................................................................................................ 9
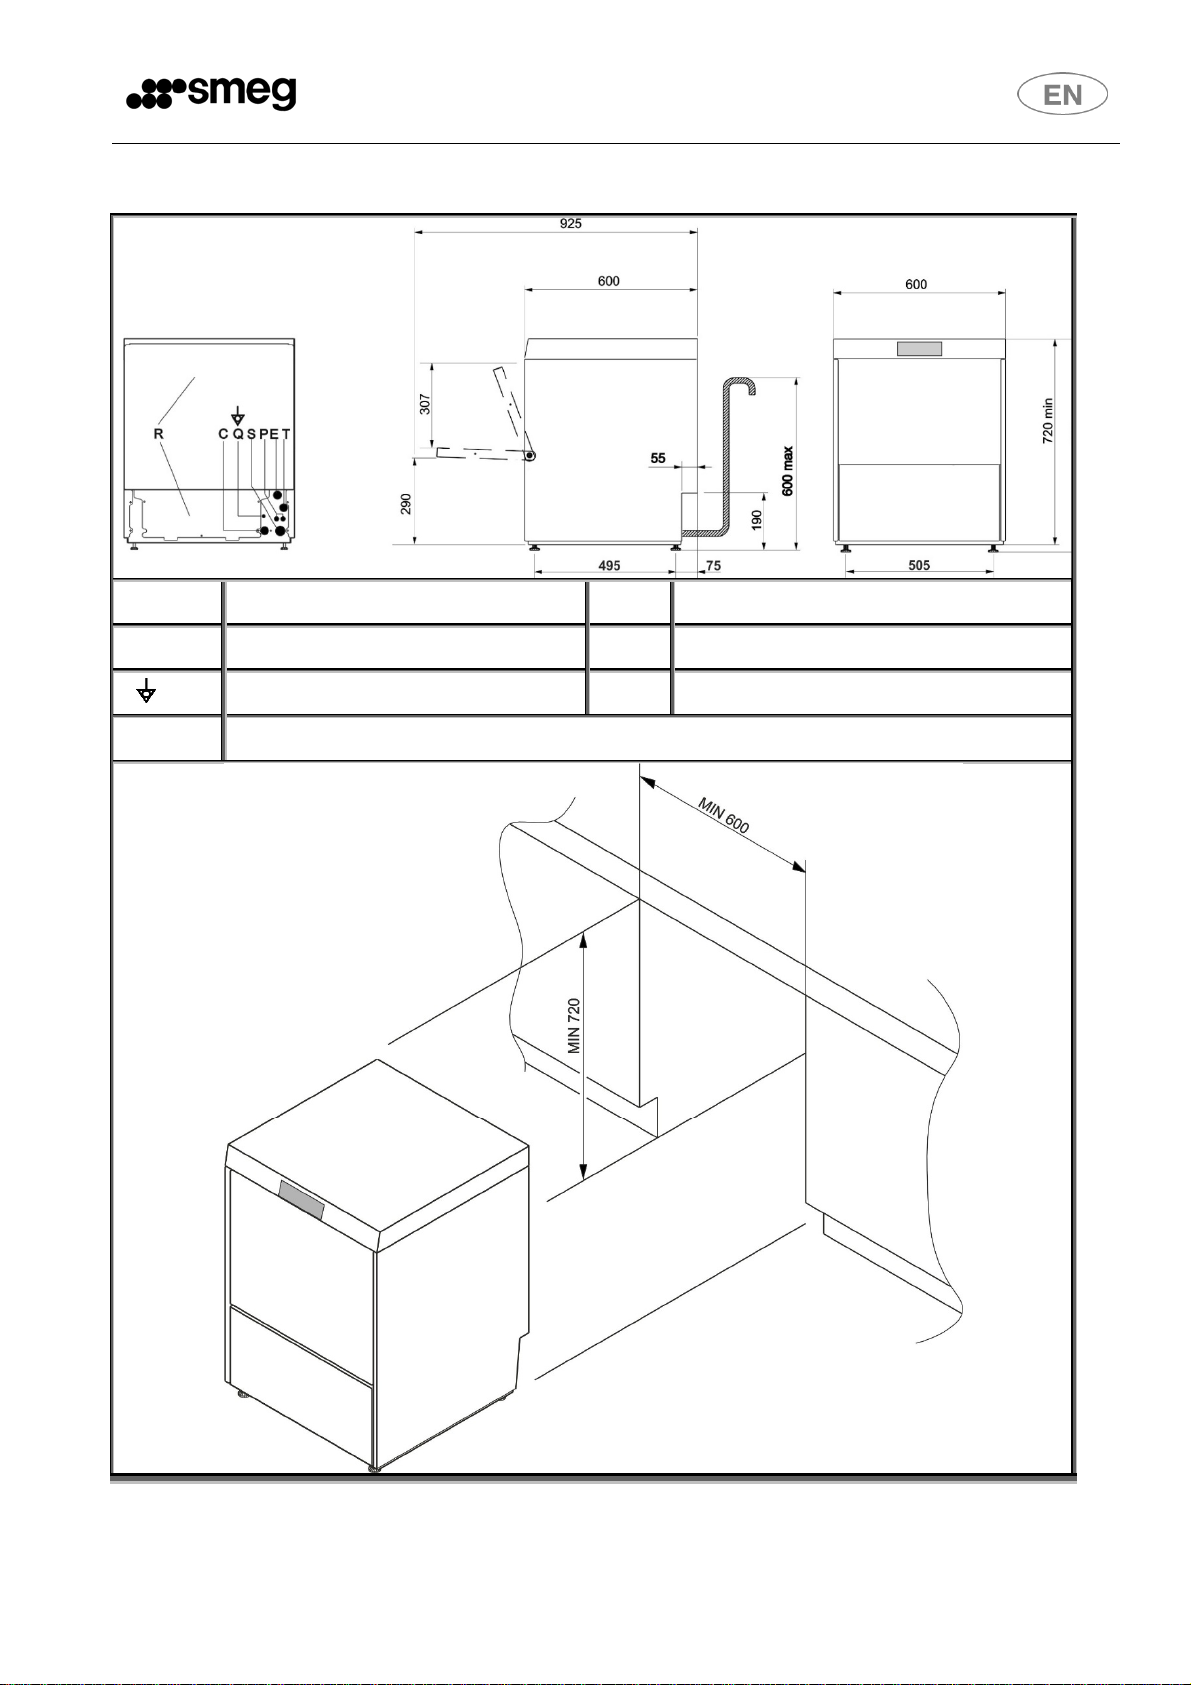
4.1 OVERALLDIMENSIONS................................................................................................................... 9
4.2 OVERALL DIMENSIONS (H 720) .....................................................................................................10
4.3 OVERALLDIMENSIONS(RAISEDMODELS).....................................................................................11
4.4 TECHNICALCHARACTERISTICS.......................................................................................................12
5PREPARING THE APPLIANCE FOR USE .................................................................................................13
5.1 POSITIONINGAND INSTALLATION.................................................................................................13
5.2 CONNECTION TOTHE WATER SUPPLY...........................................................................................15
5.3 DRAIN CONNECTION.....................................................................................................................15
5.4 CONNECTION TOTHE ELECTRICITY SUPPLY...................................................................................16
6FIRST START-UP...................................................................................................................................17
6.1 FIRSTSTART-UP............................................................................................................................17
6.2 PREPARINGFORUSE (IMPORTANT)............................................................................................17
6.3 USING THE WATER SOFTENER (ON MODELS WITH THIS FEATURE ONLY).......................................17
7CONTROL PANEL .................................................................................................................................18
7.1 SET-UP (AUTHORISED STAFFONLY)..............................................................................................19
7.2 MODIFIABLE PARAMETERS...........................................................................................................20
7.3 STARTING THE PERISTALTIC PUMPS – RAPID FILLING OF DETERGENT AND RINSE AID DELIVERY
CIRCUIT...................................................................................................................................................23
8MALFUNCTIONS SHOWN ON THE DISPLAY (FOR THE TECHNICIAN)....................................................24
9INSTRUCTIONS FOR THE USER.............................................................................................................26
9.1 BEFORE WASHING........................................................................................................................27
9.2 FIRSTUSE EACH DAY(TANK AND BOILEREMPTY)..........................................................................28
9.3 OPERATINGANOMALIES...............................................................................................................29
9.4 PROGRAMCHANGE......................................................................................................................30
10 CHOSING THE PROGRAM.................................................................................................................31
11 BASKETS PROVIDED.........................................................................................................................32
12 MAINTENANCE AN CLEANING .........................................................................................................32
12.1 DAILY FILTERCLEANING................................................................................................................33
12.2 CLEANING THE FILTER DURING THE DAY.......................................................................................34
12.3 TOTAL PUMP-OUTATTHE END OFTHE DAY..................................................................................35
12.4 TOPPING UP WITH REGENERATING SALT (FOR MODELS WITH SOFTENER)....................................35
12.5 ROUTINE INSPECTIONOFTHE SPRAY ARM (ONCE A WEEK )..........................................................36
12.6 LENGTHYPERIODSOUT OF USE ....................................................................................................36
13 TROUBLESHOOTING ........................................................................................................................37
14 MALFUNCTIONS SHOWN ON THE DISPLAY (FOR THE USER)............................................................39

2
SMEG thanks you for choosing one of its products.
This manual is anintegral part of theappliance. Take goodcare of it and keep it tohand throughout
the appliance’s life cycle, since it contains important information about assembly, safety, use and
maintenance.
In the event that the appliance is sold on, consign this manual to the new owner.
Before putting the appliance into operation, read all the instructions in this manual carefully to
become familiar with the right conditions for the proper use of your professional dishwasher.

3
1PRODUCT IDENTIFICATION
1.1 Application, general functions and intended use
This dishwasher is intended for professional use in the restaurant and institutional catering sector
and complies with the relevant safety regulations. However, misuse may cause injury and/or
damage, and therefore the dishwasher must only be used by suitably trained staff. This dishwasher
isdesignedforuseinnon-mobilepremisesandisintendedonlyforwashingtableware(dishes,pans,
trays, cups, glasses and bowls) and any other item for commercial catering, stable to temperature
and humidity produced by the appliance”. Any other type of use is not permitted and may be
dangerous.
Persons whose physical, sensory or mental capabilities, inexperience or lack of knowledge render
them unable to use the dishwasher safely must not use it without the supervision and guidance of
a responsible person. The manufacturer is not liable for any injury or damage caused by failure to
comply with the instructions given in this manual, misuse, tampering with even a single part of the
appliance, or the use of non-genuine spare parts.
1.2 Name and address of manufacturer or distributor
Smeg S.p.A.
Via Leonardo da Vinci, 4 - 42016 Guastalla (RE) Tel. +39 0522 8211 - Fax + 39 0522 821453
Our Sales Department staff will be able to provide you with information about prices and special
offers.
Our After-Sales Department will be able to provide you with guidance about keeping your device
functioning correctly and put you in touch with your nearest authorised Service Centre. Our entire
product offering can be viewed at our website.
1.3 Declaration of conformity to product standards
This appliance complies with the relevant safety regulations and conforms to the requirements of
directives 2006/42/EC and 2004/108/EC.
The dishwasher is also marked in compliance with European Directive 2002/96/EC on Waste
Electrical and Electronic Equipment (WEEE).
For information on the treatment, recovery and recycling of this product, contact the
local authority, domestic waste collection service, or your Smeg reseller.
Make sure that this product is scrapped correctly to safeguard the environment and
health.

4
1.4 Description of the appliance
U COVER (TOP)
D DISPLAY AND CONTROL PANEL
A FRONT LOADING/UNLOADING DOOR
V SERVICE COMPARTMENT
F ADJUSTABLE FEET

5
2SYMBOLS USED IN THE MANUAL
This symbol instructs the user to read the instructions in the manual with care.
This symbol appears next to information important for the safety of people and the
appliance.
This symbol is applied to some parts which contain live electrical components and
indicates the risk of electric shock.
This symbol is applied close to the terminal for the connection of an external
equipotential conductor.
This symbol appears next to important information. Read theinstructions provided
with care and comply with the procedures and rules described.
This symbol appears next to information and technical instructions intended for the
qualified staff who are to install, commission and test the appliance and carry out
any repairs.
This symbol indicates thatat the end of its working life, the appliance must be
consigned to a disposal plant for recovery and recycling in accordance with the
relevant legislation in the country of installation. Contact a specialist centre for
disposal.

6
3SAFETY PRECAUTIONS AND INSTRUCTIONS
The precautions and instructions belowcontain important information and must be read with care.
The manufacturer does not accept responsibility fordamage caused by failure to comply with the
safety precautions and instructions.
3.1 Correct installation
The dishwasher must be installed by an authorised technician.
When handling and installing the dishwasher, always wear the most suitable personal
protection equipment (PPE) for the task in hand.
Do not install a dishwasher which has been damaged during transport. If in doubt, consult
your dealer.
If the power supply cable is damaged, do not run the dishwasher.
Do not install the dishwasher in areas subject to freezing temperatures or in atmospheres
with explosion risk (ATEX).
Any accessories may only be installed on the appliance if authorised by the manufacturer.
Donotinstallthedishwashernexttoapplianceswhichirradiatestrongheat(e.g.gasburners,
stoves, etc.) since they could cause damage.
If the dishwasher is installed above the ground, make sure that the stand and dishwasher
are secured properly and do not constitute a hazard.
Electrical safety is only ensured if the dishwasher is connected to an earth conductor
compliant with the relevant electrical regulations. If in doubt, have the system inspected by
a qualified electrician.
A circuit breaker and overcurrent protection device (magnetothermal switch or fuses) must
beinstalledinaneasilyaccessiblepositiononthedishwasher'spowersupplyline.Thisdevice
must only serve the dishwasher and must be suitable for its rated electrical characteristics.
Do not connect the dishwasher to the electrical mains by means of adapters or extensions,
since they do not guarantee the safety required.
If the dishwasher is connected to the electrical mains by means of a plug, it must be of the
same type as the power socket, suitable for the appliance's rated electrical characteristics
and compliant with the relevant national regulations on electrical systems. The power plug
must be easily accessible after the appliance has been installed.
Only use new hoses for connection to the water supply. Old hoses or hoses salvaged from
previous installations must not be used.
The drain connection must be made in accordance with the relevant national regulations.
Substandard connections may cause flowback and in some cases pollution.
If the machine is not installed in a recess, ask the manufacturer for the special
mounting kit in order to make it stable.

7
3.2 Safe use
The staff assigned to use the dishwasher must be suitably trained and instructed.
The appliance is not suitable for use by juveniles or persons with reduced physical, sensorial
or mental capacities, or those without the necessary knowledge and experience. Such
persons may only use the appliance under the supervision of a person responsible for their
safety.
Do not leave the dishwasher door open. Risk of tripping or injury against the edges of the
door.
Do not sit or lean on the open door. This may tip over or damage the appliance.
The water inside the dishwasher is not drinkable.
Do not use the dishwasher for washing or soaking foods.
Do not use the water inside the dishwasher for defrosting foods, even if they are in airtight
containers.
When using the dishwasher, remember that the plates are very hot at the end of a wash
cycle.
Take care when opening the door as you might be splashed with water.
When the door is opened, splashed of hot water may come out.
Knives and pointed kitchen equipment must be placed in the basket with their tips
downwards, or horizontally, taking care not to allow them to protrude from the basket
The dishwasher is only intended for use with water and detergents suitable for washing in
professional dishwashers. The use of other products may damage both the dishes and the
appliance.
Donotoperatethedishwasherwith organicsolventsorflammableliquids.Neverloaddishes
dirty with ash, wax orpaint.
When handling detergents comply strictly with the instructions provided by the detergent
producer.
Always keep the detergent safety datasheets within reach so that the operator can consult
them easily if necessary.
Swallowing orinhaling detergents may cause serious injury to the nose, mouth and throat.
If detergent has been inhaled or swallowed, seek medical advice immediately.
When the door is opened, splashed of hot water may come out.
It is recommended to use baskets that are intact and not damaged by wear or tampering.
The plastic runners of thebaskets, if present, must not be removed, damaged, modified or
tampered with.

8
3.3 Correct maintenance
Do not clean the machine with a water jet machine, high-pressure or steam cleaners.
Before performing any maintenance procedure on the appliance disconnect it from the
mainselectricitysupply.Touchingliveelectricalcomponents,evenaccidentally,maybevery
dangerous.
Neveropenthedishwasher's case.Electricshockhazard. Only theauthorisedtechnicianmay
access the internal parts of the dishwasher.
The dishwasher may only be repaired by the authorised service organisation. Substandard
repairs may cause damage or danger for the user.
No alterations or changes of any kind to the appliance's electrical circuits or mechanical
structurearepermitted.Themanufacturerdeclinesallresponsibilityfordamagearisingfrom
unauthorised alterations.
Replaceany faultyparts only withgenuinespareparts. Themanufacturerdeclines all liability
for damage resulting from the use of non-genuine spare parts.
The power supply cable, if fitted, must be replaced by the manufacturer or an authorised
service centre in accordance with the technical data specified on the wiring diagram
supplied with the appliance, to prevent all risks.

9
4PRODUCT CHARACTERISTICS
4.1 Overall dimensions
R LOWER BACK PANEL E ELECTRICITY SUPPLY CABLE
C FILLER HOSE P PERISTALTIC HOSES
Q TERMINAL FOR EXTERNAL
EQUIPOTENTIAL CONDUCTOR. S DRAIN HOSE
T EXTERNAL DISPENSER POWER CABLE ENTRY POINT

10
4.2 Overall dimensions (H 720)
R LOWER BACK PANEL E ELECTRICITY SUPPLY CABLE
C FILLER HOSE P PERISTALTIC HOSES
Q EARTH TERMINAL S DRAIN HOSE
T EXTERNAL DISPENSER POWER CABLE ENTRY POINT

11
4.3 Overall dimensions (raised models)
R LOWER BACK PANEL
C FILLER HOSE
Q EARTH TERMINAL
E ELECTRICITY SUPPLY CABLE
P PERISTALTIC HOSES
S DRAIN HOSE
T EXTERNAL DISPENSER POWER CABLE ENTRY POINT

12
4.4 Technical characteristics
Electricity supply - See technical data
plate and
electrical wiring
diagram supplied
with the
appliance
Intake water pressure -
Intake water temperature -
Use - Indoor
Max. working altitude m 2000
Working ambient temperature °C 10 - 35
Relative humidity
80% for
temperatures up
to 25°C with
linear decrease to
50% at the
temperature of
35°C
Intake water hardness
(models with softener) °f/°d/ppm
≤ 60/≤ 34/≤ 600
Intake water hardness
(models without softener) °f/°d/ppm
≤ 3/≤ 5/≤ 30
Water intake flow rate
(models with rinsing pump) L/min min 6
Water intake flow rate
(models without rinsing pump) L/min min 12
Intake hose connection - threaded 3/4 “
Drain minimum diameter mm 25
Drain height (above appliance installation surface) mm max 600
Rinse cycle water consumption L 3.2
Boiler capacity L 6
Tank capacity L 11
Noise level LpA < 60 dB(A)
Degree of protection IPX 4
Net weight kg ˜ 55
Power supply cable type ◄HAR►H07RN-F

13
5PREPARING THE APPLIANCE FOR USE
Convey the dishwasher to the installation site, remove the packaging and check the appliance and
components for damage; any damage found must be reported to the transporter in writing. The
packagingcomponents(plasticbags,expandedpolystyrene,nails,etc.)mustnotbeleftwithinreach
of children and pets since they are potentially dangerous. All packaging materials used are
environment-friendly. They can be kept without constituting any hazard, or may be disposed of at
a specialist waste disposal centre. The plastic components suitable for recycling are marked as
follows:
PE -polyethylene: external packaging film, bag containing the instructions, protective bags.
PP - polypropylene: straps used to close the packaging.
PS -expanded polystyrene: corner guards, top of packaging.
Wooden and cardboard components can be disposed of in accordance with the local regulations.
5.1 Positioning and installation
Place the dishwasher in the chosen point and remove the protective film. Level the dishwasher
(with the aid of a spirit level) on its four feet, adjusting them to ensure that it is stable. If the
dishwasher is installed above the ground, make sure that the stand and dishwasher are secured
properly and do not constitute a hazard.
All operations described in this section must be carried out and/or checked by the
qualified staff who install and commission the dishwasher.
The systems and premises in which the dishwasher is installed must comply with the
relevant regulations.
If the dishwasher is installed next to another appliance, also check the
recommendations provided by the manufacturer of the adjacent appliance.
Installations other than those described must first be approved by the manufacturer.
Use only professional furnishings and units in the vicinity of the dishwasher. Any
other types of furnishing may be damaged.

14

15
5.2 Connection to the water supply
Check that the intake water pressure, flow rate and temperature are as stated in the dishwasher's
technical characteristics. If the dynamic pressure exceeds the limit stated in
the technical characteristics, a pressure reducer must be installed. If the
pressure is lower, it might be necessary to fit a special pump to ensure
optimal performance. Connect the water intake hose to a connector with ¾”
gas threaded fitting, inserting the filter "A" provided. The tap must be easily
accessible after installation of the appliance.
5.3 Drain connection
The dishwasher is fitted with a drain pump and can operate with drain connections on the floor or
wall. Before connecting the hose, check that the diameter and height ofthe wall drain connection
are as stated in the dishwasher's technical characteristics. When connecting the dishwasher's
drain hose, take care to avoid kinks, sharp bends or crushing. Since the drain water temperature
can be very high, the end of the drain hose must be fixed to the drain connection using the hose
clamps provided.
Only use new hoses for connection to the water supply. Old hoses or hoses salvaged
from previous installations must not be used.
If the water supply system has been unused for a long time or if work has been done
on it, before connecting the appliance's intake hose run the water to flush the air
and dirt from the pipes.
FOR MODELS WITH A WATER SOFTENER
An “approved” double check valve or some other noless effective device providing
backflow prevention protection to at least fluid category two shall be fitted at the
point of connection between the water supply and the fitting or appliance.
FOR MODELS WITHOUT A WATER SOFTENER
An “approved” single check valve or some other no less effective device providing
backflow prevention protection to at least fluid category two shall be fitted at the
point of connection between the water supply and the fitting or appliance.
The drain connection must be made in accordance with the relevant national
regulations. Substandard connections may cause flowback and in some cases
pollution.
No extensions must be added to the drain hose supplied with the appliance. Any
extensions might cause drainage problems.

16
5.4 Connection to the electricity supply
The dishwasher must be connected to the electrical system by authorised, skilled staff, in
accordance with the relevant regulations. Also comply with the technical instructions for the
connection provided with the appliance. The dishwasher's rated electrical characteristics are
provided on its technical data plate. A circuit breaker with contactgap rated for category II
overvoltage and an overcurrent protection device (magnetothermal switch or fuses) must be
installed in an easily accessible position on the dishwasher's power supply line. These devices must
only serve the dishwasher and must besuitable for its rated electrical characteristics. The
electrical protection devices must undergo afunctional test before the dishwasher is put into
operation. If the dishwasher is connected to the electrical mains by means of a plug, it must be of
the same type as the power socket, suitable for the appliance's rated electrical characteristics and
compliant with the relevant national regulations. The power plug must be easily accessible after
the appliance has been installed.
Only for configurations indicated with NC on the data
plate (example at side), the chamber and boiler
heating elements never operate at the same time.
Electrical safety is only ensured if the dishwasher is connected to an earth conductor
compliant with the relevant electrical regulations. If in doubt, have the system
inspected by a qualified electrician.
Donot connect the dishwasher tothe electrical mains by means of adapters or
extensions, since they may cause dangerous overheating.
Connect the appliance to the earth system. The earth connection terminal is low
down on the back of the appliance and is marked with the symbol.
Additional recommendation: class B all-current sensitive residual-current circuit
breaker with a tripping current of 30 mA.
The dishwasher is always poweredup unless the master switch is turnedoff or, on
appliances with power plug, the plug is disconnected.

17
6FIRST START-UP
6.1 First start-up
The electrical protection system must undergo a functional test before the appliance is put into
operation.
The appliance must be installed and/orinspected by qualified staff, who will start it up for the first
time and provide the relevant operating instructions.
6.2 Preparing for use ( Important )
The rinse aid dispenser is fitted on all models, the detergent dispenser only on some.
If both dispensers are present put the external detergent and rinse aid containers in place and
insert the respective intake hoses on the rear of the appliance into them. Red hose: detergent,
blue hose: rinse aid.
Before inserting the hoses into the containers, fit the weights (needed to
ensure that they always draw in liquid from the bottoms of the containers)
and thefilters onto their ends as shown. If the detergent dispenser is not
factory-fitted, it can be retrofitted after ordering the relative kit.
6.3 Using the water softener (on models with this feature only)
The quantity of lime in the water (which indicates its hardness) causes
whitish marks on dry dishes and dishes also tend tolose their shine over
time. The dishwasher is equipped with an automatic water softener which
removes the substances that cause hardness from the water with the aid of
regenerating salt.
The first time the dishwasher is used, a litre of water must bepoured into the
tank with the salt. Whenever the tank is filled, always take care to ensure that
the cap is firmly closed. The mixture of water and detergent must not get into
the salt tank, as this would impair operation of the regeneration system. In
this case warranty cover will be forfeited.
IMPORTANT:
Wheneverthe typeofdetergentorrinseaidis changed,itis ABSOLUTELYESSENTIALtoflushout
the peristaltic pumps by placing the external intake pipes in water for a few cycles. Always use
only products specifically recommended for use in a professional dishwasher. Failure to comply
with this recommendation leads to forfeiture of the warranty entitlement on the appliance’s
watersystem.Replacementoftheinternal tube ofthedetergent andrinse aidperistalticpumps
is recommended every 12 months or 15.000 wash cycles, by the After-Sales Service.

18
7CONTROL PANEL
On-off button
Program selection button
Start CONFIRM/PAUSE button
Total emptying button (tank and boiler)
Additional function selection button
L1 Mains power on light
L2 Light indicating dishwasher in operation, cycle running, FILL running…. (blue), ready
(green), malfunction (red)
L3 Pump-out in progress light
No rinse-aid symbol (if a system for monitoring outside the dishwasher is provided)
Tank heating element on symbol
No salt symbol (if softener is fitted)
Boiler element on symbol
No detergent symbol (if a system for monitoring outside the dishwasher is provided)
Light L2
Green light: dishwasher ready
Blue light: dishwasher in operation (washing in progress, FILL in progress ....)
Red light: indicates a malfunction
The instructions apply to "undercounter" and hood-type dishwashers, so some sections of the
manual may describe procedures referring to one or the other type, depending on the model
purchased (e.g. open the door/lift the hood....).

19
When the display control panel is switched on, the
display shows the type of dishwasher (PRF 400,
PRF 500, CAPOTE…….), followed by the firmware
version and update installed.
If the dishwasher is already powered up, press the
on/off button for direct display of the firmware
version and update installed.
7.1 SET-UP (Authorised staff only)
Dishwasher parameter modification procedure
With the tank empty
1- Switch the appliance on; the display will show
“FILL” and filling will start.
2- Open the door/lift the hood (depending on the
model); "CLOSE" will appear on the display
3- Press the button and hold it down for 5/7
seconds. When -------- appears on the display, release
the button and press it again to access the main PCB
setup menu.
With the tank full/the hood open
1 - Press the button and hold it down for 5/7
seconds. When -------- appears on the display, release
the button and press it again to access the main
PCB setup menu.
All the modifiable parameters can now be displayed, scrolling through them with the button.
Press the button to select the value required for each parameter.
To confirm the value required simply quit the menu or move on to the next parameter by pressing
.
Quitting the setup menu automatically: wait about 3 minutes without using the controls.
Quitting the setup menu in manual mode: hold the ON/OFF button until the beep sounds; the
dishwasher switches off.
Set-up
During first start-up, the functions/parameters listed below must be set or adjusted:

20
7.2 Modifiable parameters
The illustrations are purely guideline. The minimum and maximum temperatures
available depend on the model (glass washer, dishwasher, undercounter or hood-
type model, ..).
Rinsing temperature
(boiler temperature)
Washing temperature
(tank temperature)
Warning: The tank and boiler temperatures shown on the display may be different from the
actual temperatures by a few degrees, especially in transient phases (just after theFILL is
completed, just after the end of the cycle, etc.) due to the inertia of the measurement probe.
Adjusting rinse aid dispensing (optional if installed)
Every time is pressed,
the value increases of 0,1
g/l up to a max. of 2 g/l.
Default: 1,2 g/l.
NOTE: Do not exceed the amount indicated by the manufacturer, as shown on the package.
An excessive amount may cause foaming.
Adjusting detergent dispensing (optional if installed)
Every time is pressed,
the value increases of 0,2
g/l up to a max. of 20 g/l.
Default: 2,6 g/l.
NOTE: Do not exceed the amount indicated by the manufacturer, as shown on the package.
An excessive amount may cause foaming.
Autostart function
Set at “on” to start the cycle when the hood/door is
closed.
Set at “off” to start the cycle after confirmation with
the start button .
Table of contents
Other Smeg Dishwasher manuals