Smeg UG405DSUK User manual

PROFESSIONAL DISHWASHER


1
Summary
1 PRECAUTIONS FOR SAFETY AND USE .......................................................................................................................2
1.1 Trademark ........................................................................................................................................................2
1.2 Name and address of manufacturer or d str butor ..........................................................................................2
1.3 Declarat on of conform ty to product standards ..............................................................................................2
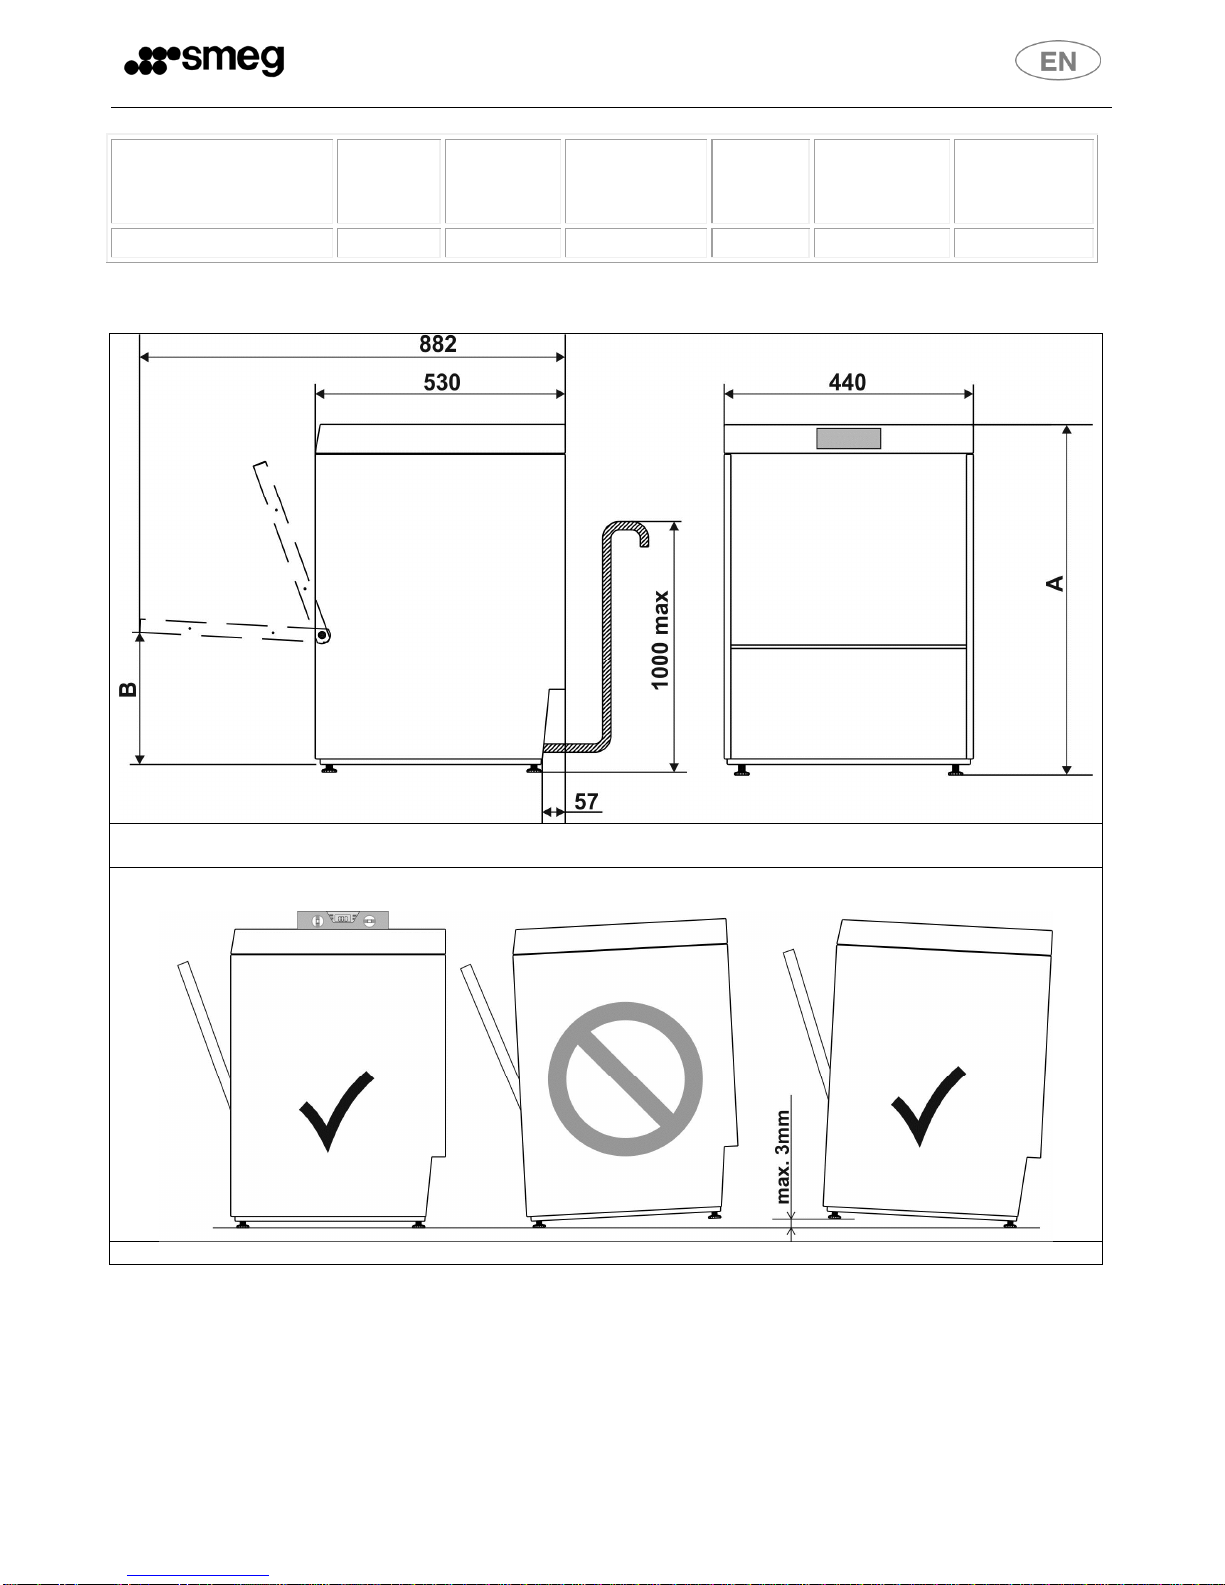
2 TECHNICAL DATA ......................................................................................................................................................3
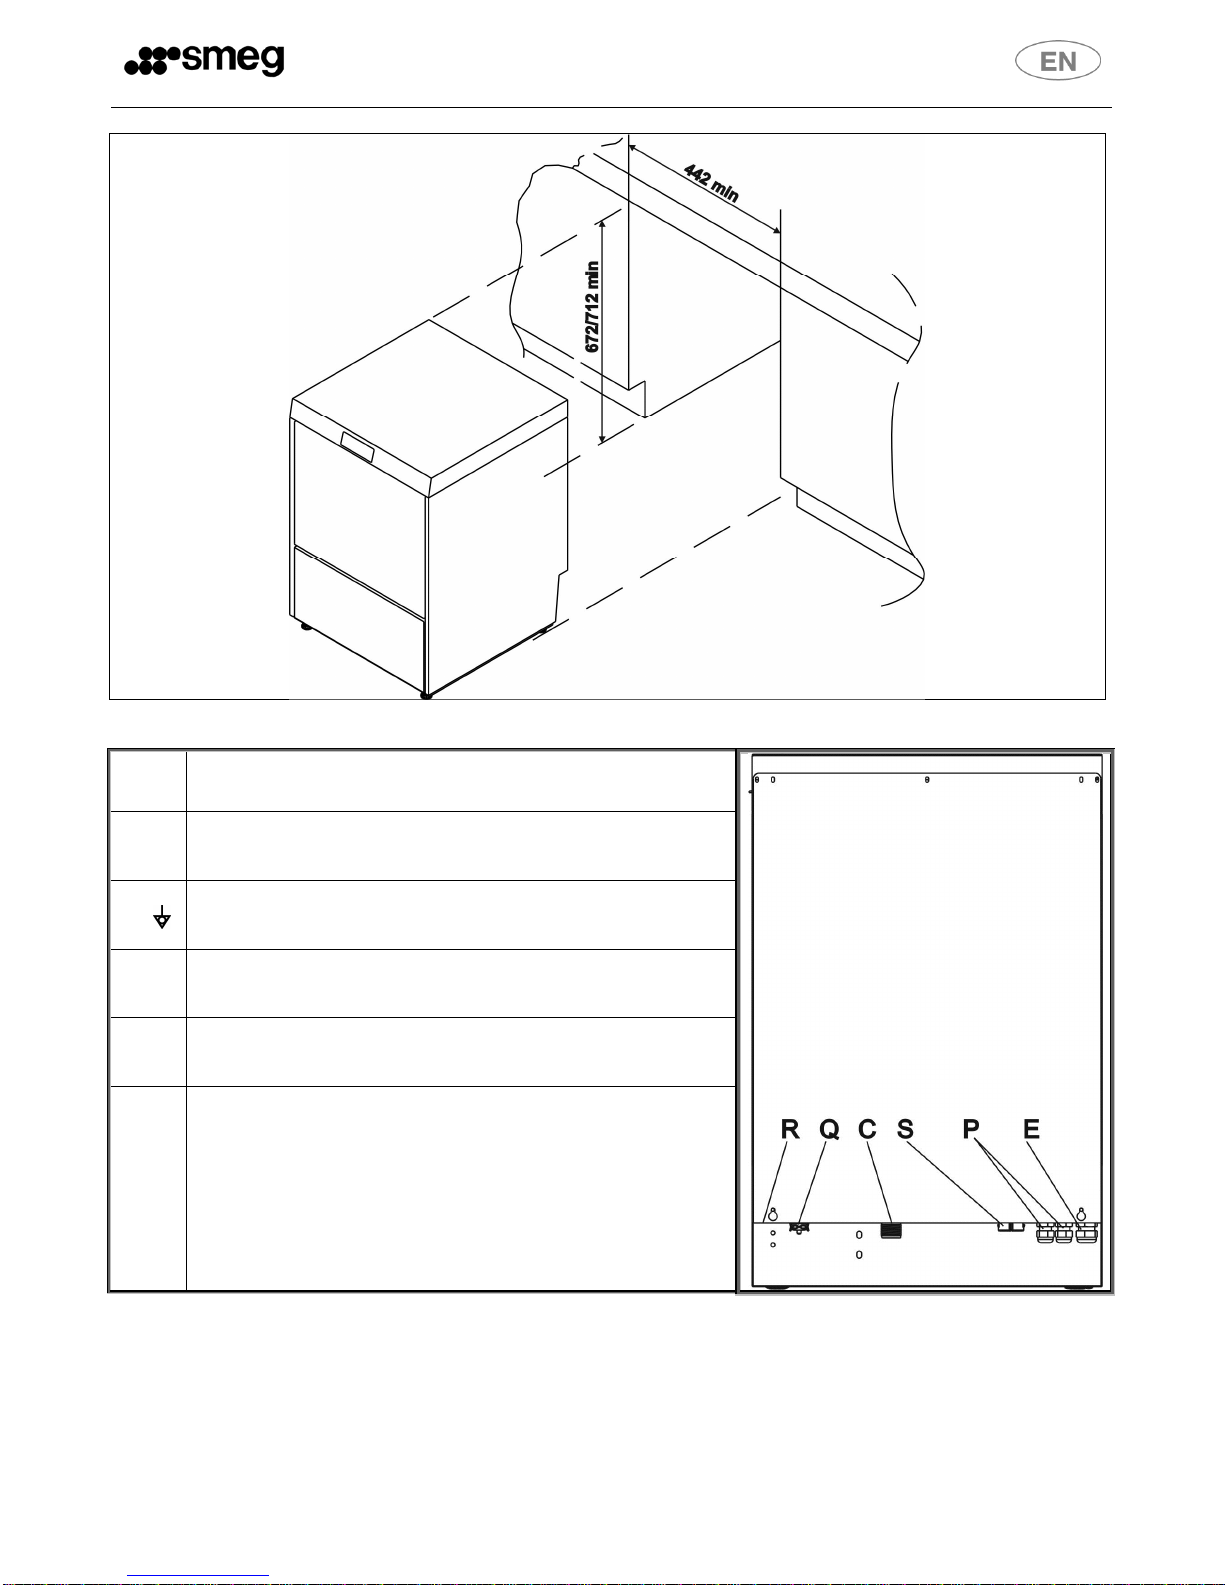
3 INSTALLATION AND POSITIONING ............................................................................................................................6
4 INSTRUCTIONS FOR TECHNICAL STAFF .....................................................................................................................6
4.1 Plumb ng hookup ..............................................................................................................................................6
4.2 Electr cal connect on ........................................................................................................................................7
5 FIRST START-UP ........................................................................................................................................................7
5.1 Us ng the water softener (on models w th th s feature only) ..........................................................................8
6 SET-UP (Author sed techn cal staff only) ..................................................................................................................9
6.1 Contents of d splay ........................................................................................................................................ 10
6.2 Note on d splay of temperatures .................................................................................................................. 10
6.3 Parameter programm ng procedure (setup) ................................................................................................. 10
6.4 Mod f able parameters .................................................................................................................................. 11
6.5 Adjust ng detergent and r nse a d d spens ng (only ava lable on certa n models) ........................................ 11
6.5.1 R nse a d – Grams/l ter dosage (depends on model)- The d splay reads “ri” ....................................... 11
6.5.2 Detergent - Grams/l ter dosage (depends on model) - The d splay reads “dE” .................................... 11
6.6 Start ng the per stalt c pumps n manual mode – rap d f ll ng of detergent and r nse a d c rcu t ................ 12
6.7 Adjust ng the regenerat on frequency (models w th softener only) ............................................................. 12
6.8 Ma ns water hardness sett ng table .............................................................................................................. 12
6.9 Extra r nse opt on (long r nse). - D splay reads “E.r” ..................................................................................... 12
6.10 "Clean water cycle" opt on - D splay reads “CL” ........................................................................................... 13
6.11 “Thermostop” opt on - D splay reads “tS” .................................................................................................... 13
6.12 Fast/eco start ng opt on - D splay reads “F”................................................................................................. 13
7 MALFUNCTIONS SHOWN ON THE DISPLAY (FOR THE TECHNICIAN) ..................................................................... 13
8 INSTRUCTIONS FOR THE USER ............................................................................................................................... 15
8.1 Control panel ................................................................................................................................................. 15
8.2 Before wash ng .............................................................................................................................................. 16
8.3 F rst use each day (tank and bo ler empty) ................................................................................................... 17
8.4 Choos ng the program ................................................................................................................................... 18
8.5 Chang ng the program ................................................................................................................................... 18
9 MAINTENANCE AND CLEANING............................................................................................................................. 20

2
9.1 Da ly clean ng of f lters .................................................................................................................................. 21
9.2 Rout ne nspect on of the spray arms (once a week) .................................................................................... 22
9.3 Lengthy per ods out of use ............................................................................................................................ 23
10 TROUBLESHOOTING .......................................................................................................................................... 23
11 MALFUNCTIONS SHOWN ON THE DISPLAY (FOR THE USER) ............................................................................ 25
SMEG Thanks you for choos ng one of ts products.
Read all the nstruct ons n th s manual carefully to become fam l ar w th the r ght cond t ons for the proper use
of your d shwasher.
TECHNICAL INSTRUCTIONS
These are ntended for the qual f ed staff who are to nstall, comm ss on and test the appl ance and carry out
any serv c ng and repa rs.
INSTRUCTIONS FOR THE USER
These prov de recommendat ons for use, a descr pt on of the controls and the correct procedures for clean ng
and ma nta n ng the d shwasher.
1PRECAUTIONS FOR SAFETY AND USE
1.1 Trademark
SMEG
1.2 Name and addre of manufacturer or di tributor
Smeg S.p.A.
V a Leonardo da V nc , 4 - 42016 Guastalla (RE) Tel. +39 0522 8211 - Fax + 39 0522 821453
nternet: www.smegfoodserv ce.com, ema l : fooddserv ce@smeg. t
Info :
INFORMATION AND SERVICE FOR SMEG PROFESSIONAL DISHWASHERS
Our Sales Department staff w ll be able to prov de you w th nformat on about pr ces and spec al offers.
Our After-Sales Department w ll be able to prov de you w th gu dance about keep ng your appl ance funct on ng correctly and
put you n touch w th your nearest author sed Serv ce Centre. Our ent re product offer ng can be v ewed at:
1.3 Declaration of conformity to product tandard
THIS APPLIANCE IS TAGGED UNDER EUROPEAN DIRECTIVE 2002/96/EC ON WASTE ELECTRICAL AND ELECTRONIC EQUIPMENT
(WEEE). BY MAKING SURE THAT THIS PRODUCT IS DISPOSED OF CORRECTLY THE USER HELPS TO PREVENT POTENTIAL
DETRIMENTAL EFFECTS ON HEALTH AND THE ENVIRONMENT. WHEN DECOMMISSIONING THE APPLIANCE COMPLY WITH THE
LOCAL WASTE DISPOSAL REGULATIONS. FOR FURTHER INFORMATION ON THE TREATMENT, RECOVERY AND RECYCLING OF THIS
PRODUCT, CONTACT THE COMPETENT LOCAL OFFICE, THE DOMESTIC WASTE COLLECTION SERVICE, OR THE SHOP WHERE THE
PRODUCT WAS PURCHASED. THE APPLIANCE MUST BE GROUNDED AS REQUIRED BY ELECTRICAL EQUIPMENT SAFETY
STANDARDS. THE DISHWASHER IS INTENDED FOR PROFESSIONAL USE ONLY AND MUST ONLY BE USED BY AUTHORISED STAFF.
IT IS DESIGNED TO WASH TABLEWARE (PLATES, CUPS, BOWLS, OVEN DISHES AND CUTLERY) AND SIMILAR ITEMS IN THE
RESTAURANT AND INSTITUTIONAL CATERING SECTOR, AND COMPLIES WITH THE INTERNATIONAL STANDARDS ON ELECTRICAL
AND MECHANICAL SAFETY (CEI-EN-IEC 60335-2-58/61770) AND ELECTROMAGNETIC COMPATIBILITY (CEI-IEC-EN 55014-1/-2,
61000-3;4, 50366). THE MANUFACTURER DECLINES ALL RESPONSIBILITY FOR INJURY OR DAMAGE CAUSED BY FAILURE TO
COMPLY WITH THE ABOVE REGULATIONS OR DERIVING FROM INCORRECT USE, TAMPERING WITH EVEN JUST ONE PART OF THE
APPLIANCE AND THE USE OF NON-ORIGINAL SPARE PARTS.

3
THIS MANUAL IS AN INTEGRAL PART OF THE DISHWASHER AND MUST ALWAYS BE KEPT INTACT TOGETHER
WITH THE APPLIANCE.
POSITIONING, HOOKUP, COMMISSIONING, TROUBLESHOOTING AND REPLACING THE POWER CABLE MUST BE
CARRIED OUT BY QUALIFIED STAFF.
THE APPLIANCE MUST BE GROUNDED AS REQUIRED BY ELECTRICAL EQUIPMENT SAFETY STANDARDS.
THE SYMBOL OF THE RUBBISH BIN WITH A BAR ACROSS IT ON THE PRODUCT OR IN THE TECHNICAL
DOCUMENTATION INDICATES THAT THIS PRODUCT MUST NOT BE TREATED AS ORDINARY DOMESTIC WASTE
BUT MUST BE CONSIGNED TO THE SPECIAL COLLECTION POINT FOR THE RECYCLING OF ELECTRICAL AND
ELECTRONIC EQUIPMENT.
NEVER PLACE SOLVENTS SUCH AS ALCOHOL OR TURPENTINE, WHICH MIGHT CAUSE AN EXPLOSION, INSIDE
THE APPLIANCE. NEVER LOAD DISHES DIRTY WITH ASH, WAX OR PAINTS.
NEVER USE THE DISHWASHER OR ANY PART OF IT AS A LADDER, SUPPORT OR STAND FOR PEOPLE,
ANIMALS OR ANY OBJECT. LEANING OR SITTING ON THE OPEN DOOR OF THE DISHWASHER MIGHT
CAUSE IT TO TIP OVER, PUTTING PEOPLE IN DANGER. NEVER LEAVE THE DISHWASHER DOOR OPEN
SINCE PEOPLE MIGHT TRIP OVER IT.
DO NOT DRINK ANY WATER LEFT IN THE DISHES OR DISHWASHER AT THE END OF THE WASHING PROGRAM.
THE APPLIANCE IS NOT SUITABLE FOR USE BY JUVENILES OR PERSONS WITH REDUCED PHYSICAL,
SENSORIAL OR MENTAL CAPACITIES, OR THOSE WITHOUT THE NECESSARY KNOWLEDGE AND EXPERIENCE.
SUCH PERSONS MAY ONLY USE THE APPLIANCE UNDER THE SUPERVISION OF A PERSON RESPONSIBLE FOR
THEIR SAFETY.
2TECHNICAL DATA
Water ntake pressure
kPa (bar)
250-600 (2,5 ÷ 6)
Water ntake pressure (w th r nse pump)
kPa (bar)
100-600 (1 ÷ 6)
Water ntake temperature
°C
15°C – 60°C
Intake water hardness (models w th softener <60°f)
°f
<15°f
R nse cycle water consumpt on
l
2.3
Bo ler capac ty
l
4
Tank capac ty
l
8
Durat on standard cycles w th water at 50°C
s
120/150/180
No se level
dB(A)
< 60
Degree of protect on
IPX
4
Net we ght
Kg
32/36
Power supply cable type
◄HAR►
H07RN-F

4
VOLTAGE FUSE
TANK
HEATING
ELEMENT
MOTOR BOILER
TOTAL
POWER
RATING
POWER
CABLE
230V-50Hz /1/N/PE 13A 2,0kW 0,3kW 2,3kW 2,6kW 3X2,5
Measure
“A”: min 670 / 710
Measure “B”: 209 / 249

5
R REAR INFERIOR PANEL
C CHARGING HOSE
Q EARTH TERMINAL
E POWER SUPPLY CABLE
P PERISTALTIC PUMP TUBES
S WASTE PIPES

6
3INSTALLATION AND POSITIONING
INSTALLATION and POSITIONING
Br ng the d shwasher to the nstallat on s te, remove the packag ng and check the appl ance and components for damage; any
damage found must be reported to the transporter n wr t ng. The packag ng components (plast c bags, expanded polystyrene,
na ls, etc.) must not be left w th n reach of ch ldren and pets s nce they are potent ally dangerous. All packag ng mater als used
are env ronment-fr endly. They can be kept w thout const tut ng any hazard, or may be d sposed of at a spec al st waste d sposal
centre. The plast c components su table for recycl ng are marked as follows: PE polyethylene: external packag ng f lm, bag
conta n ng the nstruct ons, protect ve bags. PP polypropylene: straps. PS expanded polystyrene: corner guards, top of
packag ng. Wooden and cardboard components can be d sposed of n accordance w th the relevant regulat ons.
When the product s decomm ss oned t must not be dumped n the env ronment; t must be d sposed of n accordance w th the
relevant regulat ons. All metal parts are n sta nless steel and can be removed. The plast c parts are marked w th the symbol
dent fy ng the mater al used.
Po itioning
Warning: the ndoor system and prem ses n wh ch equ pment for nst tut ons s nstalled must comply w th
the relevant regulat ons.
The manufacturer decl nes all l ab l ty for d rect or nd rect njury or damage der v ng from fa lure to comply w th these
regulat ons. Before nstallat on, check that there are no objects or mater als near the mach ne wh ch may be damaged by steam
or splashes of wash ng solut on, or that such tems are su tably protected. Place the d shwasher n the chosen po nt and remove
the protect ve f lm. Level the d shwasher (w th the a d of a sp r t level) on ts adjustable feet to ensure that t s stable; all other
mount ng solut ons must be approved by the manufacturer.
4INSTRUCTIONS FOR TECHNICAL STAFF
4.1 Plumbing hookup
PLUMBING HOOKUP
The water p pel nes and electr c ty supply cable lead out of the bottom r ght-hand corner of the appl ance.
Connect the water ntake hose to a connector w th ¾” ga threaded f tt ng, f tt ng the f lter A prov ded ( n
models w th Acquastop, the f lter and r ng-nut form a s ngle un t). The connect on to the water ma ns must
only be made w th new hoses; the use of old or worn hoses s not perm tted.
The dynam c water upply pre ure must be between 1 and 6 bar (accord ng models); f t s h gher, nstallat on of a pressure
reducer s necessary. If the pressure s le than 2.5 bar (models w thout r nse pump) t m ght be necessary to f t a spec al pump
on the appl ance to ensure opt mal performance. Contact the After-Sale Service. It s essent al to f t a ma n stop tap on the
water ntake del ver p pel ne; the tap must be access ble after nstallat on of the appl ance, so do not nstall t beh nd the
d shwasher. The stated cycle durat on appl es to appl ances suppl ed w th hot water >50°C<60°C. If the d shwasher s suppl ed
w th cold water, the cycle durat on m ght ncrease depend ng on the ntake water temperature. Drainage: The d shwasher i
fitted with a drain pump and can operate w th dra n connect ons on the floor or wall. Refer to the connect on d agram for the
max mum perm tted he ght of wall dra ns – (see TECHNICAL DATA)
Warning: make sure that the ntake and dra n hoses are not bent, constr cted or crushed after nstallat on.

7
When nstall ng the dra n hose to a s phon w th valve, the max mum he ght of the dra n outlet s reduced to 600 mm.
4.2 Electrical connection
The di hwa her and any add t onal equ pment mu t be connected to the electrical y tem by author sed,
sk lled staff, n accordance w th the relevant regulat ons; also comply w th the techn cal nstruct ons for the
connect on. The total rated power s stated on the appl ance’s techn cal data plate. The electr cal protect on
dev ces f tted for the d shwasher must serve th s appl ance only. The user must have a ma ter witch and a
differential afety breaker, with rating uitable for the appliance’ characteri tic , nstalled on the electricity
upply line n accordance w th the relevant regulat ons. These sw tches must be nstalled close to the
d shwasher, be eas ly access ble after nstallat on, and prov de complete d sconnect on from the electr cal
ma ns n overvoltage class III cond t ons.
Warning!
The d shwasher s always powered up unless the master sw tch s turned off.
Connect the appl ance to the user’s earth system. The term nal for the connect on s n the bottom r ght-
hand corner of the appl ance. The earth w re (PE) s yellow-green n colour, the neutral w re (N) s blue and the
l ve w res (L1, L2, L3) are black, grey and brown. In the event of s ngle-phase connect on (230V-1N~), the
connect on to the electr cal ma ns mu t be made us ng a cable w th plug compliant with the relevant
regulation .
Accord ng to the target market, the d shwasher can be equ pped w th a cable fitted with plug.
THE POWER SUPPLY CABLE, IF FITTED, MUST BE REPLACED BY THE MANUFACTURER OR AN AUTHORISED
SERVICE CENTRE IN ACCORDANCE WITH THE TECHNICAL DATA SPECIFIED ON THE WIRING DIAGRAM
SUPPLIED WITH THE APPLIANCE, TO PREVENT ALL RISKS.
5FIRST START-UP
Fir t tart-up
The electr cal protect on system must undergo a funct onal test before the appl ance s put nto operat on.
The appl ance must be nstalled and/or nspected by qual f ed staff, who w ll start t up for the f rst t me and prov de the
relevant operat ng nstruct ons.
Preparing for u e (important)
The r nse a d d spenser s f tted on all models, the detergent d spenser only on some.
If both di pen er are present put the external detergent and r nse a d conta ners n place and nsert the respect ve ntake
hoses on the rear of the appl ance nto them. Red hose: detergent, blue hose: r nse a d
Before nsert ng the hoses nto the conta ners, f t the we ghts (needed to ensure that they always draw n
l qu d from the bottoms of the conta ners) and the f lters onto the r ends as shown. If the detergent d spenser
s not factory-f tted, t can be retrof tted after order ng the relat ve k t.

8
IMPORTANT
Whenever the type of detergent or r nse a d s changed, t s ABSOLUTELY ESSENTIAL to flush out the per stalt c pumps by
plac ng the external ntake p pes n water for a few cycles. Always use only products spec f cally recommended for use n a
profess onal d shwasher. Fa lure to comply w th th s recommendat on leads to forfeiture of the warranty ent tlement on the
appl ance’s water system. Replacement of the internal tube of the detergent and r nse a d per stalt c pumps s recommended
every 12 month or 15.000 wa h cycle , by the After-Sales Serv ce.
5.1 U ing the water oftener (on model with thi feature only)
The quant ty of l me n the water (wh ch nd cates ts hardness) causes wh t sh marks on dry d shes and d shes
also tend to lose the r sh ne over t me. The d shwasher s equ pped w th an automat c water softener wh ch
removes the substances that cause hardness from the water w th the a d of regenerat ng salt.
The f rst t me the d shwasher s used, a l tre of water must be poured nto the tank w th the salt. Whenever the
tank s f lled, always take care to ensure that the cap s f rmly closed. The m xture of water and detergent must
not get nto the salt tank, as th s would mpa r operat on of the regenerat on system. In th s case warranty
cover w ll be forfe ted.

9
6SET-UP (Authori ed technical taff only)
Set-up
Dur ng f rst start-up, the funct ons/parameters l sted below must be set or adjusted.
Control Panel
Key to Symbol
On/off button
Total pump-out (tank -bo ler) button
Regenerat ng salt symbol (only f softener s f tted)
Short programme button
Med um programme button
Long programme button
L1
Short programme Led
L2
Med um programme Led
L3
Long programme Led
L4
Dra nage Led
L5
Appl ance on Led
L6
No salt Led (only f softener s f tted)
Key to me age on di play
CLOSE Close the door
FILL Mach ne prepar ng for cycle
End End of operat on requested
PrF
400/500/CAP
Mach ne model
(v ewed when the mach ne s started w th master sw tch)
F x xx r xxx Vers on/rev s on of the nstalled f rmware.
(v ewed when the mach ne s started w th master sw tch, after the model code)
UnLoad Pump-out
OFF Energ zed mach ne OFF

10
U ing the button
Button Short pre Pre ed for 2” Pre ed for 5” Long pre , relea e, pre again
D splay temperatures
Bo ler and tank On/OF
Door open and mach ne OFF.
Long press >>> d splay reads
“- -“ >>> release and press
aga n: Access Setup Menu (1)
Scroll through Setup
opt ons (2) Start Pump-out Total pump-out (tank+bo ler)
Set Short Programme Start Short Programme
Set Med um Programme Start Med um Programme
Set Long Programme Start Long Programme
Set P0 (Empty tank) Start P0
Door clo ed
Per stalt c pumps n Manual
mode to pr me p pes
Reset to DEFAULT
parameters (1)
Techn c an user only
1) Restores the default parameters, for new sett ngs see po nt (6.3)
A ser es of operat ons can be carr ed out when the d shwasher s f rst nstalled to custom se t to the user's requ rements.
6.1 Content of di play
The d splay prov des the follow ng nformat on:
• Mach ne off but energ zed: OFF
• Mach ne on and ready for use: End/P1-P2-OP3
• Wash phase: ||||||||||
• Programm ng phase: See parameter programm ng sect on
• Error message: See error messages sect on
6.2 Note on di play of temperature
Temperatures shown on the d splay m ght not nd cate the actual temperature n the tank and/or bo ler dur ng heat ng -
wa t about 1’ after the heat ng elements sw tch off to see the real temperature.
6.3 Parameter programming procedure ( etup)
To mod fy the parameters, proceed as follows start ng w th the appl ance n “OF” status w th the door open.
1) Sw tch the appl ance us ng the On/OF button
2) Press and hold the button unt l the d splay shows “- -“ , release and press aga n.
3) Press the pump-out button to scroll through the parameters for mod f cat on
4) Mod fy the parameter by press ng button P1
5) Dur ng setup operat ons, the descr pt on and value of the parameter alternate on the d splay.
6) Select the other parameters for mod f cat on n the same way and proceed as descr bed above
7) To ex t the setup menu press and hold unt l the d splay shows “OFF”, press P2 or P3 or wa t at least 3
m nutes w thout press ng any key; n th s way the mach ne automat cally ex ts the setup menu.

11
6.4 Modifiable parameter
Th s table l sts the model cho ce or programme and temperature opt on parameters.
Di play Setting available De cription
°b From 85° to 71° Bo ler temperature
°t From 62° to 52° Tank temperature
r 0 – 2 gr/lt ( n steps of 0,1) R nse a d batch ng
dE 0-10 gr/lt
(0-3 n steps of 0,2; 3-10 n steps of 1,0)
Detergent batch ng
St On - OF Auto-start:
wash ng programme starts when door s closed On enabled OF d sabled
HA H0 – H6 Water hardness sett ng (see table 6.8 n the follow ng pages)
Er On-OF Prolonged r nse at the end of the wash ng cycle (+8”).
CL On-OF Clean water cycle. On enabled OF d sabled
TS On - OF Thermostop On enabled OF d sabled
F
FS-EC Start ng the mach ne n FAST or ECO mode
(models w thout r ns ng pump only)
Sr - Access Serv ce menu (for Author sed Eng neer only)
6.5 Adju ting detergent and rin e aid di pen ing
(only available on certain model )
6.5.1 Rin e aid – Gram /liter do age (depend on model)- The di play read “
ri
riri
ri
”
Every t me s pressed, the
value ncreases of 0,1 g/l up to a
max. of 2 g/l.
Default: 1,2 g/l.
6.5.2 Detergent - Gram /liter do age (depend on model) - The di play read “
dE
dEdE
dE
”
Factory-set default value = 2 gr/lt.
From 0,0 g/l to 3,0 g/l every t me
s pressed, the value
ncreases of 0,2 g/l.
Beyond 3,0 g/l every t me s
pressed, the value ncreases 1,0
g/l up to 10,0 g/l (max mum
value).

12
6.6
Starting the peri taltic pump in manual mode – rapid filling of detergent and rin e aid circuit
Energ zed d shwasher and full tank: press for 5 seconds buttons P2 +P3 s multaneously.
The per stalt c pumps work unt l P1 or P2 are pressed aga n; dur ng the procedure the nd cator l ghts stay on and
the d splay shows “rd”. The r nse a d c rcu t s f lled n 7 m nutes, the detergent c rcu t s f lled n 2 m nutes.
S nce the pumps work at the same t me, only the r nse a d (blue tube n the r nse a d jerrycan) must be w thdrawn
for 5 m nutes, then the detergent (red tube n the detergent jerrycan) s w thdrawn too for the last two m nutes.
6.7
Adju ting the regeneration frequency (model with oftener only)
See appl ance setup menu (po nt 6.4)
W th values over 60°dF /33°dH an external water treatment dev ce must be used and the regenerat on
frequency must be set at H0
6.8
Main water hardne etting table
After a number of wash ng cycles correspond ng to the set water hardness has been started, the d shwasher starts
automat cally the res n regenerat on cycle, that lasts about 90 seconds. Dur ng th s phase the mach ne load or unloads
automat cally, even though t sn’t perform ng a wash ng cycle.
Hardne
(°dH German degree )
Hardne
(°dF French degree )
Setting
level
Re in regeneration interval:
approximate number
of wa h cycle
Regenerat on off HA: 00 -----
8.5 15 HA: 152
11 20 HA: 02 128
17 30 HA_ 03 default 74
22.5 40 HA: 04 37
28 50 HA: 05 27
33.5 60 HA: 06 11
6.9
Extra rin e option (long rin e). - Di play read “
E
EE
E.
..
.r
rr
r
”
R nse s 8” longer than the standard n every wash ng cycle.
Press to enable (On)/d sable (OF)

13
6.10
"Clean water cycle" option - Di play read “CL
CLCL
CL”
W th th s opt on clean water s used for every wash ng. At each cycle,
the wash ng water s completely dra ned and t s replaced w th clean
water from r ns ng.
Press to enable (On)/d sable (OF)
6.11
“Thermo top” option - Di play read “tS
tStS
tS”
“on” = the minimum temperature of rin e as set, ndependently from
the ntake water temperature, the nom nal durat on of cycle may be
extended by a few seconds.
“off” = the minimum temperature of rin e may be a few degrees lower
than the set one, f hot ntake water s not used.
Press to enable (On)/d sable (OF)
6.12
Fa t/eco tarting option - Di play read “F
FF
Fi”
Fa t (FS): t allows to start the mach ne n less t me than the standard;
t nvolves a greater water consumpt on at the f rst start.
Eco tarting (EC): the mach ne starts n standard t me, w thout any
add t onal water consumpt on.
Press to enable (On)/d sable (OF)
7MALFUNCTIONS SHOWN ON THE DISPLAY (FOR THE TECHNICIAN)
The d shwasher s able to dent fy a number of malfunct ons and show them on the d splay. If the problem pers sts after the
d shwasher has been sw tched off and back on, proceed as descr bed below:
Er 04 Tank temperature probe
malfunct on
Tank temperature probe d sconnected or not work ng.
Er 05
Tank water f ll ng malfunct on - The tank wasn’t f lled n the expected t me: check the water supply tap, the
dynam c supply pressure, cleanl ness of the nlet water f lter, cleanl ness of the
r nse nozzles, any damage of the water charg ng hose. If the problem st ll
occurs dur ng the “FILL”:
- Work level tank pressure sw tch damaged ( t always detects “empty”: check f
the tank safety pressure sw tch starts operat ng).
- Leakage from the tube connected to the a r trap; f the problem s not solved,
t occurs dur ng the work program.
- vent valve of the dra n p pe obstructed w th d rt: w th s phonage, the tank
gets completely empty at the end of a wash ng program.
Er 06
Water pump-out malfunct on
Check:
- f lter cleanl ness; obstruct ons, bend ng and narrow ng of the dra n p pe.
- poss ble obstruct ons of the dra n pump (blocked w th a fore gn body).
In case the problem s not solved, please contact the After-Sales Serv ce.
Er 23
Bo ler does not heat up as expected. The problem m ght occur because water s cont nually enter ng the tank (the
causes are as for “Er 05” – see above) If the bo ler heat ng element s
damaged, th s m ght be due to operat on w th no water n the bo ler - the

14
pressure sw tch s nd cat ng full even w th the bo ler empty: - damaged bo ler
heat ng element – conta ctor fa lure - open on bo ler safety thermostat s de. -
bo ler temperature probe faulty or ncorrectly pos t oned - motherboard relay
fa lure, Important: If the bo ler heat ng element s damaged, th s m ght be due
to operat on w th no water n the bo ler, pressure sw tch cont nues to g ve full
read ng even w th bo ler empty: check bo ler a r trap and/or relat ve pressure
sw tch and replace f necessary.
Er 24 Bo ler temperature probe
malfunct on
Bo ler temperature probe d sconnected or not work ng
Er 25
Bo ler water f ll ng malfunct on The bo ler wasn’t f lled n the expected t me: check the water supply tap, the
dynam c supply pressure, cleanl ness of the nlet water f lter, any damage of
the water charg ng hose, or check the follow ng n th s order:
- faulty bo ler pressure sw tch ( t always detects “empty”),
- leakage or unb nd ng of the tube (water runs ns de the tube)
- menu serv ce wron sett ng “rP”
Er 26
Bo ler empty ng malfunct on - check cleanl ness of the r nse nozzles
- faulty bo ler pressure sw tch ( t always detects “full”)
- leakage or unb nd ng of the tube (water runs ns de the tube)
- r ns ng pump malfunct on ( f present)
Er 27
Bo ler empty ng malfunct on – w th
tank full
Or bo ler full s gnal on models
w thout r ns ng pump
Faulty bo ler pressure sw tch ( t always detects “full”). If th s occurs n models
w thout r ns ng pump, the bo ler pressure sw tch s wrongly detected: check
sett ngs n the serv ce menu on entry “rP”
“rp” = on for models w th r ns ng pump
“rp” = of for models w thout r ns ng pump

15
8INSTRUCTIONS FOR THE USER
8.1 Control panel
Key to Symbol
On/off button
Total pump-out (tank -bo ler) button
Regenerat ng salt symbol (only f softener s f tted)
Short programme button
Med um programme button
Long programme button
L1
Short programme Led
L2
Med um programme Led
L3
Long programme Led
L4
Dra nage Led
L5
Appl ance on Led
L6
No salt Led (only f softener s f tted)
Key to me age on di play
CLOSE Close the door
FILL Mach ne prepar ng for cycle
End End of operat on requested
PrF
400/500/CAP Appl ance model (d splayed when the appl ance s sw tched on w th the master sw tch).
UnLoad Pump-out
OFF Energ zed mach ne OFF

16
U ing the button
Button Short pre Pre ed for 2” Pre ed for 5”
D splay of temperatures n
Bo ler (L3) and tank (L1) On/OF
Start total dra n (tank + bo ler)
Start Short Programme
Start Med um
Programme
Start Long Programme
Set P0 Start programme P0: empty ng of tank to clean f lters.
Sw tch off and back on to allow reuse.
8.2 Before wa hing
Use only detergents and r nse a ds for ndustr al d shwashers. Do not use detergents ntended for hand wash ng.
We recommend the use of Smeg products, spec ally developed for th s d shwasher.
When topp ng up the tanks, take care not to swap the products; th s m ght damage the d shwasher and cause
malfunct ons.
Do not m x d fferent detergents; th s would damage the d spenser dev ce. Failure to comply w th th s recommendat on
leads to forfeiture of the warranty ent tlement on the appl ance’s water system.
Industr al d shwasher detergents may cause ser ous rr tat on. Comply carefully w th the nstruct ons prov ded by the
detergent producer on the pack.
Check
1. Turn on the ma ns water tap (user)
2. The level of detergent and r nse a d n the conta ners.
3. That there s regenerat ng salt n the relat ve conta ner ( f f tted).

17
4. That the f lters are n place, the spray arms rotate, and there are no fore gn bod es n the d shwasher.
5. Sw tch on the master sw tch (user): the dec mal po nts of both d g ts appear on the d splay.
8.3 Fir t u e each day (tank and boiler empty)
Door clo ed and ma ter witch on ON:
Press and hold for 2/3 seconds, Leds ON/OF l g h t up and
the f rmware vers on and e rev s on are d splayed (F xxx r xxx…);
FILL s d splayed afterwards.
Tank f ll ng starts. When the tank s full the d splay reads “End”
alternat ng w th the last runn ng program (End/P1).
Load the d shes and close the door
Select the program requ red by hold ng down one of the three
buttons requ red for about 2”; the Led of the program flashes.
Dur ng the wash, a ser es of vert cal bars on d splay nd cate the
progress of the selected program.
When the program s over, the program led stops flash ng and stays
on, the d splay alternates the run program and “End” (ex. P2/End).
Unload the d shes

18
When the door s closed aga n, the system offers the last program run.
8.4 Choo ing the program
SYMBOL PROGRAM TYPE OF DIRT DURATION (*)
Short Glasses and cups 2’
Med um Glasses, cups and plates w th l ght d rt 2’30”
Long Very d rty d shes and cutlery 3’
(*) The cycle durat on stated above s guaranteed f the appl ance s connected to hot water > 50°C <60°C
If the d shwasher s suppl ed w th cold water, the cycle durat on m ght ncrease depend ng on the ntake water temperature
and the "Thermostop" sett ng.
If the door i opened when a program i in progre , the program i interrupted; when the door i clo ed again
the program mu t be re tarted.
Power failure.
If the door s open when power s restored, the d splay reads “CLOSE” and “°t” flashes; the heat ng element stays
off for the user’s safety, n order to avo d the r sk of burns.
Clo e the door to re ume heating the water in the tank.
8.5 Changing the program
If the master sw tch s not turned off, the appl ance sets on the last
programme performed. To change the program, press the button of
the des red program, the led flashes and the d splay reads the
program durat on.
To conf rm hold down for about 2”. The led flashes and the wash
program starts.
If a programme s already runn ng, t can be changed by f rst sw tch ng the appl ance to pause status (by press ng one of the
buttons for 2”) and then select ng the programme requ red.
This manual suits for next models
1
Table of contents
Other Smeg Dishwasher manuals

Smeg
Smeg Universale Aesthetic STL332CH User manual

Smeg
Smeg STO905U User manual

Smeg
Smeg DFC612BK User manual

Smeg
Smeg Dishwasher ST1105 User manual

Smeg
Smeg ST8246U User manual

Smeg
Smeg LVS344PM User manual

Smeg
Smeg STX2DK User manual

Smeg
Smeg DWAU6314X2 User manual

Smeg
Smeg PL8210X User manual

Smeg
Smeg WT112-1 User manual