Smeg SWM107E User manual

WASHING MACHINE
USER MANUAL
SWM107E
BEFORE USING THE WASHING MACHINE, YOU SHOULD
CERTAINLY READ THE INFORMATION IN USER’S MANUAL.

CHAPTER-1: TECHNICAL SPECIFICATIONS 3
CHAPTER-2: BEFORE USING WASHING MACHINE 5
xSafety warnings 5
xRecommendations 6
CHAPTER-3: SETTING UP ..... 7
xRemoving transport safety screws 7
xAdjusting adjustable stays 9
xElectrical connection 10
xWater inlet connection 10
xWater discharge connection 11
CHAPTER-4: PRELIMINARY PREPARATION FOR
LAUNDERING 12
CHAPTER-5: CONTROL PANEL 16
xDetergent drawer 17
xProgramme knob 18
xSpin speed selector knob 19
xElectronic display 20
CHAPTER-6: OPERATING YOUR MACHINE 21
xSelecting programme 21
xAuxiliary functions 21
xStarting the programme 27
xChild lock 28
xCancelling programme 29
xFinishing programme 30
CHAPTER-7: WARNING SYMBOLS 31
xWarning of water cut-off/low mains water pressure 31
xWarning of clogged pump fitler 32
CHAPTER-8: MAINTENANCE AND CLEANING OF YOUR
MACHINE 33
CHAPTER-9: PRACTICAL INFORMATION 38
CHAPTER-10: TROUBLESHOOTING 40
CHAPTER-11: AUTOMATIC FAULT WARNINGS AND
WHAT TO BE DONE 45
CHAPTER-12: DESCRIBING AND SAVING ENERGY 47
2
CONTENTS

2 3 4
1
5
6
8 9
10
7 7
7 7
3
CHAPTER -1: TECHNICAL SPECIFICATIONS
1.Detergent drawe
r
2.Upper tray
3.Programme knob
4.Electronic display
5.Door
6.Cover of pump filter
7.
Transport safety
screw
8.Power cable
9.Discharging hose
10.Water inlet valve

Operating voltage / frequency
(V/Hz)
(220-240) V ~/50Hz
Total current (A) 10
Water pressure (Mpa)
Maximum: 1 Mpa
Minimum: 0.1 MPa
Total power (W) 2200
Maximum dry laundry capacity
(kg)
7
Wringing revolution (rev / min) 1000
Programme number 15
Dimensions
(Height x Width x Depth) (mm)
845 x 597 x 527
4
CHAPTER -1: TECHNICAL SPECIFICATIONS

SAFETY WARNINGS
xDo not use multiple receptacles or extension cord.
xDo not plug in damaged or torn plugs.
xIn case of a breakdown of power cable, contact the nearest
authorized service for replacing it.
xNever pull the cable when unplugging. Grab the plug when
unplugging.
xDo not plug-in or out the plug from the receptacle with wet hands
to prevent electric shock.
xNever touch the machine with your wet, damped hand or foot.
xNever open the detergent compartment when the appliance is
running.
xNever force the door to open when the washing machine is
running.
xDo not touch discharging hose and water during discharging as the
appliance may reach high temperatures when running.
xIn case of any breakdown, unplug the appliance firstly and then
turn the water faucet off. Do not attempt to repair by yourself and
consult authorized service.
xRemember that packaging materials of your machine may be
dangerous for children. Keep the packaging materials in a place
where children cannot reach or dispose of them as to wasting
instructions.
xDo not allow your children play with the washing machine which is
an electrically-driven appliance.
xKeep your pets away from your machine.
xYour machine should only be used by adults in line with the
information provided in this user’s manual.
xYour machine is designed to be used domestically. Commercial
use will cause your warranty to be cancelled.
xAnyone’s intervention to your machine except authorized services
in anyway will cause your warranty to be invalid.
xIdeal operating temperature of your machine is 15-25ÛC.
xDo not deploy your machine on carpet and suchlike grounds that
shall block ventilation of the base.
xDo not keep inflammable liquids near your machine.
5
CHAPTER -2: BEFORE USING YOUR WASHING MACHINE
SAFETY WARNINGS

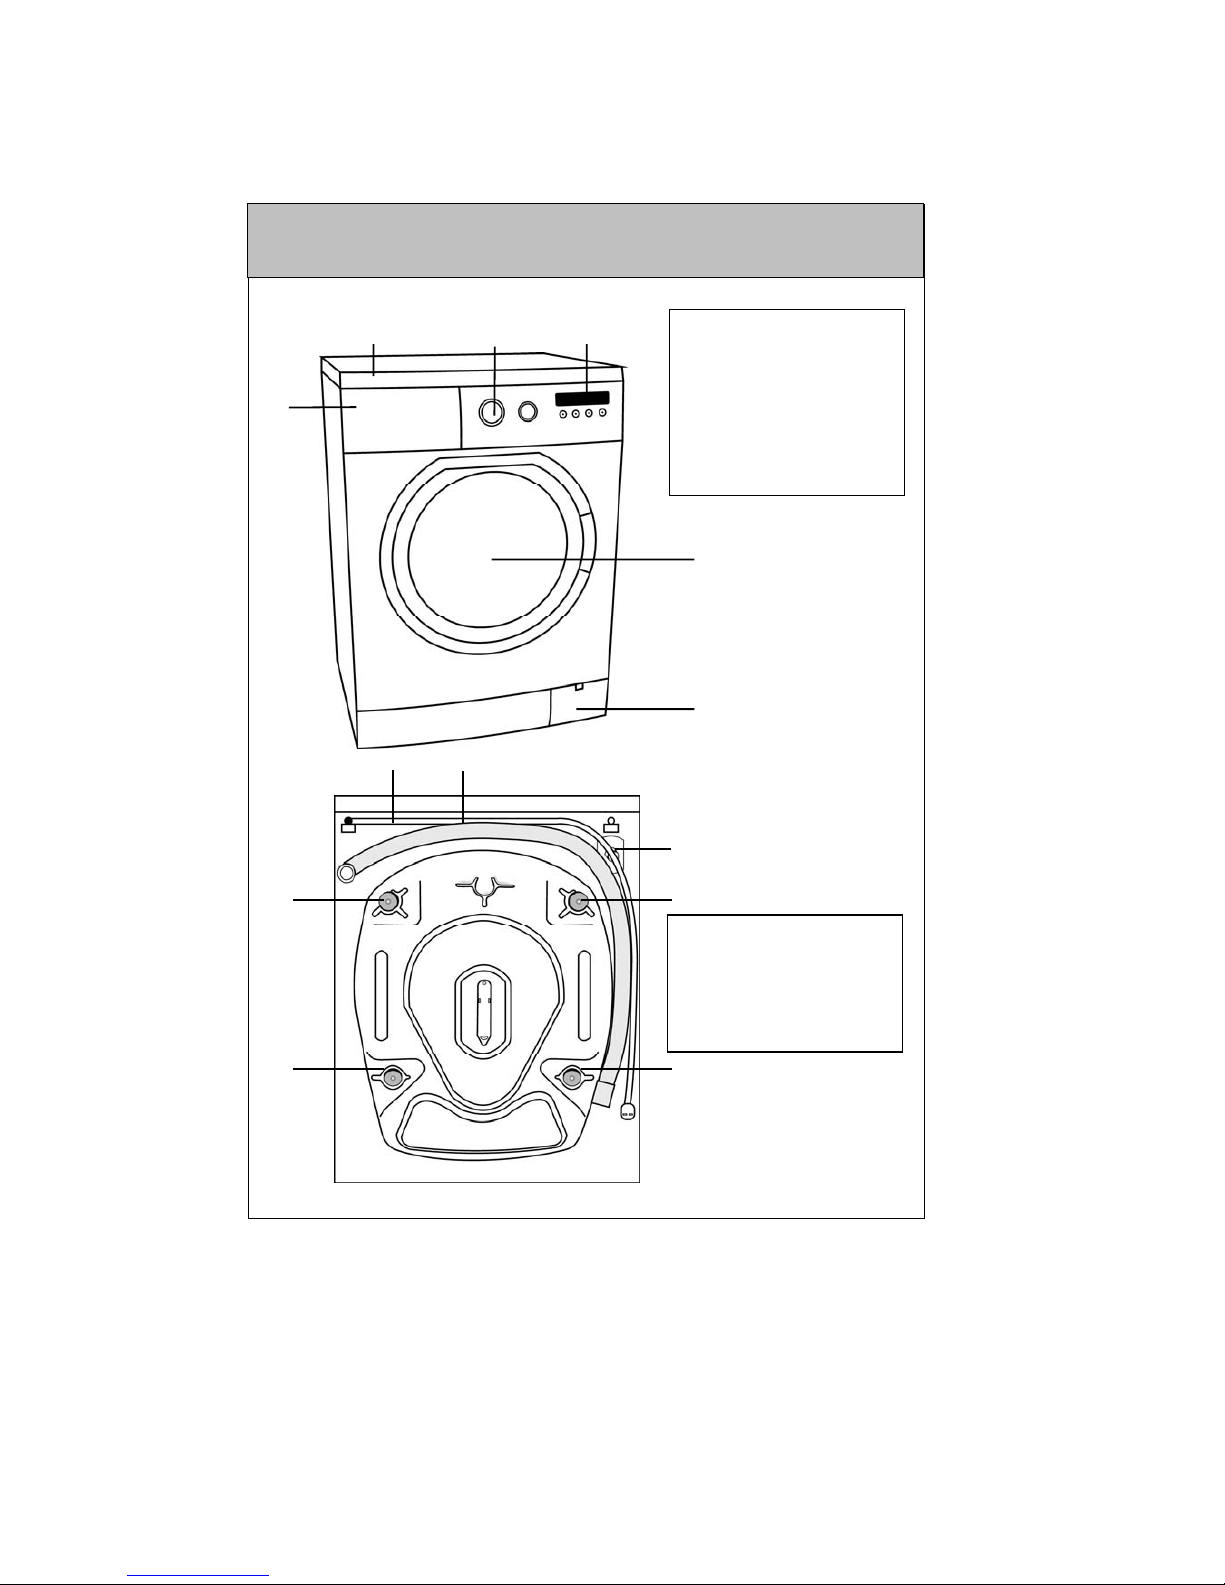
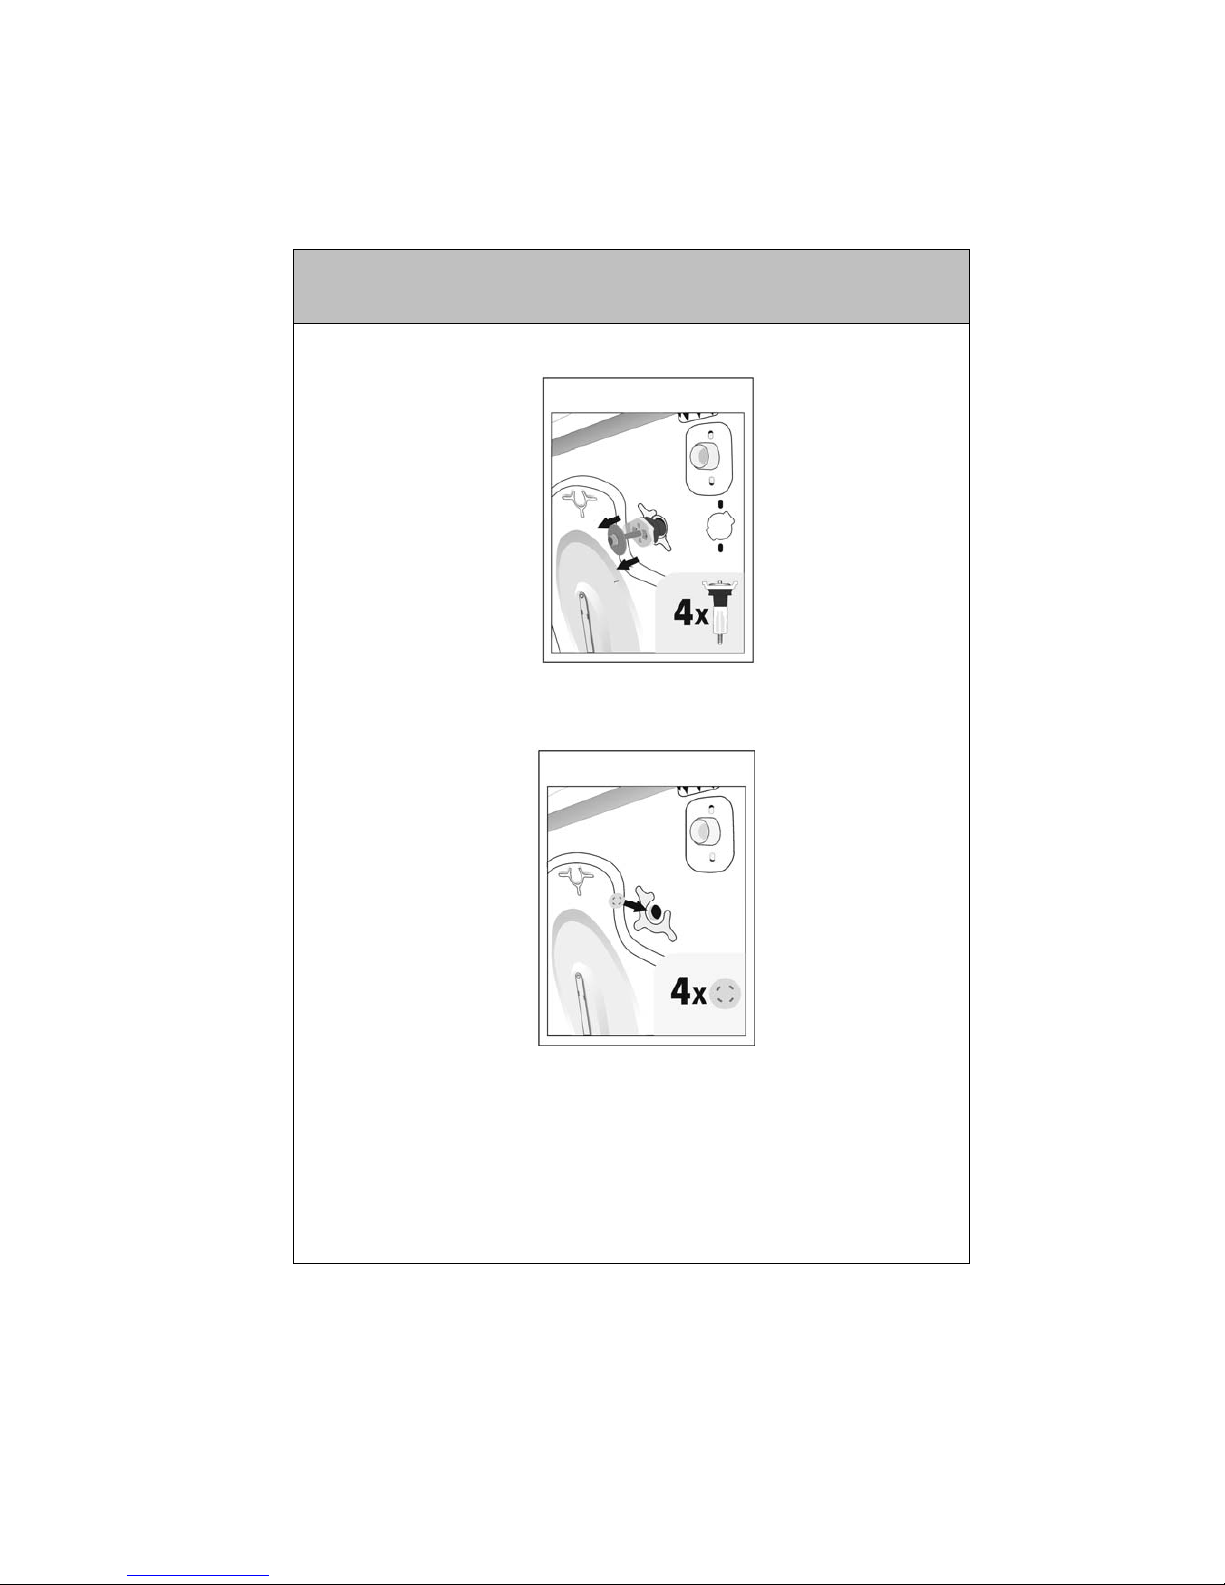
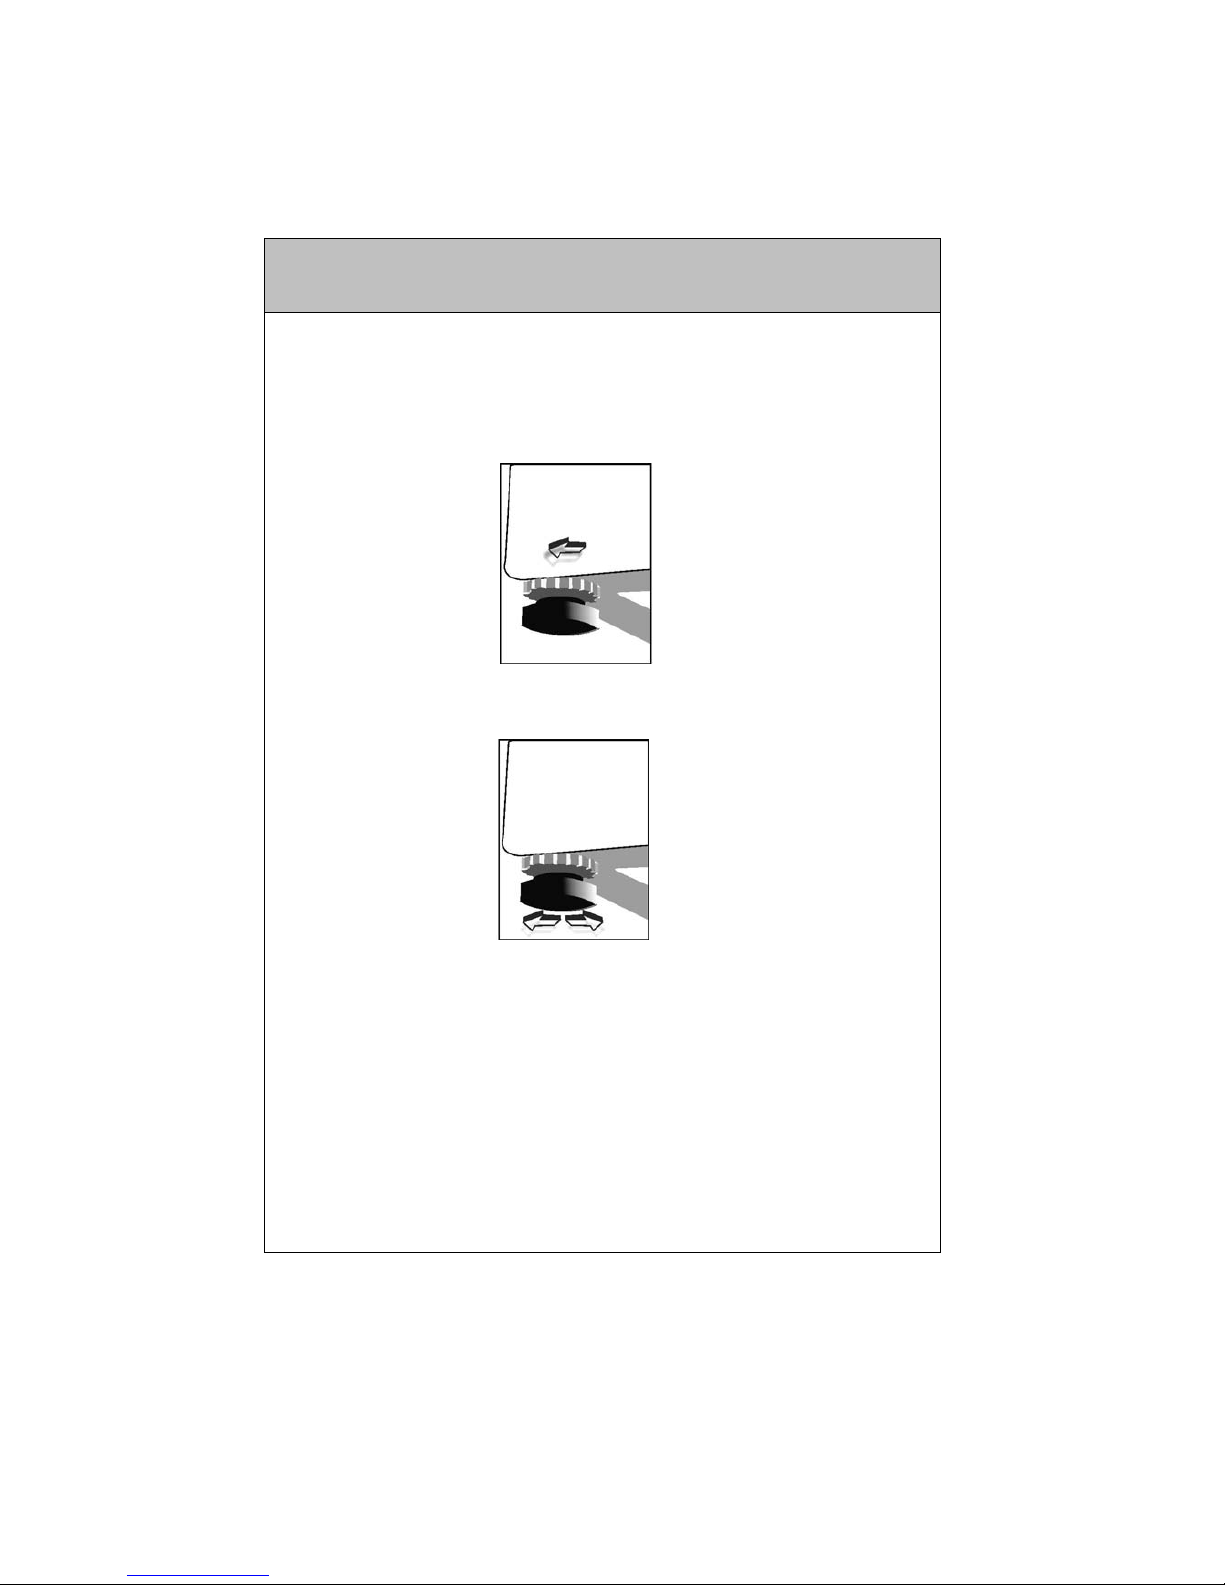
xYou should absolutely remove the transport screws of your
machine before the first usage. Faults occurring in the machines
operated with transport screw fitted shall be out of scope of
warranty.
xDo not put discharging hose of your machine in a vessel, bucket or
sink.
xYour machine is out of warranty against faults caused by any kind
of external factors (spate, pesticides, fire, etc.).
xThe appliance is not intended for use by people (including children)
with reduced physical,sensor yor mental capabilities , or lack of
experience and knowledge , unless they have been given
supervision or instruction concerning use of the appliance by a
preson responsible for their safety.Children should be supervised
to ensure that they don’t play with the appliance.
RECOMMENDATIONS
xBefore beginning to use your washing machine, ask for free-of-
charge help about installing, commissioning and using your
washing machine by calling the nearest authorized service.
xIt is recommended to perform the first washing operation in
95ÛWhite Cotton programme and without laundry by inserting
½ scale of detergent in 2nd compartment of the detergent
drawer.
xAs detergent or softener exposed to air for a long time may cause
residues, put your detergent or softener in the detergent drawer in
the beginning of each washing.
xIt is recommended that you wash only extremely dirty laundries in
prewashing programme.
xThe amount of laundries you put in your washing machine shall not
exceed the maximum amount indicated. By this way, your machine
shall run in saving mode.
xIt will help that inner side of your machine will remain dry and no
unpleasant smell will occur provided that you unplug the appliance,
turn off the water inlet faucet and leave the door open or spaced-
out if you will not use your machine for a long time.
xSome water may be left in your machine due to experiments and
tests carried out during production. This will not damage your
machine.
6
CHAPTER -2: BEFORE USING YOUR WASHING MACHINE
SAFETY WARNINGS / RECOMMENDATIONS

Before operating your washing machine, you should certainly remove
the transport safety screw on the rear side of the machine.
For this reason, transport safety screws shall be loosened by being
rotated in counter-clockwise using an appropriate wrench.
7
CHAPTER -3: SETTING UP
REMOVING TRANSPORT SAFETY SCREWS

Transport screws shall be removed by pulling out.
Fit the plastic transport screw taps delivered in accessories bag to the
places where transport screws have been removed.
The transport safety screws should be stored to be used in case of a
transportation.
You should absolutely remove the transport screws of your machine
before the first usage. Faults occurring in the machines operated with
transport screw fitted shall be out of scope of warranty.
8
CHAPTER -3: SETTING UP
REMOVING TRANSPORT SAFETY SCREWS

xDo not install your machine on a carpet or suchlike grounds.
xTo ensure silent and vibration-free operation of your machine, it
should be deployed on a non-sliding and firm ground.
xLoosen the plastic adjustment nut.
xAdjust the stays upward and downward by rotating them.
xAfter maintaining the balance, compress the plastic adjustment nut
upward again.
xNever put cardboard, wood or suchlike materials under your
machine if you are intending to stabilize the distortions on the
ground.
xWhen cleaning the ground, on which your machine rests, be
careful not to disorder stays stabilization.
9
CHAPTER -3: SETTING UP
ADJUSTING ADJUSTABLE STAYS

Electrical connection
xYour washing machine is set to 220-240V and 50Hz.
xMains cord of your washing machine is equipped with a specific
grounded plug. This plug should always be inserted to a grounded
receptacle of 10 amperes. Fuse current value of the power line
connected to this plug should also be 10 amperes. If you don’t
have such a receptacle and fuse confirming with this, please have
it done by a qualified electrician.
xWe do not take the responsibility of the damages that occur
due to ungrounded usage.
xOperating your machine under low voltage will cause the life cycle
of your machine to be reduced and its performance to be
restricted.
Water inlet connection
xYour machine may have either a single inlet (cold) or double water
inlets (cold/hot) based on its specifications. White-capped hose
should be connected to cold water inlet and red-capped hose to
hot water inlet (applicable for machines with double water inlets).
xTo eliminate water leakages in points of contact, 1 or 2 nuts are
provided in the hose package (applicable for machines with double
water inlets). Fit these nuts to the ends of new water inlet hoses on
the side of faucet.
xConnect the white-elbow end of the water inlet hoses to the white-
filtered water inlet valve on the rear side of the machine and the
red-elbow end to red-filtered one (applicable for machines with
double water inlets). Tighten plastic parts of the junctions using
your hand. In uncertain conditions, have the connection works be
done by a qualified plumber.
xFlow of water with pressure of 0.1-1 Mpa will allow your machine to
operate more efficiently (0.1 Mpa pressure means that more than 8
litres of water will flow through a fully-tapped faucet per one
minute).
xEnsure that points of contact do not leak by tapping the faucet
completely after carrying making the connections.
xEnsure that new water inlet hoses are not folded, broken, crushed
or their dimensions are not altered.
xMount new water inlet hoses to a ¾ Ý, threaded faucet.
xIf your machine has double hot water inlets, the temperature of hot
water inlet should be maximum 70°C.
10
CHAPTER -3: SETTING UP
ELECTRICAL CONNECTION / WATER INLET CONNECTION

Water discharge connection
xEnsure that water discharge hose is not folded, twisted, crushed or
elongated.
xWater discharge hose can be fitted minimum 60 cm and maximum
100 cm above the ground.
xThe end of water discharge hose can be fitted to a specific
apparatus directly attached to dirty water discharge hole or outlet
joint of the basin elbow.
xNever attempt to extend the water discharge hose by jointing.
xDo not put discharging hose of your machine in a vessel, bucket or
sink.
11
CHAPTER -3: SETTING UP
WATER INLET CONNECTION / WATER DøSCHARGE
CONNECTION

xSeparate your laundries according to their types (cotton, synthetic,
sensitive, woollen, etc.), their temperatures (cold, 30°, 40°, 60°,
90°) and degree of contamination (slightly stained, stained, highly
stained).
xNever wash your coloured and white laundries together.
xWash your coloured laundries separately in the first washing as
they may bleed.
xEnsure that there are no metallic materials on your laundries or in
the pockets; if so, take them up.
WARNING: Faults that will emerge in case of penetration of
foreign substances into your machine are not included within the
scope of warranty.
xRemove the metallic or plastic hooks of tulle curtains or curtains or
place them in a washing net or bag and then muzzle them.
xUnzip and button up your laundries.
xReverse textiles such as pants, knitwear, t-shirt and sweat suit.
xWash socks, handkerchief and suchlike small laundries in a
washing net.
Normal washing
Maximum
washing
temperature is
90°C
Maximum
washing
temperature is
60°C
Maximum
washing
temperature is
30 °C
Hand washing No washing
12
CHAPTER-4: PRELIMINARY PREPARATION FOR
LAUNDERING SEPARATING LAUNDRIES

Whitening
available
No whitening Ironing
temperature is
maximum 110°C
Ironing
temperature is
maximum 150°C
Ironing
temperature is
maximum 200°C
No ironing
Dry cleaning
available
No dry cleaning Leave on a flat
place
Hang when wet Dry by hanging Drying by twirling
is not allowed
Dry cleaning in
gas oil, pure
alcohol and R113
is allowed
Perchloroethylen
e R11, R113,
Petroleum
Perchlorinetyhlene
R11, R113, Gas
oil
13
CHAPTER-4: PRELIMINARY PREPARATION FOR
LAUNDERING SEPARATING LAUNDRIES

xOpen the door of your machine.
xSpread your laundries in your machine.
Note: Maximum loading capacity may vary based on the
laundry type you will wash, degree of contamination and the
programme you have chosen. Do not exceed maximum dry
loading capacity indicated in the programme table for
washing programmes.
You can take the following table of weights as an example.
LAUNDRY TYPE
WEIGHT (gr)
Towel 200
Linen 500
Bathrobe 1200
Quilt cover 700
Pillow slip 200
Underwear 100
Tablecloth 250
xPut the laundries separately.
xEnsure that no laundry is stuck between the cover and bellow seal
when closing the door of your machine.
xPush the door of your machine until hearing the locking sound to
close it.
xClose the door of your machine properly, otherwise your machine
will not start the washing operation.
14
CHAPTER-4: PRELIMINARY PREPARATION FOR
LAUNDERING PUTTING LAUNDRIES IN THE MACHINE

The amount of detergent you will put in your machine will depend on
the following criteria:
xYour detergent utilization will be based on the degree of
contamination of your laundries. Do not prewash your less stained
laundries and put your slight amount of detergent in the 2nd
compartment of the detergent drawer.
xFor your much stained laundries, select a programme including
prewashing, and put ¼ of the detergent you will put in the
detergent drawer in the 1st compartment of the detergent drawer
while putting the remaining ¾ of it into 2nd compartment.
xUse detergents produced for automatic washing machine in your
machine. The amount of detergent you will use for your laundries
is printed on the detergent package.
xThe higher the degree of hardness of the water the more detergent
you will use.
xThe amount of the detergent you will use will increase as the
amount of your laundries increase.
xPut the softener in the softener compartment in the detergent
drawer. Do not exceed the MAX level. Otherwise, softener will flow
into washing water through flushing.
xSofteners with high density are required to be thinned to a degree
before being put in the drawer. Because high-density softener will
clog the flush and avoid the flow of the softener.
xYou can use your liquid detergents in all programs without
prewashing. For this, fit liquid detergent level plate in the
accessories bag into 2nd compartment of the detergent drawer and
set the amount of liquid detergent according to the levels on this
plate. Remember to detach the liquid detergent plate.
15
CHAPTER-4: PRELIMINARY PREPARATION FOR
LA
U
NDERIN
G
ADDIN
G
DETER
G
ENT INT
O
MA
C
HINE

16
CHAPTER 5: CONTROL PANEL
1-Detergent drawer
2-Programme knob
3-Spin speed selector knob
4-Electronic display
5-Start / Pause button
6- Auxiliary function buttons
56
1 2 4
3

A. Prewashing compartment
B. Main washing compartment
C. Softener compartment
D. Siphon cover
E. Liquid level detergent plate
17
CHAPTER 5: CONTROL PANEL
DETERGENT DRAWER
A
B
C
D
E

You may select the programme you like to wash your laundries
through programme knob. You may set the programme selection
operation by rotating the programme knob in both direction.
Ensure that the programme knob is exactly on the programme
you want to select.
18
CHAPTER 5: CONTROL PANEL
PROGRAMME KNOB

By the spin speed selector knob, you can make the adjustment of
speed for the process of spinning your clothes.The speed adjustment
interval is between (No spin) and the maximum spinning speed
of your machine.
If the spin speed selector knob is higher than the to the selected
program spin speed maximum speed, machine will make the spin
according to the program maximum spin speed.
NOTE: Do the spinning process of your sensitive and delicate
clothes in the most appropriate mode.
19
CHAPTER 5: CONTROL PANEL
SPIN SPEED SELECTOR KNOB

1-Door lock light
The door lock lighting, machine locked the door.
2-Child lock light
The clild lock lighting, the child lock will active.
3-Wash light
The wash lighting, indicates that the machine during the wash.
4-Rinse light
The rinse lighting, indicates that the machine during the rinse.
5-Spin light
The spin lighting, indicates that the machine during the spin.
6-Electronic display
On the electronic display, you may view washing water temperature,
the amount time your machine will continue washing. Furthermore,
electronic display will warn you by means of fault symbols on the
display when a fault occurs on your machine and notify you of the
completion of the washing programme by revealing expression of
“END” on the display as soon as the washing programme you have
selected has finished as well.
20
CHAPTER 5: CONTROL PANEL
ELECTRONIC DISPLAY
This manual suits for next models
1
Table of contents
Other Smeg Washer manuals

Smeg
Smeg IWA120 User manual

Smeg
Smeg LBW810IT User manual

Smeg
Smeg LSE1200 Operation and maintenance manual

Smeg
Smeg WHT814LSIT-1 User manual

Smeg
Smeg LB3T92PIT User manual

Smeg
Smeg SWM840 User manual

Smeg
Smeg Washing Machine K85 User manual

Smeg
Smeg WD2145 User manual

Smeg
Smeg LBI127 User manual

Smeg
Smeg LBB14CR-2 User manual