SmokeCloak EASY 2200 User manual

SmokeCloak EASY 2200
INSTALLATION AND OPERATING INSTRUCTION

2 EASY 2200 user manual
Every effort has been made to ensure that the contents of this
manual are correct. MSS Professional A/S does not accept any li-
ability for loss or damage caused or alleged to be caused directly or
indirectly by this manual. The contents of the manual may be subject
to change without notice. MSS Professional A/S makes no warranty
of any kind with regards to this material.
© 2012 MSS Professional
Reproduction in any matter whatsoever without the written permis-
sion of MSS Professional A/S is strictly forbidden.
READ AND SAVE THESE
INSTRUCTIONS
MSS Professional A/S
Agerhatten 25
DK - 5220 Odense SØ
Danmark
Telefon: +45 6473 1407
www.smokecloak.com

3
EASY 2200 user manual
Manual
EASY 2200
Please read this manual carefully before attempting to install an EASY 2200.

4 EASY 2200 user manual
Conventions
The following symbols are used in this manual to help you install the
SmokeCloak system correctly and safely.
Note
Gives useful advice or suggestions to enhance the
performance of the SmokeCloak system.
Important
Indicates important information that is critical for
the correct use of your products and must always be
read carefully.
It is essential that only genuine SmokeCloak uid is
used. Damage to the equipment and possible health
hazard is likely if incorrect uid is used. The warranty
on all of the equipment will also be void.
Under no circumstances should the on board power
supplies of the SmokeCloak “12v output” be linked
to any other 3rd party equipment e.g. alarm panels,
additional power supplies, etc. as this could cause
unexpected faults within the machines.
In areas tted with equipment generating high le
vels of electrical interference, screened alarm cable
may be required to ensure correct operation of the
EASY unit.

5
Contents
Contents
1. IN THE BOX......................................................................... 6
2. QUICK START GUIDE ............................................................ 6
3. SPECIFICATIONS .................................................................. 8
4. MACHINE LAYOUT ............................................................. 10
5. INSTALLATION................................................................... 12
6. DIRECTING THE NOZZLE.................................................... 13
7. FLUID ................................................................................ 15
8. PRIMING THE MACHINE .................................................... 17
9. BATTERIES ........................................................................ 18
10. WIRING UP THE MACHINE ................................................. 21
11. INTERFACE BOARD............................................................ 22
12. CONNECTION DETAILS....................................................... 23
13. CLOAK SENSOR ................................................................. 40
14. SETTING THE ACTIVATIONS TIME ....................................... 42
15. PREPARATION FOR FINAL TEST ......................................... 44
16. MAINTENANCE.................................................................. 45
17. PC-TOOL ........................................................................... 46
18. USING THE SOFTWARE...................................................... 49
19. TIMERS............................................................................. 50
20. ACCESSORIES ................................................................... 56
Fluid FL600 ....................................................................... 56
Cloaksensor CS07A............................................................. 57
LED Strobe......................................................................... 58
Sounder IPA 117 ................................................................ 59
Voice Module...................................................................... 60
Batteries ............................................................................ 61

6 EASY 2200 user manual
1. In The Box
Before attempting to install the machine it is advisable to ensure that you
have all the required components. Upon opening your SmokeCloak EASY
box you should nd:
x1 off EASY 2200 unit
Check serial labels to ensure the correct voltage
x1 off Manual pack
Warning stickers
Mounting template
Quick start guide
CD Rom containing manual
x1 off Accessory Pack
Straight nozzle insert
30 degree nozzle insert
Circlip (x2 off)
Suppressors
x1 off Cloaksensor (CS07A)
In addition to the above items you will also need 2x 1.2 Ah 12 V batteries.
MSS Professional A/S recommends FIAMM or similar quality.
In addition, the following specialist tools will also be required:
Internal Circlip Pliers (20 mm)
2. Quick Start Guide
To quickly prepare and re your unit, the following steps should be taken.
For more detail on anything below, see the full guide provided.

7
98
Test
5
1
Max
2,5 m
Max 3 m
3
7
6
24

8 EASY 2200 user manual
3. Specications
EASY 2200
Dimensions 468 x 382 x 223 mm
Weight (install) 19.15 kg
Weight (shipped) 23 kg
Weight (hanging) 21.15 kg
Performance 764m3in 30 s*
Reaction time 0.2 s
Fluid consumption 260 ml in 30 s
Standard colour White
Mounting Vertical or Horizontal
Fluid Reservoir 1,0 L
Heat up time (Rdy) 9 minutes (230 V)
Heat up time (Full) 15 minutes 45 s (208V)
13 minutes (230V)
Timer Adjustable
Voltage 230V, 208V
Heat Power 208/230V 2 x 950 W
Power consumption at 230V (max) 2.0 KW
Power consumption at 208V (max) 1.65 KW
Standby Power consumption @ full temperature 105 W
Standby Power consumption during power save
mode 72 W
Current Draw at 230 V (max) 8.85 A
Current Draw at 208 V (max) 7.8 A
Pumps x2 24 V solidstate, variable
output

9
EASY 2200 user manual
Weight (Install)
Represents the weight of the machine, without the covers on, and without
the batteries or any uid installed.
Weight (Shipped)
Represents the weight of the machine packed within its box
Weight (Hanging)
Represents the weight of the machine, in its armed state hanging on a
wall. That includes covers, Batteries and a full container of uid.
Heat-up time (rdy)
The gure given is a time to ‘ready’ state at an ambient temperature of 20°C
Heat-up time (full)
The gure given is a time to full temperature at an ambient temperature
of 20°C
10 EASY 2200 user manual
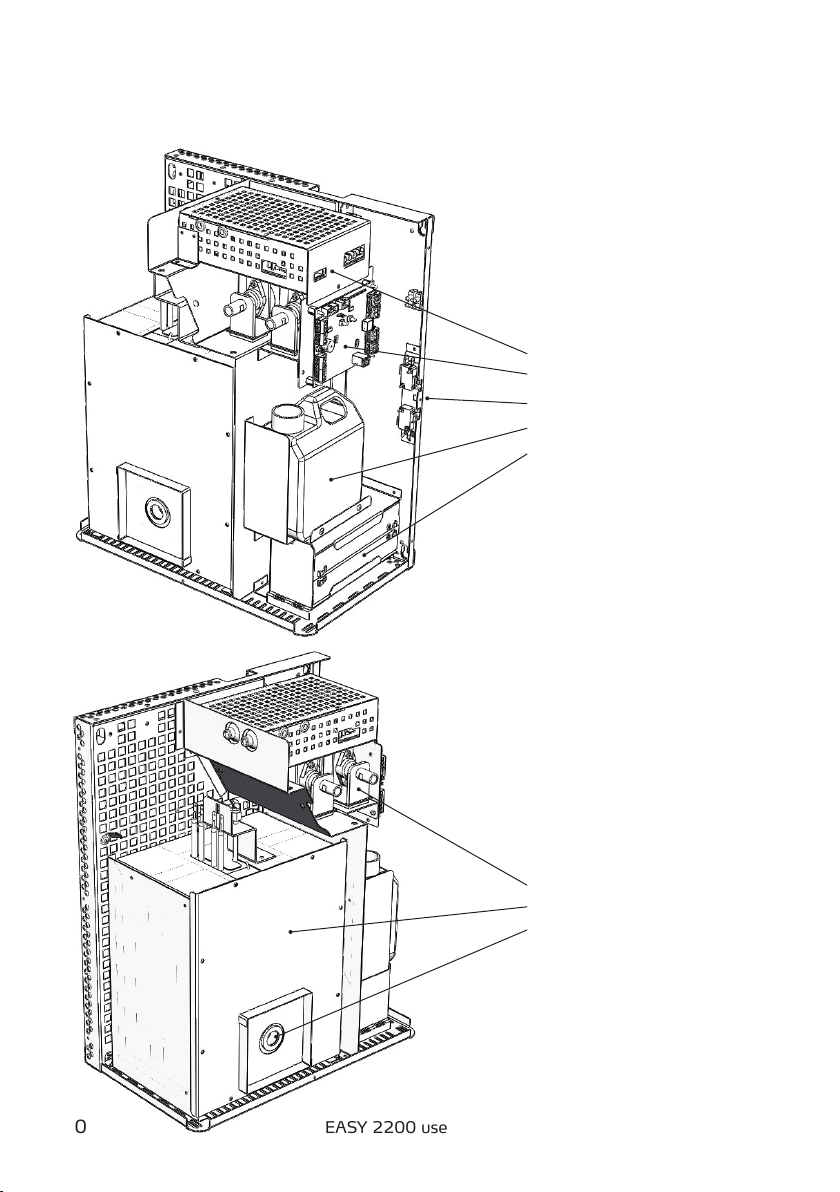
4. Machine Layout
1. Main power PCB
2. Interface PCB
3. Tamper switch
4. Fluid bottle
5. Batteries
5. Pumps
6. Heat exchanger
7. Nozzle output

11
EASY 2200 user manual
Internal isometric
Bottom
L/H side
External front
Top
R/H side
Internal
Rear
Front

12 EASY 2200 user manual
5. Installation
5.1 Position
The SmokeCloak EASY can be installed vertically for wall mounting, or
alternatively mounted horizontally for ceiling installations.
This equipment should only be installed and connected
to the supply by a suitably skilled and competent
person.
This apparatus must be earthed. Connections are
made to a plug-in terminal block. The SmokeCloak
should be connected to a standard 13 amp fused spur.
Flexible mains cables must have a minimum cross-
section area of 1.25 mm2 (and must be BASEC
approved in the UK). Ensure that the protective
earth conductor is made longer than the live and
neutral conductors, and that the cable clamp grips
both the sheath and insulation.
Wall mounting: It is not recommended to install
the machine in excess of 2.5 m high, otherwise the
smoke coverage near the oor may be compromised.
Horizontal mounting: Ensure the machine is no
more than 3 m above the oor, otherwise smoke
dispersal may be compromised.
In areas tted with equipment generating high le
vels of electrical interference, screened alarm cable
may be required to ensure correct operation of the
EASY unit.

13
EASY 2200 user manual
6. Directing the nozzle
EASY 2200 will come as standard with no nozzle installed.
It is the job of the installer to assess, install and test which
of the nozzles supplied should be used in order to ensure
that the machine is best suited to the particular installation.
Straight Nozzle Provides a single powerful burst directed
perpendicular to the front of the
machine.
30-Degree Nozzle Provides a single powerful burst
directed at 30° to the front plane of the
machine.
Note: by changing the orientation of
the nozzle the effect can be projected
in varying directions.
14 EASY 2200 user manual
Installing the correct nozzle
for the rst time:
1. By making a quick assessment of the area to be protected by the
SmokeCloak, decide which of the two available standard nozzles
should be used. You can see examples on the previous page.
2. Take the required nozzle and install it within the nozzle body.
3. Take the circlip provided and using a pair of internal circlip pliers,
engage the circlip into the ridge running around the inside of the
nozzle body. It is crucial this is installed correctly in order to retain the
nozzle safely.
4. Follow the test procedure.
Take great caution when changing the nozzle, it
becomes extremely hot as the machine heats up.
Do not attempt to handle the nozzle once the
machine has heated up to temperature.
Following any installation or changing of the nozzle
– Ensure that a test ring is carried out to ensure
that the new nozzle has been correctly and safely
installed. When performing this rst test ring
insure that the grille plate is installed correctly and
everybody is standing back from the front of the
machine.

15
EASY 2200 user manual
7. Fluid
FL600 uid is used to generate the vapour cloud. This glycol based uid is
made to a special formula, which is designed to produce 40% obscuration
of light at 40 cm with minimum condensation.
The uid should be changed annually and the machine test red after the
uid has been replaced to ush the old uid out of the internal uid lines
in the machine.
Whilst unopened the uid has a 5 year shelf life when stored correctly.
7.1 Installing the Fluid Bottle
Your EASY 2200 product will be supplied with a full uid container
installed. It will arrive with a sealed travel cap installed. The following
steps should be taken in order to correctly install the uid bottle and the
uid sensing unit.
1. Remove the uid bottle from the machine,
2. Slide the uid sensor assembly inside the bottle – screw down the cap
tightly to create a seal.
3. The bottle can then be slid back into position within the machine.
4. It is recommended that following any installation of the bottle a short
test re is carried out to ensure the uid line has been correctly re-
installed and to re-prime the uid feed lines.

16 EASY 2200 user manual
It is essential that only genuine SmokeCloak uid
is used. Damage to the equipment and a possible
health hazard is likely if incorrect uid is used. The
warranty on all of the equipment will also be void
7.2 Changing the Fluid
As part of the maintenance of the SmokeCloak EASY it is essential that
the uid is replaced annually to ensure that the quality of the effect
produced is maintained at the desired level.
In order to change the uid follow the same instructions in the previous
section for installing the uid bottle, once removed.
Discard the empty uid container and replace with a new full bottle of uid.
The uid should be changed (not topped up)
at least once a year. Do not mix batches of uid.
(Batch number is printed on the front of the bottle).
Take care not to overll the bottle
– it could potentially lead to electric shock.

17
EASY 2200 user manual
8. Priming the machine
Following either the initial installation of the uid bottle or following
changing of the bottle it is essential that a short test ring is carried out to
ensure that the uid feed pipes are correctly primed. Failure to follow this
procedure will lead to delayed response time the rst time the machine
is red following the service or, more signicantly, a failure to observe a
connection fault incurred during the installation or re-installation of the
uid bottle.
During the test ring, observe the output to ensure the level is satisfactory
before leaving the machine.
If the level appears to be below what would normally be expected of the
machine, repeat the test process. If after 3 test cycles the output still
appears to be below the ‘regular’ level of effect check the following:
1. The uid cap was correctly re-engaged into the bottle, that the uid
feed pipe wasn’t trapped in any way, and that the cap was rmly
screwed back into position.
2. If there still appears to be a problem contact your supplier.

18 EASY 2200 user manual
9. Batteries
9.1 To install the batteries:
NEW drawing?

19
EASY 2200 user manual
Once the batteries are installed within the bracket provided they must
then be wired together in series and connected to the power board.
Follow the instructions below – The battery loom provided should be
used. It will contain a single blue wire used for linking the batteries in
series and in addition a red and a black wire for connecting the wires back
to the power board.
The red wire should be terminated at PL22 on the power board and the
black wire at PL21. The terminals labeled + with the red wire, and - with
the black wire.
The battery backup system provides power for the control electronics and
pumps when mains electricity is removed.

20 EASY 2200 user manual
The standard backup system does not provide power for the heater. The
insulation is designed to retain sufcient heat in the aluminium heat
exchanger assembly.
The SmokeCloak must have the batteries installed,
even when operating from the mains,
The battery backup system requires 24 V d.c. - it is
necessary to t two 12 V 2.1 Ah batteries in series
in the SmokeCloak. Do not use larger than 2.1 Ah
capacity batteries to prevent fuse failure due to
excessive charging current.
Please note that the temperature inside the SmokeCloak
can exceed 40 degrees depending on the ambient
temperature - the batteries must be able to with-
stand this temperature under charging.
Take care with polarity. The SmokeCloak is protected with an auto-reset
fuse to safeguard against reverse polarity connection of the batteries. The
LEDs on the interface board will give indication of correctly installed uid
and batteries.
PCB damage due to incorrectly tted/sized batteries
is not covered under warranty.
MSS Professional strongly recommends that Fiamm
2.1 Ah batteries or similar quality are tted.
These can be purchased from MSS through your
distributor.
Table of contents
Other SmokeCloak Fog Machine manuals


