SMONET Y001 User manual
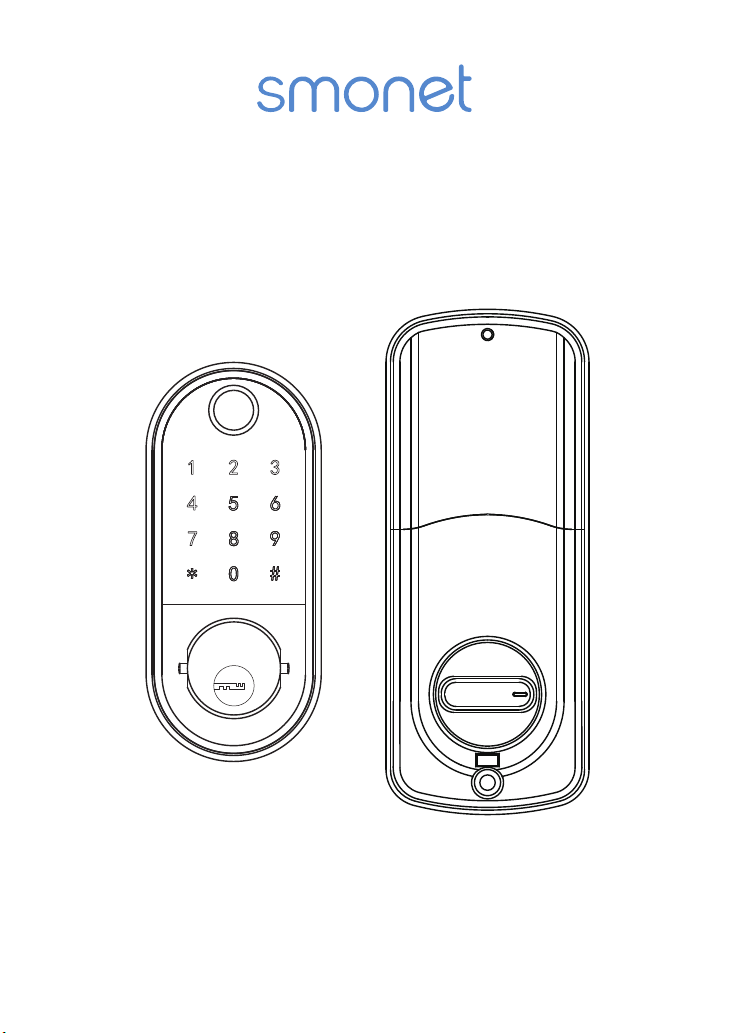
Smart Lock Manual
Electronic Keypad Deadbolt Lock

PREFACE
Please read this manual before installing.
Any question, please contact our customer service.
WARNING:
This Manufacturer advises that no lock can provide complete security
by itself.
This lock may be defeated by forcible or technical means, or evaded
by entry elsewhere on the property.
No lock can substitute for caution, awareness of your environment,
and common sense.
In order to enhance security and reduce risk, you should consult a
qualified locksmith or other security professional.
How Can I Get Tech Support?
E-MAIL: service@clocktida.com
Toll Free: 1-866-262-2888
(Available after 6:00 PM at Pacific time)

DIRECTORY
INTRODUCTION
Product Specifications
Package
Performance
INSTALLATION MANUAL
Tools Needed
Installation Step
SMART INSTRUCTION
Pairing Lock to Phone App
TT LOCK App Operating
MATCH the Wi-Fi GATEWAY to the APPLICATION
MATCH the TTLOCK APP to the ALEXA APP
MATCH the SMART WATCH to the SMART LOCK
OPERATION INSTRUCTIONS
Setting Admin Passcode
Lock/Unlock
Dead Lock
Reset
Battery Power Runs Out
FAQ
01
01
02
03
04
04
04
12
12
13
18
19
21
22
22
23
23
24
24
27
INTRODUCTION
< 01 >
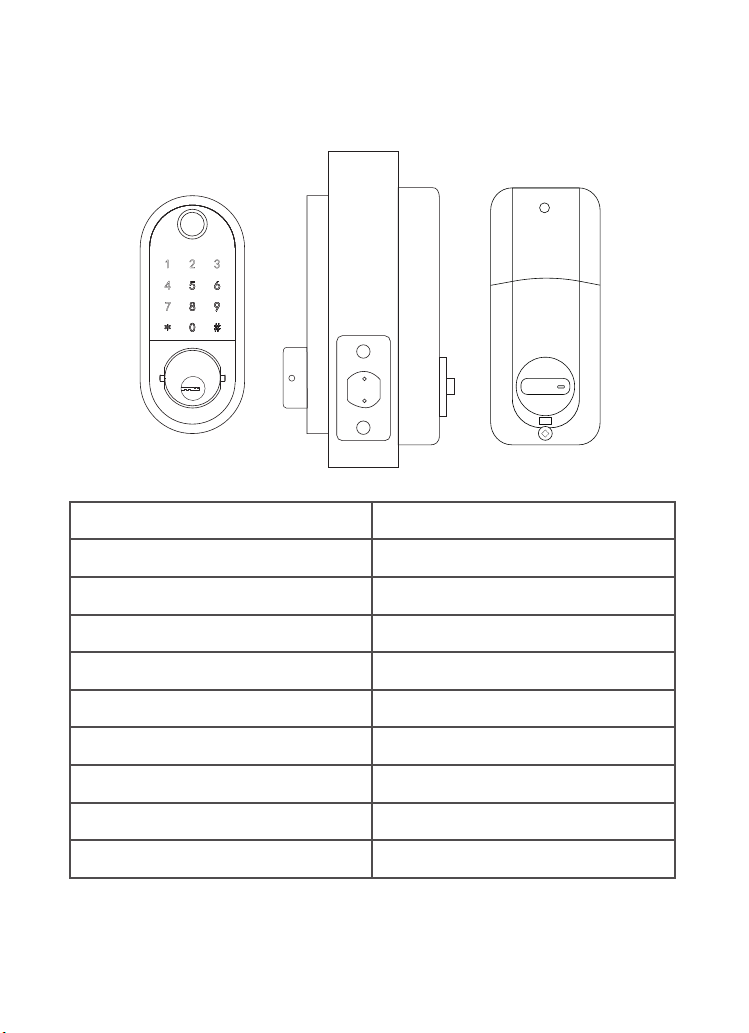
Product Specifications
Item No.
Material
Weight
Communication mode
Unlocking way
Support System
Unlock time
Power supply
Static current
Working current
Y001
Zinc Alloy
2.46 lb
Bluetooth 4.0ble
Bluetooth, Code, Mechanical key
Android 4.3 / IOS 7.0 above
≈ 1.5 sec
4pcs AA batteries
≤30uA
≤200mA
< 02 >
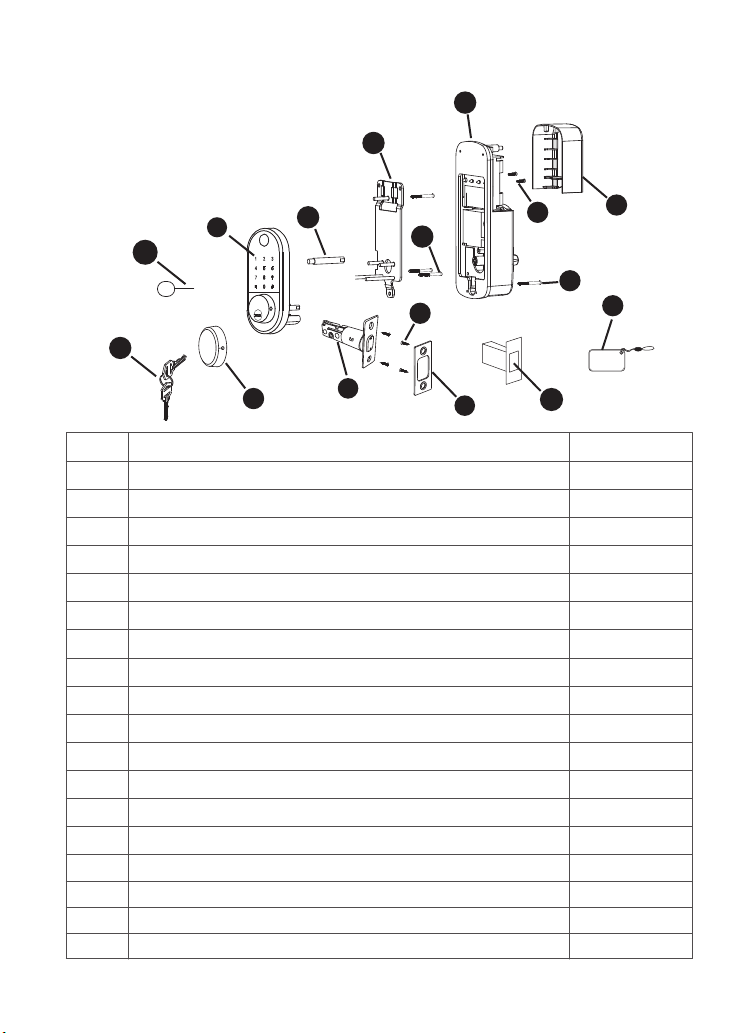
Package
Part Quantity
A
B
C
D
E
F
G
H
I
J
K
L
M
N
O
P
Q
2
1
1
2
1
4
1
1
1
4
1
3
1
1
1
2
2
Description
Key
Keypad
Keyhole Cover
Double-screw Bolt
Latch
Wood Screws
Strike Plate
Box Striking Plate
Inside Mounting Plate
Flat Screw
Receiver Module
Short Flat Screw
Longest Flat Screw
Battery Cover
Size Reference Card
Drill Bit
Needle
R2
ICCard
A
CD
I
K
J
BEG
F
N
R
L
M
Q
H

1.Smarter and Safer
Smart Lock Front Door set out to provide extra home security with
keyless codes, Bluetooth unlock, anti-peep password and auto lock
(5-200s) to keep your house safe and sound.
2.Real Time Record
Through Keyless Door Locks for Homes APP, you could check the
unlocking records and incorrect password records from the Admin
account in real time. And you’ll have comfort in knowing your door’s
status.
3.Fast Sharing and Convenient
With Smart Digital Door Locks for Homes, You can share code with
friends and guests valid for a few weeks,hours, or minutes, and
revoke them whenever you need to. Never worry about lost, stolen or
copied keys again.
4.Easily Install and Smart Reminder
Just a screwdriver and a easy-to-follow instruction to easily install
Door Locks with Keypads. And when in low battery, Keypad Door Lock
Deadbolt Set will alarm and could be temporary charged by a 9V
battery.
< 03 >
Performance
Tools Needed
Phillips Screwdriver Tape Measure Pencil Other Chiseling Tools
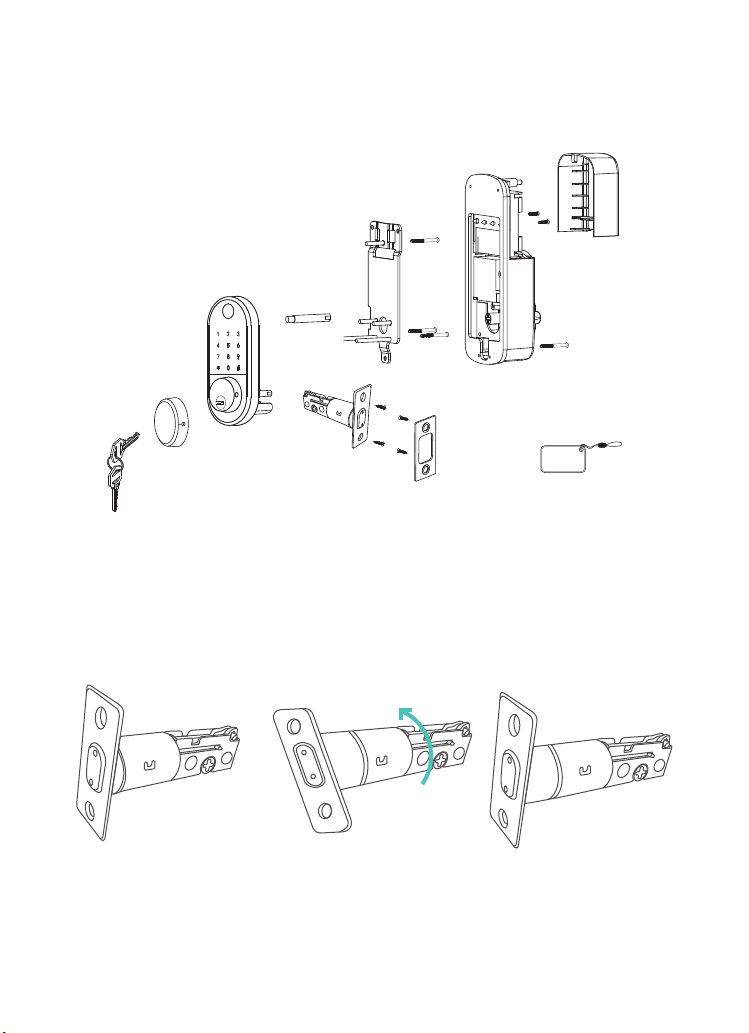
Installation Step
1.Adjusting Latch Length
INSTALLATION MANUAL
< 04 >
Note: Install and test lock with door open to avoid being locked out
Note: When performing this operation, please take protective
measures and be careful of the metal edge not to injure yourself.
2.Check Door Dimensions
Hold the right part of the lock tongue with your right hand and turn
the left iron piece counter clockwise (about 15 degrees) with your
left hand.
When the rectangular position of the 2-3/8”(60mm) tick mark
changes from convex to concave (as shown), slowly extend the
locking latch, and then turn clockwise the inside of the locking latch
back to the rectangular position of 2-3/4”(70mm)scale.
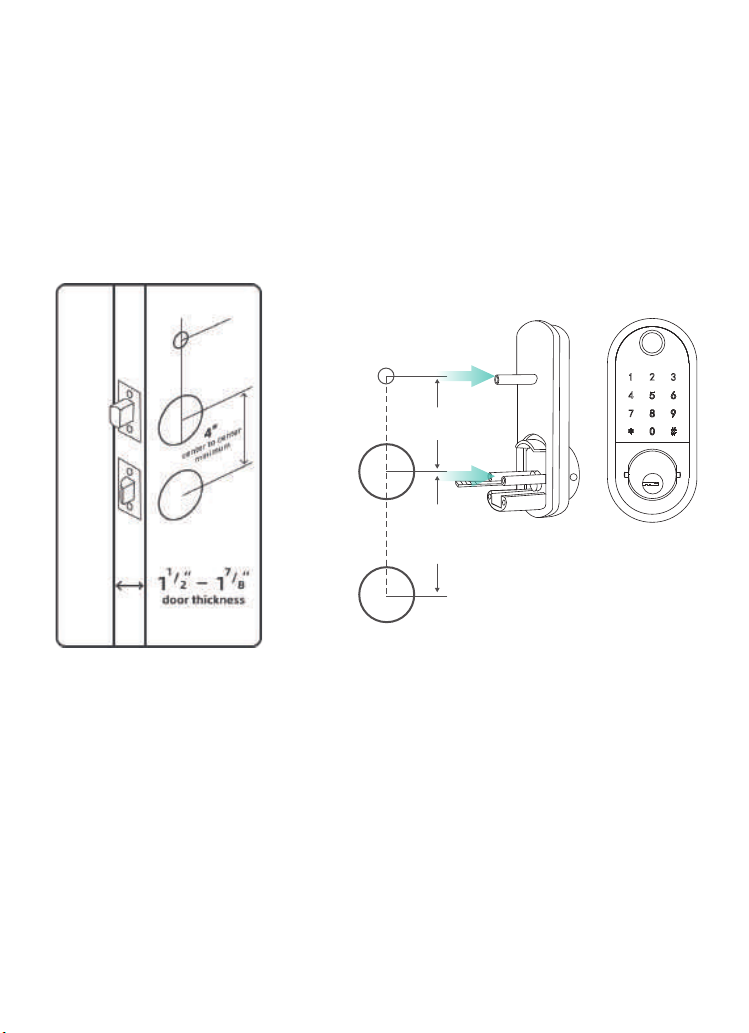
1) Backset Determination
Backset is a distance from door edge to center of hole on door face.
2) Hole's Diameters
Using the marks as guide to drill holes
Φ3/8''(10mm)----Fasten Smart door lock
Φ2-1/8''(54mm)
3) Door Thickness
The door thickness within 1-1/2'' to 1-7/8'' (38mm-48mm) are all
suitable for the keypad deadbolt handle set.
< 05 >
In order to fasten door lock,
you need to drill an extra hole.
center to center
minimum
4”
2⁷/8”
³/8”
2¹/8”

A.Identify the center of plate: Close the door to lay the latch bolt
against the door frame.
Mark the the outline of the plate onto door jamb.
B.Drill 25mm deep at intersection of horizontal and vertical line of
plate.
3.Install Lock
1)Install Latch
Note:Need to keep this way up when inserting the latch.
< 06 >
A.Mark the outline of the faceplate ,then take out the latch.
C.Insert the latch into the door ,use 2 wood screws to secure latch.
B.Chisel 1mm-2mm deep along the outline to allow the faceplate
to be aligned with the door edge.
2)Install Plate
Insert the latch and ensure it is parallel to the door face.
Chisel 1mm-2mm deep along the plate outline to allow the plate to
be aligned with the door frame.
C.Insert the plastic lock groove and the strike plate into door jamb
tighten with wood screws.
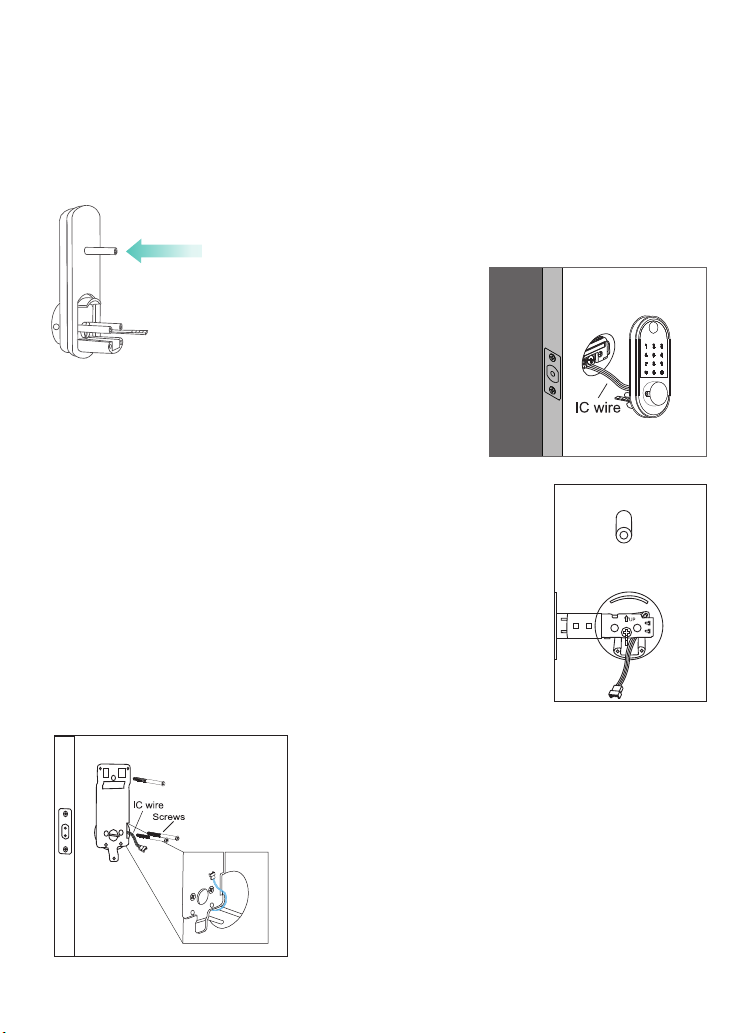
3)Install Keypad
< 07 >
PlaceICwire,latchlinkbaranddou-
ble-screwsthroughtheholesonthe
deadbolt,asthepictureontheright
shows.
Note:ICwireshouldbeplacedunderlatch.
Afterinstallingthefrontpad,rollthe
handlespindletotestifitcouldworkwith
deadboltornot.Ifcouldnot,takeoutthe
frontpadandrollthelatchlinkbararound
90degreeandtrytoinstallagainuntillit
couldworkwiththedeadbolt.
Pass the IC wire and the latch link bar to
mounting plate.
Use 1 flat screw to secure with the keypad
double-screw bolt.
Use 2 flat screw connect mounting plate
with latch.
Note: Please place the IC line as shown in
the figure to avoid the lock latch out of
control.
Install double-screw bolt into
keypad inner plate.

5)Adjust Thumb Turn Piece
< 08 >
4)Identify Door Handing
The door is "Left-handle" if
the hinges are on the left
side of the door.
Whereas the door is "Right-han-
dle" if the hinges are one the
right side of the door.
Rotate the thumb turn piece to
“Horizontal Direction” for
Left-handle(open into room)
door when in unlock status.
Rotate the thumb turn piece to
“Vertical Direction” for
Right-handle(open into room)
door when in unlock status.
Left-handle Right-handle
Hinge Hinge
Left-handle Right-handle

< 09 >
7)Install Receiver Module
Remove the battery cover (Press the spring button with the sharp
object and push the cover up first then push it up)
6)Adjust the Toggle Button of the Cover
To install the lock for left side
handling, ensure the toggle
button on the back cover
assembly is set to "L".
To install the lock for right side
handling, ensure the toggle
button on the back cover
assembly is set to "R".
L R L R
3
Needle
Battery Cover

< 10 >
8)Insert Battery and Install Back Battery Cover
Insert 4pc(AA)1.5V Alkaline
batteries and slide the battery
cover back onto the receiver
module.
ConnectICwiretothewhiteportcarefully.
Note:Ensure the thumb turn piece and the toggle button of the
cover in right way.
Use 2 short flat screw tighten the
receiver module inner battery
groove. Longest flat screw
connect the receiver module
with door.
L R

< 11 >
Remarks:
(1)Alkaline batteries are recommend in order to stabilize the
power supply,if you don't use alkaline, battery performance will
be reduced greatly.
(2)All settings will be retain in the memory even if the batteries
are complete dead . A micro USB can directly power the lock and
activate the keyboard. Charging it via the ports under the lock.

SMART INSTRUCTION
< 12 >
1.Download the App ”TTLock”
Android Mobile Phone--Search “TTLock” from Google Play.
Apple Mobile Phone--please search “TTLock” from App Store.
Pairing Lock to Phone App
3.Match the Lock to the Application
When matching, follow the prompt steps of the program, you need
to touch the screen after installing the lock and installing the battery,
match the blue icon lock , and set the name for the lock.
Note: If the smart lock is in a non-addable state, Takeoutbatteries
topoweroffthelockabout5seconds.Then,poweronandlong
pressmanualbuttonabout10seconds.Oncehearingbeepbeep
sound,thelockisresetsuccessfully.
2.Register and Login the Account

1.Account Information Change
When logging in "TTLock" App,you need set up an account
contain account password.
Each account can be added with multiple smart device locks for
management.
Once the smart lock is added, it will become the admin account
for the lock.
TT LOCK App Operating
< 13 >

< 14 >
2.Lock/Unlock
4.Generate Passcode
Press for unlock, long press for lock.It requires
your smart phone and Bluetooth lock to be
within a certain range.
Note: If you want remote control,you need to
connect to the Gateway.
Generate or customize the pass-
code of the Bluetooth lock.
Generate or customize permanent,
one-time, time-limited, recurring
passcode.
Note: Generate the passcode to
clear the passcode that Bluetooth
lock stored by "Erase". Once used,
in addition to the admin passcode,
other passcode will be cleared.
3.Send ekey
You can add another account on
the app.
This way your family can also
control the Bluetooth lock via the
app.
Support authorized users to Limit
time, Permanent, One-time,
Recurring control smart lock.
< 15 >
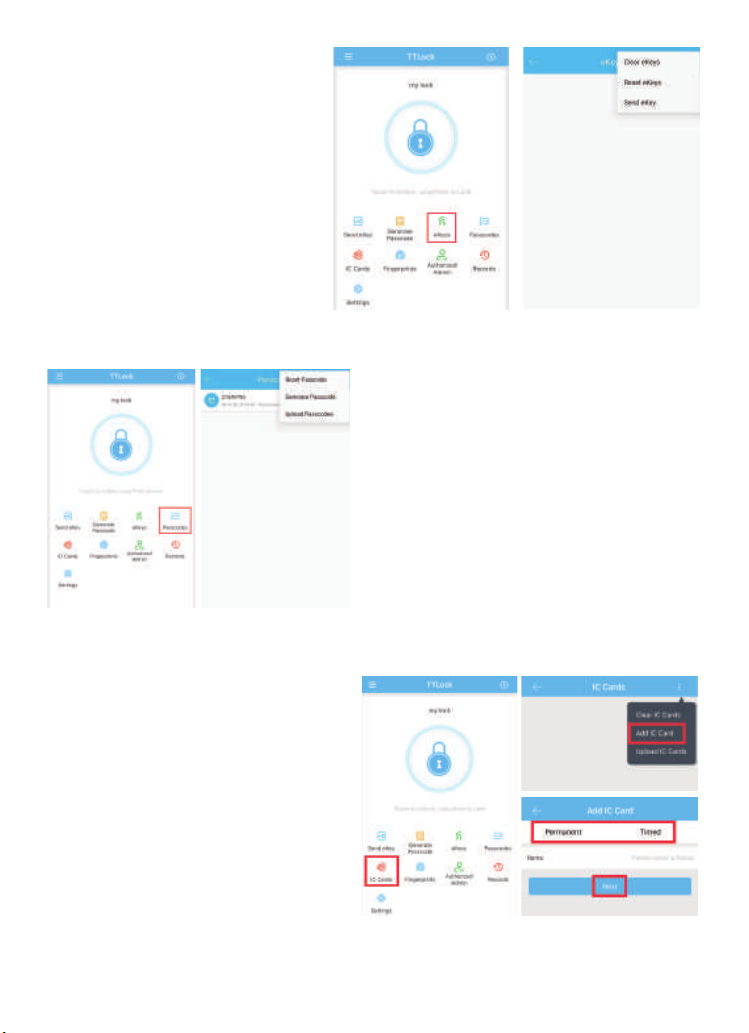
5.ekeys
Manage the authorized
accounts in “Send eKey”.
Admin can clear eKey, reset
eKey, send eKey etc.
6.Passcodes
It records all passwords stored by
the Bluetooth lock you had set.
In addition, it can also reset,
generate, upload passwords.
7.IC Cards
You can match two types of IC
card: Permanent or Timed.
Place the card against the card
reader sensor on the smart
Lock(keypad panel).

10.Settings
It have the function about the
Bluetooth lock function setting,
lock information setting, remote
unlocking, auto-off time, lock
sound, time proofread, record
reading, etc.
< 16 >
8.Fingerprints
You will be required to Place
and Remove your finger to the
sensor several times please
follow the prompts.
9.Records
It records the time and manner of
the smart lock when someone
opening or closing.
Manage your Bluetooth lock safely
and efficiently.

< 17 >
You can find the information about
the lock such as battery power,
admin passcode.
Note:The admin passcode will not
be cleared when erase passcode.
If you forget to lock your door
often, you could to set “Auto
Lock”.
Set the time for automatic locking
in your needs, so you don't have to
worry about security accidents due
to being unlock.
11.Remote Control
Remote control support needs an extra
additional Wi-Fi Gateway. Match the gate-
way, smart phone, app then the smart lock
can support remote control lock.
Table of contents
Other SMONET Lock manuals

Popular Lock manuals by other brands


Assa Abloy
Assa Abloy 813C-50 installation guide

COMPX
COMPX StealthLock SL-100 instruction manual

Allegion
Allegion Kryptonite 815 Combo user manual

COMPX
COMPX Stock Locks C1703 Dimensional drawing

Assa Abloy
Assa Abloy Sargent Profile v.S1 installation instructions

MAV
MAV 1008 Installation and Removal Instructions