Hornbill HBUS-ZNS-Y001-BLK User manual

Smart Lock Manual
Electronic Keypad Deadbolt Lock
HBUS-ZNS-Y001-BLK


',5(&725<
,1752'8&7,21
3URGXFW6SHFLŀFDWLRQV
Package
Performance
,167$//$7,210$18$/
Tools Needed
,QVWDOODWLRQ6WHS
60$57,16758&7,21
Pairing Lock to Phone App
77/2&.$SS2SHUDWLQJ
0$7&+WKH:L)L*$7(:$<WRWKH$33/,&$7,21
0$7&+WKH77/2&.$33WRWKH$/(;$$33
0$7&+WKH60$57:$7&+WRWKH60$57/2&.
23(5$7,21,16758&7,216
Setting Admin Passcode
Lock/Unlock
Dead Lock
Reset
%DWWHU\3RZHU5XQV2XW
01
01
03
04
04
04
13

,1752'8&7,21
< 01 >
3URGXFW6SHFLŀFDWLRQV
,WHP1R
Material
:HLJKW
Communication mode
Unlocking way
Support System
Unlock time
Power supply
Static current
:RUNLQJFXUUHQW
Y001
Zinc Alloy
OE
Bluetooth 4.0ble
Bluetooth, Code, Mechanical key
$QGURLG,26DERYH
ɯVHF
4pcs AA batteries
ɱX$
ɱP$

!
Package
Part Quantity
A
B
C
D
E
F
*
H
,
J
K
L
M
N
2
P
Q
1
1
1
4
1
1
1
4
1
3
1
1
1
Description
Key
Keypad
Keyhole Cover
Double-screw Bolt
Latch
:RRG6FUHZV
Strike Plate
Box Striking Plate
,QVLGH0RXQWLQJ3ODWH
Flat Screw
Receiver Module
Short Flat Screw
Longest Flat Screw
Battery Cover
Size Reference Card
Drill Bit
Needle
R
,&b&DUG
A
CD
,
K
J
BE*
F
N
R
L
M
Q
H

1.Smarter and Safer
Smart Lock Front Door set out to provide extra home security with
keyless codes, Bluetooth unlock, anti-peep password and auto lock
VWRNHHS\RXUKRXVHVDIHDQGVRXQG
5HDO7LPH5HFRUG
Through Keyless Door Locks for Homes APP, you could check the
unlocking records and incorrect password records from the Admin
account in real time. And you’ll have comfort in knowing your door’s
status.
3.Fast Sharing and Convenient
:LWK6PDUW'LJLWDO'RRU/RFNVIRU+RPHV<RXFDQVKDUHFRGHZLWK
friends and guests valid for a few weeks,hours, or minutes, and
revoke them whenever you need to. Never worry about lost, stolen or
copied keys again.
(DVLO\,QVWDOODQG6PDUW5HPLQGHU
Just a screwdriver and a easy-to-follow instruction to easily install
Door Locks with Keypads. And when in low battery, Keypad Door Lock
'HDGEROW6HWZLOODODUPDQGFRXOGEHWHPSRUDU\FKDUJHGE\D9
battery.
< 03 >
Performance

Tools Needed
3KLOOLSV6FUHZGULYHU7DSH0HDVXUH3HQFLO2WKHU&KLVHOLQJ7RROV
,QVWDOODWLRQ6WHS
1.Adjusting Latch Length
,167$//$7,210$18$/
< 04 >
1RWH,QVWDOODQGWHVWORFNZLWKGRRURSHQWRDYRLGEHLQJORFNHGRXW
1RWH:KHQSHUIRUPLQJWKLVRSHUDWLRQSOHDVHWDNHSURWHFWLYH
measures and be careful of the metal edge not to injure yourself.

&KHFN'RRU'LPHQVLRQV
Hold the right part of the lock tongue with your right hand and turn
WKHOHIWLURQSLHFHFRXQWHUFORFNZLVHDERXWGHJUHHVZLWK\RXU
left hand.
:KHQWKHUHFWDQJXODUSRVLWLRQRIWKHҲPPWLFNPDUN
FKDQJHVIURPFRQYH[WRFRQFDYHDVVKRZQVORZO\H[WHQGWKH
locking latch, and then turn clockwise the inside of the locking latch
EDFNWRWKHUHFWDQJXODUSRVLWLRQRIҲPPVFDOH
%DFNVHW'HWHUPLQDWLRQ
Backset is a distance from door edge to center of hole on door face.
+ROHV'LDPHWHUV
Using the marks as guide to drill holes
ŻPP)DVWHQ6PDUWGRRUORFN
ŻPP
'RRU7KLFNQHVV
7KHGRRUWKLFNQHVVZLWKLQWRPPPPDUHDOO
suitable for the keypad deadbolt handle set.
!
,QRUGHUWRIDVWHQGRRUORFN
you need to drill an extra hole.
center to center
minimum
Ҳ
ȺҲ
³/Ҳ
¹/Ҳ

$,GHQWLI\WKHFHQWHURISODWH&ORVHWKHGRRUWROD\WKHODWFKEROW
against the door frame.
Mark the the outline of the plate onto door jamb.
%'ULOOPPGHHSDWLQWHUVHFWLRQRIKRUL]RQWDODQGYHUWLFDOOLQHRI
plate.
,QVWDOO/RFN
,QVWDOO/DWFK
Note:Need to keep this way up when inserting the latch.
< 06 >
A.Mark the outline of the faceplate ,then take out the latch.
&,QVHUWWKHODWFKLQWRWKHGRRUXVHZRRGVFUHZVWRVHFXUHODWFK
%&KLVHOPPPPGHHSDORQJWKHRXWOLQHWRDOORZWKHIDFHSODWH
to be aligned with the door edge.
,QVWDOO3ODWH
,QVHUWWKHODWFKDQGHQVXUHLWLVSDUDOOHOWRWKHGRRUIDFH

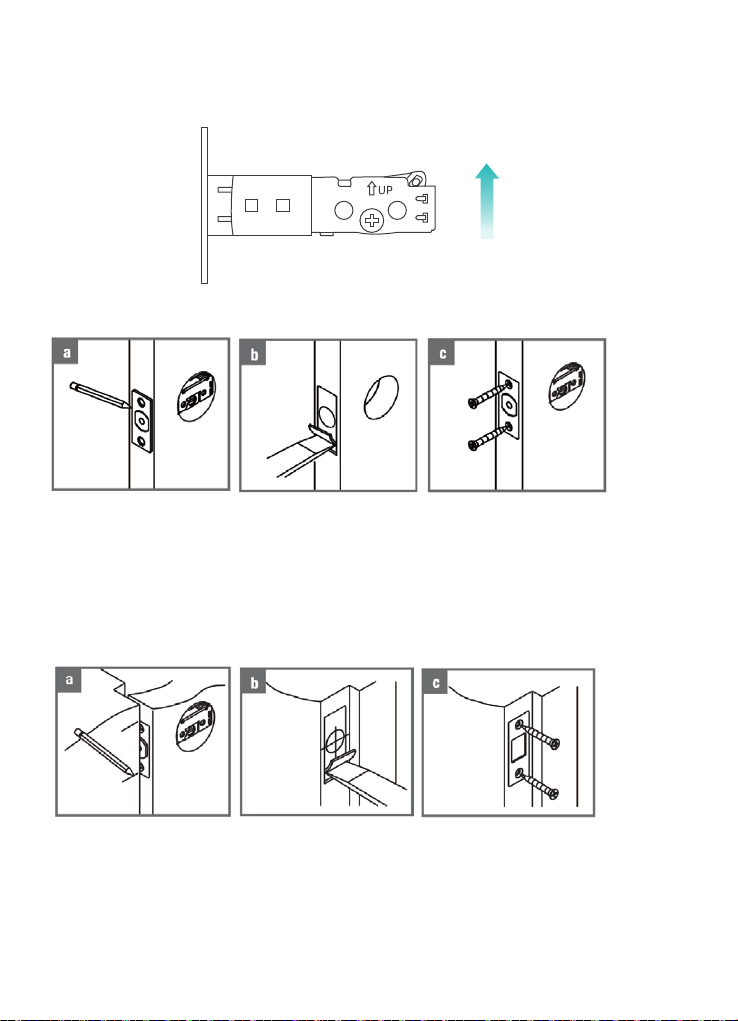
&KLVHOPPPPGHHSDORQJWKHSODWHRXWOLQHWRDOORZWKHSODWHWR
be aligned with the door frame.
&,QVHUWWKHSODVWLFORFNJURRYHDQGWKHVWULNHSODWHLQWRGRRUMDPE
tighten with wood screws.
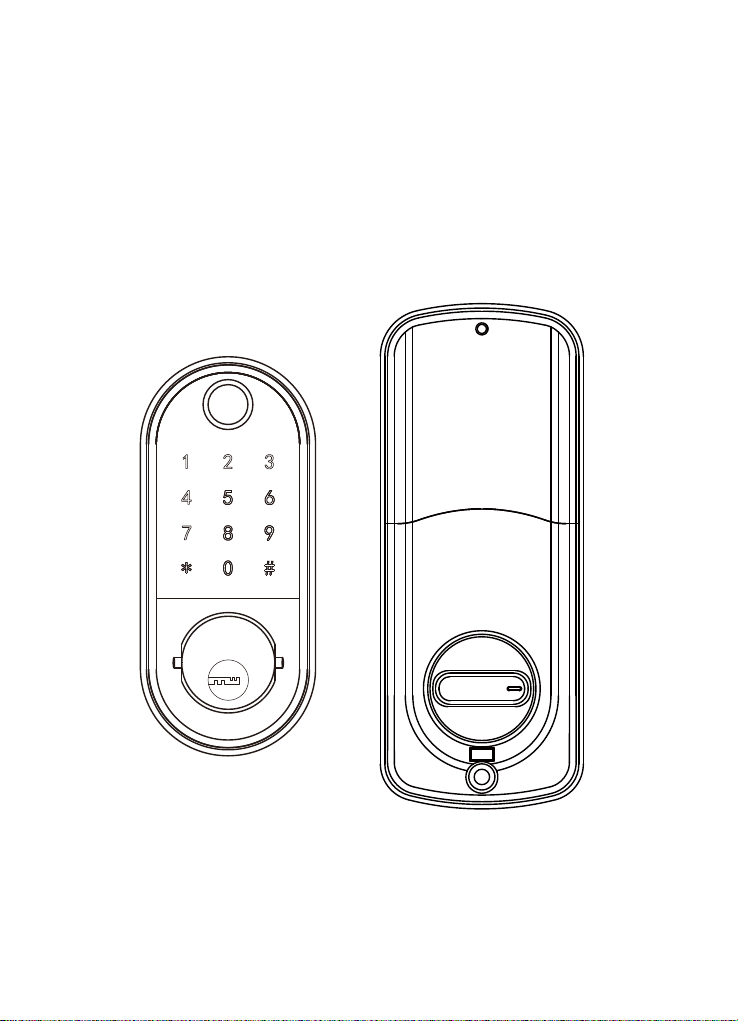
,QVWDOO.H\SDG
!
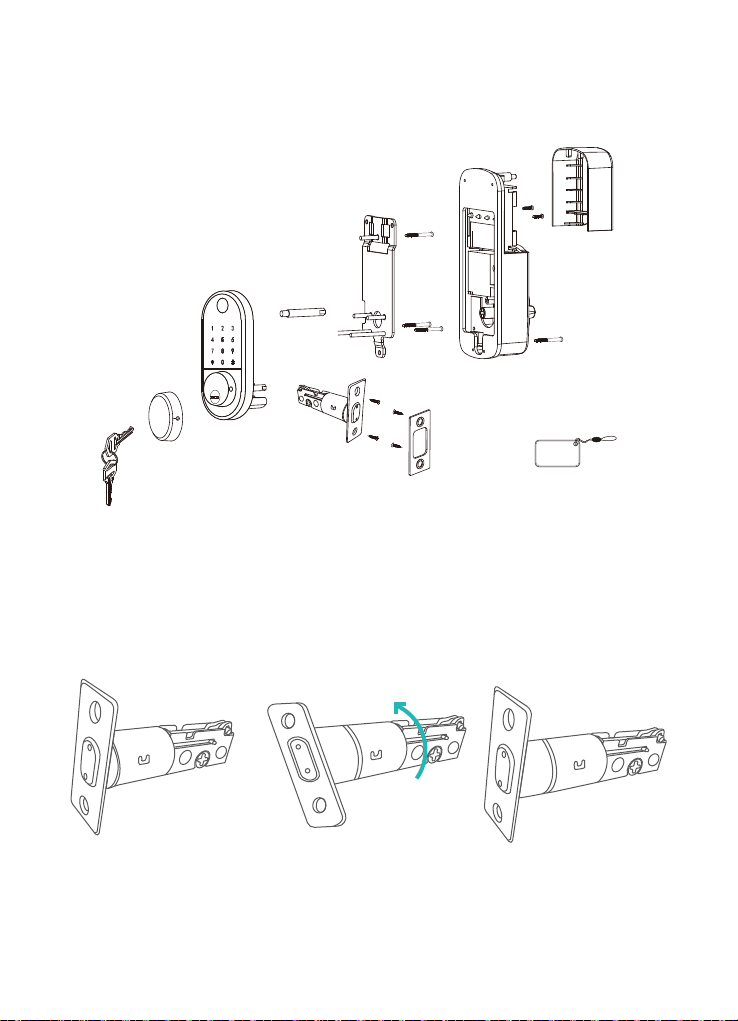
3ODFHb,&bZLUHbODWFKbOLQNbEDUbDQGbGRX-
EOHVFUHZVbWKURXJKbWKHbKROHVbRQbWKHb
GHDGEROWbDVbWKHbSLFWXUHbRQbWKHbULJKWb
shows.
1RWHb,&bZLUHbVKRXOGbEHbSODFHGbXQGHUbODWFKb
$IWHUbLQVWDOOLQJbWKHbIURQWbSDGbUROObWKHb
KDQGOHbVSLQGOHbWRbWHVWbLIbLWbFRXOGbZRUNbZLWKb
GHDGEROWbRUbQRWb,IbFRXOGbQRWbWDNHbRXWbWKHb
IURQWbSDGbDQGbUROObWKHbODWFKbOLQNbEDUbDURXQGb
bGHJUHHbDQGbWU\bWRbLQVWDOObDJDLQbXQWLOObLWb
FRXOGbZRUNbZLWKbWKHbGHDGEROW
3DVVWKH,&ZLUHDQGWKHODWFKOLQNEDUWR
mounting plate.
8VHŁDWVFUHZWRVHFXUHZLWKWKHNH\SDG
double-screw bolt.
8VHŁDWVFUHZFRQQHFWPRXQWLQJSODWH
with latch.
1RWH3OHDVHSODFHWKH,&OLQHDVVKRZQLQ
WKHŀJXUHWRDYRLGWKHORFNODWFKRXWRI
control.
,QVWDOOGRXEOHVFUHZEROWLQWR
keypad inner plate.

$GMXVW7KXPE7XUQ3LHFH
!
,GHQWLI\'RRU+DQGLQJ
The door is "Left-handle" if
the hinges are on the left
side of the door.
:KHUHDVWKHGRRULV5LJKWKDQ-
dle" if the hinges are one the
right side of the door.
Rotate the thumb turn piece to
ұ+RUL]RQWDO'LUHFWLRQҲIRU
/HIWKDQGOHҡRSHQLQWRURRPҢ
door when in unlock status.
Rotate the thumb turn piece to
ұ9HUWLFDO'LUHFWLRQҲIRU
5LJKWKDQGOHҡRSHQLQWRURRPҢ
door when in unlock status.
Left-handle Right-handle
Hinge Hinge
Left-handle Right-handle

!
,QVWDOO5HFHLYHU0RGXOH
Remove the battery cover (Press the spring button with the sharp
REMHFWDQGSXVKWKHFRYHUXSŀUVWWKHQSXVKLWXS
$GMXVWWKH7RJJOH%XWWRQRIWKH&RYHU
To install the lock for left side
handling, ensure the toggle
button on the back cover
assembly is set to "L".
To install the lock for right side
handling, ensure the toggle
button on the back cover
assembly is set to "R".
L R L R
3
Needle
Battery Cover

< 10 >
,QVHUW%DWWHU\DQG,QVWDOO%DFN%DWWHU\&RYHU
,QVHUWSFҡ$$Ң9$ONDOLQH
batteries and slide the battery
cover back onto the receiver
module.
&RQQHFWb,&bZLUHbWRbWKHbZKLWHbSRUWbFDUHIXOO\b
Note:Ensure the thumb turn piece and the toggle button of the
cover in right way.
8VHVKRUWŁDWVFUHZWLJKWHQWKH
receiver module inner battery
JURRYH/RQJHVWŁDWVFUHZ
connect the receiver module
with door.
L R

< 11 >
Remarks:
ҡҢ$ONDOLQHEDWWHULHVDUHUHFRPPHQGLQRUGHUWRVWDELOL]HWKH
SRZHUVXSSO\LI\RXGRQWXVHDONDOLQHEDWWHU\SHUIRUPDQFHZLOO
be reduced greatly.
ҡҢ$OOVHWWLQJVZLOOEHUHWDLQLQWKHPHPRU\HYHQLIWKHEDWWHULHV
are complete dead . A micro USB can directly power the lock and
activate the keyboard. Charging it via the ports under the lock.

60$57,16758&7,21
!
'RZQORDGWKH$SSҲ77/RFNҲ
$QGURLG0RELOH3KRQH6HDUFKұ77/RFNҲIURP*RRJOH3OD\
$SSOH0RELOH3KRQHSOHDVHVHDUFKұ77/RFNҲIURP$SS6WRUH
Pairing Lock to Phone App
3.Match the Lock to the Application
:KHQPDWFKLQJIROORZWKHSURPSWVWHSVRIWKHSURJUDP\RXQHHG
to touch the screen after installing the lock and installing the battery,
match the blue icon lock , and set the name for the lock.
1RWH,IWKHVPDUWORFNLVLQDQRQDGGDEOHVWDWH7DNHbRXWbEDWWHULHVb
WRbSRZHUbRłbWKHbORFNbDERXWbbVHFRQGVb7KHQbSRZHUbRQbDQGbORQJb
SUHVVbPDQXDObEXWWRQbDERXWbbVHFRQGVb2QFHbKHDULQJbEHHSbEHHSb
VRXQGbWKHbORFNbLVbUHVHWbVXFFHVVIXOO\
5HJLVWHUDQG/RJLQWKH$FFRXQW

$FFRXQW,QIRUPDWLRQ&KDQJH
:KHQORJJLQJLQ77/RFN$SSѬ\RXQHHGVHWXSDQDFFRXQW
contain account password.
Each account can be added with multiple smart device locks for
management.
2QFHWKHVPDUWORFNLVDGGHGLWZLOOEHFRPHWKHDGPLQDFFRXQW
for the lock.
77/2&.$SS2SHUDWLQJ
< 13 >

< 14 >
/RFN8QORFN
*HQHUDWH3DVVFRGH
3UHVVIRUXQORFNORQJSUHVVIRUORFN,WUHTXLUHV
your smart phone and Bluetooth lock to be
within a certain range.
1RWH,I\RXZDQWUHPRWHFRQWURO\RXQHHGWR
FRQQHFWWRWKH*DWHZD\
*HQHUDWHRUFXVWRPL]HWKHSDVV-
code of the Bluetooth lock.
*HQHUDWHRUFXVWRPL]HSHUPDQHQW
one-time, time-limited, recurring
passcode.
1RWH*HQHUDWHWKHSDVVFRGHWR
clear the passcode that Bluetooth
ORFNVWRUHGE\(UDVH2QFHXVHG
in addition to the admin passcode,
other passcode will be cleared.
3.Send ekey
You can add another account on
the app.
This way your family can also
control the Bluetooth lock via the
app.
Support authorized users to Limit
WLPH3HUPDQHQW2QHWLPH
Recurring control smart lock.

!
HNH\V
Manage the authorized
DFFRXQWVLQұ6HQGH.H\Ҳ
Admin can clear eKey, reset
eKey, send eKey etc.
6.Passcodes
,WUHFRUGVDOOSDVVZRUGVVWRUHGE\
the Bluetooth lock you had set.
,QDGGLWLRQLWFDQDOVRUHVHW
generate, upload passwords.
,&&DUGV
<RXFDQPDWFKWZRW\SHVRI,&
card: Permanent or Timed.
Place the card against the card
reader sensor on the smart
/RFNNH\SDGSDQHO

10.Settings
,WKDYHWKHIXQFWLRQDERXWWKH
Bluetooth lock function setting,
lock information setting, remote
XQORFNLQJDXWRRłWLPHORFN
sound, time proofread, record
reading, etc.
< 16 >
)LQJHUSULQWV
You will be required to Place
DQG5HPRYH\RXUŀQJHUWRWKH
sensor several times please
follow the prompts.
5HFRUGV
,WUHFRUGVWKHWLPHDQGPDQQHURI
the smart lock when someone
opening or closing.
Manage your Bluetooth lock safely
DQGHŃFLHQWO\

!
<RXFDQŀQGWKHLQIRUPDWLRQDERXW
WKHORFNVXFKDVEDWWHU\SRZHUѬ
admin passcode.
Note:The admin passcode will not
be cleared when erase passcode.
,I\RXIRUJHWWRORFN\RXUGRRU
often, you could to set “Auto
/RFNҲ
Set the time for automatic locking
LQ\RXUQHHGVVR\RXGRQWKDYHWR
worry about security accidents due
to being unlock.
11.Remote Control
Remote control support needs an extra
DGGLWLRQDO:L)L*DWHZD\0DWFKWKHJDWH-
way, smart phone, app then the smart lock
can support remote control lock.
Table of contents
Other Hornbill Lock manuals