smrtmugg Self-Heating Travel Mug User manual
USER MANUAL

Thank you very much for the purchase. Please read this instruction manual carefully before
use to ensure proper use. Keep it in a common place after reading it.
This product uses a rechargeable lithium battery. If this is the first time using this product,
or it has been idle for an extended period of time, please fully charge the battery before
using. Please always exercise extreme caution while using this product to avoid burns from
hot liquid.
Built-in lithium battery is rated for 500 discharge cycles while still maintaining 80% of the
originally rated battery life.
Product and Accessories
Cup Lip Sealing Sleeve
Cup Lip
Cup Lip Main Body
Locking Switch
Drinking Mouth
Drinking Mouth Sealing Ring
316 Stainless Steel Vaccum Cup Body
Heating Element
Power /Heating Key power (Click 3
times) Heating Mode (Long Press)
Exits Heating (Long Press)
PC Material Cup Base
Setting Button
Temperature setting
(Click or Long Press
when heated
OLED Display
Screen
Mid bolt
Charging input/Power
supply Output
Type-C Interface
Back of Smart Cup Base
Type-C Cable
External power conversion
head (OTG)
This text and text are for reference only, please take the actual object as the standard
Page | 02

Power On/Off Operation
Click” ”key continually 3 times,to switch
on the SmrtMugg. The screen will display
real-time temperature, power consumption
and power words. If no operation after pow-
ering on, the screen will turn off and go into
standby mode. Wake up the screen when
you shake or touch the cup.
Power On Operation
When it is under standby mode, click “ “key
3 times continually, the screen displays
”GoodBye” and it is powered off. Under cir-
cumstances such as transportation, taking
a flight, etc., you may need to switch off all
its functions.
Power Off Operation
Heating Constant Temperature Mode
When In the standby mode, long press the
“ ” button ( 2 seconds), the screen dis-
plays “Set 860F” (the initial temperature or
set temperature of the last operation), press
the “ ” button to increase or decrease (long
press to increase quickly) Set the target
temperature. The temperature setting range
is 86°F~1500F. Click the “ “ button or leave
it for 3 to 5 seconds to enter the constant
temperature heating mode, and the screen
displays the real-time temperature.
When heated, the preset target temperature will increase rapidly and cycle if you long
press “ ” button. Click “ ” to adjust the heating temperature. The factory-set tem-
perature is 115°F, After the adjustment is completed, the preset target temperature will
be automatically saved when you boot the cup.
lf it is not operated, automatically enter the main interface of heating constant tempera-
ture after 3 seconds.
In the heating state, the screen shows “ 86°F”, which is the real-time temperature. “ ”
light on means constant temperature heating. “ ” flashing means actively heating. When
there are the following prompts, such as the cup tilts to one side, water shortage or pause
heating, please check whether the cup is placed vertically, and then continue heating.
Exit Heating Mode. When it is constant temperature heating, long press “ ” key for 2
seconds, then the screen displays “Cancel”. The cup exits heating and enters sleep mode.
When the water is heated, its upper and lower temperature is different. Assuming
water temperature is 113°F, there may be deviation on the temperature displayed after
shaking, which is normal.
When the real-time heating temperature is close to the target temperature (approxi-
mately 20°F), the heating will enter a constant temperature state.
1300F
Set
860FSet
1400F
Page | 03

Sleep Mode
The cup has an auto sleep function. When this function works, the screen is under
power-saving state and displays nothing.
Gently shake the cup or press the switch key to wake up the screen and real-time
temperature and power will be displayed on the screen.
Charging Operation
Insert AC/DC Type-C plug into Type-C
interface and make sure it is plugged in
tightly.
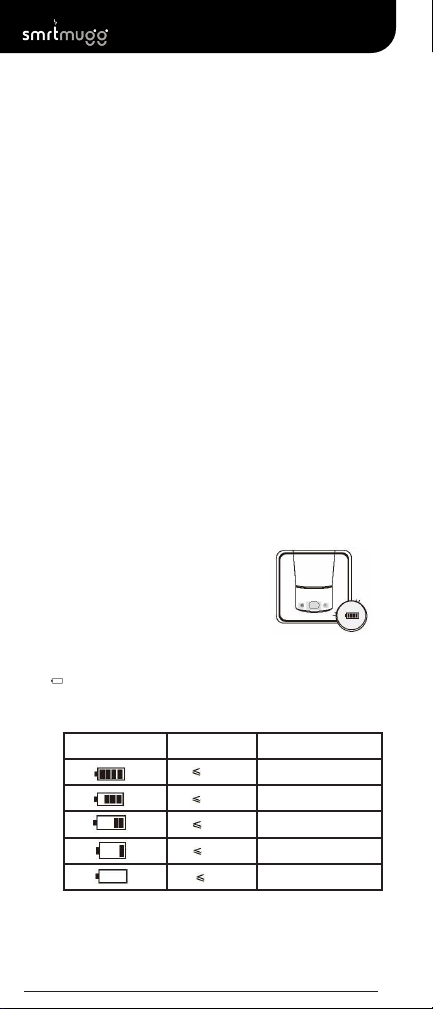
When the charging starts, the number of
battery cells displayed in the LCD indicates
the remaining power, as shown in the figure.
It takes about 3-4 hours to complete a full
charge.
In order to make sure the charging is com-
pleted as soon as possible, it is recommend-
ed to use a power adapter with output
current 2A.
Mobile Power Function
The device supports the “OTG” interface. Plug the “OTG” adapter line into the type-C inter-
face of the cup, it displays “ “ and the device enters the status of external power supply.
Then you can connect the phone or other peripherals to the device via data cable. At this
moment, mobile power function has started and LCD screen displays the power consump-
tion (Referring to battery remaining capacity indicator).
Please note you cannot use the mobile power function and the heating element at the
same time. The fully charged SmrtMugg battery has enough capacity to fully charge an
iPhone approximately 3 times
Charging the device with lightning
interface
Charging the device with Type-C
interface
(OTG) iphone ipad
(OTG) Samsung Huawei
APPLE original factory
delivery lightning connector
Page | 04
OUTPUT
Heating and Battery Life
The SmrtMugg contains a very powerful
heating element. Please exercise extreme
caution while you are heating your drink
so not spill or tip the mug. Contents con-
tained within the mug may be extremely
hot.
The SmrtMugg can heat water up to 150°F
in approx. 10-15 minutes, depending on the
temperature of the liquid added to the
mug. Cold water heated up to 150°F will
take about 15 minutes. Warm water heat-
ed up to 150°F will take about 10 minutes.
Please note that heating up the liquid
from a lower temperature to a higher tem-
perature takes a lot more battery life. For
best battery performance, pour in a liquid
that’s already hot and then use the Smrt-
Mugg to maintain the hot temperature of
the liquid.
Battery Power Consumption Display
When it is in standby mode, the screen
shows real-time temperature and power
consumption if you shake the cup or touch
the switch key.
When it is heating, the screen shows
real-time temperature, target temperature
and power consumption.
When battery is running low, the screen
shows “ ” and the device exits working
status.
The SmrtMugg has an estimated battery
life of 10 hours of heating, which we refer
to as an all day battery life. Our measur-
ment of a 10 hour battery life is based upon
pouring in a hot liquid, and setting the
SmrtMugg to maintain a temperature of
135°F. If you set the SmrtMugg to a cooler
temperature, your battery will last longer.
Likewise a higher temperature will drain
the battery quicker.
The battery life will also vary depending
upon a number of external factors such
as: liquid temperature at pour, speed of
liquid consumption, external temperture,
set temperature, whether lid is on/off, or
closed or open, etc...
Battery Display Grid Margin Instruction
100% Usable (Fully charged)
75% Usable
50% Usable
25% Please get ready to charge
5% Low voltage, Please charge
Page | 05
Artificial Intelligence
Disassembly Method
As shown in picture, rotate counterclock-
wise to take it apart.
When it is in constant temperature heating mode, if the cup drops, it exits any working
state, and the screen shows “Alright?”, then it exits its original working state. It reminds
you to check if there is damage on cup base, if not, click any key to confirm and exit the
current working state.
Smart protection-Waming on Accidental Drop
The heating will pause automatically if the cup is tilted 45 degrees. This is to avoid scald if
the heated water spills over. The heating continues after the cup is placed vertically. If the
cup is tilted for more than 30 minutes consecutively, it exits heating mode automatically.
Suspend Working after Tilting
When there is little water in the
cup, the device will automatically
enter the protection state to avoid
the danger of dry burning at high
temperature.
Water Shortage Protection
When there is little water in the cup, the device
will automatically enter the protection state to
avoid the danger of dry burning at high tem-
perature.
Heating & High Temperature Warning
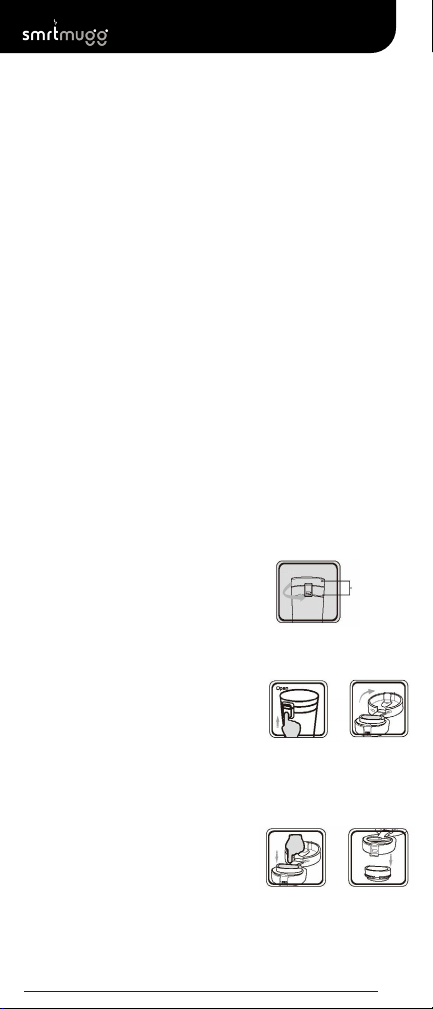
How to disassemble the lid
As shown in the picture, push the lock-
ing key upwards to unlock, then press the
PUSH button to open the cup lid. Please
make sure cup lid seal is still attached to
the cup lid.
As shown in the picture, at the drinking
mouth where the finger points to, press the
drinking mouth vertically from the top and
remove it. Make sure the drinking mouth
sealing ring is still attached to drinking
mouth.
Mid bolt
Open
Page | 06
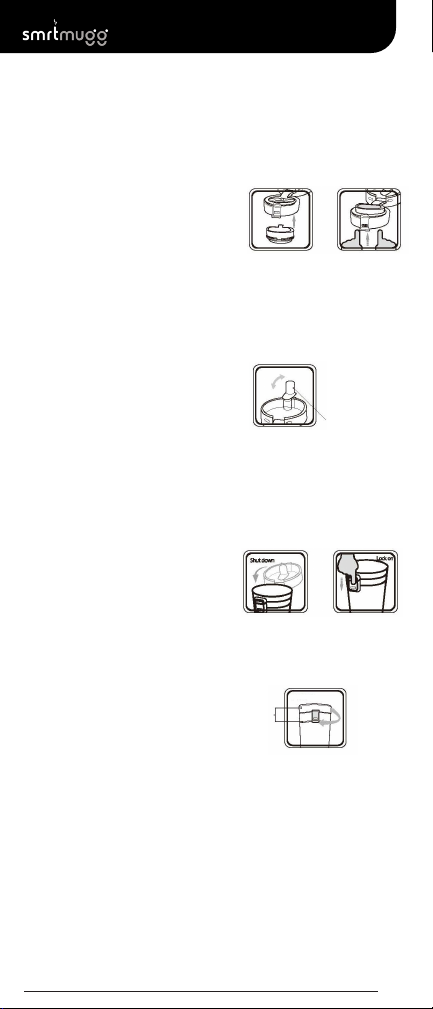
Disassembly Method
The installation of the drinking mouth is
as follows, as shown in the picture. Put the
drinking mouth under the bottom of the
cover, and push it vertically and upwards
until the “click” sound is heard.
lnstallation Method
Do not operate by force, otherwise it may
cause damage. Be sure to install the drink-
ing mouth according to the operating steps.
When you unpick and wash and install the
cup lid sealing ring, please follow the oper-
ating steps as shown in the picture to en-
sure the service life.
Dirtiness on the sealing ring may lead to peculiar smell. Therefore, please unpick the
sealing ring and clean it with neutral detergent. Keep it clean to extend service life.
As shown in the picture, keep the cup body
in a vertical state. If you hear a “click” sound,
then that means you have closed the cup lid
properly. Push down the locking switch to
ensure that the cup is closed tightly.
When the cup body is placed vertically, as
shown in the picture, rotate the clockwise to
ensure its firm installation.
After installation, place the cup horizontally to check whether there is leakage. If there
is leakage, please immediately go to the installation steps to see if there is any miso-
peration.
This may be caused by the seal being installed upside down.
when you unpick and wash
the cup lid sealing plug,
please grasp this part and
remove sealing sleeve
Mid bolt
Shut down
Page | 07
It is recommended to use power adapter with output current 2
Detailed Parameter of Smart Cup Base
Type SmrtMugg
Cup Size 3.07”W x 3.38”D x 9.06”H
Water-Holding Capacity 10 oz
Heating Temperature Range 86°F to 150°F
Operating Temperature Range 14°F to 104°F
Input 5V - 1.0A-3.0A
Output 5V - 2.1A(MAX)
Configuration of Battery 3.7V 14400MAH(52.2WH)
Charging Temperature 32°F to 104°F
Charging Time About 3-4 hours
Material of Drinking Mouth and Cup LId PP
Material of Sealing Plug & Sealing RIng Silica gel
Material of Cup Plug aidehyde resin
Material of Cup Body 316 stainless steel
Material of Heating Element Surface Cr
Material of Cup Base Skin Polycarbonate (PC)
Cup Structure Double Layer Vacuum Insulation
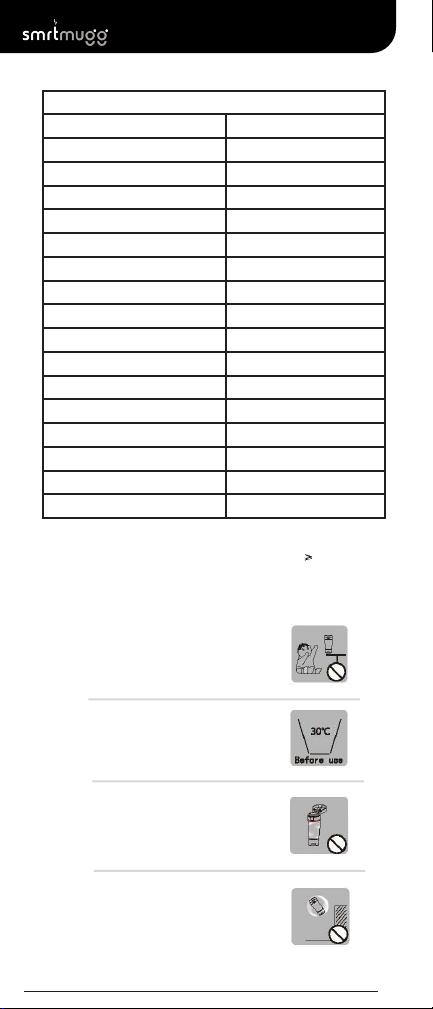
Precuation For Use
MInor should use the product under the
gudiance of adults or instruction from
adults
Clean the cup with mild detergent
before use
When adding water to the cup, do not over-
fill. Fill only as high as the line indicated in
the illustration.
Avoid drops, collisions or strong shocks.
Any of the above mentioned situations will
cause cup body deformation and affect
product efficacy
Page | 08

Precuation For Use
Before cleaning, the power supply must be
cut off to avoid any form of direct heating
or high temperature. it is strictly forbidden
to heat the product open flames, induction
cooker, microwaves oven and dishwashers.
If it needs to be placed in the bag, wheth-
er horizontally or vertically, please confirm
if the sealing ring of the product is tightly
Installed, so as to avoid water leakage.
Please clean the cup thoroughly after use,
wipe the water with soft cloth and dry it
completely. Keep it in cool and dry place.
Always make sure charging plug cover is
tightly installed before cleaning.
Do not add dry ice, carbonated drinks and
other liquids that are easy to produce high
pressure in the vacuum cup. Do not add soy
sauce, soup and other liquids containg al-
kaline and acidic ingredients to avoid cup
corrosion
Restore Factory Setting
When it displays nothing or any operation cannot be made, it may be abnormal software
operation. Please click “ ” key quickly more than 10 times. The screen will display version
number. Restore factory setting and then you can continue to use the product.
Environmental Protection
The product uses lithium batteries. In order to avoid environmental pollution, please
recycle the battery according to the guidance of battery recycling site after the battery
is scrapped.
Page | 09

Table of contents
Other smrtmugg Camping Equipment manuals


